legerdemain
Member
- Joined
- Jun 7, 2024
- Messages
- 5
I have only lurked here thus far but after a great experience I wanted to share my thoughts on a new epoxy floor I put in my 20x20 garage-turned-workshop.
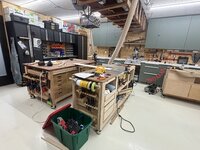
I closed on a 1965 house a couple of months ago and the old owners had converted the garage to a living space with a patio door in lieu of a garage door, but did not do anything about the concrete. There was evidence of termite damage and the perimeter of the garage was speckled with drilling for that. It was also covered in years of paint/grease spatters. Basically a mess, as you can see from the photos, but with great potential.


CHOOSING A COATING
I knew I wanted to do some kind of epoxy or polyaspartic or polyurea flooring since I do woodworking and didn’t want to have sawdust accumulate in any tiles. I don’t like the look of flakes and I also wanted a white floor. Basically the hardest version of a DIY floor, since white is unforgiving and I wouldn’t have flakes to cover my sins. And the house closing ate up a ton of cash, so I needed to be budget conscious.
After a lot of research on this forum and All Garage Floors, I reached out to three vendors with questions and asking for an opinion—I figured that I would want either (a) a single-part polyurea or (b) a multi-coat system with an epoxy primer, 100% solids epoxy base coat, and a polyurethane coat on top. My main concern with polyurea was that it might be too thin to cover the many imperfections in the concrete.
One vendor never responded. Another one suggested I use a multi-coat polyurea kit, which seemed like a good option but would cost $1,200 or so excluding patching/leveling products. I think that probably would have turned out well too. The third, which is what I ultimately chose, was AlphaGarage. Bert responded quickly and though they didn’t offer a polyurea system, he provided a lot of information on their epoxies. He asked for additional photos so that he could provide more detailed recommendations. I wasn’t shy about asking loads of questions, and he always emailed back quickly and thoroughly. After a LOT of back and forth, I settled on a two-component CFLC System, which is made up of a primer (I used BondTite 1101) and 100% epoxy body coat (I used LiquaTile 1143, which is UV-resistant) with no clear coat on top. It made sense because I wanted a solid color floor and self-leveling. The lack of third coat would help the budget, and it seemed like a urethane topcoat was going to be finicky—Bert told me that unlike epoxies, urethanes need to be applied in thin coat(s) between 4-7mils thick. Thin coats are more susceptible to developing roller tracks, and being the final coat, those would be permanent. So I went with the two-part system as well as AlphaGarage’s TrowelEase, an epoxy mortar binder, for floor repair. With shipping, the TrowelEase, a squeegee, the BondTite primer, and an extra-large quantity (for leveling and a thicker coat—around 42mil thick) of the main LiquaTile body coat it added up to around $1,500. Here's what it all looked like:


PREP
In order to save some cash after going over budget for the coating, I decided to hand grind the floor myself with a 7” angle grinder and a diamond wheel plus dust shroud from Amazon. The dust shroud didn’t fit properly, actually, so I duct taped it on and made do. I knew that acid etching was not going to do the trick, and I didn’t want to deal with renting a grinder and heavy duty dust extractor, loading all of it up in a rented vehicle since I don’t own a truck, lugging it into the house, hauling it around, bringing it back, etc., not to mention the cost. For context, I am a 5’1 105lb woman. I’m strong for my size, but any 12-year-old boy would still have me beat. I am married but my husband is the opposite of handy. I trust him with my life, but not my tools—or projects!
Grinding took a looooong time. Multiple days. My ****** grinder kept overheating so I had to take frequent breaks because I was worried about burning up the motor. I used a full-face 3M mask to protect from the dust—I started with a regular woodworking dust mask but it didn’t feel protective enough, even with the dust shroud plus my shop vac with cyclone attachment. I cleaned the floor with a heavy duty degreaser but I probably could have gotten away with just vacuuming because the entire surface was removed. Also, thank goodness for knee pads!
I chased existing cracks with a smaller angle grinder so that I could fill them in. I also put backer rod in a couple larger gaps around parts of the perimeter and used a self-leveling flexible polyurethane sealant.
In terms of patching the divots, I had a lot of trouble getting a hold of granusil ($120 for shipping a $20 product was a no go) or other kiln dried fine sand or silica to mix with the TrowelEase. Everywhere was sold out. I tried to use some regular all-purpose sand from the home center, but it wasn’t nearly fine enough. It was like trying to trowel wet brown sugar. Honestly, this made me somewhat regret getting the TrowelEase. I have a lot of it left over and I think maybe I could have gone with another concrete patching product that didn’t require a separate aggregate. I ended up using concrete dust from my grinding as the aggregate and that worked ok. After patching, I sanded the spots flat and cleaned again.
COATING
The primer went on very easily and spread beautifully. Even with only the primer done, the floor looked SO much better. I mixed it according to the detailed instructions that Bert gave me—in fact, I printed out all of the data sheets and instructions from the website, read everything multiple times, and highlighted the most important steps. I knew from research that mixing properly was incredibly important so I set timers and had multiple mixing paddles and drills ready to go so I wouldn’t lose time. A tool addiction comes in handy sometimes.
I had some bubbles come up after the primer dried so I sanded those flat and vacuumed/wiped before proceeding. Also, though I did coat the floor with the LiquaTile the next day, which meant I didn’t have to do it, I lightly scuffed the primed floor with an orbital sander to promote adhesion. And cleaned AGAIN. The scuffing was probably overkill.
The LiquaTile was a lot thicker, stuff had sunk to the bottom, and it definitely gave me the impression that all mixing (first individually mixing parts A and B, then pouring the hardener into the bigger bucket and mixing, then pouring the mixture into a separate bucket and mixing some more) was necessary. The multiple mixing paddles were great since I could use separate paddles for parts A and B and didn’t have to worry about the epoxy hardening and ruining them.
Then, the pour. This was HEAVY. After the primer experience, I enlisted my husband for this. I used the notched squeegee to spread it, and then backrolled with an 18” roller. Since there was some bubbling with the primer, I tried to roll a bit more with the white epoxy coating. I wonder if a spike roller would have helped bubbling, or if I’d mixed too much air in—I’ll never know! I had to work very quickly. It was very hot out and I kept the mini split running so that I would have more working time with cooler temps and to prevent additional bubbling, but there was still only a very limited amount of working time, being epoxy.
An aside: I DIY’d my own spiked shoes with some cheap $6 sandals from Amazon and screws. To stop it from being too pokey for my feet I added a layer of some foam insoles cut to size (pic is before I did this). The spiked shoes that are sold online claim to be one size fits all but given their measurements they seem to be for the generic man’s foot. My shoe size is 5.5. Bert told me I might be able to forego the shoes, but I decided to do it anyway and I’m glad I did because I didn’t have to worry too much about walking on the floor to backroll. I do wish I’d made it a little more sturdy, though, maybe with a thicker shoe sole. The screws started bending a little at the end of the second day and I got some epoxy on a toenail. And it is still there. Do they make epoxy nail polish? Because this stuff is permanent.

The finish was GORGEOUS. There were a few bubbles that no one noticed but me, and a couple places where bugs had gotten stuck while it had been drying, but those spots bothered me so when it dried I tried to sand and go over them with a little leftover epoxy. I DO NOT recommend this. The patched areas are visible since the self-leveling doesn’t work well with little areas, and the bubbles probably would have been less noticeable since they were so small. Bert did warn me about this (epoxies don’t feather well) but I went ahead despite his advice… Bad decision. Regardless, though, the floor looks beautiful. I just have to avoid crawling on it looking for imperfections, because they are definitely there.


FINAL THOUGHTS
Things I wished I had done differently:

Wow this turned out long. Thank you for reading!
P.S. I can only attach 10 photos so I will follow up with a couple more in a comment.
I closed on a 1965 house a couple of months ago and the old owners had converted the garage to a living space with a patio door in lieu of a garage door, but did not do anything about the concrete. There was evidence of termite damage and the perimeter of the garage was speckled with drilling for that. It was also covered in years of paint/grease spatters. Basically a mess, as you can see from the photos, but with great potential.
CHOOSING A COATING
I knew I wanted to do some kind of epoxy or polyaspartic or polyurea flooring since I do woodworking and didn’t want to have sawdust accumulate in any tiles. I don’t like the look of flakes and I also wanted a white floor. Basically the hardest version of a DIY floor, since white is unforgiving and I wouldn’t have flakes to cover my sins. And the house closing ate up a ton of cash, so I needed to be budget conscious.
After a lot of research on this forum and All Garage Floors, I reached out to three vendors with questions and asking for an opinion—I figured that I would want either (a) a single-part polyurea or (b) a multi-coat system with an epoxy primer, 100% solids epoxy base coat, and a polyurethane coat on top. My main concern with polyurea was that it might be too thin to cover the many imperfections in the concrete.
One vendor never responded. Another one suggested I use a multi-coat polyurea kit, which seemed like a good option but would cost $1,200 or so excluding patching/leveling products. I think that probably would have turned out well too. The third, which is what I ultimately chose, was AlphaGarage. Bert responded quickly and though they didn’t offer a polyurea system, he provided a lot of information on their epoxies. He asked for additional photos so that he could provide more detailed recommendations. I wasn’t shy about asking loads of questions, and he always emailed back quickly and thoroughly. After a LOT of back and forth, I settled on a two-component CFLC System, which is made up of a primer (I used BondTite 1101) and 100% epoxy body coat (I used LiquaTile 1143, which is UV-resistant) with no clear coat on top. It made sense because I wanted a solid color floor and self-leveling. The lack of third coat would help the budget, and it seemed like a urethane topcoat was going to be finicky—Bert told me that unlike epoxies, urethanes need to be applied in thin coat(s) between 4-7mils thick. Thin coats are more susceptible to developing roller tracks, and being the final coat, those would be permanent. So I went with the two-part system as well as AlphaGarage’s TrowelEase, an epoxy mortar binder, for floor repair. With shipping, the TrowelEase, a squeegee, the BondTite primer, and an extra-large quantity (for leveling and a thicker coat—around 42mil thick) of the main LiquaTile body coat it added up to around $1,500. Here's what it all looked like:
PREP
In order to save some cash after going over budget for the coating, I decided to hand grind the floor myself with a 7” angle grinder and a diamond wheel plus dust shroud from Amazon. The dust shroud didn’t fit properly, actually, so I duct taped it on and made do. I knew that acid etching was not going to do the trick, and I didn’t want to deal with renting a grinder and heavy duty dust extractor, loading all of it up in a rented vehicle since I don’t own a truck, lugging it into the house, hauling it around, bringing it back, etc., not to mention the cost. For context, I am a 5’1 105lb woman. I’m strong for my size, but any 12-year-old boy would still have me beat. I am married but my husband is the opposite of handy. I trust him with my life, but not my tools—or projects!
Grinding took a looooong time. Multiple days. My ****** grinder kept overheating so I had to take frequent breaks because I was worried about burning up the motor. I used a full-face 3M mask to protect from the dust—I started with a regular woodworking dust mask but it didn’t feel protective enough, even with the dust shroud plus my shop vac with cyclone attachment. I cleaned the floor with a heavy duty degreaser but I probably could have gotten away with just vacuuming because the entire surface was removed. Also, thank goodness for knee pads!
I chased existing cracks with a smaller angle grinder so that I could fill them in. I also put backer rod in a couple larger gaps around parts of the perimeter and used a self-leveling flexible polyurethane sealant.
In terms of patching the divots, I had a lot of trouble getting a hold of granusil ($120 for shipping a $20 product was a no go) or other kiln dried fine sand or silica to mix with the TrowelEase. Everywhere was sold out. I tried to use some regular all-purpose sand from the home center, but it wasn’t nearly fine enough. It was like trying to trowel wet brown sugar. Honestly, this made me somewhat regret getting the TrowelEase. I have a lot of it left over and I think maybe I could have gone with another concrete patching product that didn’t require a separate aggregate. I ended up using concrete dust from my grinding as the aggregate and that worked ok. After patching, I sanded the spots flat and cleaned again.
COATING
The primer went on very easily and spread beautifully. Even with only the primer done, the floor looked SO much better. I mixed it according to the detailed instructions that Bert gave me—in fact, I printed out all of the data sheets and instructions from the website, read everything multiple times, and highlighted the most important steps. I knew from research that mixing properly was incredibly important so I set timers and had multiple mixing paddles and drills ready to go so I wouldn’t lose time. A tool addiction comes in handy sometimes.
I had some bubbles come up after the primer dried so I sanded those flat and vacuumed/wiped before proceeding. Also, though I did coat the floor with the LiquaTile the next day, which meant I didn’t have to do it, I lightly scuffed the primed floor with an orbital sander to promote adhesion. And cleaned AGAIN. The scuffing was probably overkill.
The LiquaTile was a lot thicker, stuff had sunk to the bottom, and it definitely gave me the impression that all mixing (first individually mixing parts A and B, then pouring the hardener into the bigger bucket and mixing, then pouring the mixture into a separate bucket and mixing some more) was necessary. The multiple mixing paddles were great since I could use separate paddles for parts A and B and didn’t have to worry about the epoxy hardening and ruining them.
Then, the pour. This was HEAVY. After the primer experience, I enlisted my husband for this. I used the notched squeegee to spread it, and then backrolled with an 18” roller. Since there was some bubbling with the primer, I tried to roll a bit more with the white epoxy coating. I wonder if a spike roller would have helped bubbling, or if I’d mixed too much air in—I’ll never know! I had to work very quickly. It was very hot out and I kept the mini split running so that I would have more working time with cooler temps and to prevent additional bubbling, but there was still only a very limited amount of working time, being epoxy.
An aside: I DIY’d my own spiked shoes with some cheap $6 sandals from Amazon and screws. To stop it from being too pokey for my feet I added a layer of some foam insoles cut to size (pic is before I did this). The spiked shoes that are sold online claim to be one size fits all but given their measurements they seem to be for the generic man’s foot. My shoe size is 5.5. Bert told me I might be able to forego the shoes, but I decided to do it anyway and I’m glad I did because I didn’t have to worry too much about walking on the floor to backroll. I do wish I’d made it a little more sturdy, though, maybe with a thicker shoe sole. The screws started bending a little at the end of the second day and I got some epoxy on a toenail. And it is still there. Do they make epoxy nail polish? Because this stuff is permanent.
The finish was GORGEOUS. There were a few bubbles that no one noticed but me, and a couple places where bugs had gotten stuck while it had been drying, but those spots bothered me so when it dried I tried to sand and go over them with a little leftover epoxy. I DO NOT recommend this. The patched areas are visible since the self-leveling doesn’t work well with little areas, and the bubbles probably would have been less noticeable since they were so small. Bert did warn me about this (epoxies don’t feather well) but I went ahead despite his advice… Bad decision. Regardless, though, the floor looks beautiful. I just have to avoid crawling on it looking for imperfections, because they are definitely there.
FINAL THOUGHTS
Things I wished I had done differently:
- Used a different product for filling cracks, since I couldn’t locate the appropriate aggregate and I had so much product left over. The trial and error on this plus trying to source the aggregate took a good amount of time.
- Possibly used a smoother roller for the top coat. I used a 3/8” nap one as recommended, and I think it was fluffy enough to have given me a slight texture that’s visible under bright lights. Or maybe I just overworked it, I’m not sure.
- Left it alone after the LiquaTile coating!!! Trying to fix the little bubbles and bug marks just led to more work and a result that wasn’t better, just different.
- It looks fantastic. The product was great. The process was tedious, but not too bad. I have gotten a ton of compliments on the floor. My husband initially asked if white was a bad choice because it would not hide dirt and dust, but I actually think it’s a good thing—a workshop should be clean. It just feels so fresh and pristine. After he saw it he shut up about the color. Using flakes would have hidden the little issues but I’m glad I didn’t go down that path, since this look is just so much better in my view. I maybe could have gotten away with a thinner coating and saved some money there, but it’s hard to complain about the results.
- Bert from AlphaGarage was incredible throughout the entire process. We exchanged—no joke—around 70 emails total, many of them quite long, since I had spread the work out over weeks (I have a full-time job and two little kids). He gave me his phone number too, and I felt like I could ask him anything. He knew a ton about not only the product but everything about this process, and his advice was spot on every time. I’ve never had such amazing customer service.
- I did a ton of prep work, not just physically for the floor, but also in terms of reading instructions, doing research, etc. And I think that made a huge difference.
Wow this turned out long. Thank you for reading!
P.S. I can only attach 10 photos so I will follow up with a couple more in a comment.


")