Beerhippie
Well-known member
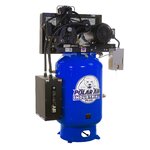
I was looking to buy an intake air silencer/muffler for our monster recip DeVilBliss back-up compressor. Sound levels in the shop when it's running vary from the high 90s to the low 80s. I hate having to wear ear protection over my ear protection when sitting at my desk.
Several of the replies I got to my query here re: best bang for the buck intake silencer/muffler were that there were several builds on You Tube that I should check out. I did. Simple enough, and I have almost all the parts on hand.

2 gal. bucket w/lid; a pile of left-over rockwool.

The black iron fittings and 1/4-20 X 1" screws and nuts were all I needed to buy. The flanges were marked down from $11 to $4, so lucked out there--and bought the last ones. Total of about $15. That's most of the tools I'll need--but something always comes up....
I cut the 1 1/4" holes in the bucket and lid with the ho' saw--then needed to pare off that raised circle. Sharp chisels are a joy to use.

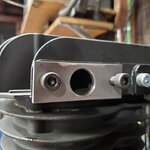
Use the flange for a drilling guide:

Secure a flange inside and out with the 1/4-20 screws:

I didn't use any sealant, as the polyethylene bucket itself should make for a dandy gasket sandwiched between the two flanges. I did use red Loctite as this thing will be seeing lots of vibration.
Screw a short 1" NPT ****** to the bottom flanges:

Now it's time to make the central tube from the SS hardware cloth. Why SS hardware cloth? It was the first piece I laid eyes on.

I cut the cloth to the depth of the bucket and I'll fit it by trial and error once it's a tube. Easier than trying to measure and math the depth of the flanges.
I used a piece of 1 1/4" conduit for a mandrel to make the cloth into a tube.

After a few trial fittings,

8 1/4 was the right length--for the flanges I used.
Now you can see why I put flanges on the inside:

The boss of the flange makes centering the tube easy and keeps it there.
Now for the glass-pack:

I fluffed the rockwool up until the tube was buried.

One DIY glass-pack muffler, no internal restriction.
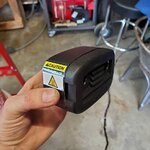
Now, here's where I diverge from the You Tube DIYers: I have an OSHA-approved sound pressure meter. All the videos I watched complained that the auto sound level on their cameras made it impossible to demonstrate the before/after sound level, but claimed it was significant.
A snap-shot of the sound level at my desk before installing the muffler:

It varied from about 84 to near 90 over a minute or two. I could set the meter for a longer-term average, but that would require reading the manual again.
Closer to the beast:

That would go up to almost 100 dB.
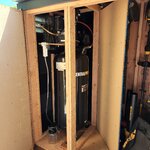
Muffler installed:

Ain't that just purty as all get-out?
Sound pressure level at my desk after installing the muffler:

Abso-f*&kin-lutely no difference. Sound levels around the shop are the same.
Now I'm thinking I need a real muffler--one with baffles. Which is quieter--a glass-pack muffler or a baffled muffler? I wonder if there's one in the metal pile at the dump that isn't blown out?
Several of the replies I got to my query here re: best bang for the buck intake silencer/muffler were that there were several builds on You Tube that I should check out. I did. Simple enough, and I have almost all the parts on hand.
2 gal. bucket w/lid; a pile of left-over rockwool.
The black iron fittings and 1/4-20 X 1" screws and nuts were all I needed to buy. The flanges were marked down from $11 to $4, so lucked out there--and bought the last ones. Total of about $15. That's most of the tools I'll need--but something always comes up....
I cut the 1 1/4" holes in the bucket and lid with the ho' saw--then needed to pare off that raised circle. Sharp chisels are a joy to use.
Use the flange for a drilling guide:
Secure a flange inside and out with the 1/4-20 screws:
I didn't use any sealant, as the polyethylene bucket itself should make for a dandy gasket sandwiched between the two flanges. I did use red Loctite as this thing will be seeing lots of vibration.
Screw a short 1" NPT ****** to the bottom flanges:
Now it's time to make the central tube from the SS hardware cloth. Why SS hardware cloth? It was the first piece I laid eyes on.
I cut the cloth to the depth of the bucket and I'll fit it by trial and error once it's a tube. Easier than trying to measure and math the depth of the flanges.
I used a piece of 1 1/4" conduit for a mandrel to make the cloth into a tube.
After a few trial fittings,
8 1/4 was the right length--for the flanges I used.
Now you can see why I put flanges on the inside:
The boss of the flange makes centering the tube easy and keeps it there.
Now for the glass-pack:
I fluffed the rockwool up until the tube was buried.
One DIY glass-pack muffler, no internal restriction.
Now, here's where I diverge from the You Tube DIYers: I have an OSHA-approved sound pressure meter. All the videos I watched complained that the auto sound level on their cameras made it impossible to demonstrate the before/after sound level, but claimed it was significant.
A snap-shot of the sound level at my desk before installing the muffler:
It varied from about 84 to near 90 over a minute or two. I could set the meter for a longer-term average, but that would require reading the manual again.
Closer to the beast:
That would go up to almost 100 dB.
Muffler installed:
Ain't that just purty as all get-out?
Sound pressure level at my desk after installing the muffler:
Abso-f*&kin-lutely no difference. Sound levels around the shop are the same.
Now I'm thinking I need a real muffler--one with baffles. Which is quieter--a glass-pack muffler or a baffled muffler? I wonder if there's one in the metal pile at the dump that isn't blown out?
Last edited:


")