To avoid these ads, REGISTER NOW!

What did you do "IN" your garage today?

To avoid these ads, REGISTER NOW!

M.Brane

ALLIANCE MEMBER
Joined
Feb 11, 2024
Messages
1,715
Location
1 hr N/W of LA LA Land
Put away all the tools from my upholstery adventure. Remembered the road find 1/4" Craftsman road find ratchet that's been soaking in CA/BS solution for a week. Took it out, and cleaned it. I think it's a goner. Looks like it got bent from being run over. Continued pondering the install possibilities for my Interphone BT headset in my new Shoei Neotec3.
 

TurnipTruck

Well-known member
Joined
Aug 28, 2005
Messages
1,550
Location
Southcentral Alaska
I swapped around some gas cylinders today.
I last refilled the straight CO2 on my MIG a dozen years ago and finally ran it out this last weekend. I hooked up the mystery cylinder I bought at a garage sale at least five years ago and discovered it’s a full 75/25 which is perfect for MIG. The empty cylinder of CO2 I was able to exchange for 100% Argon so now I will see if I can learn how to TIG.
 

Jay__Dub

Well-known member
Joined
Nov 19, 2024
Messages
1,246
Location
Cold Country, Canada
Cleaned off a bench that somehow got cluttered after I had just cleaned it off last year. Mercy.

Put stuff away, and I've got stuff to toss. Warm day. The carb comes off the tractor today, before old man winter comes back.

Oh, and I'm going to run the gas out of my snowblower, shut the tank off, and put it away.

So if it snows again, you can blame me.
 

ObnoxiousFumes

Well-known member
Joined
May 22, 2023
Messages
1,483
Location
Southwest Sask
I reconfigured my metric drawer for the idontknowhowmanyth time.

I got 12 more metric 3/4” drive sockets, and I had to redo my metric drawer to fit them in.

They are on the right hand side on the pegs under the axle nut socket set.
IMG_5709.jpeg
How on earth do you find the socket you want in that drawer?! Fairly makes my head spin! 😂
Very nice. 👍
 

ecotec

Well-known member
Joined
Oct 5, 2010
Messages
5,408
How on earth do you find the socket you want in that drawer?! Fairly makes my head spin! 😂
Very nice. 👍
I am used to my layout. It actually makes sense, once you get used to it.

The 1/4” drive is the easiest configuration, because the 10mm line up from front to back (with the exception of the bit sockets and the row and a half of spare 10mm). The 10mm sockets are on the 9th nubbin out of 14. After a very short time, you will grab the right one without even thinking about it.

The vast majority of 10mm sockets have purple paint on them for reference.

At some point, I want a box with a wider and deeper metric drawer and lots more of the plastic socket strips in 3/8” and 1/2”. I have about 5 different styles of socket organizers in that drawer, and would love to get it down to one or two.
 
Last edited:
To avoid these ads, REGISTER NOW!

Outlawmws

Well-known member
Joined
Aug 9, 2011
Messages
39,091
Location
The Badlands
How on earth do you find the socket you want in that drawer?! Fairly makes my head spin! 😂
Very nice. 👍

I have a couple of racks with my most used metric sets in them I keep the 10, 12, and 14 MM "upside down" so I can tell as a glance which is which, because the markings are a PITA to read, as unlike SAE, it's hard to spot the difference in sizes at a glance. There was a reason SAE got away from sizes in 32nds. :see:
 

Beerhippie

Well-known member
Joined
Oct 13, 2023
Messages
9,622
Location
Far NE Oregon
My thumb feels almost entirely fine now.

I just wish I could say the same about my lower back. Something I did in the last couple of days has set that and the related sciatica off. My right leg feels like it's being crushed.

Spent the morning F'in' with a Rinnai. It stopped seeing flow, which means the flow turbine--a tiny part that's utterly essential to function--had something stuck in it or was broken. I tore the damned WCU out to get to the turbine and indeed, is was completely clogged with bits of scale that should not have been able to get there. Replaced the turbine--I'll clean it later--and reinstalled the Water Control Unit (not a euphemism) and turned the water back on... only to see water gushing out of the bottom of the WCU. That meant a worn-out water inlet fitting. Salvaged one from an old Rinnai and replaced that. Got everything working again and then lunch....

Now to find something else I can do standing upright.
 

BonzoHansen

Well-known member
Joined
Jun 24, 2005
Messages
1,729
Location
NJ
that is a crazy pic of sockets. I keep mine in different drawers by drive size - 1/4, 3/*8, 1/2+ along with ratchets, extensions, etc. that is as good as i can get lol
 

ObnoxiousFumes

Well-known member
Joined
May 22, 2023
Messages
1,483
Location
Southwest Sask
I have a couple of racks with my most used metric sets in them I keep the 10, 12, and 14 MM "upside down" so I can tell as a glance which is which, because the markings are a PITA to read, as unlike SAE, it's hard to spot the difference in sizes at a glance. There was a reason SAE got away from sizes in 32nds. :see:
That’s actually a really good idea.
 

Crazyjake8493

Well-known member
Joined
Sep 26, 2014
Messages
3,948
Location
Upstate NY
Even though winter is over and I'll be taking the cab off shortly, I added an LED light to my tractor's soft cab.

I bought a 4-pack of these LED lights a few years ago and only ended up putting one of them in the cap of my truck, so I had the other three laying around.
 

Attachments

  • cablight2.jpg
    cablight2.jpg
    651.8 KB · Views: 25
  • cablight1.jpg
    cablight1.jpg
    714.7 KB · Views: 23

jimkinney

Well-known member
Joined
Jan 3, 2009
Messages
298
Location
Florida's Space Coast
I reconfigured my metric drawer for the idontknowhowmanyth time.

I got 12 more metric 3/4” drive sockets, and I had to redo my metric drawer to fit them in.

They are on the right hand side on the pegs under the axle nut socket set.
IMG_5709.jpeg
Nice, but I'm not in the same league. I'm retired and not making a living with my tools.
Metric sockets, crows feet, torx and hex. SAE are in the other box.

1000009447.jpg
 
Last edited:

rharman

Well-known member
Joined
Apr 22, 2012
Messages
8,734
Location
SoCal
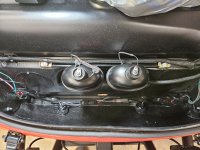
I bought a pair of batteries and decided to mount the included holders to the underside of the side shelf on my HF cart.


battery_holders.jpg

1774542681294.jpeg
I dunno, but you gotta ask her when she's ten feet tall. So I don't think she'll be hard to find.

@aka Larry - Did you get those 8ah batteries from Acme on their recent sale? I picked up a pair as well but still waiting for them to ship. It was a heck of a deal, for sure.

@kaymccampbell - Bonus points for the White Rabbit reference. One of my all time favorites! Grace Slick... What a voice!
 

bugnut

ALLIANCE MEMBER
Joined
Jul 14, 2012
Messages
3,837
Location
Central Ohio
Baja project today. When first on the road last year handling was a bit squirrely, as a lot of weigh has come off the front end. Last fall tested a solution by placing a couple sandbags on the front mounted gas tank and lowering air pressure. Today a permanent (maybe) solution installed. Mesh tubular like sock fabric, stuffed with packing peanuts and installed on top of wiring to provide protection. Then filled up ziploc bags, placed inside canopy anchors, with pea gravel. These were installed in the space were a spare would reside. Added about 70lbs in front of the axle. Now we need to test!
 

Attachments

  • 20260326_131200.jpg
    20260326_131200.jpg
    1.4 MB · Views: 26
  • 20260326_131207.jpg
    20260326_131207.jpg
    1.1 MB · Views: 21
  • 20260326_131210.jpg
    20260326_131210.jpg
    1.1 MB · Views: 22
  • 20260326_131532.jpg
    20260326_131532.jpg
    986.1 KB · Views: 21
  • 20260326_134230.jpg
    20260326_134230.jpg
    1.7 MB · Views: 22
  • 20260326_134243.jpg
    20260326_134243.jpg
    690.9 KB · Views: 21
  • 20260326_134300.jpg
    20260326_134300.jpg
    767 KB · Views: 22
  • 20260326_134938.jpg
    20260326_134938.jpg
    931 KB · Views: 21
  • 20260326_140125.jpg
    20260326_140125.jpg
    997.2 KB · Views: 21

kaymccampbell

Well-known member
Joined
Feb 27, 2015
Messages
29,410
Location
Upstate New York
Baja project today. When first on the road last year handling was a bit squirrely, as a lot of weigh has come off the front end. Last fall tested a solution by placing a couple sandbags on the front mounted gas tank and lowering air pressure. Today a permanent (maybe) solution installed. Mesh tubular like sock fabric, stuffed with packing peanuts and installed on top of wiring to provide protection. Then filled up ziploc bags, placed inside canopy anchors, with pea gravel. These were installed in the space were a spare would reside. Added about 70lbs in front of the axle. Now we need to test!
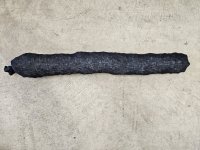
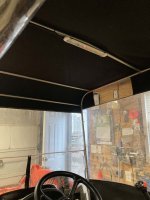
One would think that dialing back the front torsion bars to get stock height, thus returning to original geometry would desqirrelify the front end on a lightened chassis like a Baja.
 

ctandc72

Well-known member
Joined
Sep 19, 2020
Messages
1,085
Location
VA
Last night, after a Harbor Freight run (finally broke down and picked up a welding table) I got the first coat of the rust converter paint on the mower deck

IMG_0518.JPEG

It needs to set up for a few hours - so I'll hit it with another coat tonight. Buddy of mine turned me onto this stuff. It's no magic bullet for rust - because we all know there is no magic bullet. It's mechanical removal (grinding / sanding / cutting out rotted metal) then treating metal, and that's still no guarantee.

That being said - he's been using this stuff on mower decks, truck frames, tractors etc - stuff that sees moisture and weather. As he's restored more than a few high $$$ cars - when he says something works, I take him at his word. Basically he said if you aren't stripping to clean metal, etching, epoxy / top coat etc - this stuff works well to if not stop more rust at least slow it a lot. He put it on a pitted up / rusted finish mower he was trying to just get a another season or two out - that was more than a few years ago.

IMG_0519.JPEG

He and I have both used POR15 in the past. Rust Bullet, KBS and others. All of them work well in their own way - but prep is the key. This stuff? It's cheap via Amazon. It goes a LONG way. Knock the scale off, clean it up, put a thin coat on, let it set up (works faster when it's humid) then hit it with another coat. UV doesn't seem to bother it much either, unlike some other coatings that prescribe a top coat for that very reason.

Tip - the paint has A LOT of solids in it. It comes in a plastic liner inside the can. Mix it up GOOD. When you're not using it, get as much air out of the liner as you can, then use a zip tie to keep it closed off. Personally I reverse the zip tie - keeps it tight, but you can keep reusing the zip tie. If not, pour in a mason jar. Don't get any on the jar threads though LOL. Cleans up fairly easy (hands / brush etc) unlike POR and some other stuff. As always YMMV.

Hope to get the SS in the shop tonight / early tomorrow morning and get the diff / ATF fluid changed out, get the deck / new blades back on the mower and then start working on the Silverado frame and melting some metal.
 

Levaughn

Well-known member
Joined
Feb 17, 2015
Messages
1,392
Location
NY
I changed for about the fourth time since owning it the blend door actuator on my 2011 Impala. It has three but the one farthest right behind the glove box is always the culprit. I changed it about three weeks ago thinking I was good to go, but when I installed it, the knocking was present with the new one. I took the one I replaced apart and saw one tooth was missing from the gear. I bench tested it and it seemed to work fine with the missing tooth (it may have just jammed up the gear) Then I did some research and found that the new ones are ****. It's not the gears but the electronics. The cheap ones are defective right out the box. I had one with broken teeth shelved about ten years old. I swapped out the broken gear with a good one. I bench tested it and it worked. I installed it and no more tapping. Some were saying it may have needed to be re-calibrated. I tried it before removing the actuator but it was still tapping.
The big gear I changed broke a tooth again. I had two spare actuators for parts and changed it out. I saw two new actuators on Ebay for $20, bought those to keep just in case that one or the other two actuators go bad (there's three total) I think because this particular actuator is the one that opens and close the large blend door, it works harder.
 
Last edited:
To avoid these ads, REGISTER NOW!
Top Bottom