Skyman
Well-known member
A zork of MiG, a bit of grinder, and a splash of paint, and it'll be all better.
No eye of newt?


A zork of MiG, a bit of grinder, and a splash of paint, and it'll be all better.

But will it carry the weight of the three full kegs on your next camping trip...Already tested with an off-cut from another project. It'll be fine. I weigh about 150 soaking wet, and have no intention of walking on the bed. The fact that the ply barely deflects when not screwed down tells me it'll be plenty stout when secured.

Finished up my Athol 614 1/2.
Spray area with aerosol foot powder. Leak will show easily.Opened the doors in the shop to 60 degrees today, fired up the baja and backed it out of the shop. Noticed puddle on floor and realized it was leaking gas, hurried out to see if I could spot the leak after shutting it down, Found spot that was dripping not origin. Watched it while it dripped as it is close to the exhaust. When cool resumed work. A test drive of the Ford tractor, seems okay but cannot get idle below 1000rpm. Then drew an adapter to 3d print. fired up the printer. Rearranged vehicles and tractors so baja was on the driveway apron. Proceeded to try locating the gas leak, removed tire and stared, nothing, then started it up and still nothing. I'm afraid to drive it till the source is corrected. Left it parked tire off, on the driveway apron.
Then onto yard work.
Ahhh.... I didn't catch that they weren't genuine. The pair of DeWalt from Acme was only $169 so I jumped on that. Also got another $10 off with an online discount code. I'm a bit leery of the knock-offs.


We've got a hilltown near here called Athol.Always seems like being insulted by someone with a speech impediment. "Hey, thith ithnt the pathing lane, you athol!"
There's an Athol, Idaho, too. I know a guy from there. He lives up to the name.We've got a hilltown near here called Athol.


This is my first time with the knock-offs myself. I figured they'd have to be pretty bad not to be worth $25 each.


 s on the charging station I need to tidy up cords on...figure if the power goes out better to have some charged.
I'd keep a close eye on them while charging. @Squankum posted a link to a pretty detailed study on 18650 cells. Man, was that eye-opening.... and scary.This is my first time with the knock-offs myself. I figured they'd have to be pretty bad not to be worth $25 each.


It's why my charging cabinet is steel, surrounded by fireproof materials and there's a timer with fixed presets.I'd keep a close eye on them while charging. @Squankum posted a link to a pretty detailed study on 18650 cells. Man, was that eye-opening.... and scary.

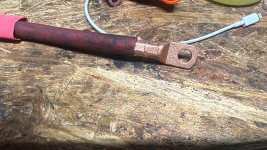
Did the same about two years ago. Little sanding and grinding, welding a washer over the face and then polished it out. has worked fine as repaired.Made a tool.
Some PVC pipe I had on hand anyway, time with my Dremel to hog out the end to make it fit, and cut some slots to fit the ring.
Retaining ring for the cone shaped glass shade on new wall sconce lights for the bathroom. My hand won’t fit down in to the shade far enough to tighten the ring.
Cut up a scrap of 1x3 to make a clamp rack.
Ruined one end of a Jorgensen bar clamp, ran it in to the table saw blade.
Better than a body part contacting the blade, but I just got this clamp so I’m a bit annoyed with myself for trashing it.
I'd keep a close eye on them while charging. @Squankum posted a link to a pretty detailed study on 18650 cells. Man, was that eye-opening.... and scary.

 www.garagejournal.com
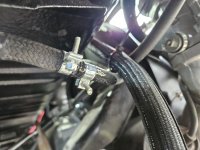
Hose is fresh as of last August. ThanksIs the hose bad? It looks wet and mushy.
Great idea, thanksSpray area with aerosol foot powder. Leak will show easily.
Before Home Depot was here, in So. FL there was a chain, Lindsey Lumber. They were pretty-big. They carried name-brand tools, and it was similar to what would be HD. They also had a tool rental dept. I rented a tar kettle and bought tar plugs to feed it, when I was re-roofing my first So. FL house, which would be 100 years old this year. Back then, it was a spry 54 years old. It was built w/CMU's/CBS as some of you may call 'em. Termites aren't fond of concrete.Highest failure rate of any fastener has to go to cheap hose clamps
")
I've had it with all the screwing off on this job!
Don't confuse "screwing off" with "screwing in"!

Are you going to do the foundation work yourself?No way - I'll take a mess over fire - that's end of project fatal damage ****. Buried stuff is just a mess.
Update - so far it looks like it's just the back part - where my tools and stuff were is still standing, just hard to get to... the mower, garden stuff, etc... never mind. But all in all, it looks like the bullet (or cannonball) slid past us again. It could have been a LOT LOT worse!!!

This should be a little more comfy:

Somehow, I've never really had a problem with leveling the Van. On rare occasions, I've used a few rocks, but mostly, I can find a spot large and level enough to suit me. As long as my head isn't downhill, I'm pretty good.Do you have leveling ramps for your van? I made a couple from 2X10 that resemble this one I got later:
I got that one at a yard sale. but the wood ones are only 2 level and that is all I generally needed. I made them so they stack together and they have the leading ends cut 45 deg.
I can get pics if you want