To avoid these ads, REGISTER NOW!

Rebuilt a 1967 Wilton Cadet 3.5 Jaw

harris.jasonm

Active member
Joined
Feb 26, 2023
Messages
31
I found this old Cadet on Craigslist for $75. No cracks or repairs. Had about 4 coats of paint on it but all the internals were solid and in great shape. I did a quick rehab of it. I think it came out pretty good. Thought I would share.
 

Attachments

  • 3.jpg
    3.jpg
    103.3 KB · Views: 21
  • 4.jpg
    4.jpg
    84.5 KB · Views: 15
  • 5.jpg
    5.jpg
    93.1 KB · Views: 12
  • 6.jpg
    6.jpg
    82.6 KB · Views: 10
  • 7.jpg
    7.jpg
    40.2 KB · Views: 10
  • 8.jpg
    8.jpg
    48.8 KB · Views: 9
  • 9.jpg
    9.jpg
    90.5 KB · Views: 12
  • 10.jpg
    10.jpg
    72.5 KB · Views: 13
To avoid these ads, REGISTER NOW!
OP
H

harris.jasonm

Active member
Joined
Feb 26, 2023
Messages
31
Here are the remainder of the pics.
 

Attachments

  • 11.jpg
    11.jpg
    75.4 KB · Views: 13
  • 12.jpg
    12.jpg
    75.6 KB · Views: 12
  • 13.jpg
    13.jpg
    82.7 KB · Views: 12
  • 14.jpg
    14.jpg
    86.3 KB · Views: 12
  • 15.jpg
    15.jpg
    85.5 KB · Views: 12
  • 16.jpg
    16.jpg
    93.1 KB · Views: 13
  • 17.jpg
    17.jpg
    80.6 KB · Views: 15
  • 18.jpg
    18.jpg
    76.2 KB · Views: 19
  • 19.jpg
    19.jpg
    76.7 KB · Views: 21

fishwatcher

Well-known member
Joined
Jan 26, 2023
Messages
757
Great job! A Cadet was my first vise restore project. I really like their style and it’s plenty strong for most utility vise or even mechanics needs as it was originally intended.
 
OP
H

harris.jasonm

Active member
Joined
Feb 26, 2023
Messages
31
Great job! A Cadet was my first vise restore project. I really like their style and it’s plenty strong for most utility vise or even mechanics needs as it was originally intended.
Thank you. This was my first one taking all the way apart and bringing back to life. It was really enjoyable. I can see why messing with these old vises can become addictive. I have wanted a bullet for a long time but ran across this one. I also did a 4.5" cadet to be my main vise so I guess no bullet for me! LOL... These will do and I like the style and the vintage of them both. Who knows what I might run across in the future but you don't see as many of the Cadet line and I like that.
 
OP
H

harris.jasonm

Active member
Joined
Feb 26, 2023
Messages
31
This is the 4.5" that I put a brass bushing in the inside and made a brass shim for the outside of the screw. Hade to make new pass through bars for the base clamps. Had Logan make me some new jaws, cleaned up and kept the patina and added a little flair so it would look cool on my bench. I have a big 6.5" Snap On bullet at work so these just see work on the small projects I do around the house.
My workbench has been a fun project that has evolved over the past 15 years. I started with a vintage Snap On box from the early 60's. Put a butcher block top on it and had built a wood surround for it. Then I got this 1968 C10 hood and made a new surround out of that. And now the vise on it is from 1965 so it is kind of period correct to what someone could have done back in the day. I like patina and old stuff so I think it's cool. It is kind of a focal point in my man cave and functional art so to speak.
 

Attachments

  • 47.jpg
    47.jpg
    75.3 KB · Views: 12
  • 48.jpg
    48.jpg
    92.6 KB · Views: 9
  • 49.jpg
    49.jpg
    96.6 KB · Views: 12
  • 43.jpg
    43.jpg
    963.8 KB · Views: 12
  • 31.jpg
    31.jpg
    86.3 KB · Views: 15
Last edited:

fishwatcher

Well-known member
Joined
Jan 26, 2023
Messages
757
This is the 4.5" that I put a brass bushing in the inside and made a brass shim for the outside of the screw. Hade to make new pass through bars for the base clamps. Had Logan make me some new jaws, cleaned up and kept the patina and added a little flair so it would look cool on my bench. I have a big 6.5" Snap On bullet at work so these just see work on the small projects I do around the house.
My workbench has been a fun project that has evolved over the past 15 years. I started with a vintage Snap On box from the early 60's. Put a butcher block top on it and had built a wood surround for it. Then I got this 1968 C10 hood and made a new surround out of that. And now the vise on it is from 1965 so it is kind of period correct to what someone could have done back in the day. I like patina and old stuff so I think it's cool. It is kind of a focal point in my man cave and functional art so to speak.
That’s an awesome set up with the hood, custom surround, and butcher block top! The stylized paint on the Cadet is just a perfect compliment.

Did you (or could you) capture a picture of the bushing? I’d be interested in how what you used and how you built both the bushing and the shim.

It’s great to learn new tips and tricks here every time I visit GJ. Thanks!
 
To avoid these ads, REGISTER NOW!
OP
H

harris.jasonm

Active member
Joined
Feb 26, 2023
Messages
31
That’s an awesome set up with the hood, custom surround, and butcher block top! The stylized paint on the Cadet is just a perfect compliment.

Did you (or could you) capture a picture of the bushing? I’d be interested in how what you used and how you built both the bushing and the shim.

It’s great to learn new tips and tricks here every time I visit GJ. Thanks!
Sure, I will take is apart and snap a few pics soon. For the internal bushing I purchased a brass thrust washer. 1.5 OD and 1" ID. About an 1/8 thick. I then sanded that until it had a 64th of clearance from the locking key that goes on the front of the vise. Once that was done I had a bit of a gap in the groove where the locking plate or key goes on the front so I had an old brass gauge from a sprinkler system. I took that apart and used the rear portion of the housing to trace the U shaped locking key. Made a brass shim the same dimensions as the plate and drilled the holes in it and simply slid it in so now it has a brass bushing on both sides of the casting which the Cadet never had.
The surround on my bench out of an old hood was a fun project. I could see what I wanted in my mind. The hood was 14" wider than I needed it so I had to cut the nose and section it 7.5" out of each side. Then I built the frame out of 1" square and used the rest of the sheet metal to skin that. Overall I was really happy with how it turned out although it was a lot more work than any sane person would do for that. The pinstriping on the vise was just a why not. I have a guy who does that. He wanted an old box I had no use for so I traded him the work for the box. Why not. You only live once.
 
OP
H

harris.jasonm

Active member
Joined
Feb 26, 2023
Messages
31
A few pics of the bench surround. Having a press brake and all the cool tools at work was what made this project possible.
 

Attachments

  • WB10.jpg
    WB10.jpg
    70.2 KB · Views: 7
  • WB5.jpg
    WB5.jpg
    98.7 KB · Views: 5
  • WB4.jpg
    WB4.jpg
    94.8 KB · Views: 5
  • WB3.jpg
    WB3.jpg
    98.7 KB · Views: 4
  • WB2.jpg
    WB2.jpg
    110 KB · Views: 4
  • WB1.jpg
    WB1.jpg
    92.5 KB · Views: 4
Last edited:
OP
H

harris.jasonm

Active member
Joined
Feb 26, 2023
Messages
31
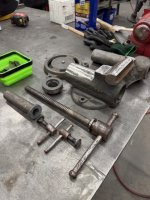
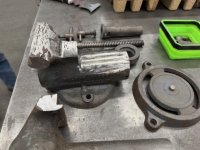
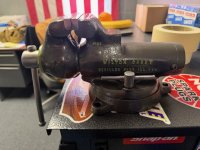
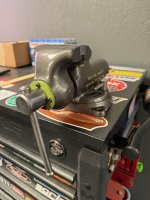
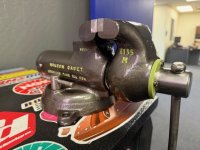
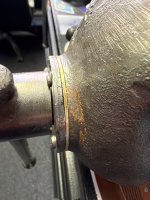
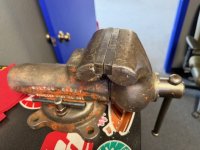
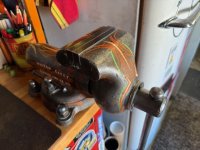
This is a picture of the brass washer before I sanded it to the tolerance I needed. And you can see the shim in the other. Just a copy of the U shaped locking washer in the front with the three screws in it. Made of brass. You have the main screw with the handle. That has the shoulder that sits against the casting in the front jaw. Then the groove behind the shoulder on the screw that the locking U shaped key rides in. This appeared to have a fair amount of slop from new as it was not worn all that bad and I just wanted to tighten it up. Putting the brass washer between the front jaw casting and the shoulder on the screw was perfect leaving about a 64th of tolerance from the backside of the shoulder and the front of the jaw. But then I had a larger gap which caused an 1/8th in gap when reversing and I was not happy with that. Hence the shim behind the locking plate that took that up. Overall now, virtually zero play in the jaw and being brass it runs super smooth. Also, just the brass edge of that shim showing is a detail I like. Most will never notice but anyone who does this stuff will and will understand how much work actually went into this thing.
I thought the shim was going to be a lot tougher than it was. Once I discovered rummaging through my hoard of junk that I had something to make it from. I roughed it out then sanded it with a die grinder and had it done in no time.
 

Attachments

  • IMG_1996.jpeg
    IMG_1996.jpeg
    817.1 KB · Views: 4
  • IMG_1997.jpeg
    IMG_1997.jpeg
    661.2 KB · Views: 4
Last edited:
OP
H

harris.jasonm

Active member
Joined
Feb 26, 2023
Messages
31
This was version 1 of the workbench. This wooden surround I built went to a buddy who put it on his reloading bench so it worked out perfectly that it did not go to waste. And the vise I had on this bench before was an old USA made Craftsman that I redid and now lives on my father in laws bench.
 

Attachments

  • B2.jpg
    B2.jpg
    55.3 KB · Views: 4
  • B1.jpg
    B1.jpg
    94.6 KB · Views: 4
  • B.jpg
    B.jpg
    111.8 KB · Views: 4
  • T.jpg
    T.jpg
    741.4 KB · Views: 4
  • T1.jpg
    T1.jpg
    852.4 KB · Views: 4
  • 34.jpg
    34.jpg
    82.6 KB · Views: 5
  • 35.jpg
    35.jpg
    90.5 KB · Views: 5
  • 36.jpg
    36.jpg
    95.4 KB · Views: 6
OP
H

harris.jasonm

Active member
Joined
Feb 26, 2023
Messages
31
And the 4.5" that is on my bench now as it made it's way through the refresh. I liked the patina and original paint on this vise, it matches my bench. It was well used but not overly abused so the scars make it cool. I got this vise from a man who said it was his grandfathers and he wanted it to live on. I lost sleep over doing the pinstriping but also did not want it to look like just an old beat up vise. I tore it down and all the internals are redone and the brass bushings were added. I had to make the pass through bars out of some round stock and then heat treated them to darken and harden. So at the end of the day I just went for it and I am extremely happy with how it came out.
 

Attachments

  • 46.jpg
    46.jpg
    640.9 KB · Views: 5
  • 42.jpg
    42.jpg
    595.1 KB · Views: 5
  • 41.jpg
    41.jpg
    729.8 KB · Views: 4
  • 40.jpg
    40.jpg
    467.3 KB · Views: 4
  • 28.jpg
    28.jpg
    75 KB · Views: 4
  • 27.jpg
    27.jpg
    68.5 KB · Views: 4
  • 24.jpg
    24.jpg
    83 KB · Views: 4
  • 23.jpg
    23.jpg
    75.5 KB · Views: 4
  • 47.jpg
    47.jpg
    75.3 KB · Views: 7
Last edited:
To avoid these ads, REGISTER NOW!
Top Bottom