To avoid these ads, REGISTER NOW!

In-floor Scissor Lift Install

jtbinvalrico

Well-known member
Joined
Jan 2, 2010
Messages
1,375
Location
Tampa FL
If I’m seeing this correctly, it appears that those frame members are resting on the inner sides of the platforms. On scissor platforms you want to make sure the load is more to the center - that’s what the cross bars would do…..But, if your pinch welds are more lined up with the center of the platform, then higher blocks might get you there…..But, if your car is that low, you may not be able to slide the cross bars under it to begin with. Got some photos of the car on the ground?
 
Last edited:
To avoid these ads, REGISTER NOW!

hpfiend

Member
Joined
Mar 23, 2017
Messages
19
Wow! What a great thread! I read all 42 pages of it over the last week. There are a lot of very talented makers in here. I have been in discussions with EAE about their 6503V2 recently. I am going to go through the import and freight costs with a fine toothed comb as they have been detailed a few times in this thread which is very helpful. I will admit I am having a hard time navigating the tariff documents so far to see what that charge will be and determine if this is a good idea or not.

I am in Ohio and if anyone is near by and would like to go in in the order, maybe we could share freight. I have a four post lift currently and am having an issue with my current mid-engine project in that the engine/cradle assembly will not fit up between the four post lift ramps.

I have decided I definitely want a full rise scissors for my second lift in my residential 2.5 car garage but I someday plan on building a new 3 bay garage with more ceiling height. I have about 10' clearance now. Has anyone considered mounting a flush mount scissors lift above ground temporarily? It is tough to visualize but I was thinking of using some large angle iron to bolt to the sides and then fastening it down to the existing slab. Are they really 10-12" high at rest? If that is the case, the ramping could be more difficult than doing the concrete work twice!

How are you guys getting the 90 degree pvc fitting onto the 2" pipe that was hammered and cleaned through the dirt to connect to the cored vertical section? Are you installing this conduit run in sections with couplers? If not, how are you lining the pipe up with the hole at full length?

I definitely want to use some welded angle iron to support the top perimeter of my forms and act as coping for the edges.
 

Cyclehead

Well-known member
Joined
Jan 19, 2017
Messages
85
Location
Georgia
My Chinese full rise flush scissor lift is indeed 12” tall when compressed. I don’t have steel edging on my bunkers and haven’t had any problems with edges cracking. However I like the idea of steel angles to edge the bunkers and close any gaps. It depends how precisely your bunkers are poured.
I use heavy rubber “cow mats” as toppers for my lift plates. They are slightly larger than the plates and fit the bunkers precisely, which helps keep sand and dirt out when sweeping. I have adjusted my lift height to accommodate the heavy rubber pads, so they’re flush with the garage floor.
 

jtbinvalrico

Well-known member
Joined
Jan 2, 2010
Messages
1,375
Location
Tampa FL
Right around post #79 of my installation shows this part. I sectioned out about a one foot square piece of concrete under where the control panel would go. Dig down a bit and locate the pipe that has been pushed through. Use a long 90 degree sweep to get the pipe vertical - remember, you have to put hydraulic, air, and electrical thru that bend, so you want it to be as wide a sweep as possible.


tig

Well-known member
Joined
Feb 7, 2011
Messages
1,053
Location
Durango, CO
What about water?

I'd like to use my (soon to be) BendPak MDS-6LPF for detailing. I can easily imagine spraying the underside of the car while it's up on the lift.

The BendPak manual says nothing about drainage, nor does it say anything about getting the thing wet.

D0B56Qe.png

1) There appear to be holes in the bottom of the base plates. I assume I can put a drain below those?
2) How bad an idea is it to be spraying water on the hydraulic cylinders while extended?
 

Yarz

Well-known member
Joined
Sep 11, 2013
Messages
121
Location
Tarentum PA
I don't know if there are different chromes on cylinder rods, but excavators, loaders, log splitters, etc. get wet all the time. As long as you don't aim at / blow water past the seals, I think it'd be ok.
 

camarosrus69

Well-known member
Joined
Aug 7, 2013
Messages
243
Location
South central Kansas
I wouldn't be too concerned about the water, the seals will wipe that off when the cylinders compress, however if you're washing off something particularly grimy, you should wipe them down, and blow off the seal area. Any grit in there might damage the seals.
 

mike93lx

ALLIANCE MEMBER
Joined
Dec 9, 2013
Messages
37,457
Location
Richmond, VA
I don't know if there are different chromes on cylinder rods, but excavators, loaders, log splitters, etc. get wet all the time. As long as you don't aim at / blow water past the seals, I think it'd be ok.
Not to mention the shocks on every car rolling down the road
 

jtbinvalrico

Well-known member
Joined
Jan 2, 2010
Messages
1,375
Location
Tampa FL
What about water?
Spraying the underside of a vehicle is going to result in a good amount of water running and dripping into a small space - that small space being the pits. The manual for this lift states that it cannot be installed outdoors.....the manual doesn't specifically mention water, but I'd assume that's one of their concerns. Some considerations:

1) I'd recognize that a lot of this exits the practices described in the manual and likely voids the warranty. In designing the pits for an application that I intended to get wet, I'd incorporate some way of managing water. That could be a sump of some sort under the platforms or a channel around the base of the platforms to catch water. Then you need a way to remove that water - a pump, or a gravity drain if you're high enough. The manual indicates no more than a 3 degree slope is allowed. Does that mean that Bendpak tolerates a 3 degree slope of the garage floor vs the base of the pits? The manual doesn't describe a process for leveling or shimming the platform bases. That tells me that the integrity of the installation relies heavily on the pits being level. Level surfaces and flowing water are mutually exclusive.....Can any of that 3 degree slope allowance be utilized for water drainage?

2) The extending legs of these scissor lifts typically have either a wheel or a slider of some sort which rides in a track along the outer edge of the base plate as the lift goes up and down - you'd want to make sure water doesn't float debris onto that track.

3) With a pit depth of 5.25", it wouldn't take much to get a lot of the metal submerged in water - consider grounding both platforms.

4) Are the concrete anchors supplied with the lift suitable for water immersion? Consider upgrading them if you can't determine if they are.
 

Cairo94507

Well-known member
Joined
May 9, 2015
Messages
343
Location
Auburn, CA
I had a mid-rise scissor lift from BendPak- excellent lift. Mine was sunk into the floor and we porcelain tiled the floor and sides of the pits.

If you want to wash the underside of a car, I would buy some plastic tarps and try to close off the lift and pits from as much water intrusion as possible. I would not want water getting into all of the moving joints and sitting under the lift ramps, etc.

I would also make sure you have a good solid 6" concrete base to mount the lift to. We dug our pits down and did a 6" layer of crushed rock and used a tamper to pack that as tight as possible adding water to assist. Then we used a layer of sand and raised re-bar into the middle of the remaining space, tied to the existing garage floor and poured 6-8" of concrete to make sure it was level.

When we dropped the mid-rise lift in place it fit perfectly with about 3/8" clearance all around. Of course we also ran all the lines in the floor through a chase to an empty bottom wall cabinet, where we housed all of the hydraulics- totally hidden. We then canabalized the BendPak control panel and mounted it to the side of the cabinet directly above the lower cabinet so we had nothing on the floor, in the way, taking up space. All you saw was a clean control panel and the actual lift in the floor.
 

Attachments

  • IMG_3075 (1).jpg
    IMG_3075 (1).jpg
    124.7 KB · Views: 219
  • IMG_3086.jpeg
    IMG_3086.jpeg
    587.3 KB · Views: 197
  • IMG_3074.jpg
    IMG_3074.jpg
    145.3 KB · Views: 202

buzzyng

Member
Joined
Jan 2, 2013
Messages
17
What an amazing thread. I have a Nussbaum scissor that has been surface mounted for about 2 years as I wasn't sure where I wanted to install it for in-ground. I ended up putting a pair of 4posts on that side and now am going to install the single scissor on the other. I've just spent the past two days reading and truly appreciate all the information. I have a couple questions as I was headed down one path until I read everything

I had planned on installing like the 1st pic. Excavate down two pits, 4-6" gravel, 6" concrete, rebar only in the new recessed floor. Most everyone created 4-6" wide wall around the perimeter and tied rebar into the existing slab. (2nd pic). While #2 is definitely more stout, is it really necessary?

If so, when you fill in the concrete, it will level out to the bottom of the forms.
1) How long do you wait until pouring the walls as I've seen stuff from 30min to 2hrs.
2) how to trowel the floor with all the bracing in place.
3) how long until removing all the bracing?

I will be parking my daily over the lift and when it rains, it will drip water into the pit. Since there isn't any way to trench a drain (about 60' under driveway), is this something really to worry about as I wont be washing cars inside.

thanks
 

Attachments

  • be2bf10c19bcb7bebf07f5ac7442b06d.jpg
    be2bf10c19bcb7bebf07f5ac7442b06d.jpg
    327.3 KB · Views: 153
  • OG install.JPG
    OG install.JPG
    58.9 KB · Views: 149

jtbinvalrico

Well-known member
Joined
Jan 2, 2010
Messages
1,375
Location
Tampa FL
You may find some additional answers and perspective in the thread below….How deep are your pits going to be? Sounds like that Nussbaum may have a relatively shallow depth requirement. But whether the pit base is 6 inches or 14 inches you need some way of tying the pit base to the existing slab….Imagine those two pit bases just floating on the ground below them with nothing tying them to the slab above.

Finishing the pit floors - well, that’s a compromise between enough framing to contain the concrete and space to get in there to smooth it out. The more shallow the pit, the less concrete to manage.


mike93lx

ALLIANCE MEMBER
Joined
Dec 9, 2013
Messages
37,457
Location
Richmond, VA
What an amazing thread. I have a Nussbaum scissor that has been surface mounted for about 2 years as I wasn't sure where I wanted to install it for in-ground. I ended up putting a pair of 4posts on that side and now am going to install the single scissor on the other. I've just spent the past two days reading and truly appreciate all the information. I have a couple questions as I was headed down one path until I read everything

I had planned on installing like the 1st pic. Excavate down two pits, 4-6" gravel, 6" concrete, rebar only in the new recessed floor. Most everyone created 4-6" wide wall around the perimeter and tied rebar into the existing slab. (2nd pic). While #2 is definitely more stout, is it really necessary?

If so, when you fill in the concrete, it will level out to the bottom of the forms.
1) How long do you wait until pouring the walls as I've seen stuff from 30min to 2hrs.
2) how to trowel the floor with all the bracing in place.
3) how long until removing all the bracing?

I will be parking my daily over the lift and when it rains, it will drip water into the pit. Since there isn't any way to trench a drain (about 60' under driveway), is this something really to worry about as I wont be washing cars inside.

thanks
Not all that much water drips off a car from rain. Dehumidification in the garage will deal with that no problem.

Snow melt is a different story, but still, a dehumidifier can deal with it, just slower.
 

tig

Well-known member
Joined
Feb 7, 2011
Messages
1,053
Location
Durango, CO
Long time lurker on this thread! I've wanted an in-floor scissor lift forever (and almost pulled the trigger on one for a house in Utah...but then lift happened). I haven't posted anything here yet on my "Gruntled" install, but I'm now at the point where it's interesting...

rGiP2Ke[1].png

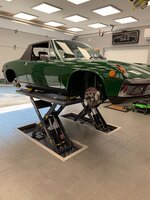
* BendPak MDS-6LPF. I went mid-rise because I will also be installing a BendPak XPR-10AXLS two-post lift or servicing. This lift is for lighter work; primarily car detailing.
* Floor will be covered with RaceDeck Free-Flow (see layout plan above) and has been sloped such that water either heads to the wall (where there's a trench drain) or into the lift footing where I've plumbed a drain that goes to the wall, parallel to the conduit for the hydraulics.
* I poured the footing such that I can adjust the lateral width; I didn't like the idea of being stuck with a width before I actually use the lift in anger. Once I decide on the spacing, I will fill the gap (s) with treated wood. The RaceDeck will hide all this.
* The footings are intentionally poured extra deep (~6") so that I can shim the lift up as needed to ensure it's flush with the RaceDeck. I'm also going to put a 1-degree slope to the front so any liquids flow out the holes in front of the lift bases into my drain system.
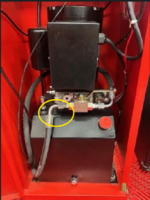
* I verified with BendPak that I can mount the flow separator that is normally by the power unit in the footing, running only a single 5700psi-capable (the BP power unit goes off at 3450psi according to BP) hydraulic line from the power unit to the footing area. Normally, for this lift, the flow separator is fed by a short hose from the power unit, and then two longer hoses feed each of the lifts. I could run it the same way, but I like the idea of minimizing the stuff that's in my conduit.

These pictures show my test fit after the concrete had been poured. I'm still 20+ days away from the concrete being cured enough to actually affix and use the lifts.
52735409794_880887e9a6_h.jpg
52766235934_7f59b58e0d_h.jpg
52765983726_1732ea716f_h.jpg

Eggciting, eh?
 

vavet

Well-known member
Joined
Mar 6, 2012
Messages
5,321
Location
Ashland, VA
Long time lurker on this thread! I've wanted an in-floor scissor lift forever (and almost pulled the trigger on one for a house in Utah...but then lift happened). I haven't posted anything here yet on my "Gruntled" install, but I'm now at the point where it's interesting...

rGiP2Ke[1].png
I see the word Hanger...but I suspect it should say Hangar. Tell us more about that.
 
  • Like
Reactions: tig

Trix88

Member
Joined
Feb 13, 2021
Messages
5
Location
Canadaa
Hello Im in the process of finishing my garage. My electricity is going in next week. I was wondering where the second leg of the 220v plug to. I have 3 wire coming out of the lift. One black one L (one of the 220 leg) blue N (its got a sticker saying its the neutral. One yellow with green line PE (from what I see in the diagram should be a ground. So where do I plug the Red wire ( second leg of the 220)
Sorry English is not my primary language. Thanks for your help guys
P.S my lift is the FM9SL
 

tarmy

Well-known member
Joined
May 28, 2014
Messages
4,670
Location
Nor Cal
Awesome build and documentation.

You FAILED though…the flush mount was supposed to be with the fancy car mat…not the concrete. I kid of course.

Beautiful shop and rides as well OP. I followed this thread from the beginnin.
 
To avoid these ads, REGISTER NOW!

larry4406

Well-known member
Joined
Jan 27, 2006
Messages
19,115
Location
Northern Virginia
I know this is an older thread, but DAMN there are some beautiful installations documented here! Just scrolled thru it all.

What is the current "Go to" scissor lift for in-floor installation today?
 

simonjb

New member
Joined
Feb 4, 2012
Messages
4
I am in the install phase and have a question - Assuming the pits are different depths, say different by 1 inch, how can the lowered height of the two platforms be equalized? My assumption is that the only way is to use the leveling bots or to place shims under one. There isn't a way to have the platforms themselves stop at different points.
 

Attachments

  • IMG_2681.jpg
    IMG_2681.jpg
    142.7 KB · Views: 51

jtbinvalrico

Well-known member
Joined
Jan 2, 2010
Messages
1,375
Location
Tampa FL
Shimming or grouting the floor of the pit is normal and expected - this is often done in heavy industrial settings. The key is to support the load where the weight will go, and that’s not just under the anchor bolts. Consider supporting the area under the roller track as well when you get the platform raised to the height you want. Some guys here know a bit about grouting the area under heavy equipment, and that may be the way to go if you’re an inch out. But placing some 1” bars of steel - maybe 4” wide - on the outer edge of the pit floor would do the trick. To answer your question about equalizing….you want the platforms to rise from an equally closed position. The “adjustment” that can be made only changes the height of one relative to the other; put differently, the “adjustment” at full rise or full close may be good there, but will be off when that platform closes or rises.
 

californiamilleghia

Well-known member
Joined
Apr 11, 2020
Messages
537
Location
SoCal
Which Chinese company has anyone used lately to order one ?

And for the guys that have already ordered and installed , What would you change in your install ?

Thanks
 

tommyccbc

Member
Joined
Nov 5, 2024
Messages
15
Garage project of 2024 almost complete. I am putting the finishing touches on my lift install, which I ordered from China, via Alibaba. I don't really have a breakdown of all the costs, but hiring a customs broker made it pretty easy. There is a great write up early in the forum, just know the prices have increased, not dramatically but a good amount. I spent about a grand on shipping and delivery to my house in Riverside, CA. When I say delivery, I rented a U-Haul and drove to Torrance to pick it up. Lift ran about $1700. I was even able to pcik the color

Audi TTS.jpgAUdi A7.jpgLift.jpgTommys garage sign.jpgHose reel.jpgSeating area.jpgUrinal.jpg
 

larry4406

Well-known member
Joined
Jan 27, 2006
Messages
19,115
Location
Northern Virginia
Garage project of 2024 almost complete. I am putting the finishing touches on my lift install, which I ordered from China, via Alibaba. I don't really have a breakdown of all the costs, but hiring a customs broker made it pretty easy. There is a great write up early in the forum, just know the prices have increased, not dramatically but a good amount. I spent about a grand on shipping and delivery to my house in Riverside, CA. When I say delivery, I rented a U-Haul and drove to Torrance to pick it up. Lift ran about $1700. I was even able to pcik the color

Audi TTS.jpgAUdi A7.jpgLift.jpgTommys garage sign.jpgHose reel.jpgSeating area.jpgUrinal.jpg
WOW!

Welcome to the forum! Home run with your first post!
 

tommyccbc

Member
Joined
Nov 5, 2024
Messages
15
Well good SoCal morning to you all and thank you for the kind words. I have run into a snag. My lift only has one Valve located at the front of the pump unlike the two shown in my owner's manual. Guess how many YouTube videos with in-ground lifts in them have one valve? Zero, Zilch, Nada. I have raised and lowered the lift 5 or 6 times, and the secondary platform doesn't raise at all. The instructions that came with the lift are like reading hieroglyphics and are clearly for a different lift. So that's fun. Before I go unhooking hydraulic lines and dealing with the mess that comes with it, I decided I am going to post the pictures here, because the answer is always in the room. Appreciate any help. TC


Control Box Hoses.pngHydraulic hoses to platform one.pngHoses to the secondary platform.png
 

Attachments

  • Secondary hose to secondary platform.png
    Secondary hose to secondary platform.png
    227.3 KB · Views: 13
  • Cabinet hose to main platform.png
    Cabinet hose to main platform.png
    232.2 KB · Views: 13

vavet

Well-known member
Joined
Mar 6, 2012
Messages
5,321
Location
Ashland, VA
Someone smarter than me will probably come along soon, but maybe it would help if you drew out a simple block diagram of how things are connected now. The pics aren’t doing it for me. Just something that shows the pump, the hoses, and the connections on the cylinders.
 

tommyccbc

Member
Joined
Nov 5, 2024
Messages
15
After posting earlier I swapped the hoses in the control center. The yellow circle is representative of the left side when looking straight at the pump and goes to the "T" The Blue is the right. Only one valve with a hose on each side. I believe this is the leveling ****, simply because there isn't another valve. Now that I have swapped the hoses only the right ramp lifts, before I switched the hoses only the left lifted. First and foremost, I just want to make sure I now have them hooked up correctly. When I swapped the hoses a lot of air came out of the right/blue side. Not the left/yellow side which tells me that the fluid is flowing through the left/yellow side and pushing the air through the right/blue side. I do not have a bleeder on either cylinder.


Lift hydraulic hose schematic.png
 

Attachments

  • Screenshot 2025-03-23 212316.png
    Screenshot 2025-03-23 212316.png
    247 KB · Views: 14
  • Lift control box.jpg
    Lift control box.jpg
    23.3 KB · Views: 20

jtbinvalrico

Well-known member
Joined
Jan 2, 2010
Messages
1,375
Location
Tampa FL
Looks like you should connect hose 1 to the left master cylinder (should be the larger of the two). Open the valve to allow fluid into that cylinder. When it rises to max height, it will then push fluid out of the end of the left master cylinder and into the right slave cylinder through hose 2 and 3, at which point it will rise to the same height as the left master cylinder......When you lower, they both should go down. Raise them again and stop them midway. If they are at different heights, turn that valve and hit the up button to send fluid only to the right slave cylinder until both are level and even, then turn the valve back to send fluid only to the left/master cylinder (this will be your normal operating position). All hose 4 and the other position on that valve do is serve to balance the platforms.
 
Last edited:

tommyccbc

Member
Joined
Nov 5, 2024
Messages
15
Looks like you should connect hose 1 to the left master cylinder (should be the larger of the two). Open the valve to allow fluid into that cylinder. When it rises to max height, it will then push fluid out of the end of the left master cylinder and into the right slave cylinder through hose 2 and 3, at which point it will rise to the same height as the left master cylinder......When you lower, they both should go down. Raise them again and stop them midway. If they are at different heights, turn that valve and hit the up button to send fluid only to the right slave cylinder until both are level and even, then turn the valve back to send fluid only to the left/master cylinder (this will be your normal operating position). All hose 4 and the other position on that valve do is serve to balance the platforms.
Exactly!! I sent an email to the company I bought it from in China yesterday morning and they were kind enough to send a video. I had it hooked up correctly the first time and swapped the hoses back. I ran each side individually to the highest point and bled the line running into the back of the master cylinder. I was thinking of it like a caliper and looking for a bleeder valve to bleed, yeah none of those lol.
 

Brust

Member
Joined
Jan 13, 2006
Messages
13
Location
Virginia USA
Don’t mean to raise a dead thread- anyone bought from alibaba lately? Curious about tariffs as they don’t seem to align with published numbers necessarily. I’ve purchased some classic mini parts from the uK and was hit with 35% even though auto parts were published st the time at 15%. Probably origin of metal etc but sort of annoying.

Anyway, I’m looking at an autoke 3500 or 4k. 1350-1400 plus 1k shipping.


Cyclehead

Well-known member
Joined
Jan 19, 2017
Messages
85
Location
Georgia
Don’t mean to raise a dead thread- anyone bought from alibaba lately? Curious about tariffs as they don’t seem to align with published numbers necessarily. I’ve purchased some classic mini parts from the uK and was hit with 35% even though auto parts were published st the time at 15%. Probably origin of metal etc but sort of annoying.

Anyway, I’m looking at an autoke 3500 or 4k. 1350-1400 plus 1k shipping.

That looks identical to the lift I bought 5 (?) years ago. I love it! I wonder if the seller has accurate info about tariffs. Generally they are very responsive to questions. I think auto translate is making communication easier.
 

Brust

Member
Joined
Jan 13, 2006
Messages
13
Location
Virginia USA
Thanks for the response. They had it “on sale” a few weeks back for under $1k… I asked if they could do that price and the advertised price went from 1350 to 1400. Haha. Uno reverse card on me. I’ll converse with them and see what information they have.
Another question- when folks speak of getting a shipping agent, is that separate from the one from alibaba?
 
To avoid these ads, REGISTER NOW!
Top Bottom