To avoid these ads, REGISTER NOW!

What did you do "IN" your garage today?

CoogarXR

Well-known member
Joined
Jan 11, 2016
Messages
6,843
Location
Ohio
Well, today is the all-important day when posting about my new garage goes from "what did you do in your yard/garden today" to "what did you do IN your garage today"!

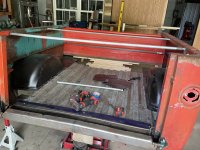
The new garage is finished! Pardon the wet floor, it started raining as they were finishing the roof:
20260516_214555.jpg
20260516_214619.jpg

If you're wondering why there's standing water on the floor when I have a floor drain, I only have the area by the garage doors sloped. The side with the windows is flat, since it will be built as offices and a bathroom.

I just happened to find a brand new 50ft string of temporary construction lights at a thrift store for $7, and that lights the place up just fine until I can get real electric run out there.
 
To avoid these ads, REGISTER NOW!

PhantomEB

Well-known member
Joined
Feb 6, 2006
Messages
6,682
Location
Medicine Hat, AB, Canuckistan
Waiting on Amazon with my new 130amp alternator, that will be my back up down the road when I go 250 amps in the bronco for the lights I plan.

Fingers crossed that I see 14.7 on the Voltmeter!

until then I will fab up another ground strap for the alternator this time. Already got body to frame and frame to block so need an alt to block. Perhaps a block to body too?
 

545_days

Well-known member
Joined
Oct 30, 2016
Messages
574
Location
Texas
Technically outside my garage... I prefer to paint inside, but the ceiling is too low for painting the roof of the Ram 3500, so I painted early this morning before the wind picked up.

The clear coat and paint on the roof and hood was badly broken down, so I sanded it all out and shot 2 coats of 2k epoxy primer. I also shot the finish coat for the silver stripe at the bottom of the driver's door which was a replacement white door. The weather isn't promising, so I'll get the finish coat and clear coat on in a week or two.

I didn't get a good before photo, but here is the hood part way through sanding with 400 grit, before switching to 600 grit.

1000002376.jpg

1000002383.jpg

1000002381.jpg

A couple of bugs landed on the roof, but even NBA players aren't tall enough to see them without getting up on their tip-toes.
 

Beerhippie

Well-known member
Joined
Oct 13, 2023
Messages
9,606
Location
Far NE Oregon
A couple of bugs landed on the roof
The joys of painting en plein air!

Got the lap belt mounted to where the lower attachment for the shoulder belt was:

55276203354_0a9118c608_o.jpg

Then I got back to what I went out to the rig to do yesterday before mission creep took over and I ended up mounting the jump seat:

55275974886_dbf4d7ccf8_o.jpg

Mounting the fire extinguisher.
 
Last edited:

545_days

Well-known member
Joined
Oct 30, 2016
Messages
574
Location
Texas
A good match in front.
1000002385.jpg...but not so good in back.
1000002386.jpg

I guess I'll have wait until after clear coat to know for sure, but for a truck that is not my daily driver I'm calling it good enough.

Edit to add: The rear driver's side door was another Facebook Marketplace replacement after the same altercation with a tree that damaged the driver's door. It was already silver, so I only painted the top black. It was never a 100% perfect match as it probably came from a different model year.
 
Last edited:

Itinerant

Well-known member
Joined
Nov 17, 2013
Messages
1,036
Location
Behind the Zion Curtain
I was mowing the lawn when the personal pace system on my mower abruptly stopped pacing my person. A quick visual inspection found that the traction cable had broken.

IMG_5090.jpeg

I could hear odd belt noises so into the garage to pull the cover and wire up a temporary fix to hold the transmission more or less horizontal so I could finish the job.

IMG_5088.jpeg
 

Attachments

  • IMG_5090.jpeg
    IMG_5090.jpeg
    690 KB · Views: 3

pancholasvegas

Well-known member
Joined
Nov 6, 2017
Messages
248
We burned the midnight oil this weekend getting things moving on the trailer.

Started by mounting the newly fabricated roll pan in place temporarily. This aids in the future assembly of the bed floor.

IMG_4512.jpeg

This piece being aftermarket, the fitment isn’t quite 100%, especially for an application with as many modifications as mine (read: floor has been lowered among everything else.)

I cut two notches and began folding the pan into our decided height, mating to the floor.


IMG_4513.jpeg

This was done gradually, finding a happy meaning between what look right and when it would begin to interfere with the tailgate lines and gaps.

IMG_4517.jpeg

From there, a filler panel that I made on the bead roller was put in between the rollpan and the existing bed floor. This is actually how it is done from the factory, which is nice.

The roll pan and filler piece are plug welded to each other. I coated the insides of these pieces with epoxy primer before this, cleaning the plug weld holes with a modified drill bit to clean off the paint.


IMG_4551.jpeg

I did a fair amount of work off camera working on the sections of the bed that tie together from the corners inward - very invasive so I apologize I didn’t take photos as it’s a lot of busywork.

We’ve an appointment at the frame shop shortly to have the frame built and body set on top, so we’re kicking it in high gear. That means it’s time to finally cut to length. Lasers, fine line tap & fine point sharpies came out.

IMG_4556.jpeg

Cut to length - the flat of the top rail was left for now to play with how we’re affixing the front panel.

IMG_4562.jpeg

Process mirrored on opposite side.

IMG_4561.jpeg

Stepping back and up - the floor is starting to really take shape. There are some filler pieces that will be welded in to hide a few sections and a bit of tidying up. The factory one that I have for reference is shockingly more scabbed together than this. I also know that from taking this one apart the first time.

Please don’t be alarmed at the ugly parts, there’s a lot of trimming and folding yet to do.

IMG_4565.jpeg

With the fuel neck cover clamped up, everything looks really tidy.

IMG_4566.jpeg

Getting close - couple more long sessions and a nice day of weather for primer and we’ll be off to the frame shop.
 

Attachments

  • IMG_4548.jpeg
    IMG_4548.jpeg
    877.7 KB · Views: 4

micromind

Well-known member
Joined
Sep 24, 2023
Messages
2,989
Location
Fernley, Nevada, about 30 miles east of Reno.
We burned the midnight oil this weekend getting things moving on the trailer.

Started by mounting the newly fabricated roll pan in place temporarily. This aids in the future assembly of the bed floor.

IMG_4512.jpeg

This piece being aftermarket, the fitment isn’t quite 100%, especially for an application with as many modifications as mine (read: floor has been lowered among everything else.)

I cut two notches and began folding the pan into our decided height, mating to the floor.


IMG_4513.jpeg

This was done gradually, finding a happy meaning between what look right and when it would begin to interfere with the tailgate lines and gaps.

IMG_4517.jpeg

From there, a filler panel that I made on the bead roller was put in between the rollpan and the existing bed floor. This is actually how it is done from the factory, which is nice.

The roll pan and filler piece are plug welded to each other. I coated the insides of these pieces with epoxy primer before this, cleaning the plug weld holes with a modified drill bit to clean off the paint.


IMG_4551.jpeg

I did a fair amount of work off camera working on the sections of the bed that tie together from the corners inward - very invasive so I apologize I didn’t take photos as it’s a lot of busywork.

We’ve an appointment at the frame shop shortly to have the frame built and body set on top, so we’re kicking it in high gear. That means it’s time to finally cut to length. Lasers, fine line tap & fine point sharpies came out.

IMG_4556.jpeg

Cut to length - the flat of the top rail was left for now to play with how we’re affixing the front panel.

IMG_4562.jpeg

Process mirrored on opposite side.

IMG_4561.jpeg

Stepping back and up - the floor is starting to really take shape. There are some filler pieces that will be welded in to hide a few sections and a bit of tidying up. The factory one that I have for reference is shockingly more scabbed together than this. I also know that from taking this one apart the first time.

Please don’t be alarmed at the ugly parts, there’s a lot of trimming and folding yet to do.

IMG_4565.jpeg

With the fuel neck cover clamped up, everything looks really tidy.

IMG_4566.jpeg

Getting close - couple more long sessions and a nice day of weather for primer and we’ll be off to the frame shop.

That's coming along quite nicely!
 

Beerhippie

Well-known member
Joined
Oct 13, 2023
Messages
9,606
Location
Far NE Oregon
Fabricated one of two new mounts for the rear jump seat in the Brick:

55275758522_cb1146cd55_o.jpg

Comparing the hardware store mock-up with the real mount. I spent too much money on those L-brackets, but they really were essential to making the permanent mounts. I made the two halves, drilled them and then bolted one to the seat mount bar. I then slid the other piece into place, measured and checked the bar for level, then clamped the two pieces together. A few minutes with Mr. Sparky and I think it'll be strong enough.

55276805918_08a96e9fa1_o.jpg

I hope so.

As the sheet metal is a bit flimsy where this mounts, I made a backer plate to go on the back side:

55277073780_75e5331597_o.jpg

That should help.

Temporarily mounted using the same 5/16" sheet metal screw:

55277073785_ba1b394fe2_o.jpg

I'll finish drilling it and bolt it in place tomorrow when I have a second set of hands around. Then I can fab the other end....
 
To avoid these ads, REGISTER NOW!

BlakeTheCarGuy

ALLIANCE MEMBER
Joined
Oct 10, 2018
Messages
9,297
Location
Roanoke Virginia
Yesterday done the regular yearly maintenance on the riding mower. I’m pretty sure I had never changed the fuel filter before but I did yesterday so it’s brand new. I decided to skip the John Deere branded fuel filter and oil filter because they are so expensive. The oil filter costed me $3.99 at work so I’m going to stick with that one if it works. The air filter I would have gotten a different brand of too but they were out of everything except the John Deere brand so I just got that to be able to do it all at once.
IMG_4928.jpegIMG_4930.jpegIMG_4931.jpegIMG_4932.jpegIMG_4940.jpeg
 

mikegt4

Well-known member
Joined
Sep 12, 2005
Messages
3,262
Location
sw ohio
Looked at my trusty 1999 Ford Ranger sitting in front of the garage. Friday she let me down, one of her exceedingly rare moments. At 285k miles (owned since new) the original fuel pump failed. She is a long bed so the fuel tank is long and wouldn't you know it, near full. I am considering removing the bed, replacing the pump and put some paint on the frame while I have access.
 

Jgaz

Well-known member
Joined
Dec 16, 2016
Messages
1,628
Location
AZ
Looked at my trusty 1999 Ford Ranger sitting in front of the garage. Friday she let me down, one of her exceedingly rare moments. At 285k miles (owned since new) the original fuel pump failed. She is a long bed so the fuel tank is long and wouldn't you know it, near full. I am considering removing the bed, replacing the pump and put some paint on the frame while I have access.
If it’s anything like my 94 Dakota it’s way easier to pull the bed.
 

Outlawmws

Well-known member
Joined
Aug 9, 2011
Messages
39,080
Location
The Badlands
Chunk it out. Lots of little pieces are much easier to deal with. If in doubt, call a pro. Dropping stuff on the house is NOT an option.

That's what I have been doing. most of the branches I lopped off as far as I could, and then the next 6-8 feet weren't hard. I think I figured out I can actually cut from the street side for this big one
 

DGersic

Well-known member
Joined
Mar 12, 2017
Messages
6,257
Location
DeKalb, IL
Took my new table saw out to make sawdust. Holy sh_t, I should have bought this years ago. So much nicer than my old one.

First, cut up some scraps to make a small shelf. This will hold my new Bluetooth speaker that’s replacing my old garage radio.

IMG_9347.jpeg

Felt a bit lazy, decided not to get out the mitre saw for a couple of little cross cuts. It’s not a fine piece of furniture. Long piece was flopping around, so I made a support out of some more scraps.

IMG_9348.jpeg

Kinda surprised that they didn’t make a way for the rip fence to act as a support this way. I know it can be used with the flip over part, but I needed the vertical out of the way so that wouldn’t work. Oh, well, I need to build that nice little outfeed table too. And a new crosscut sled.

Not shown, I ripped a scrap 2x3 to an actual 1”x1“ to see how I like the size and shape for my lamp project. Had some more thoughts and ideas on that one. Will get back to that later.

Got some primer on my shelf.

IMG_9350.jpeg

And finally got my WorkMate hung on the hooks I made last week. It’s off the floor and out of the way now.

IMG_9349.jpeg
 

lowbucktruck

Well-known member
Joined
Aug 9, 2010
Messages
1,323
Location
Foothills, Northern California
I spent most of my time today pulling things out of my garage to do outdoor activities. But I did drag out and service my pressure washer... and put it to work washing down the wife's car. And then I looked at my truck and thought, what the hell. After pressure-washing the Silerado, I found my truck was not grey, but white! Who knew...
 

Attachments

  • IMG_6808.jpg
    IMG_6808.jpg
    121.7 KB · Views: 17
  • Silverado_IMG_6805.jpg
    Silverado_IMG_6805.jpg
    94.4 KB · Views: 19

SMOKEYBEAR

Well-known member
Joined
Jan 3, 2016
Messages
447
Made some time to make some progress on the boat trailer fenders. Removed the rubber step pads completely, I may replace them with a Sea Deck type material called Dura- Deck. I gotta call them today to see if they make a set for my my boat and trailer combo. 3 rounds of adhesive remover, scraping and power washing. A plastic automotive trim removal tool found a new life as the scraper. A final wash and scrub with dish soap.

Found a young man on youtube doing his bass boat carpet, used his recommendation for adhesive remover, worked pretty damn good.


Ready for carpet, trim and new fasteners.
 

Attachments

  • BTF15.jpg
    BTF15.jpg
    207.5 KB · Views: 16
  • BTF14.jpg
    BTF14.jpg
    199.2 KB · Views: 13
  • BTF13.jpg
    BTF13.jpg
    208.9 KB · Views: 12
  • BTF16.jpg
    BTF16.jpg
    200.9 KB · Views: 14

PhantomEB

Well-known member
Joined
Feb 6, 2006
Messages
6,682
Location
Medicine Hat, AB, Canuckistan
its what’s known as May Long up here in Canada, traditionally it’s the start of Camping season for a lot.

for me and my buddies it’s a weekend we avoid out in the backcountry OHV we been going to for decades. Too many idiots out there that oh I got the pass…..I can do whatever I want. Live trees cut down, TP strewn about, drunken rambunctiousness ( I admit we ain’t saints but we ain’t gonna party til someone complains etc.). The folks that show up in brand new trucks and a SxS in tow…..those my favorite. most likely living on CC.

yes we got trucks on 35s+, all into truck campers (my brother still has his toyhauler but prefers the slide in camper) and for the most part everyone owns outright what they bring out.

today is clean house, yard and shop of all garbage, cardboard and the like for garbage day and back on the bronco today, saw 14.4 on the voltmeter yesterday so left it on the maintainer over night but may need to put the trickle charger on and really give the charging system a chance.

reworking a track bar up front for better packaging and no bumpsteer today. ***** I got to pull a coil out first.

I should also change Michelle’s oil and check the brake pads while tires being rotated. I think when she takes a week off we should put those new tires on the aluminum rims and just keep the black steelies for the time being.
 

Fordguy1964

Well-known member
Joined
Mar 3, 2015
Messages
3,915
Location
Houston County, Alabama
So over the weekend I did a thing. I know it doesn't look like much but for those with a good eye... it is a real one! Short of a Thunderbolt this is the holy grail of 64 Fairlanes. Only one above this one is a Sports Coupe. While the Sports Coupe is more desirable this one is more rare.

All of the hard to find engine parts are there except for the correct radiator. I am on the lookout for that. Fairly solid body despite how it looks. Every bad part on it I have sitting on my shelves.

Goal is to get it running so it moves under its own power, maybe take it to the Fairlane Nationals at the end of next month. Then it goes to the front of the garage for storage and it's back on the wagon project. It will be fill in work while the wagon waits for parts or I am contemplating the wagon build. I got it for a steal so anything I do to it will just increase the value.


31673.jpg
31650.jpg
 

Hooked

Well-known member
Joined
Sep 24, 2010
Messages
421
Location
League City, Texas
its what’s known as May Long up here in Canada, traditionally it’s the start of Camping season for a lot.

for me and my buddies it’s a weekend we avoid out in the backcountry OHV we been going to for decades. Too many idiots out there that oh I got the pass…..I can do whatever I want. Live trees cut down, TP strewn about, drunken rambunctiousness ( I admit we ain’t saints but we ain’t gonna party til someone complains etc.). The folks that show up in brand new trucks and a SxS in tow…..those my favorite. most likely living on CC.

yes we got trucks on 35s+, all into truck campers (my brother still has his toyhauler but prefers the slide in camper) and for the most part everyone owns outright what they bring out.

today is clean house, yard and shop of all garbage, cardboard and the like for garbage day and back on the bronco today, saw 14.4 on the voltmeter yesterday so left it on the maintainer over night but may need to put the trickle charger on and really give the charging system a chance.

reworking a track bar up front for better packaging and no bumpsteer today. ***** I got to pull a coil out first.

I should also change Michelle’s oil and check the brake pads while tires being rotated. I think when she takes a week off we should put those new tires on the aluminum rims and just keep the black steelies for the time being.
This sounds like holiday weekends on the water around here. We try to avoid at all costs but it we happen out it's very early in the morning and come home late in the evening to avoid the idiots.
 

Outlawmws

Well-known member
Joined
Aug 9, 2011
Messages
39,080
Location
The Badlands
Chunk it out. Lots of little pieces are much easier to deal with. If in doubt, call a pro. Dropping stuff on the house is NOT an option.

So here is where I left he maple late yesterday. Too windy for going further. I'm pretty sure I can give it 2 lops from this fence side thanks to the pole saw. then all that I have to do is lop the stump branches which won't be bad. I've dropped everything else with no damage and plan to keep it that way, but it I don't rig it a bit the branch will hit the house its just headed that way...

the last bit wit be sectioning out the trunk and I'll have to get one of the bigger chain saws out and sharpened for that but no real danger of it falling on parked cars or pedestrians like the branches were.

Maple remnant.jpg

I mentioned the wind, and taking a page from Timm's wind mess last week - it was gusting well above 20 all night and even yesterday (still is pretty windy today, its normally calm in the AM - and I guess we are getting this from the central valley as the temps are above 70 ready, headed for 80's fast...), and the poplars and even the oaks are shedding branchlets. I took this last night and this AM filled a large wastebasket packed tight and carried an arm load of larger stuff and that was just from the street/sidewalk.

Wind & poplars.jpg
 
To avoid these ads, REGISTER NOW!
Top Bottom