To avoid these ads, REGISTER NOW!

Hoping for some guidance with building [wall] science in a metal pole barn, zone 2 Florida. Currently in analysis paralysis. Stuck.

jabeel00

Active member
Joined
Oct 18, 2023
Messages
28
Location
Florida
I've spent too much time in too many rabbit holes and now am in a state of analysis paralysis. Stuck. Hoping to get some guidance so that I can move forward with the project. Need some clarification on the building [wall] science of weather barriers/vapor barriers/insulation in a wood-post, metal-siding [Galvalume] pole barn in Zone 2, Florida.

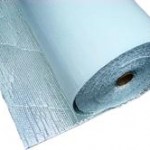
Specifically how to retrofit an existing pole barn with some type of barrier (weather barrier, actual vapor barrier, permeable barrier, etc.), before framing goes up around the exterior walls, to prevent condensation? What type of barrier should be used and how/where does it go?

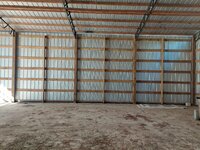
Trying to build a somewhat conditioned space (dehumidified when vacant and/or heated/cooled when occupied) in an existing wooden pole barn with corrugated metal siding roof and walls. We will be putting up 2x6x12 walls in between the existing 6x6x14 posts (and some 2x6x14 posts). While I haven't figured out the insulation details yet, I planned on insulating the walls somehow later down the road (but need to get them up first, and don't want to worry about what's behind them).

Also, adding to my confusion... Since there is only corrugated metal siding on the exterior (no sheathing, no wrap, no insulation), if we just put 2x6 framing up you would see the corrugated metal and girts behind the unfinished wall. It would essentially be a wall with no back. So, I figured to put a layer of 1/2" OSB on the back of the framing first- before the 2x6 framing go up/in. Does it make sense to do that?

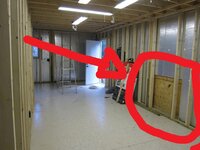
Which leads me to more questions. Should the barrier be attached to [wrapped over] and covering the existing posts and girts (and then put up the framing)? Or should I be attaching the barrier to the back of the OSB on the framing before it goes up? Am I trying to wrap/protect the OSB or the metal siding? Will any of this even work, with all the valleys in corrugated metal? SO many questions.

I just moved to a verrry small town and it's looking like I will need to be the one knowledgeable enough to instruct the contractor on how it should be done. A scary thought.

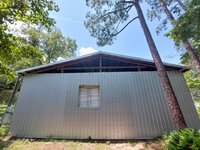
Oh goodness. Hoping someone can please help me make sense of it and prevent me from making any stupid mistakes. Hoping someone can dumb it down for me a bit. I need to move on to the next steps but do not want to worry about what is behind the walls. Attached photos of the existing setup for your reference. Many thanks in advance! Best and blessings.
 

Attachments

  • 20251104_152628.jpg
    20251104_152628.jpg
    745.3 KB · Views: 54
  • 20251104_152142.jpg
    20251104_152142.jpg
    906.2 KB · Views: 44
  • 20251104_152057.jpg
    20251104_152057.jpg
    793.4 KB · Views: 43
  • 20251104_151437.jpg
    20251104_151437.jpg
    1.1 MB · Views: 41
To avoid these ads, REGISTER NOW!

theoldwizard1

Well-known member
Joined
Feb 22, 2011
Messages
43,585
Location
SE MI
Best insulation and vapor barrier is spray foam directly onto the inside of all of the metal. Make sure the also get all of the joints and places where the wood touches metal.
 

mytimeyet

Well-known member
Joined
Apr 27, 2010
Messages
128
Location
Micanopy, FL
Fellow Floridian here. It sounds like you will have someone else doing the work. Ask if they may have done something similar before so see what they think?
I did something similar myself in a 30x40 that looks very much like your barn where I made a 10x30 conditioned space. Right way/wrong way, I don't know. It has been 10yrs with no issues so far. Cool/warm (depending on season) and dry always.
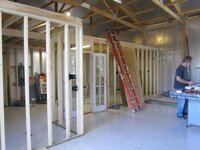
I obtained some surplus 1" polyiso that I attached to the girts between the posts leaving the space behind to 'breathe', figuring the corrugations will be fine for vapor passage up and down the wall. Inside that between the posts I framed out the 'wall' with 8' 2x4 with top and bottom plates up flush with the posts. Filled that space between the 2x4s with Kraft backed fiberglass followed by drywall. The 'free standing' wall much the same except 2x6 with 1/2"plywood 'outside' (in the shop) sheathing. 2x6 for the 'ceiling' as well. The 8' tall room also left me with a bonus 'loft' with 1/2" plywood 'floor'. Continued the fiberglass/drywall in all the inside walls and ceiling. Ran electrical/lighting while it was just a 'skeleton'.
At the time spray foam was too much $ up front so what I did was bit by bit as deals came up.
Good Luck!
 

dcg9381

Well-known member
Joined
Jun 20, 2018
Messages
12,039
Location
Austin, TX
Best insulation and vapor barrier is spray foam directly onto the inside of all of the metal. Make sure the also get all of the joints and places where the wood touches metal.
That'd be my answer too, but if you look at how this is designed, it appears to be "open vented" - unless they are enclosing with soffit. Foam won't span that. You could modify it...

1762458314652.png


Will any of this even work, with all the valleys in corrugated metal?
So that metal is called R-panel and you can get an "r-panel" foam) that is designed to fit in those "V" gaps. Just be aware it exists. It can solve for some of this.

1762458516526.png

I'm not sure how to solve for this exactly with those gaps between the roof deck and the vertical walls, if you shore that up (steel building / pole barn guys can help) then you CAN hit this with spray foam and you've got an envelope to air condition as well as a vapor barrier.

The issue with building a building inside a building is the air gap, that metal may be a different temperature on the inside than your "new wall" and it's going to condense if moisture is present. Can you build moisture barrier inside this structure? IE a structure inside a structure? Maybe...

To do it properly, you have to install a moisture barrier between the inside of that R-panel and any new insulation. IE - on the "warm/cold" interior side to prevent air from reaching R-panel that is colder than ambient. It's going to be hard to do with a pole bar that is already erected in a manner that allows for the seams, edges, etc to form a barrier.

If you're mainly cooling, it may be less of an issue because HVAC removes moisture. Here's an indication that you can retrofit it:
 
OP
J

jabeel00

Active member
Joined
Oct 18, 2023
Messages
28
Location
Florida
Best insulation and vapor barrier is spray foam directly onto the inside of all of the metal. Make sure the also get all of the joints and places where the wood touches metal.
Thank you for this info. I considered this (spray foam) early on but initially the quote I got scared me away (although this was over a year ago, from what I've heard it might be more affordable now). And if the quote didn't scare me enough, when I started to research it more [insert rabbit-hole here], the horror stories I read definitely made me second-guess it. Granted they could all be from inexperienced applicators, unfavorable conditions, etc., but still a cause for concern nonetheless.

My other concern, aside from being horribly dirty/dusty/webby/etc., was that my metal siding is Galvalume, with the large zinc/aluminum flakes all over the surface. From what little I researched [insert rabbit-hole here] they are talking about needing to prep/priming it first, or using a separation layer/barrier.
 
OP
J

jabeel00

Active member
Joined
Oct 18, 2023
Messages
28
Location
Florida
Fellow Floridian here. It sounds like you will have someone else doing the work. Ask if they may have done something similar before so see what they think?
I did something similar myself in a 30x40 that looks very much like your barn where I made a 10x30 conditioned space. Right way/wrong way, I don't know. It has been 10yrs with no issues so far. Cool/warm (depending on season) and dry always.
I obtained some surplus 1" polyiso that I attached to the girts between the posts leaving the space behind to 'breathe', figuring the corrugations will be fine for vapor passage up and down the wall. Inside that between the posts I framed out the 'wall' with 8' 2x4 with top and bottom plates up flush with the posts. Filled that space between the 2x4s with Kraft backed fiberglass followed by drywall. The 'free standing' wall much the same except 2x6 with 1/2"plywood 'outside' (in the shop) sheathing. 2x6 for the 'ceiling' as well. The 8' tall room also left me with a bonus 'loft' with 1/2" plywood 'floor'. Continued the fiberglass/drywall in all the inside walls and ceiling. Ran electrical/lighting while it was just a 'skeleton'.
At the time spray foam was too much $ up front so what I did was bit by bit as deals came up.
Good Luck!
Howdy, neighbor. Thanks for this info. I am trying to have some of it done by someone else (framing, plumbing, etc). I am convinced I have scared away all the local help with my technical questions, though. Part of the reason I am on here, trying to do my due diligence so that I can be certain it is being done properly by the framer.

Wow, this sounds VERY similar to my situation and a LOT like one of my thought processes, even down to hoping the corrugations would allow for vapor to escape. I drove past all my local big box stores (who only had 1") to get a single piece of 1.5" foam board and test fit it. In hind-site, I was trying to fill the space behind the girt which would make application more difficult, 1" makes more sense for the air space. In any event, the Home Depot guy ended up not being about to cut it without destroying the facing and it peeling off. I had to look closer in the photos, but it looks like it was the Insulfoam brand R-tech board. Maybe other brands/types keep the facing on better (?) if it's necessary/beneficial, but I'd hate to go buy a bunch only to have all the facing coming off when cut. Did your surplus polyiso have any facing or did it look like a styrofoam cooler?

Do you happen to have any photos of your process/progess? How did you attached the boards to the girts? Did you foam around them and/or tape after? So, if I follow you correctly (trying to picture it), when you "Filled that space between the 2x4s with Kraft backed fiberglass" was the kraft backed fiberglass directly up against the flush surface of girts & polyiso boards?

Thank you!
 

Attachments

  • 20251104_151437b.jpg
    20251104_151437b.jpg
    318.8 KB · Views: 29

Youngandfree

Well-known member
Joined
Dec 29, 2020
Messages
877
Location
VA
Most detached garages built in SE MI during the 50s - 70s had NO interior sheeting.
Most weren't built as a pole barn with existing sheet metal siding either. He said he's going to frame a wall with no sheeting and is considering sheeting thw side facing the existing siding and leave the inside showing studs. Far different than what you describe.
 
OP
J

jabeel00

Active member
Joined
Oct 18, 2023
Messages
28
Location
Florida
That'd be my answer too, but if you look at how this is designed, it appears to be "open vented" - unless they are enclosing with soffit. Foam won't span that. You could modify it...

1762458314652.png


So that metal is called R-panel and you can get an "r-panel" foam) that is designed to fit in those "V" gaps. Just be aware it exists. It can solve for some of this.

1762458516526.png

I'm not sure how to solve for this exactly with those gaps between the roof deck and the vertical walls, if you shore that up (steel building / pole barn guys can help) then you CAN hit this with spray foam and you've got an envelope to air condition as well as a vapor barrier.

The issue with building a building inside a building is the air gap, that metal may be a different temperature on the inside than your "new wall" and it's going to condense if moisture is present. Can you build moisture barrier inside this structure? IE a structure inside a structure? Maybe...

To do it properly, you have to install a moisture barrier between the inside of that R-panel and any new insulation. IE - on the "warm/cold" interior side to prevent air from reaching R-panel that is colder than ambient. It's going to be hard to do with a pole bar that is already erected in a manner that allows for the seams, edges, etc to form a barrier.

If you're mainly cooling, it may be less of an issue because HVAC removes moisture. Here's an indication that you can retrofit it:
Thank you for this info. The R panel foam, the barrier info, and the link are all helpful.

I was a bit hesitant to go with spray foam (cost and complications that I read of, mentioned in my reply to Theoldwizard1) but someone told me it might be considerably cheaper now than a year+ ago when I was quoted. Although that doesn't prevent the complications.

For conversation sake though, I am building 12 foot walls in the 14 foot pole barn. So that "open vented" portion might not matter as far as closing it up, as the interior building will be shorter than the pole barn walls.

Ok, so, would the order (starting from the outside, going in) be:
Metal R panel siding > the inevitable girts that the metal is attached to already (optionally with foam board filled in (as Mytimeyet described) > some sort of moisture barrier (I still need to clarify which type, vapor proof/vapor permiable/house wrap,etc.) > optional 1/2" OSB sheathing, attached to outside of > the 2x6 framing/wall going up > whatever type of insualtion > Drywall or other interior closure?

This seems to be the part that gets me every time, with the mention of "warm/cold" side- which my mind cannot compute for whatever reason :)

Many thanks!
 
OP
J

jabeel00

Active member
Joined
Oct 18, 2023
Messages
28
Location
Florida
Why would you frame a wall and not put some sheeting to the inside?
I did not intend to leave the inside open/showing studs forever. I am essentially trying to get the place dried-in asap, so that I can throw a dehumidifier in there and move my stuff from another warehouse there (a task long overdue). I figured I can always figure out the inside sheeting later, after running wires/outlets, plumbing, figuring out insulation, etc.

After becoming overwhelmed with the project as a whole (juggling a lot of things at once), I am trying to focus on what needs to be done (behind the walls) in order to get the walls up properly, since I cannot revisit that part later. I think I will have more options/an easier time with the ceiling, since it will not be a retrofit experience like the walls. Crossing my fingers anyways.
 
To avoid these ads, REGISTER NOW!

Stuart in MN

Well-known member
Joined
Sep 8, 2005
Messages
23,401
Location
Minneapolis
Are you looking to enclose/condition the entire pole shed, or just a portion of it? If it will be a partial area, maybe just build the whole thing inside the building, separate from the outside wall. You could leave just a few inches separation from the metal and then it will ventilate just like it does now.
 

mytimeyet

Well-known member
Joined
Apr 27, 2010
Messages
128
Location
Micanopy, FL
Howdy, neighbor. Thanks for this info. I am trying to have some of it done by someone else (framing, plumbing, etc). I am convinced I have scared away all the local help with my technical questions, though. Part of the reason I am on here, trying to do my due diligence so that I can be certain it is being done properly by the framer.

Wow, this sounds VERY similar to my situation and a LOT like one of my thought processes, even down to hoping the corrugations would allow for vapor to escape. I drove past all my local big box stores (who only had 1") to get a single piece of 1.5" foam board and test fit it. In hind-site, I was trying to fill the space behind the girt which would make application more difficult, 1" makes more sense for the air space. In any event, the Home Depot guy ended up not being about to cut it without destroying the facing and it peeling off. I had to look closer in the photos, but it looks like it was the Insulfoam brand R-tech board. Maybe other brands/types keep the facing on better (?) if it's necessary/beneficial, but I'd hate to go buy a bunch only to have all the facing coming off when cut. Did your surplus polyiso have any facing or did it look like a styrofoam cooler?

Do you happen to have any photos of your process/progess? How did you attached the boards to the girts? Did you foam around them and/or tape after? So, if I follow you correctly (trying to picture it), when you "Filled that space between the 2x4s with Kraft backed fiberglass" was the kraft backed fiberglass directly up against the flush surface of girts & polyiso boards?

Thank you!
This was back in 2010, so I had to do a little hunting. Here is a picture of the inside as I was putting the floor paint down. You can see the foiled iso-board attached to the girts. I used drywall screws with roofing disks to attach directly to the girts. All the way to the top and along the roof as well. I will keep hunting for other pictures of the interior build.
 

Attachments

  • IMG_5462_1080.jpg
    IMG_5462_1080.jpg
    123.9 KB · Views: 36

mytimeyet

Well-known member
Joined
Apr 27, 2010
Messages
128
Location
Micanopy, FL
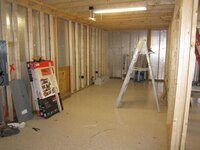
Found some more pictures of the framing that happened a year later. From these pictures the 'outside' was skinned in 1/2" ply (except against the barn wall), the Kraft backed fiber with the paper facing 'in' then covered 'inside' with drywall.
 

Attachments

  • IMG_6698_1080.jpg
    IMG_6698_1080.jpg
    115.3 KB · Views: 31
  • IMG_6699_1080.jpg
    IMG_6699_1080.jpg
    124.4 KB · Views: 30
  • IMG_6700_1080.jpg
    IMG_6700_1080.jpg
    116.3 KB · Views: 26
  • IMG_6718_1080.jpg
    IMG_6718_1080.jpg
    117.1 KB · Views: 33

spsullivan82

Member
Joined
Nov 12, 2025
Messages
20
I'm in Citrus County but also have a place in Dixie County. So my experience here is based on central ish Florida. But I would first back up half a step and get the total finished design figured out. You need to account for flooding, wind, crazy humidity, bugs etc. It would be a huge pain in the neck to get this rushed in and then figure out it was all for not because your finished plan was different.

Next I would differentiate been sealing anything vs venting it. My place in Dixie is all about venting. It's going to flood in the area almost every year. So making the structure able to vent and dry out makes more sense to me than trying seal out mother nature.... who always wins. My place in Citrus won't flood unless done kind of biblical flood happens. So everything gets sealed off like a traditional structure.
 
OP
J

jabeel00

Active member
Joined
Oct 18, 2023
Messages
28
Location
Florida
This was back in 2010, so I had to do a little hunting. Here is a picture of the inside as I was putting the floor paint down. You can see the foiled iso-board attached to the girts. I used drywall screws with roofing disks to attach directly to the girts. All the way to the top and along the roof as well. I will keep hunting for other pictures of the interior build.
Oooohh, I see. Thanks for finding the photos. I was imagining something a bit different (photo attached, yellow lines for reference)- cutting and putting the foam boards behind the girts behind the posts (in between the metal siding and girts). Which I why I was wondering how you attached the boards to the girts.

Are the boards foil on both sides or white on the other (the white facing is what I was having issues peeling/falling off the board when cut)?

I guess this is taking up 1" from your 2x6 wall cavity. In your instance it doesn't seem to matter (as you are using 2x4 framing). I was planning to use 2x6 framing, so anything I put over the girts would push the framing out a bit past the 6" posts. Probably not a big deal.
 

Attachments

  • 20251104_152628 - Copy.png
    20251104_152628 - Copy.png
    5.3 MB · Views: 26
OP
J

jabeel00

Active member
Joined
Oct 18, 2023
Messages
28
Location
Florida
Found some more pictures of the framing that happened a year later. From these pictures the 'outside' was skinned in 1/2" ply (except against the barn wall), the Kraft backed fiber with the paper facing 'in' then covered 'inside' with drywall.
Thank you for digging through the crates for more photos. I was following you but, am now wondering (just noticed something in the photos), is there wood sheeting behind the girts in your place?
 

Attachments

  • IMG_6718_1080.jpg
    IMG_6718_1080.jpg
    181.9 KB · Views: 23
  • IMG_5462_1080.jpg
    IMG_5462_1080.jpg
    209.6 KB · Views: 24
OP
J

jabeel00

Active member
Joined
Oct 18, 2023
Messages
28
Location
Florida
Are you looking to enclose/condition the entire pole shed, or just a portion of it? If it will be a partial area, maybe just build the whole thing inside the building, separate from the outside wall. You could leave just a few inches separation from the metal and then it will ventilate just like it does now.
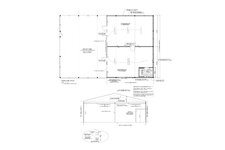
The back half(ish), plans attached. Oof, while that's not a bad idea at all, I am not quite sure how that would go.. with the existing setup. There is currently a vent in the back wall (that will end up being replaced with a window), as well as a bit of plumbing we will be tying into (although it also needs to be cut up and replaced, as the former owner did not allow enough room [rough in or elbow room] for walls/framing). Also wonder if the engineering stats will change with it not tied into all the 6x6 posts.
 

Attachments

  • 20251104_151242.jpg
    20251104_151242.jpg
    583.3 KB · Views: 19
  • 20251012_180854.jpg
    20251012_180854.jpg
    809.6 KB · Views: 17
  • 20251012_180726.jpg
    20251012_180726.jpg
    1 MB · Views: 18
  • Screenshot_20250326_173825_Gallery.jpg
    Screenshot_20250326_173825_Gallery.jpg
    745.5 KB · Views: 20
  • 20230801_133511.jpg
    20230801_133511.jpg
    1.1 MB · Views: 19
  • Screenshot_20230519_222413_Redfin.jpg
    Screenshot_20230519_222413_Redfin.jpg
    897.9 KB · Views: 21
Last edited:
OP
J

jabeel00

Active member
Joined
Oct 18, 2023
Messages
28
Location
Florida
I'm in Citrus County but also have a place in Dixie County. So my experience here is based on central ish Florida. But I would first back up half a step and get the total finished design figured out. You need to account for flooding, wind, crazy humidity, bugs etc. It would be a huge pain in the neck to get this rushed in and then figure out it was all for not because your finished plan was different.

Next I would differentiate been sealing anything vs venting it. My place in Dixie is all about venting. It's going to flood in the area almost every year. So making the structure able to vent and dry out makes more sense to me than trying seal out mother nature.... who always wins. My place in Citrus won't flood unless done kind of biblical flood happens. So everything gets sealed off like a traditional structure.
Thank you for this info. I hear ya, and good advice. Unfortauntely I have been in the "one step forward, two steps back" phase for over a year. Yikes! Here are the plans [attached] of what I thought was supposed to be a "simple" project. [Deep breath]. Now if only I could figure out the wall layers details.
 

Attachments

  • 250049 (Review #2) Jabeel- barn build out - Copy edited (2).jpg
    250049 (Review #2) Jabeel- barn build out - Copy edited (2).jpg
    174.8 KB · Views: 25

mytimeyet

Well-known member
Joined
Apr 27, 2010
Messages
128
Location
Micanopy, FL
Thank you for digging through the crates for more photos. I was following you but, am now wondering (just noticed something in the photos), is there wood sheeting behind the girts in your place?
Here is a picture from just after the floor was poured. The builder put in a 1 sheet wide 'wainscot' all around the bottom. Its just attached to the lower girts. The iso-board is just attached to the girts the same way and ends up flush with the inside of the posts. So the wainscot and iso are just cut to fit between the posts. The iso is just attached to the wainscot directly where present. So basically there is a 1 1/2" air gap behind the iso (where the girts are) on most of the wall. The surplus iso came in 10'x2' pieces and cut very nicely with a just a hand saw, just made a bit of 'snew' dust. After the supplier for the surplus iso ran dry I switched to the Lowes 3/4" sheets. Still a ways to go to finish the entire barn. The 'hole' in the iso you highlighted is where a package AC unit that became available will come through a bit later in the build.
 

Attachments

  • IMG_4705_1080.jpg
    IMG_4705_1080.jpg
    93.2 KB · Views: 28

readhead

Well-known member
Joined
Dec 8, 2012
Messages
6,201
Location
Durango, Co.
I was in the metal building business for almost twenty five years and have a few thoughts regarding your situation. First, I would warn you away from spray foam. I and many other builders and suppliers will void warranties if foam is installed. I would recommend rigid foam sheets.
From what I can see in the photos you do not have R panel siding. R panel has 1 1/4” tall ribs on 12” centers. You appear to have a panel that is very common and has 3/4” ribs on 9” centers. This is important if you are purchasing closures or other accessories.
Best of luck with your project.
 

cpakalolo

Well-known member
Joined
Mar 30, 2026
Messages
120
I've spent too much time in too many rabbit holes and now am in a state of analysis paralysis. Stuck. Hoping to get some guidance so that I can move forward with the project. Need some clarification on the building [wall] science of weather barriers/vapor barriers/insulation in a wood-post, metal-siding [Galvalume] pole barn in Zone 2, Florida.

Specifically how to retrofit an existing pole barn with some type of barrier (weather barrier, actual vapor barrier, permeable barrier, etc.), before framing goes up around the exterior walls, to prevent condensation? What type of barrier should be used and how/where does it go?

Trying to build a somewhat conditioned space (dehumidified when vacant and/or heated/cooled when occupied) in an existing wooden pole barn with corrugated metal siding roof and walls. We will be putting up 2x6x12 walls in between the existing 6x6x14 posts (and some 2x6x14 posts). While I haven't figured out the insulation details yet, I planned on insulating the walls somehow later down the road (but need to get them up first, and don't want to worry about what's behind them).

Also, adding to my confusion... Since there is only corrugated metal siding on the exterior (no sheathing, no wrap, no insulation), if we just put 2x6 framing up you would see the corrugated metal and girts behind the unfinished wall. It would essentially be a wall with no back. So, I figured to put a layer of 1/2" OSB on the back of the framing first- before the 2x6 framing go up/in. Does it make sense to do that?

Which leads me to more questions. Should the barrier be attached to [wrapped over] and covering the existing posts and girts (and then put up the framing)? Or should I be attaching the barrier to the back of the OSB on the framing before it goes up? Am I trying to wrap/protect the OSB or the metal siding? Will any of this even work, with all the valleys in corrugated metal? SO many questions.

I just moved to a verrry small town and it's looking like I will need to be the one knowledgeable enough to instruct the contractor on how it should be done. A scary thought.

Oh goodness. Hoping someone can please help me make sense of it and prevent me from making any stupid mistakes. Hoping someone can dumb it down for me a bit. I need to move on to the next steps but do not want to worry about what is behind the walls. Attached photos of the existing setup for your reference. Many thanks in advance! Best and blessings.
The outer wall does not need a vapor barrier. The vapor barrier is between the warm moist air and the cold metal sheathing. Insulate with whatever you like and use a continuous vapor barrier on the inside. Some think that there should be a house wrap. No, not needed with a metal exterior. If moisture does get in there in the winter, it will just go on past through the small gaps between the metal. Yes, your vapor barrier needs to cover the posts. Use caulk and foam and definitely use Zipwall tape to get it all sealed up on the inside. But if you are going to build a wall, it is actually much better if you put foam board on the wall and then cover it up with the wall studs, additional insulation and all. This is the absolute best way to finish out a basement tool If you can make a barrier with foam board, you will not need a vapor barrier in addition if you tape the seams like we should. In colder areas, a R value of 4.5 to 6 or so in your foam board will let you use any insulation method over it because the moisture will not be able to actually get to the cold surface to condense. In Florida, you guys don't have to worry about cold exterior walls so much anyway. Sometimes, down there, a building has the opposite problem with the moisture sticking to the inner surface because it is colder. Don't over analyse the situation. If we make it too complicated, we won't get it done.
 
To avoid these ads, REGISTER NOW!
Top Bottom