

You are using an out of date browser. It may not display this or other websites correctly.
You should upgrade or use an alternative browser.
You should upgrade or use an alternative browser.
What did you do "IN" your garage today?
- Thread starter mayhemman
- Start date

afinepoint
Well-known member
- Joined
- Jul 16, 2024
- Messages
- 198
Fixed - for now a loud hedge trimmer. Was using and ran into a branch it couldn't cut. Trimmer began making loud rattling sound like gears gnashing. Disassembled, inspected greased and reassembled. Noise gone. Again for now. I think the teeth "bars" might have become misaligned in the housing when it got jammed. I had to lift the assembly up out of the housing to inspect so of course it was misaligned by then.
Ever fix an (noise) issue on an infrequently used tool and then be unable to remember exactly what it sounded like the last time you used it?
Ever fix an (noise) issue on an infrequently used tool and then be unable to remember exactly what it sounded like the last time you used it?
nadogail
Well-known member
Stapled a liner into an Elevated Raised Bed Planter Box
niget2002
Well-known member
I was going to put it in the AI thread, but no one in there would have understood it eitherThis belongs in the "I have no idea" section. Holy foreign language.
Zim
")
SMOKEYBEAR
Well-known member
- Joined
- Jan 3, 2016
- Messages
- 468
Took today off, trying to "catch up". All over the place today, Second outside work table, drying the boat out from the last "adventure" and recent humidity/ rain, final prep on the trailer fenders/ carpet ( tomorrow is the day), some top coat paint on a drill press project. Pics, no order...
Attachments


Ultradog MN
Well-known member
Hmmm,Stapled a liner into an Elevated Raised Bed Planter Box
Last Sunday my neighbor lady borrowed my stapler to "staple the liner into an elevated raised bed planter box" ---
and hasn't brought it back yet.
Did it take you 5 days to do yours?
I don't need it anytime soon but hope she returns it.
Skyman
Well-known member
nadogail
Well-known member
My pneumatic stapler does the job very quickly, the slowest par of the job is measuring ihe fabric.Hmmm,
Last Sunday my neighbor lady borrowed my stapler to "staple the liner into an elevated raised bed planter box" ---
and hasn't brought it back yet.
Did it take you 5 days to do yours?
I don't need it anytime soon but hope she returns it.
bmwrd0
Well-known member
Spent time making an extractor for Project218.
Skyman
Well-known member
A little periodic maintenance over the past few days included coolant drain and fill.
I didn’t like the look of this original tee fitting, so I ordered a plastic replacement since replacement OEM parts are long gone. Obvious problem when comparing old to new:

Vendor insists it should work, has sold hundreds of them. Not happening.
Plan B: Give the original a soak in Evaporust, followed by prime and paint. Found rust lurking under bubbled paint. Said screw it took it to a nearby welding shop and had them sandblast and powder coat it.

Yep. I’m good with that.
Back together, system refilled, air purged, pressure tested. Good to go.


I didn’t like the look of this original tee fitting, so I ordered a plastic replacement since replacement OEM parts are long gone. Obvious problem when comparing old to new:
Vendor insists it should work, has sold hundreds of them. Not happening.
Plan B: Give the original a soak in Evaporust, followed by prime and paint. Found rust lurking under bubbled paint. Said screw it took it to a nearby welding shop and had them sandblast and powder coat it.
Yep. I’m good with that.
Back together, system refilled, air purged, pressure tested. Good to go.
Beerhippie
Well-known member
Yep. It's done. Pics to follow. Beer and chatting with an attractive young lady are first.Got any more epoxy?
coldh2o
Well-known member
Yep. It's done. Pics to follow. Beer and chatting with an attractive young lady are first.
Was she attractive before the beer?
Built the framework for a new bench:
It's going to be a 3x6 freestanding island with that table saw mounted level with the end of it.
Finished framing and wired it up:


Since the saw will be mounted level with the end of the bench, and I plan to flush mount a router too, I added those receptacles to plug in with the cords up and out of the way. The power strip on the front is for convenience.
Ready to add the top.
Beerhippie
Well-known member
Axe is as done as it's going to be:

I sanded the handle with an RO sander with 150 grit Cubitron to knock the weathering off. I used some more 20 minute epoxy to solidify and consolidate the splintery bits near the head, then sanded again. Gave it a few coats of 50/50 BLO and mineral spirits. I knocked some of the rust off the head while I was at it, and it got the BLO treatment too.
Good enough for what it is. It is a good, usable tool again. It will be trashed again in a few years.
Beerhippie
Well-known member
Yes. She's a friend's wife, and one of the best folks you'll ever meet. If you meet her and disagree, I will fight you.Was she attractive before the beer?
Outlawmws
Well-known member
Yep. It's done. Pics to follow. Beer and chatting with an attractive young lady are first.
It is all about priorities!
Josh Dekubber
Well-known member
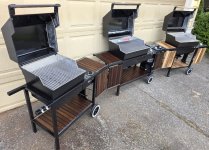
Just finished restoring my 1992 Weber Genesis 4000.

Attachments
-
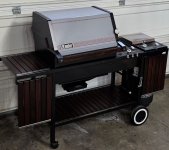 image.jpg160.3 KB · Views: 24
 -
 Screenshot_20260529_210210_Photos.jpg526.8 KB · Views: 21
 -
 Screenshot_20260529_204606_Photos.jpg1 MB · Views: 21
 -
 Screenshot_20260529_215258_Photos.jpg229.5 KB · Views: 19
 -
 Screenshot_20260529_214418_Photos.jpg458.6 KB · Views: 19
 -
 Screenshot_20260529_215220_Photos.jpg796.2 KB · Views: 17
 -
 Screenshot_20260529_214404_Photos.jpg973 KB · Views: 18
 -
 Screenshot_20260529_214535_Photos.jpg386 KB · Views: 16
bugnut
ALLIANCE MEMBER
@Josh Dekubber She's a beaut!
Skyman
Well-known member
@Josh Dekubber She's a beaut!
I'll say. That turned out great!
zimman
Well-known member
This statement brings us back to you being a "great sport" Thanks for that.I was going to put it in the AI thread, but no one in there would have understood it either
My BIL retired from IBM after 38 years and he used to head into the deep dark world of codes and terabytes and logrithems or whatever. I'd lean in and tell him "come back to Earth Mike" we're in the living room. LMMFAO.
Zim
zimman
Well-known member
Cut and coped some tube for the roof rack. Almost like the one I built for the Toyota except using round tube this time vs. square. Need 4 more.
Zim


Toyota Roof Rack

Zim
Toyota Roof Rack
Josh Dekubber
Well-known member
Thank you!@Josh Dekubber She's a beaut!
Josh Dekubber
Well-known member
Thank you!I'll say. That turned out great!
Beerhippie
Well-known member
Grrr... it's been raining continuously for over twelve hours now, and not a drizzle.
I'm spending the morning getting soaked while chasing leaks on the Brick. Worst one is the leak right over the clutch pedal where it drips directly onto my left foot. I suspect that's the antenna... back out into the rain to take the upper grille off....
This would be a nice time to have a warm, dry garage.
Ultradog MN
Well-known member
I get your frustration but what we wouldn't give for a couple days of good, drenching rain here.Grrr... it's been raining continuously for over twelve hours now, and not a drizzle.
I'm spending the morning getting soaked while chasing leaks on the Brick. Worst one is the leak right over the clutch pedal where it drips directly onto my left foot. I suspect that's the antenna... back out into the rain to take the upper grille off....
This would be a nice time to have a warm, dry garage.
Today in my garage...
Cleaned the MINI today and applied Opti Seal to the paint and plastic trim...


I had a few paint chips on the Cayman bonnet that were bugging me...
I had a touch up bottle of the OEM paint with the small brush inside the cap...
I knew I didn't want to use the supplied brush because it always creates a "pimple" bump at the repair site...
I had a couple paint pens that work with capillary action and filled the paint reservoir in the pen..
With a bright light so I could see well, it did a nice job of keeping the paint inside the chip walls and by dabbing the tool you can control the amount of paint... Cleanup with Acetone...
And better yet, no paint "pimples"... This is a great tool to use on paint chips...
Worked out well...

Cleaned the MINI today and applied Opti Seal to the paint and plastic trim...
I had a few paint chips on the Cayman bonnet that were bugging me...
I had a touch up bottle of the OEM paint with the small brush inside the cap...
I knew I didn't want to use the supplied brush because it always creates a "pimple" bump at the repair site...
I had a couple paint pens that work with capillary action and filled the paint reservoir in the pen..
With a bright light so I could see well, it did a nice job of keeping the paint inside the chip walls and by dabbing the tool you can control the amount of paint... Cleanup with Acetone...
And better yet, no paint "pimples"... This is a great tool to use on paint chips...
Worked out well...
firebirdparts
Well-known member
I'm going to try that. ^^^
Made some 2x4 crabbing for work after doing some air bag training the other day.

Itinerant
Well-known member
Went looking for the blue Loctite as I was putting a new blade on the lawnmower and found this.

Had a new tube on hand so I installed the blade and then repaired the drawer.
Cut out the damaged section and cleaned up the edges, then cut a piece of heavy card stock for a new bottom.


Consolidated parts and hardware that was scattered between two drawer stacks so now I have one empty which I will likely move along. Vacuumed up cotton bunnies that have blown in throughout the week.
Had a new tube on hand so I installed the blade and then repaired the drawer.
Cut out the damaged section and cleaned up the edges, then cut a piece of heavy card stock for a new bottom.
Consolidated parts and hardware that was scattered between two drawer stacks so now I have one empty which I will likely move along. Vacuumed up cotton bunnies that have blown in throughout the week.
Attachments
Last edited:
bulletpruf
Well-known member
In the garage today? Not a damn thing; work is sucking the life out of me. But I work for myself and I bill by the hour, so at least I'm putting more $ in the emergency bulldozer fund.
SMOKEYBEAR
Well-known member
- Joined
- Jan 3, 2016
- Messages
- 468
Carpet on the boat fenders, quite the job, however I am enjoying the project. I've been at it all day after the gym and a few work tasks. I'm saving the tedious part of wrapping the top for tomorrow when I'm a bit fresher so I don't rush it and make an error. I'll probably watch some more videos, the ones I've already watched helped a ton to get this far today.
Some more paint work on the drill press project.
Pics, no order..
Some more paint work on the drill press project.
Pics, no order..
Attachments


Cut more trim and woodwork for the house. Stained some, painted some, waited for it to dry, then installed it.
It was such a beautiful, breezy day, I went ahead and mowed too. Didn't trim, because, as Sweet Brown says, "ain't nobody got time fo' dat".
It was such a beautiful, breezy day, I went ahead and mowed too. Didn't trim, because, as Sweet Brown says, "ain't nobody got time fo' dat".
Shadowdog500
Well-known member
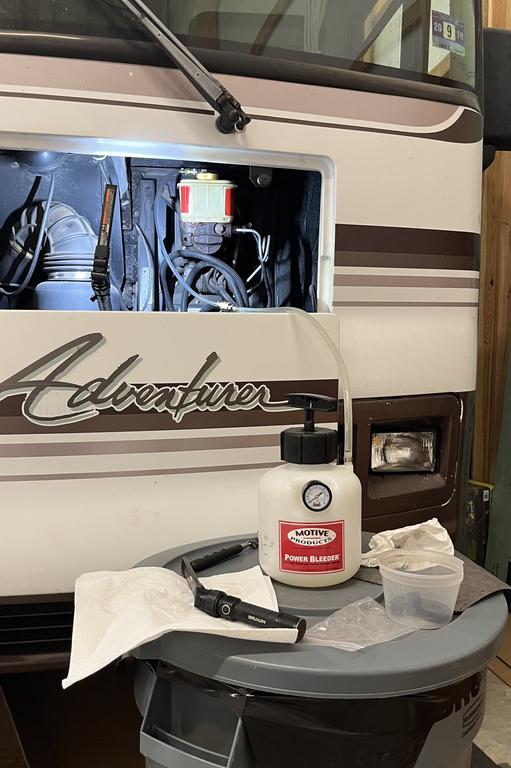
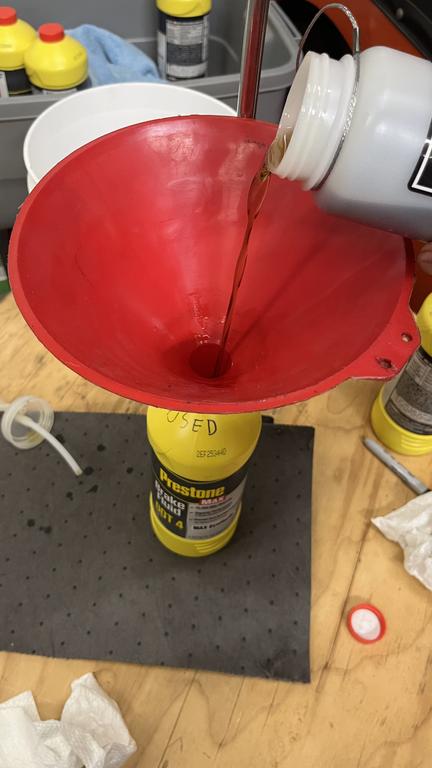
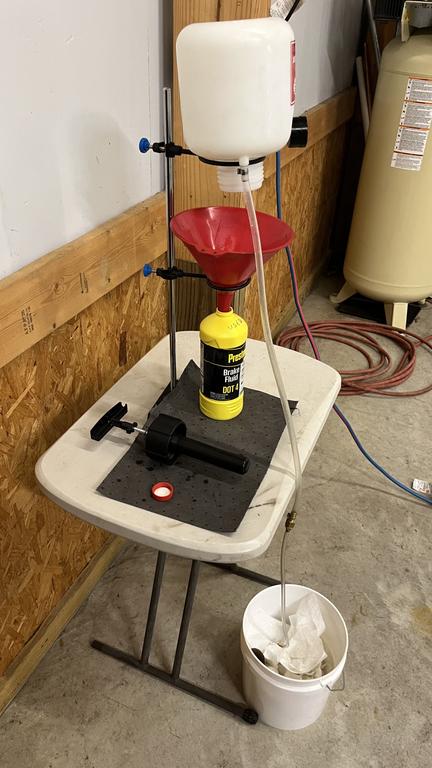
I flushed the brake fluid in my Motorhome today.
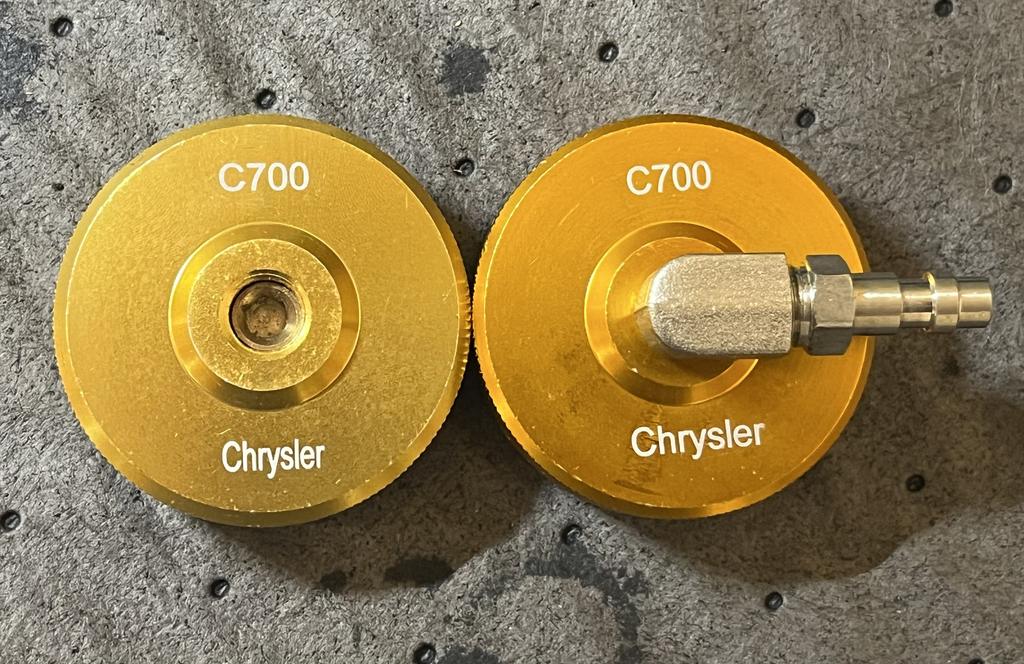
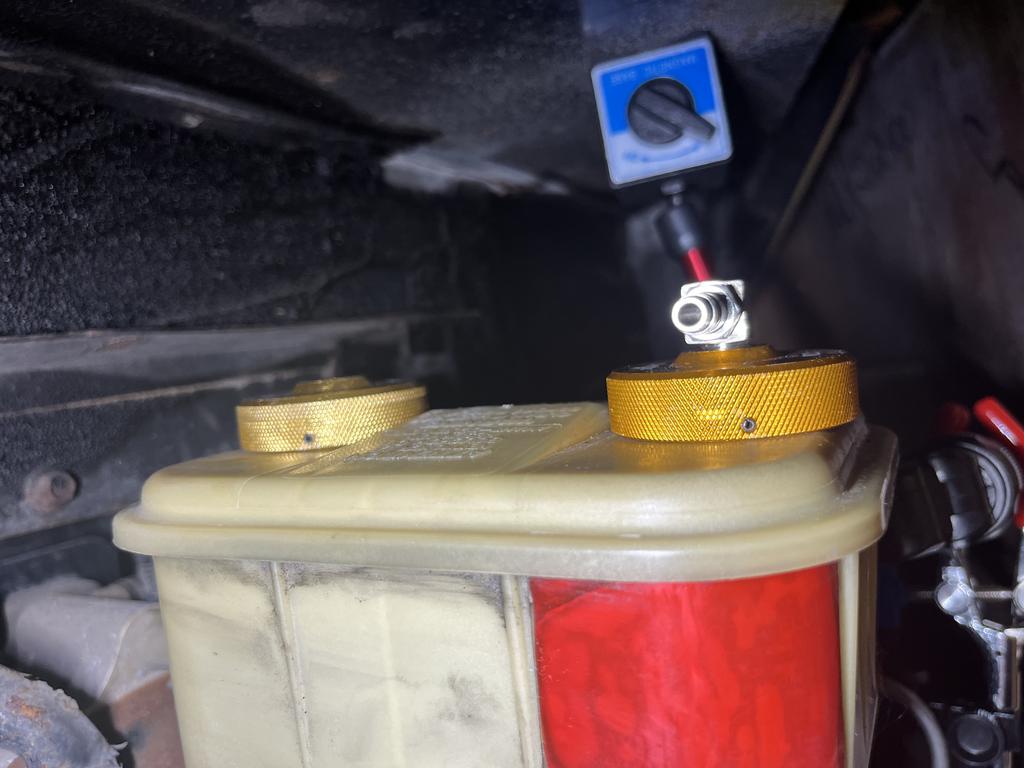
I used my Harbor Freight pneumatic vacuum bleeder to **** all but about ¼” to 3/8” of the brake fluid out of the master cylinder reservoirs. Never remove all the fluid or you will get air in the system. Then I topped the reservoirs with Prestone MAX Dot 4 brake fluid and pressure bled the system using my Motive pressure bleeder with Speedi-Bleed master cylinder cap adapters. I added the proper coupler to the hose on my Motive pressure bleeder to attach Speedi-Bleed caps. The Bosch Hydro-Max master cylinder has two separate reservoirs. It needs the Speedi-Bleed C1100 Chrysler brake bleeder adapter, which is a pair of C700 Chrysler cap adapters, with one plugged. The front reservoir is for the rear brakes, and the rear reservoir is for the front brakes.
Here are some photos.
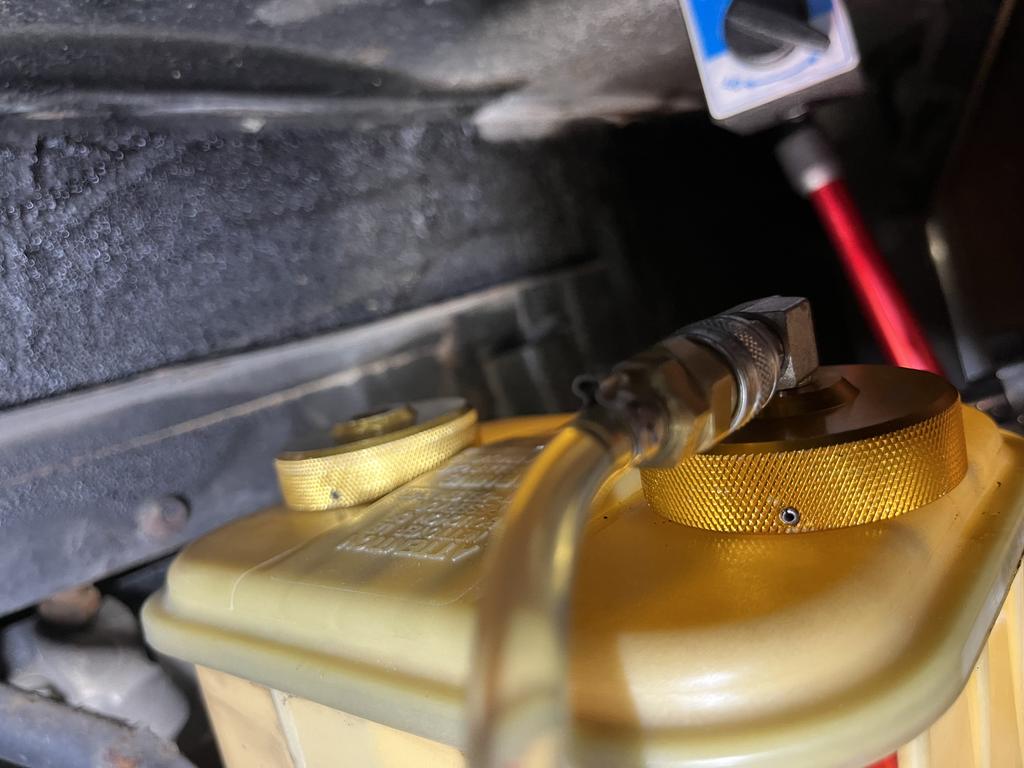
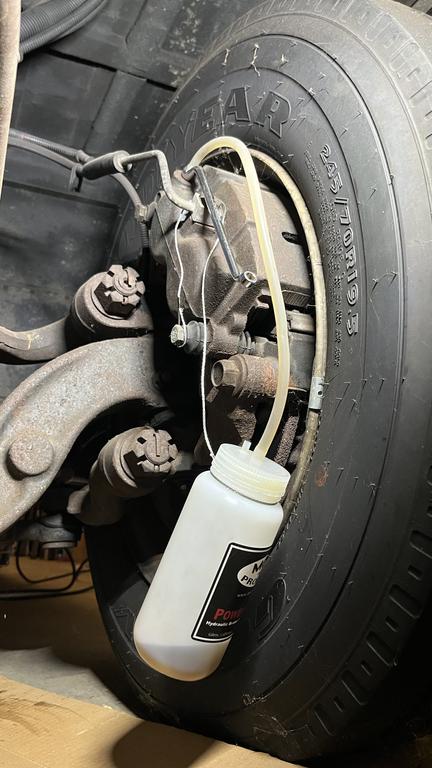
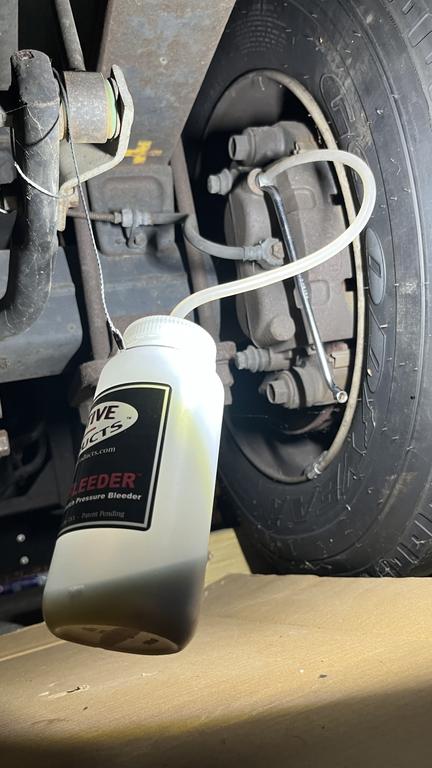
No Spills using this system.

Cleanup up is easy using a lab stand
I used my Harbor Freight pneumatic vacuum bleeder to **** all but about ¼” to 3/8” of the brake fluid out of the master cylinder reservoirs. Never remove all the fluid or you will get air in the system. Then I topped the reservoirs with Prestone MAX Dot 4 brake fluid and pressure bled the system using my Motive pressure bleeder with Speedi-Bleed master cylinder cap adapters. I added the proper coupler to the hose on my Motive pressure bleeder to attach Speedi-Bleed caps. The Bosch Hydro-Max master cylinder has two separate reservoirs. It needs the Speedi-Bleed C1100 Chrysler brake bleeder adapter, which is a pair of C700 Chrysler cap adapters, with one plugged. The front reservoir is for the rear brakes, and the rear reservoir is for the front brakes.
Here are some photos.
No Spills using this system.
Cleanup up is easy using a lab stand
BlindViper
Well-known member
Started off the day by making a scrap run. I had plans to build some drawers for a cart that I have for socket storage. Well I got about $500 for my scrap pile. So I stopped at Harbor Freight. I ended up buying the 32" tool cart they have. It will work much better then what I was going to build anyway. I will just use the old cart for flat storage when wrenching on the lift.
Attachments

Beerhippie
Well-known member
I think I found my leak (or one of them):

That don't look like it was sealing very well.
I cleaned and dried the hell out that area--rain had stopped--and the back of the gasket, then applied a small bead of black RTV to the back of the gasket and a little wax to the paint in the area under the gasket.

I drove about forty miles this afternoon and the fix seems to have worked quite well--it never rained the whole way. I think I'll pour a pitcher of water over it and see if it leaks....
Pitcher pour-over test passed!
That don't look like it was sealing very well.
I cleaned and dried the hell out that area--rain had stopped--and the back of the gasket, then applied a small bead of black RTV to the back of the gasket and a little wax to the paint in the area under the gasket.
I drove about forty miles this afternoon and the fix seems to have worked quite well--it never rained the whole way. I think I'll pour a pitcher of water over it and see if it leaks....
Pitcher pour-over test passed!
Helped a buddy with a 2011 1.4 Audi A1 yesterday, battery run flat and confirmed not charging. Load tested alternator power/ground with a head light bulb and only saw about 0.2v drop = main wires good, probed signal wire with a scope (plug connected, Linbus) picture perfect trace = Linbus is up and communicating and confirms that the alternator is kaput.
Before I got started changing it out today thought Id try get some of the roof shaded as it was supposed to be around 30c, had some left over DPM from the pit and managed to get about 2/3 of the worst part of the roof covered, just an experiment to what works and what doesnt, used some leftover batten to tack it down and 6" timber I had as a centre stand off (think mini tent), worked great despite the DPM being black dropping ceiling surface temps about 10c and close to ambient. Temps in the pit always seem to hold 20c no matter what so I thought id try blast some of that cool air into the rest of the garage, had one o them fans they use for bouncy castles sitting doing nothing, noisy but high pressure/flow, worked better than expected, kinda jets the cool air straight up and smashes it off the ceiling over me and the job, and kept the garage a comfortable blustery 29c most of the day, most notable plus was not feeling like your head is next to a heat lamp . Relieved to get some sort of control over the crazy temps in the garage.
Fan inlet temp after settling out some.
Before I got started changing it out today thought Id try get some of the roof shaded as it was supposed to be around 30c, had some left over DPM from the pit and managed to get about 2/3 of the worst part of the roof covered, just an experiment to what works and what doesnt, used some leftover batten to tack it down and 6" timber I had as a centre stand off (think mini tent), worked great despite the DPM being black dropping ceiling surface temps about 10c and close to ambient. Temps in the pit always seem to hold 20c no matter what so I thought id try blast some of that cool air into the rest of the garage, had one o them fans they use for bouncy castles sitting doing nothing, noisy but high pressure/flow, worked better than expected, kinda jets the cool air straight up and smashes it off the ceiling over me and the job, and kept the garage a comfortable blustery 29c most of the day, most notable plus was not feeling like your head is next to a heat lamp
. Relieved to get some sort of control over the crazy temps in the garage.Fan inlet temp after settling out some.
Last edited:

Just finished restoring my 1992 Weber Genesis 4000.
This is an original concept, reusing (much less restoring) last years grill. Around here every spring last years grill is set out at the curb and the following week the cardboard box from the new grill is set out at the curb.
Great job on the restoration, a 1992 grill still in use is amazing.
bmwrd0
Well-known member
So, how do you eat an elephant? One bite at a time.
Starting the process of unloading the Dalton

Every part of this thing is cast iron. 440lbs shipping weight for a lathe slightly bigger than a six inch Craftsman, before the mast and motor are added. Which means I am going to need to disassemble this as far as possible to do it safely. But, on the plus side, I found both the steady rest and follower rest in with the spare junk that came with it! Score, as finding these for a 100+ year old lathe is not so easy.
Starting the process of unloading the Dalton
Every part of this thing is cast iron. 440lbs shipping weight for a lathe slightly bigger than a six inch Craftsman, before the mast and motor are added. Which means I am going to need to disassemble this as far as possible to do it safely. But, on the plus side, I found both the steady rest and follower rest in with the spare junk that came with it! Score, as finding these for a 100+ year old lathe is not so easy.
Finished framing and wired it up:
Ready to add the top.
Top on:

I decided to add extra top supports at literally the last minute (I was already spreading glue).
In its final position, connected to power, saw stand built, everything done except vacuum hose and bottom shelf:


Somebody, I forgot who, wrote a post a little while ago extolling the virtues of a shop notebook. I decided that was a good idea, and when a colleague retired and we all descended on his office like vultures to raid it for left-behind items, I saw that empty notebook and grabbed it for that purpose. All I had to do was cut out the front page - "Mayer Brown 2010 Annual Partners Meeting" - and Bob's yer uncle.
Last edited: