To avoid these ads, REGISTER NOW!

Above 1200 Sq/FT Planning a detached 6-car garage from scratch — here's what 2.5 months of design actually looks like

Wokspaces above 1200 squarefeet.

sashik3

Active member
Joined
Oct 4, 2014
Messages
28
Location
Kansas city
The day both my kids passed their driving tests, my wife looked at our garage and said the thing I'd been avoiding for years: "Where are they going to park?"

There was no room. There hadn't been for a long time.

That was the moment the dream stopped being a daydream.

---

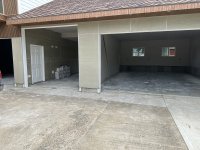
Here's what I ended up designing: a detached 60x32 ft six-car garage — dedicated workshop, small office, a roughed-in bathroom, a center drive-through bay that doubles as a full car wash and detail station, and a full second floor prepped for a future apartment. Built on 2.2 acres in Kansas. I drew every line of it myself using Punch Professional Home Design after an architect quoted me $25,000 for blueprints.

I spent 2.5 months doing nothing but planning before a single shovel touched the ground. Permit submissions, engineering reviews, utility locates, weather timing, material sourcing, contractor scheduling — all of it figured out on paper first.

A few things that might surprise people who haven't done a build like this:

— The building is 32 feet wide. Not 31, not 33. Because 32 lands clean on the standard 16/24" framing grid, so the plywood, siding panels, drywall, and roof trusses all drop in without a cut. That number alone probably saved a couple thousand dollars in wasted material.

— The center bay has a 9-foot door. I didn't strictly need it at the time. But boats, lifted trucks, trailers, tall equipment — that one decision means the building can say yes to almost anything that rolls up to it.

— Before a drop of concrete went down, I ran underground conduit, a second 200-amp panel, water and sewer rough-ins, copper refrigerant lines for HVAC that doesn't exist yet, and pre-wired spots for future heat pumps and solar. None of it is in use. All of it is waiting. Doing it while the walls were open cost almost nothing. Doing it later would've meant a demolition crew.

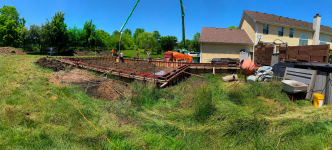
— I built a temporary crushed rock road with geotextile fabric running parallel to my existing driveway before any machinery showed up. Fully loaded concrete trucks rolled over it after rain with zero problems. The fabric lets you scrape the rock right back off when you're done instead of grinding it permanently into the dirt.

The drive-through bay was the requirement that made everything harder. Because I needed to drive straight through the center and out the back into the yard, it forced me to completely rethink the roofline, the load-bearing structure, and the rear foundation wall. There's a slope difference front-to-back, so I had to build a ramp inside the bay to make the grade work.

I had the trusses designed by the plant engineer — asked them to swap some 2x4 members for 2x6 and raise the pitch slightly for more headroom upstairs. 45-day lead time from Menards. When they arrived, the trailer was too long to get them to the site, so the driver dropped them at the driveway entry and I used long carts to roll them in one at a time.

The upstairs is still unfinished. But every wire, every pipe, every utility it'll ever need is already in there — roughed in while the walls were open, designed once so I'd never have to tear into it twice.

---

I'll keep updating this thread as the build progresses — site prep, excavation, foundation, framing, roofing, electrical, siding, the car wash bay setup, all of it.

Happy to answer questions about the planning and design process specifically if anyone is working through something similar. There were a lot of decisions I wish I'd seen someone else document before I had to figure them out myself.

What would you have done differently on the layout — especially on a 6-car footprint with a workshop built in? Curious what this crowd thinks about the drive-through center bay vs. just going wider.
 
To avoid these ads, REGISTER NOW!

thammel

Well-known member
Joined
Oct 3, 2005
Messages
2,243
Location
Maryland
Will be very cool to see how this all comes together!! My questions and comments:

1) I presume the dimensions are exterior. So the interior will be more like 31 x 59
2) For 6 cars wide, this allows 10 feet per car. I find that to be rather tight. I would have gone 72 feet wide for 6 bays.
3) My 32x28 has only 2 doors on the front. They are 10' wide by 8' high. I'd never go smaller than this. (Our 20x20 house garage has 2 doors that are 8x7. These are so small you have to be really careful pulling in).
4) I hope the bathroom includes a shower. That's the one item I missed doing in my build.
5) I suggest you insulate it yourself. That way you know you'll get a really good insulation job.
6) I presume you'll have mini splits or other HVAC. Be sure to isolate the second floor with a door at the top or bottom of the stairway or all the heat will flow right up to the second story.
7) The copper hvac lines that you pre-ran...where do these run? I have 2 mini splits - one for the second story and one for the garage. I ran my linesets in the walls on the inside of the insulation.

Can't wait to see more!!!

Tom
 
OP
S

sashik3

Active member
Joined
Oct 4, 2014
Messages
28
Location
Kansas city
Will be very cool to see how this all comes together!! My questions and comments:

1) I presume the dimensions are exterior. So the interior will be more like 31 x 59
2) For 6 cars wide, this allows 10 feet per car. I find that to be rather tight. I would have gone 72 feet wide for 6 bays.
3) My 32x28 has only 2 doors on the front. They are 10' wide by 8' high. I'd never go smaller than this. (Our 20x20 house garage has 2 doors that are 8x7. These are so small you have to be really careful pulling in).
4) I hope the bathroom includes a shower. That's the one item I missed doing in my build.
5) I suggest you insulate it yourself. That way you know you'll get a really good insulation job.
6) I presume you'll have mini splits or other HVAC. Be sure to isolate the second floor with a door at the top or bottom of the stairway or all the heat will flow right up to the second story.
7) The copper hvac lines that you pre-ran...where do these run? I have 2 mini splits - one for the second story and one for the garage. I ran my linesets in the walls on the inside of the insulation.

Can't wait to see more!!!

Tom
Thanks, Tom — really appreciate the detailed notes. Let me go through your points:

1 & 2) Yep, those are exterior dimensions, so the interior works out close to what you figured. And you're right that ~10 ft per bay is on the tighter side — I'd have loved to go 70+ feet wide like you, but between local regulations and budget, I had to work within what I had. In practice it fits how we actually use it: the kids park two cars plus a jet ski and some bikes in the bay with the 16-foot door (we've fit two Priuses nose-to-tail with a Tundra before — only the small cars go in a row). The next bay holds two in a row too, or I'll put the tractor and the Venza in there.

3) On doors, mine are actually a mix: a wide 16-foot door on the kids' side, a 9.5-foot door in the middle drive-through bay, and an 8x8 on the shop bay. The shop bay (8x8) is where I keep storage, ATVs, shelves, benches, and a small office area (which currently houses a couple of ASIC miners for a little crypto hobby). I hear you on size — the 16-footer makes loading the jet ski and bigger stuff easy, and the 8x8 is plenty for the shop.

4) Good call on the shower — mine's pre-plumbed but not finished yet. It's on the list.

5) Did exactly that — insulated all the walls and ceilings myself. Partly so I know it's done right, and partly so that if I finish the upstairs down the road, the floor won't be cold from the garage below. I also put 2" foam under the concrete in the shop and bathroom area before the pour, so it's comfortable to work in there through the Midwest winters — just did those bays to save money and time on the flatwork.

6 & 7) You nailed the second-floor heat issue — the whole upstairs is left open for a future bedroom/studio conversion, so I'll definitely isolate that stairway when the time comes(most likely exterior door at the bottom of the stairs) . For HVAC, I pre-ran three independent copper linesets (in white foam) plus the control and power wiring from the outside corner, with two 30-amp Siemens breakers for the split systems, mounted out of the sun. Right now the lines feed the shop, office, and bathroom; upstairs is roughed in for later. I ran everything — linesets, wiring, water — up along the trusses near the soffit so the center stays wide open for that future build-out.

I bought all the insulation in batts from Menards to grab the 11% rebate — saved a little bit :).

I'm slammed right now, but I'm planning to write up each section on the blog as I go. Thanks again for taking the time, Tom — really helpful stuff.
 
OP
S

sashik3

Active member
Joined
Oct 4, 2014
Messages
28
Location
Kansas city
Are stamped drawings not required for permits?
They were, in my case. My county requires the drawings to be stamped by a licensed state engineer — so I drew the plans up myself, then found an engineer to review and stamp them. He came back with a few suggestions and revisions, I made those fixes, and once it all checked out he stamped the blueprints and I submitted for permits. So I did the design work, but a licensed engineer still signed off before anything got approved
 
To avoid these ads, REGISTER NOW!

MrFreeze

Active member
Joined
Sep 10, 2020
Messages
39
Location
Seattle, WA
They were, in my case. My county requires the drawings to be stamped by a licensed state engineer — so I drew the plans up myself, then found an engineer to review and stamp them. He came back with a few suggestions and revisions, I made those fixes, and once it all checked out he stamped the blueprints and I submitted for permits. So I did the design work, but a licensed engineer still signed off before anything got approved

I'm not licensed in Kansas (or Missouri, depending), but every other state I am a licensed professional engineer in does not allow a PE to stamp a drawing unless the PE had "direct supervision" of the design process. All states (and Canadian provinces for that matter) have wording to this effect in their bylaws or codes of ethics:

"Drawing or other document review after preparation without involvement in the design and development process as described above cannot be accepted as direct supervision." - Washington Administrative Code 196-25-070

I am very well aware this happens all the time, but by rule of law it is not supposed to. The role of the PE is not to act as a design review and clearinghouse, it is to perform the actual design.

That said, I am sure your design is fine, and I wish you success with it. Just mentioning this as it is a pet peeve of mine - I am frequently asked to stamp designs done by other people, and they are sometimes upset when I explain why I can't do it.

Enjoy your new garage
MrFreeze
 

Tommo3

Well-known member
Joined
Oct 23, 2014
Messages
99
Location
Blackfen, Kent UK
I'm not licensed in Kansas (or Missouri, depending), but every other state I am a licensed professional engineer in does not allow a PE to stamp a drawing unless the PE had "direct supervision" of the design process. All states (and Canadian provinces for that matter) have wording to this effect in their bylaws or codes of ethics:

"Drawing or other document review after preparation without involvement in the design and development process as described above cannot be accepted as direct supervision." - Washington Administrative Code 196-25-070

I am very well aware this happens all the time, but by rule of law it is not supposed to. The role of the PE is not to act as a design review and clearinghouse, it is to perform the actual design.

That said, I am sure your design is fine, and I wish you success with it. Just mentioning this as it is a pet peeve of mine - I am frequently asked to stamp designs done by other people, and they are sometimes upset when I explain why I can't do it.

Enjoy your new garage
MrFreeze
So no PE has any help in preparing drawings and the profession is learnt academicaly without the supervision of an experienced practitioner?
 

545_days

Well-known member
Joined
Oct 30, 2016
Messages
581
Location
Texas
So no PE has any help in preparing drawings and the profession is learnt academicaly without the supervision of an experienced practitioner?
Help with drawings and calculations are fine, but that help must be under the supervision (responsible charge) of the PE. I have PE stamped drawings for refinery units with a team of over a dozen engineers and designers working under my supervision.

You usually must work for 4 years under the supervision of other PE's who must write recommendations that you are competent as a part of your license application. You don't just pop out of school with a PE license. You must gain experience in the practice of engineering as well.

In addition, in many jurisdictions an architect could also seal drawings. The architect might consult a PE for specific structural issues.

While plan stamping is illegal, for something as simple as a house or shop, the homeowner usually provides only a floor plan. Assuming the PE performed any necessary calculations, verified code compliance, and adds notes and details as necessary to ensure that the design and installation are safe, and maintains records of his work he has assumed responsible charge for the design. Most homeowner supplied "designs" didn't include the details, fastener schedules, concrete specifications, and other notes required to ensure code compliance, and any PE stamping something like that deserves disciplinary action.
 
Last edited:

kitdoctor

Well-known member
Joined
Oct 30, 2010
Messages
509
Location
Sunshine Coast, Australia
Two and a half months, boy you had it easy! Honestly though, well done, as I understand what you've achieved.

For comparison, our build schedule went like this:
  • May 2021 purchased five acres.
  • June 2021 - July 2022 surveyed, slope analysis, architectural concept plans, preliminary town planning review, geotechnical report, wastewater disposal report, engineering report, preliminary civil design and planning scheme report.
  • July 2022 - October 2022 - lodge planning permit application and await planning permit.
  • October 2022 - September 2023 - detailed civil engineering design and documentation.
  • October 2023 - June 2024 - plumbing and drainage design and permit.
  • October 2023 - December 2023 - execute civil engineering and building construction contracts. Owner builder course and owner builder permit.
  • December 2023 - December 2025 - building approvals (permits), mandatory inspections and reclassification process.
  • February 2024 - August 2024 - civil works, including retaining walls but excluding asphalt driveway.
  • September 2024 - February 2025 - shed and garage construction.
  • March 2025 - March 2026 - interior fit out of shed and garage.
  • November 2025 - December 2025 - prepare driveway for asphalt.
  • February 2026 - asphalt driveway.
I project managed the project and delivered it as an owner builder, working essentially full-time on it since it started.

Good luck with your build.
 
To avoid these ads, REGISTER NOW!
Top Bottom