To avoid these ads, REGISTER NOW!

Miniature Little Giant power hammer

Slava Yorish

Well-known member
Joined
Sep 12, 2024
Messages
63
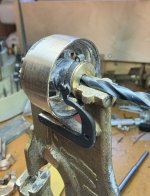
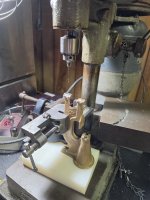
I start a new project. This time a miniature working Little Giant power hammer. Unlike my previous projects this time it will require a large number of parts cast.
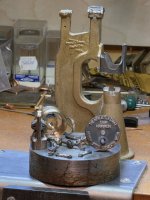
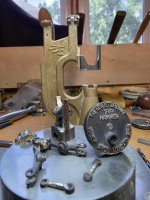
Little Giant power hammers have a very recognizable shape. The one I decided to make is a miniature version of 50lbs model.
As usual, it all starts from the CAD model.
 

Attachments

  • Little giant 50 lbs.JPG
    Little giant 50 lbs.JPG
    176.7 KB · Views: 60
To avoid these ads, REGISTER NOW!
OP
S

Slava Yorish

Well-known member
Joined
Sep 12, 2024
Messages
63
After CAD is complete next stage is choose the scale and 3d print all components.
I 3d printed a version with 6 inch tall base. But if I cast it after I could only position 5.5 inch tall part in the flask. So it determins the scale my miniature will be built.
 

Attachments

  • 20260426_161743.jpg
    20260426_161743.jpg
    645 KB · Views: 49
OP
S

Slava Yorish

Well-known member
Joined
Sep 12, 2024
Messages
63
Original power hammers were sand-cast. The company also made about a dozen of salesman items- fully functional miniature hammer. The base of that hammer was 18 inches tall and it also was sand cast. They used wooden patterns in the foundry. My model is much smaller. I can not get fine detailes with sand casting therefore I use wax models and investment casting or lost wax process. First step is to get waxes. For such a small project waxes can be 3d prin on resin printer from special wax resin. Such a resin is expensive and for mass production is better to make molds and inject molds with a regular casting wax. Once parts are printed I assemble it in trees for casting.
 

Attachments

  • 20260603_150627.jpg
    20260603_150627.jpg
    862.8 KB · Views: 30
  • 20260604_190758.jpg
    20260604_190758.jpg
    730.3 KB · Views: 21
  • 20260605_202142.jpg
    20260605_202142.jpg
    1.2 MB · Views: 24
  • 20260607_114122.jpg
    20260607_114122.jpg
    1 MB · Views: 35
To avoid these ads, REGISTER NOW!
OP
S

Slava Yorish

Well-known member
Joined
Sep 12, 2024
Messages
63
Now I start machining parts. Flywheel machined inside and outsode. Clutch hub and a sleeve. Everything should fit to the body between two bearings.
 

Attachments

  • 20260608_175219.jpg
    20260608_175219.jpg
    559.2 KB · Views: 23
  • 20260609_170529.jpg
    20260609_170529.jpg
    583.2 KB · Views: 28
OP
S

Slava Yorish

Well-known member
Joined
Sep 12, 2024
Messages
63
Some progress with the front shield. Now it is attached on #0-80 screws. Bearing pads installed as well.as the main shaft. The ram installation requires milling the slot in the body. I will make it when my milling machine will back to operation.
 

Attachments

  • 20260615_105507.jpg
    20260615_105507.jpg
    751.3 KB · Views: 2
  • 20260615_105245.jpg
    20260615_105245.jpg
    569.4 KB · Views: 2
To avoid these ads, REGISTER NOW!
Top Bottom