To avoid these ads, REGISTER NOW!

A little Snap On Tool Box Cleanup and Restoration

chargedmr2

Well-known member
Joined
Sep 18, 2019
Messages
217
Location
WA
I picked up my first real tool box a few weeks ago and I'm loving it so far! It's a Snap-on KR-1000B from 1988 (does that count as vintage? Most of my vintage tools are from the 1940s or earlier, so this one feels a little on the "new" side for my usual vintage tastes). It's in great shape overall, but definitely needed some TLC to get back to 100 percent function.

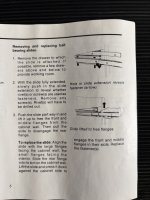
First thing I did was figure out how to remove the drawers and slides. There were plenty of references to doing that in the forum here, which really helped. But I also had the owners manual that came with the tool box to assist as well. Here's the instructions from Snap-on. One page for removing the drawers and one for removing the slides:
IMG_7955 2.jpegIMG_7956 2.jpegIMG_7957 2.jpeg

Overall, the instructions were pretty straightforward, but removing the top drawers can be a little bit of a pain since there's less room for the process. If you've done this before, you probably know what I mean. But after you get past the top drawers it get's pretty easy.
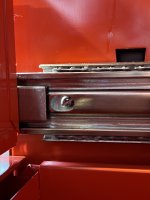
My slides were all riveted in place so I had to drill those out. Not too tough, but screws would have been a little nicer to deal with. There's one rivet at the front of each slide. You have to position the slide just right to see the rivet, and then drill it out. Here's a pic showing the rivet holes circled in white:
IMG_7857.jpeg

At first, I was planning to reinstall the slides with rivets after the cleanup was done, but I opted to tap the existing rivet holes for #10-32 machine screws. That worked out perfect since the holes are a bit under 3/16" in diameter and took the threads just about perfectly. This way I can avoid drilling in the future if I ever need to remove another slide.
IMG_7958.jpegIMG_7962.jpeg

Once I got the slides out, I inspected them and they were in perfect physical shape. The bearings were gunked up with old dried grease, and that was the main problem. Most of the slides did not operate smoothly and the drawers took way too much effort to open and close.

To fix that, I soaked the slides in some mineral spirits to break down the old grease. After that was done, I reapplied some new grease and they were sliding beautifully. This was a lot of work, but well worth it! They are basically just like new again!

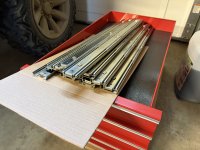
Here's a pile of slides after cleaning things up:
IMG_7944.jpeg

Very happy with the progress so far! This is shaping up to be an EXCELLENT tool box!
 
To avoid these ads, REGISTER NOW!
OP
C

chargedmr2

Well-known member
Joined
Sep 18, 2019
Messages
217
Location
WA
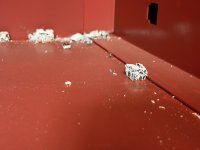
So, a little more on restoring the slides. After I removed the drawers, I noticed there were several plastic pieces laying on the inside floor of the box. At first I wasn't sure what they were, but they turned out to be components from the slides themselves. They were mostly the bumpers/detents which keep the drawers snugly held in the closed position and also prevent the clunking of metal together. Oddly, they were covered in white material almost as though they molded, but I don't think it was actually mold (who knows??):
IMG_7861.jpeg

Some of them were in bad shape and disintegrated, so I knew I'd be needed replacements. I did a little digging online in this forum and a few other places and learned a few things.

First, the slides are under warranty by Snap-on for life. The warranty appears to apply only to the original owner, but many people have success getting all new slides even for boxes that were purchased second hand by calling Snap-on corporate (YMMV, I didn't try that myself).

Second, it seems that Snap-on no longer uses Accuride slides, and I believe they have their own name on the newer ones. I've heard they are not of the same quality as the older Accuride slides, but I couldn't verify that.
Third, I learned that Accuride also warrantees their slides for life. And I found a few (really outdated) threads here indicating that an email to Accuride resulted in all new plastic components free of charge.

Since my slides were in great shape, and I'd rather stick with the originals, I opted for contacting Accuride. And I'm glad I did, because I received an immediate response (on a Sunday afternoon, no less!) from a gentleman named Jorge (who was referenced in the forum here MANY years ago). It turns out Jorge is still the man! Several days later, Fedex dropped a package at my door will all new plastic components for the slides.

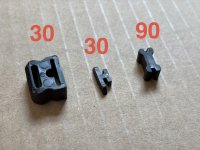
There were four diffident pieces that I requested (quantities listed as well):IMG_7879.jpegIMG_7883.jpeg

I was even provided more than I asked for:
IMG_7945.jpeg

Okay, that's it for now, but more to come on some more clean-up and restoration. I also have plans for installing a very nice 2" thick maple top on the box and some other minor improvements!
 
OP
C

chargedmr2

Well-known member
Joined
Sep 18, 2019
Messages
217
Location
WA
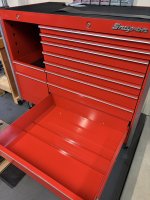
Before I get back to the cleanup/restoration stuff, I figured I'dshow a few more pics of the box itself and the drawers. The paint is in really nice shape with a few exceptions in the high use/contact areas. The drawers are even like new inside and still have all the original drawer liners.

IMG_7746.jpegIMG_7757.jpegIMG_7758.jpegIMG_7760.jpegIMG_7921.jpegIMG_7954 2.jpeg

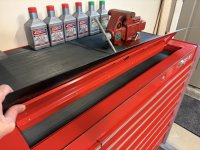
And here's the secret compartment hidden under the top mat. Okay, it's not really a secret, but it's for longer tools that don't fit in the drawers below.
IMG_7752 3.jpeg
 

Shelbylex

Well-known member
Joined
Jan 20, 2018
Messages
3,132
Location
MA
Got to love it, Chergedmr2!
It looks beautiful!!! (and very functional!!!)
 
OP
C

chargedmr2

Well-known member
Joined
Sep 18, 2019
Messages
217
Location
WA
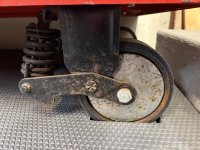
So, the casters were looking pretty sad and had some surface rust and grime. I was thinking the only way to restore them would be a full disassembly followed by cleaning and new paint. Turned out some acetone for the chromed center area and some polish brought them back enough that I think I will just leave well-enough alone. Here's one of the dirty casters followed by a cleaned one. Not too bad!
IMG_7922.jpegIMG_7940.jpeg
 

MileHighRover

Well-known member
Joined
Mar 13, 2018
Messages
1,126
When are you going to polish and ceramic coat the paint? Until then I don't want to see any more pictures.

:lol_hitti :lol_hitti :lol_hitti
 
To avoid these ads, REGISTER NOW!

Lookin4'67Galaxieconv

Well-known member
Joined
Jul 2, 2008
Messages
16,635
Location
Atlanta, GA
@Lookin4'67Galaxieconv That's a NICE box and those casters are looking brand new again. Great work! Were you able to get replacement detents through Accuride. They were great and it only took a few days before I had all new plastic components for the slides, no charge.
Yep, I went through Jorge too. And he sent extras as well. I am curious on the detent you got in the middle. Where does that one go?

1000023866.jpg
 
OP
C

chargedmr2

Well-known member
Joined
Sep 18, 2019
Messages
217
Location
WA
Finally finished getting the slides all back together for the left bank of drawers. What a pleasure to use now! IMG_7985.jpeg

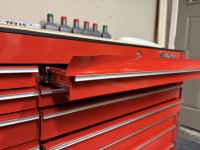
I also added some additional rubber padding to the hooks on the back of each drawer since I noticed they occasionally clinked against the back wall of the box when sliding the drawers closed. And that was even with fresh bump stops and all new plastics installed in the slides. With the added rubber, the drawers come to a solid close, without any metal on metal contact.
IMG_8001.jpeg

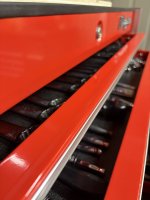
And those little rubber stops were made from some extra edging that I used to cover the top edges of the box. Those top edges were missing paint in the high use areas of the front, so rather than repainting, I figured I’d go this route and it turned out great. Top edges are new protected and it looks great to boot!
IMG_7969.jpeg
IMG_7966.jpegIMG_7976.jpegIMG_7978.jpegIMG_7975.jpeg

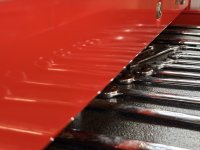
And here’s what’s next. There’s a little missing paint and wear to the top two drawers, so I found some vinyl wrap made by Avery called Cardinal Red Supreme. I’m not sure it’s a dead match, but it’s REALLY close!
IMG_8002.jpeg
 
Last edited:
OP
C

chargedmr2

Well-known member
Joined
Sep 18, 2019
Messages
217
Location
WA
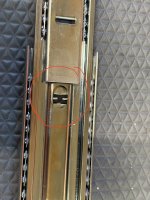
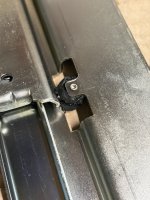
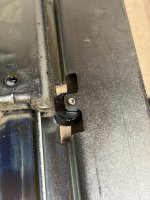
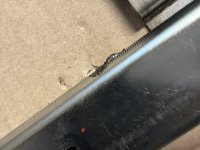
Finally pulled the slides for the large drawer on the bottom right. They’re different than all of the others since they are meant to carry a lot more weight. They also have a different rubber detent for holding the drawer in the closed position. The detent is a rubber wheel seen in the pictures below and there are small bumps in the slide that pass over the wheel, holding the drawer steadily closed.Mine are soft as clay and completely non functional. I’ll have to see if this is something Accuride still supplies. Fingers crossed!!
IMG_8100.jpeg
IMG_8093.jpeg
IMG_8094.jpegIMG_8096.jpeg
 
OP
C

chargedmr2

Well-known member
Joined
Sep 18, 2019
Messages
217
Location
WA
If you hadn't mentioned the tape I wouldn't have even noticed it. Hopefully it wears well. (y)
The color difference is just barely detectable in person, but a really good match overall. The vinyl is made for wrapping cars, so I have high hopes for the durability. And there isn’t an adhesive so it can peel off without any residue, which is nice.
 
To avoid these ads, REGISTER NOW!
Top Bottom