One more update for today because I don't want to cut big holes in the wall of the house during a thunderstorm...
This update is going to be about my luck with vehicles. Bad luck, specifically. There is a cruel irony in the fact that my friend--who could easily be fooled into heading to the store for some blinker fluid--can buy a used Altima that came from a rental fleet and get 150,000 trouble-free miles from it, but I buy a brand new Honda that needs three engine rebuilds and new CVs within the first 70K. (I think I've already told that story of why I'll never own another product with a Honda H on it earlier in this thread.)
The first vehicle I bought was an old Ford Courier, freshman year in college. I bought my first new vehicle when I was 23 and started working where I still work. Between those two vehicles, the string of bad luck, self-inflicted disasters, and poor purchases was so bad that I could forgive someone for thinking I'm exaggerating if I told them the story. In that span, I went through (and I do mean "went through," as in, "no trace of any of these vehicles remaining") eight vehicles. (I swear it was more, but I can't remember.) I was young and broke, so I kept having no choice but to buy cheap cars, and those cheap cars kept exploding on me.
For my sake as much as that of the story, a brief summary in chronological order:
- 1978 Ford Courier: Owned for two years, ran increasingly poorly until it just wouldn't run at all. Gave it away to a mechanic at work, and he found that all the main bearings were loose.
- 1988 Honda CRX Si: Had it for about six months. Loved it. Somebody changed lanes into me on the freeway, and I flipped/rolled it four times. Suffice it to say it did not survive...
- Chevy cargo van, can't remember the year: This was a replacement for the dead truck. Had it for one summer, the last summer I ran my house painting business. Always ate oil, and I once let it go too long without adding more, so the engine seized. It was towed before I could recover it, and the bill for towing and impound was more than I had, so I told them to keep it.
- 1982 Porsche 924 Turbo: Bought it with the insurance money from the CRX crash. Because I'm dumb. Awesome car, but it ate three cam lobes on a cross-country trip a few years after I bought it. On the bright side, it got about 40 mpg for its last thousand miles... I ended up towing it home from Arizona, but I never got around to fixing it and eventually gave it away.
- 1984 Honda Prelude: Great car. Had 240K miles on it when I pulled the engine to rebuild and upgrade it as part of a school project. Fresh from the machine shop, the engine was stolen out of my carport. Rest of car was hauled to the scrapyard.
- Audi 5000, can't remember the year: Only the second automatic on the list, which was lame, but at least it was the first car I ever owned with automatic climate control. I think I may have gotten six months out of this one before one of the rods decided to leave the engine.
- Late-eighties Ford ******: My brother was working at a car dealership at the time and told me about this "great" car that came in on trade and that I could have for next to nothing. This one set the record for futility, leaving me stranded on the fifth drive with an exploded water pump. Timing belt snapped on the sixth drive. I gave it to the same guy I gave the Courier to, as towing it would cost more than it was worth.
- 1991 Honda Prelude: Honda took a step back with this one. Not as good as the '84 for some reason. I think I drove this for about a year before it got completely smashed up by an uninsured drunk driver while parked in front of my house. He sped away, multiple people reported the license plate number to the police, and the police couldn't be bothered to find him. I kept driving that car for a couple of months, getting wet every time it rained because the top of the driver's door was bent out, and eventually limped it into the dealership to trade it in on my first new car. It was sputtering and lurching as it rolled onto the lot, and they were pissed that they agreed to give me $500 for it.
I did the math after the fact, and I could have been leasing a new luxury sedan for what I was spending to drive and maintain total shitboxes for a bit over four years.
All that backstory told, my luck hasn't really improved much since, which is having a pretty big impact at this very moment, specifically with our van.
I think I've said it before, but I'm a minivan guy. Freaking love them. The sliding doors, the car-like drive with truck-like cargo capacity, the versatility. They used to get pretty crappy fuel economy, though, so I was looking to change that when I was so pissed at Honda for our Odyssey, well, odyssey... that I was willing to take it in the shorts trading that pile of **** in on a new van. And Chrysler had just released a plug-in hybrid that every car media outlet was calling the greatest thing since sliced bread.
On the fuel economy front, they were absolutely right. This thing has been awesome in that regard. On the other hand, it's been in the shop three times now with hybrid system issues (it's the same system that Toyota has had sorted for decades, but Chrysler gotta Chrysler...), the last time having the whole traction battery replaced, which took like a month. These vans have had so many problems, in fact, that Chrysler has extended a lifetime hybrid system warranty to every one of them. Which is like gold, I figured.
Until I was wrong.
This was my van on the first weekend of May:
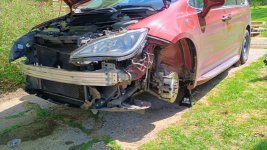
There's quite a bit of it that you have to take apart to get to the radiator, but that's getting ahead of things. To keep this already bloated story as short as possible, the van went into limp mode while MGT was driving my son to a soccer game. No CEL, no indication why, just a cartoon turtle on the screen and "Propulsion Power Reduced." It's done this before. Usually, it's just the battery over-discharging, and you have to drive it a bit or stop and restart it to clear the condition. Either way, before she could pull over, power was restored, and she continued on. It did this three times on her way to the game, so she called me. She also popped the hood and looked things over, and the only thing that looked out of sorts was that one of the many coolant reservoirs was way near the bottom, below the low fill line.
I met her there and had a look. I saw the coolant was low, but there was still some there, and it was late enough that I couldn't buy any more anyway. And it was parked in a tow-away zone, so I decided to just limp it the four miles home on slow surface streets and look it over the following day. The turtle came up right away, but I didn't need full power for that trip, so no big deal. It was going fine until about a mile before my house, when a new message popped up on the screen. Something like, "Pull over immediately. Vehicle shutting down."
And boy did it! By "immediately," it meant about four seconds. I didn't even have time to get off the road. So I blocked one lane of the road for almost an hour (funny story with a police officer, but this is already too long) while waiting for a tow truck to get it the rest of the way home. This was April 30th, and the spoiler to this story is that we still don't have that van.
I wanted to make sure that the dealer wouldn't make some excuse to not honor the warranty, so I figured I'd give it a good look-over before having it towed in. So I took the front wheels and bumper off and peeked around. The only thing out of sorts was the front radiator (the one for the hybrid components) was wet, as if from a small leak. There was also a small (size of a softball, maybe) damp spot on the driveway that would have been under the engine when the van was parked the previous day. I removed the front radiator, brought it to the shop sink, filled it with water, and couldn't find it leaking anywhere. So I dumped it back out, plugged one end, hooked an air line to the other, gave it a quick blast, and found a tiny pinhole leak near the top. Right over the leak, stuck in the fins, was a pebble about the size of something you'd have in a goldfish bowl. "You've got to be kidding me..."
Figuring I might be able to skip the dealer altogether and fix the problem for cheaper than having the thing towed, I bought a radiator, swapped it on, topped it up, and looked up the bleeding procedure. Then wished I had looked up the bleeding procedure first... It involved starting and stopping the pump, opening and closing a valve, etc. I had no means of doing any of that, so it looked as if I'd wasted my time and would have to have it towed to the dealer anyway.
And that's where things get interesting (yeah, yeah, "FINALLY," you're saying...):
Some time after dropping the van off, I got a call from the mechanic, who was really confused and wanted to hear every detail of the story. I told him the story, and he put me on with the service manager, who I had to repeat the story to. The service manager told me that this was going to be a huge repair and that it's not a warranty issue. The damage was the result of "continuation" after a collision with the tiny pebble. They say that this should be a comprehensive claim with my insurance company.
My next call, then, was to my insurance company, where I told the same story I'd just told the shop to about three different people. Then I waited a few weeks. Then I got a letter in the mail with a check to reimburse me for the radiator repair and a pat on their back for a job well done, closing out the claim. As to the rest, that's on Chrysler.
And what's "the rest"? It's $13,600 in parts and labor to replace the transmission, inverter, pump, etc. Pretty much the whole hybrid system. Obviously, that's not something I had budgeted for, so I was quickly back on the phone with both the dealer and insurance.
I waited for MONTHS while the dealer and the insurance duked it out, sometimes taking calls from both in the same day, complaining about the other being unreasonable. Finally, the dealer said I either needed to authorize the repair or come get it. It needs fixed, so I authorized the repairs and am probably looking at having to pay out of pocket.
So I've got that going for me. Which is nice.