To avoid these ads, REGISTER NOW!

Between 705 & 1200 SQ/FT From losing everything to being cash-poor and shop-rich in "only" five years!

Workspaces between 705 and 1200 squarefeet.
OP
G

GeddyT

Well-known member
Joined
Jun 17, 2015
Messages
1,245
Location
Bellingham, WA
Going to issue a correction. Typing up that last post made me wonder if I can look up order status for that lip seal and see if it's stuck somewhere. I looked up my order, and the price per meter was actually only $1. So cheap, in fact, that I ordered two different profiles just to cover more bases (pudding brain, so I'd already forgotten that detail).

Seems the reason for the delay is that the order hasn't even shipped yet. I wonder if they're waiting for a bigger order so they can make a ton of it and cut a little off for me. Kind of a bummer, but it will be worth it as long as I actually receive what I ordered sometime in the near future.
 
To avoid these ads, REGISTER NOW!
OP
G

GeddyT

Well-known member
Joined
Jun 17, 2015
Messages
1,245
Location
Bellingham, WA
Hurco update:

[A tumbleweed slowly rolls across the screen as crickets loudly chirp in the distance.]


With the Hurco update out of the way, what else has been going on? Thanks to a week of too-hot-to-get-anything-done sunshine giving way to too-wet-to-get-anything-done rain, I have a bit of time to play catch-up, so let's hop into the Wayback Machine and go all the way back to December, when I decided to start (and ultimately give up on) yet another grand gesture birthday present for MGT. Too many years ago to remember, we moved the laundry downstairs for a couple of reasons. The first was that we were tearing every wall of the former laundry room out to reframe and side, and we wanted to be able to do laundry in the interim. The other reason was that it would be nice to have an actual mud room for hanging coats, storing shoes, etc. The ultimate ultimate dream for this room, though, was for it to house a large pantry cabinet, something our house has always lacked, leading to... creative kitchen storage concepts.

The "mud room" has been sitting there waiting for some love for an amount of time that I've already established is too painful to contemplate, and I decided MGT's birthday, coupled with giving up on my lower back ever feeling "good," was proper motivation to get started.

The first step, which I didn't take any pictures of, was hanging a few pieces of drywall to fill in the gaps from prior construction. Then I had to mud and tape the corners and seams that would be inaccessible once the pantry were built. Didn't have to make it look pretty, just sealed.

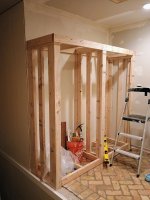
Finally, it was time to start actually building something. I decided that the cheapest, easiest, and most space-efficient form of a pantry cabinet would be to just frame it in place with standard framing lumber, panel it with melamine inside, use some leftover birch ply for floors and shelves, and face-frame with cabinet grade materials.

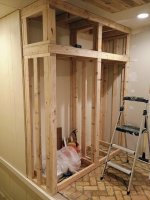
The framing was pretty straightforward:

2026-01-19+closet+1.jpg

2026-01-23+closet+2.jpg

I realized as I was building this that I was OVERbuilding this, but that's fine. If "The Big One" earthquake hits, I'll have my family hunker down in this closet...

In keeping with cheap-and-easy, here's the melamine paneling and birch bottoms installed:

2026-01-25+closet+3.jpg

Coat and backpack hooks, shelves, and face frame installed:

2026-02-04+closet+4.jpg

I chose poplar for the face frame only because it was the only wood species that had enough in stock in the right lengths that I could get the whole job done. Eventually, it's going to be painted anyway. Unfortunately, this was also the one huge mistake I made with this build. It didn't occur to me until I'd completely finished that I measured/cut/installed the rails and stiles backward. No way was I going to redo it all, so it's just going to have to be "custom"...

Doors installed on soft-close hinges and drywall screwed onto the left side:

2026-02-13+closet+done.jpg

With it then early February and with construction complete, all that was left was finishing the room. You'll notice a 2x4 at the bottom of the last few pictures, disappearing off to the left. This was part of a little scheme that I thought was pretty clever:

2026-02-13+ghetto+scaffold.jpg

I needed to do a lot of mudding and taping and texturing way up at the top of the stairwell, so I framed up a little platform from scrap that I could slide along those two rails that are screwed into the studs. It really makes getting to the ceiling nice back there, and I only smashed my head on the platform once before learning to stand it up and move it out of the way after every use.

With this mud room project, a couple machining projects, and the Hurco way covers going on all at the same time, the ping pong table became no different than any other flat surface in a shop:

2026-02-04+closet+total+mess.jpg

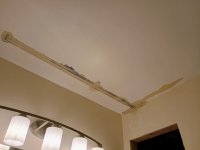
Sadly, I have no pictures of the mud room finished. Because it's not. I got really busy, so I was only able to poke at the drywall work a bit at a time, then, in mid April, disaster struck. We got a combination of ridiculously heavy rain and strong wind, and apparently it was too much for our roof. A leak formed around the master bathroom fan penetration, which dripped down over time and pooled up under the paint in our bathroom. MGT called me in to point out a bubble in the paint that looked like a soccer ball was trying to burst through. I got out a razor blade and started peeling back the damage, water dumping down as I did:

2026-04-15+bathroom+flood.jpg

Not going to sugarcoat it: this one broke me. I was already really stressing out about all of the projects piling up, and having another unexpected one dumped on top was just too much. It was all I could do to spread some schmoo on the roof and seal the leak, but I wasn't getting anywhere near drywall mud for a long while after this. Call it a mental health break. I knew that I had major house remodel work coming (spoiler: that's what I was working on when I got rained out this afternoon), so I might as well just do all of the interior work at the same time now that I had three rooms I'd be working in.

MGT--wisely--gave up on the mud room being finished and just started using it. Still an ugly construction zone, sure, but all of the added storage has been a major improvement to the house!

Anyway, still three machining projects, some car drama, and now some house work to talk about, so I'll be back at some point. I hope life is treating you all well!
 
OP
G

GeddyT

Well-known member
Joined
Jun 17, 2015
Messages
1,245
Location
Bellingham, WA
Oof. Sorry to hear about the house priests shenanigans. Hope you've made some good progress since then!
If progress can be measured in bodily pain, I've made a LOT of progress this weekend! Sneak preview:

2026-06-28+teardown+first+weekend.jpg

I'll explain these present day horrors when I'm done catching up on the backlog, though. In the meantime, some fun machining projects that I took on between work and work...

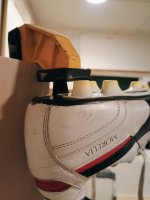
Both of my kids have picky feet. Finding soccer cleats that fit them and don't give them massive blisters or really bad heel pain has been a chore. Eventually, I did what I tend to do and obsessively researched online until I found that certain Mizuno cleats check all the boxes, and the kids really like them. Heel pain gone, blisters gone, no complaints. I had to roll the dice and order them sight unseen, though, because there's nobody in the states that has them in stock. Which made it a bit of a crisis when my son discovered while warming up for the last game of the season with his club team that one of his heel studs was MIA.

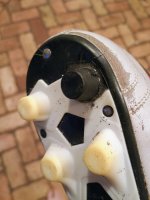
In the following two weeks, he'd have tryouts for two different club teams and his high school team, and the nearest replacement pair was in Japan, where they're made. This was going to require a creative solution, so off to the plastic stock shelf! I figured I'd turn a replacement stud on the lathe out of a plastic that sticks well to high strength epoxy adhesive and hope that the sole plate on the boot isn't nylon or something else slippery. Since nearly none of my massive supply of plastic that I bought for peanuts at auction is labeled as to material, the safe bet was just to use some ABS that was labeled as such.

It was a pretty simple part aside from figuring out how to hold it in the lathe chuck (I don't even remember what I came up with at this point, but it must have worked): just a flat-topped cone that's hollowed out inside to fit over a nub molded into the sole plate. After clamping overnight for the epoxy to cure, I was pretty stoked with how it came out!

2026-02-22+soccer+stud+1.jpg

2026-02-22+soccer+stud+2.jpg

2026-02-22+soccer+stud+3.jpg

I'd like to think that it hung on there for most of his first day of tryouts. But I can't be sure...

The other machining project I got up to in the first quarter of the year was for Andrew. He stumbled upon a cheap walk-behind tractor for sale and decided he could turn it into a trail maintenance machine. Specifically, he would adapt a blower and a sweeper to the PTO using belts and pulleys. What he needed from me was a drive shaft for the blower fan. Don't need the Hurco for that, so it was a welcome distraction.

Actually managed an incredibly nice surface finish in this chromoly with my crappy little lathe:

2026-03-11+shaft+1.jpg

And the Dufour handled the keyway with ease:

2026-03-11+shaft+2.jpg

All finished:

2026-03-11+shaft+3.jpg

Last thing for now is that I'm a year past when you're supposed to get your first colonoscopy, and MGT finally threw down and made me get off my *** (no pun intended) and schedule it. It ended up going fine, no major issues, come back in five years, yadda, yadda, but then I noticed this when reviewing the doctor's report:

2026-05-18+colonoscopy+wtf.jpg

What the eff is that supposed to mean!?...
 

bdbecker

ALLIANCE MEMBER
Joined
Nov 18, 2015
Messages
5,613
Location
Iowa
What the eff is that supposed to mean!?

Okay, that got me!

Probably just a note for the future so they know what to expect. For whatever reason, my body burns through certain types of pain/numbing agents fast. I woke up in the middle of surgery as they were installing a pin in my toe... not cool. Same thing during dental work, one shot is just not enough. I know there is a note in my dentist's files saying to give me an extra shot mid-procedure.
 
To avoid these ads, REGISTER NOW!
OP
G

GeddyT

Well-known member
Joined
Jun 17, 2015
Messages
1,245
Location
Bellingham, WA
Now we hop in the Wayback Machine and travel to Fathers Day.

MGT knew that the graveyard of furniture occupying an entire wall of the shop had annoyed me for some time. Every time she upgrades a desk or a nightstand or a dresser or an end table, the piece that gets replaced is "temporarily" stored against one wall of the shop. There wasn't anything there, anyway, but what this has effectively done is shrink the width of the shop by a bit in the only open work area. It's been a problem for so long that I'd given up and just started using these random pieces of furniture for temporary storage or work tables. You know, flat surfaces on which to pile stuff and then walk away.

She decided to do something about it for Fathers Day. And, because she's smart, she asked first instead of taking the surprise route. She knows how picky I am with certain things. I told her it was a fantastic idea and I'd love to have some actual shop furniture lining that wall. A row of steel cabinets under the windows, capped with a nice worktop. I could easily fit a dozen feet of cabinets in that space, so some careful shopping was in order to avoid the project budget ballooning out of control.

Of all places, she found that the cheapest matching steel cabinets with a combination of drawers and shelves are mail order items from Target. I had no idea what I was in for until I saw the boxes that they came in. Boxes impossibly small for large cabinets.

Turns out these things wouldn't have been out of place coming from Ikea. Complete assembly required, all screwed together instead of welded/riveted. I spent an entire afternoon watching both the men's and women's soccer teams play friendlies (both 2-0 losses) while assembling four cabinets, so no small task. Once assembled, I was decently surprised at how strong they were, but there was a problem: I wanted these cabinets stacked side by side like a single unit, but they couldn't be shoved flush together because the sides were a scatter plot of domed screw heads. My solution was spacer strips of birch ply between cabinets to hide the gaps and screw heads, with sheetmetal screws keeping the cabinets attached to each other:

2026-06-07+cabinet+flop+1.jpg

I think this took a whole extra afternoon.

2026-06-07+cabinet+flop+2.jpg

Once they were all attached together into one big unit, I used a laser and bolts screwed into the caster mounting locations to level them on my wavy floor. Also annoying and time-consuming.

My first plan for a worktop was butcher block, but the long and narrow shape of this row of cabinets was going to mean having to buy and discard a lot of extra. It was going to be pretty costly. Concrete and rebar is pretty cheap, though, and I do like a concrete countertop...

I decided countertop mix would be overkill for this, opting instead for relatively cheap high strength crack resistant mix. This would end up being a huge mistake, but I wouldn't know that for some time because of how long and tedious of a job it was getting things formed up and ready:

2026-06-07+cabinet+flop+3.jpg

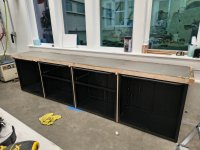
My next biggest mistake was in caulking the gaps. Or, more accurately, not caulking all of them. I caulked every seam between cabinet and form board, but it didn't occur to me that these cabinets were only screwed together: There were seams in the tops of the cabinets themselves. Not caulking those seams was about to cause me a LOT of cleanup, which I discovered immediately after I started dumping wet mix into the forms:
2026-06-07+cabinet+flop+4.jpg

You can barely see some of the drips running down the inside of the cabinets and pooling on the bottom. This picture was taken after quite a bit of cleanup, then returning the next day. One aspect of the pour that I was pretty happy with was my improvised ******** that I made by hollowing out some random plastic stock and pressing it onto an SDS bit:
2026-06-07+cabinet+flop+5.jpg

This might have worked a bit TOO well! Or maybe I just mixed my concrete a bit too wet. Hit it with the SDS, and there would almost instantly be a puddle on top. Regardless, I was pretty happy with the rough result after taking off the forms and wiping things down a bit more:

2026-06-07+cabinet+flop+6.jpg

There'll always be a haze on the inside of the cabinets, but I'm not too bothered by it. What I was bothered by was what happened when I came back several days later and tried diamond-polishing the surface with diamond pads on the RO sander. This worked really well for my bathroom countertop, but the only thing it achieved here was making another huge mess:

2026-06-07+cabinet+flop+8.jpg

It pretty much instantly evaporated the sand and cement but had zero impact on the aggregate, leaving the surface even rougher than before. I have several theories as to why it didn't work this time:

  • Wrong mix. You don't want tufts of fiberglass on your countertop surface. Also, aggregate is bigger.
  • Too much water in the mix, plus all of that moisture vibrated to the top before polishing.
  • Too soon. Not fully cured before polishing.
If I had to guess, it was a bit of column A, a bit of column B, and a lot of column C. In the end, though, I was out less than $700 for about 10 feet of cabinets and countertop, and I figured I'd just coat the countertop in polyurea to smooth it out and be done with it. Here's as far as I got on the project before I had to put it off for more pressing problems:

2026-06-07+cabinet+flop+9.jpg

I wish I could say that they still look like that, ready to be finished and filled with various sundries, but instead they look like this:

2026-06-25+MGT+new+battle+station.jpg

That's MGT's battlestation, on the big butcher block desktop that I made her, on my new cabinets. Until I finish rebuilding her office, this is where she'll be doing her work. And since this work is photo editing, it means that the lights can't be on while she's working. Which means I'm frequently without a shop until her office is rebuilt. Which is nice.

I still haven't even gotten around to putting anything in three out of the four cabinets...
 

Coolabah

Well-known member
Joined
Jun 6, 2010
Messages
1,389
Location
2nd Floor, 3rd on the Right,Narooma, Australia
Now we hop in the Wayback Machine and travel to Fathers Day.

MGT knew that the graveyard of furniture occupying an entire wall of the shop had annoyed me for some time. Every time she upgrades a desk or a nightstand or a dresser or an end table, the piece that gets replaced is "temporarily" stored against one wall of the shop. There wasn't anything there, anyway, but what this has effectively done is shrink the width of the shop by a bit in the only open work area. It's been a problem for so long that I'd given up and just started using these random pieces of furniture for temporary storage or work tables. You know, flat surfaces on which to pile stuff and then walk away.

She decided to do something about it for Fathers Day. And, because she's smart, she asked first instead of taking the surprise route. She knows how picky I am with certain things. I told her it was a fantastic idea and I'd love to have some actual shop furniture lining that wall. A row of steel cabinets under the windows, capped with a nice worktop. I could easily fit a dozen feet of cabinets in that space, so some careful shopping was in order to avoid the project budget ballooning out of control.

Of all places, she found that the cheapest matching steel cabinets with a combination of drawers and shelves are mail order items from Target. I had no idea what I was in for until I saw the boxes that they came in. Boxes impossibly small for large cabinets.

Turns out these things wouldn't have been out of place coming from Ikea. Complete assembly required, all screwed together instead of welded/riveted. I spent an entire afternoon watching both the men's and women's soccer teams play friendlies (both 2-0 losses) while assembling four cabinets, so no small task. Once assembled, I was decently surprised at how strong they were, but there was a problem: I wanted these cabinets stacked side by side like a single unit, but they couldn't be shoved flush together because the sides were a scatter plot of domed screw heads. My solution was spacer strips of birch ply between cabinets to hide the gaps and screw heads, with sheetmetal screws keeping the cabinets attached to each other:

2026-06-07+cabinet+flop+1.jpg

I think this took a whole extra afternoon.

2026-06-07+cabinet+flop+2.jpg

Once they were all attached together into one big unit, I used a laser and bolts screwed into the caster mounting locations to level them on my wavy floor. Also annoying and time-consuming.

My first plan for a worktop was butcher block, but the long and narrow shape of this row of cabinets was going to mean having to buy and discard a lot of extra. It was going to be pretty costly. Concrete and rebar is pretty cheap, though, and I do like a concrete countertop...

I decided countertop mix would be overkill for this, opting instead for relatively cheap high strength crack resistant mix. This would end up being a huge mistake, but I wouldn't know that for some time because of how long and tedious of a job it was getting things formed up and ready:

2026-06-07+cabinet+flop+3.jpg

My next biggest mistake was in caulking the gaps. Or, more accurately, not caulking all of them. I caulked every seam between cabinet and form board, but it didn't occur to me that these cabinets were only screwed together: There were seams in the tops of the cabinets themselves. Not caulking those seams was about to cause me a LOT of cleanup, which I discovered immediately after I started dumping wet mix into the forms:

2026-06-07+cabinet+flop+4.jpg

You can barely see some of the drips running down the inside of the cabinets and pooling on the bottom. This picture was taken after quite a bit of cleanup, then returning the next day. One aspect of the pour that I was pretty happy with was my improvised ******** that I made by hollowing out some random plastic stock and pressing it onto an SDS bit:
2026-06-07+cabinet+flop+5.jpg

This might have worked a bit TOO well! Or maybe I just mixed my concrete a bit too wet. Hit it with the SDS, and there would almost instantly be a puddle on top. Regardless, I was pretty happy with the rough result after taking off the forms and wiping things down a bit more:

2026-06-07+cabinet+flop+6.jpg

There'll always be a haze on the inside of the cabinets, but I'm not too bothered by it. What I was bothered by was what happened when I came back several days later and tried diamond-polishing the surface with diamond pads on the RO sander. This worked really well for my bathroom countertop, but the only thing it achieved here was making another huge mess:

2026-06-07+cabinet+flop+8.jpg

It pretty much instantly evaporated the sand and cement but had zero impact on the aggregate, leaving the surface even rougher than before. I have several theories as to why it didn't work this time:

  • Wrong mix. You don't want tufts of fiberglass on your countertop surface. Also, aggregate is bigger.
  • Too much water in the mix, plus all of that moisture vibrated to the top before polishing.
  • Too soon. Not fully cured before polishing.
If I had to guess, it was a bit of column A, a bit of column B, and a lot of column C. In the end, though, I was out less than $700 for about 10 feet of cabinets and countertop, and I figured I'd just coat the countertop in polyurea to smooth it out and be done with it. Here's as far as I got on the project before I had to put it off for more pressing problems:

2026-06-07+cabinet+flop+9.jpg

I wish I could say that they still look like that, ready to be finished and filled with various sundries, but instead they look like this:

2026-06-25+MGT+new+battle+station.jpg

That's MGT's battlestation, on the big butcher block desktop that I made her, on my new cabinets. Until I finish rebuilding her office, this is where she'll be doing her work. And since this work is photo editing, it means that the lights can't be on while she's working. Which means I'm frequently without a shop until her office is rebuilt. Which is nice.

I still haven't even gotten around to putting anything in three out of the four cabinets...
Wow I'm sure MGT will be thrilled with that option although a sacrifice/inconvenience for yourself. But this is of course what us decent guys do for our other halves.
Might I just with all due respect say- you have made the temporary situation just a little bit too good.
Did you at least make sure of a few random annoying but harmless splinters or something in the bench top ?
Yeh, all silly jokes aside, loving your thread and those cabinets turned out great.
 

zanyad

ALLIANCE MEMBER
Joined
Apr 26, 2018
Messages
2,898
Location
NE Ohio
they look like this:

2026-06-25+MGT+new+battle+station.jpg
Shiny! :thumbup:

Are you satisfied with the cabinets themselves?
 
OP
G

GeddyT

Well-known member
Joined
Jun 17, 2015
Messages
1,245
Location
Bellingham, WA
Shiny! :thumbup:

Are you satisfied with the cabinets themselves?
For the price, they're pretty decent. I think I wouldn't trust them to hold up too well if used as roller cabs on the included casters and moved around a lot while full of heavy stuff, but they might. Even though they're screwed together, they seem sturdy enough. I would prefer to not have to deal with assembly, but at an hour of assembly per, I earned a decent houly wage vs prebuilt!
 
To avoid these ads, REGISTER NOW!
Top Bottom