To avoid these ads, REGISTER NOW!

How to fix wallowed out backhoe mounts? Kubota backhoe

Gmonkee

Well-known member
Joined
May 9, 2010
Messages
2,898
-Cutting through weldments almost always risked trashing the cutter in the process. It may be a faster method to lay fillet for buildup but machining it could be unpredictable (depending upon the filler used).

-Seems like more trouble to some but I prefer using new steel too. Laying in a new plate also allows the option of choosing a separate bushing material that would hold up longer than most plate steels will. A flanged bushing could even be fastened to the plate (drilled and tapped) for easy replacement.

Don't tell my old boss but 6013 rod was the best fill weld. He insisted on 7018 which was harder.

So I saved up the stub rods of everything as filler and used the 7018 to fill gaps in plates and the 13 as wear filler.

I also could never read the measuring caliper so I used CAD, cardboard aided design, and the eyecromiter to do what he called excellent work. All the bolts and bushings always lined up.
On one off damage repair that worked. I would never fake it on aircraft had I the opportunity.
 
To avoid these ads, REGISTER NOW!
OP
S

Slowboat

Well-known member
Joined
Nov 5, 2010
Messages
611
Location
Green Mountains
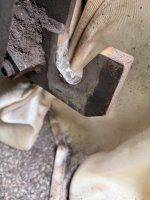
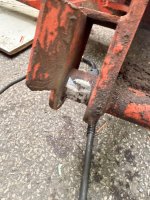
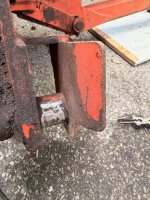
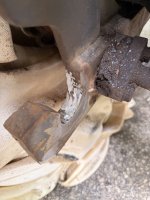
I’m not real happy with the filler welding, but the machine is tight and if I need to do it again in 100 hours that will be 5 years from now.

It took me lots of trial and mostly error to get the settings right. First time welding 3/4” thick material and just trying to build up weld…

This is not a job I’m proud to post on the internet, but so be it…

I was going to go back and clean up and add more filler but it fit well the first time and I couldn’t really see how it was fitting. I will pull it at the end of the summer and see what it looks like.
 

Attachments

  • IMG_5149.jpeg
    IMG_5149.jpeg
    518.4 KB · Views: 43
  • IMG_5150.jpeg
    IMG_5150.jpeg
    533.5 KB · Views: 42
  • IMG_5151.jpeg
    IMG_5151.jpeg
    780.9 KB · Views: 42
  • IMG_5152.jpeg
    IMG_5152.jpeg
    979.4 KB · Views: 42
Last edited:

RoninB4

Well-known member
Joined
Jul 22, 2020
Messages
3,618
Location
Under My House
- Not a very pretty repair but at least it's done and works. As a suggestion, have you made a provision for grease between where metal contacts metal? Makes a big difference in reducing wear. The previous solutions I posted would have taken a lot longer to accomplish, your repair is now done for the moment. Congratulations.
 
To avoid these ads, REGISTER NOW!
OP
S

Slowboat

Well-known member
Joined
Nov 5, 2010
Messages
611
Location
Green Mountains
- Not a very pretty repair but at least it's done and works. As a suggestion, have you made a provision for grease between where metal contacts metal? Makes a big difference in reducing wear. The previous solutions I posted would have taken a lot longer to accomplish, your repair is now done for the moment. Congratulations.
Yeah, far from pretty. I only needed to build up an 1/8” of material, and with my Hobart 210 it was hard to get the settings right - especially the wire speed to not build up too much material that I would just grind away. Space was limited, so grinding was slow. Belt sander and carbide rasp.

I used bar stock to check the fit and shape.

One idea I had, but didn’t end up doing was using bronze bar so the weld wouldn’t stick. Of course I wasn’t able to find a chunk I thought I had laying around…
 

mike93lx

ALLIANCE MEMBER
Joined
Dec 9, 2013
Messages
37,893
Location
Richmond, VA
I’m not real happy with the filler welding, but the machine is tight and if I need to do it again in 100 hours that will be 5 years from now.

It took me lots of trial and mostly error to get the settings right. First time welding 3/4” thick material and just trying to build up weld…

This is not a job I’m proud to post on the internet, but so be it…

I was going to go back and clean up and add more filler but it fit well the first time and I couldn’t really see how it was fitting. I will pull it at the end of the summer and see what it looks like.
Everyone on the internet is a certified and experienced welder, so I get the hesitation.

I promise it looks better than I would have done 😂
 

PCustoms

Well-known member
Joined
Jul 23, 2011
Messages
23,435
Location
VT
Who cares how it looks, if it works it works!


I built a grapple during COVID times, had a beautiful design. Then the laser place closed. Then I couldn't get bushings anywhere. Then...etc.

Lot of on the fly changes based on what I could get, and some design compromises. First time I used it it bent the cylinder mount and ripped a weld due to changing the cylinder length late in the build. Cut the mount off, spun the tab to get the holes right and blasted it with weld and was back running in the time it took to for the GF to make sandwiches. Looks like unrefined **** but has held for 5+ years.
 
To avoid these ads, REGISTER NOW!
Top Bottom