
You are using an out of date browser. It may not display this or other websites correctly.
You should upgrade or use an alternative browser.
You should upgrade or use an alternative browser.
ZMotorsports Shop Projects 2.0
- Thread starter zmotorsports
- Start date
moab11
Well-known member
Do you just have a single 100AH lead acid battery in the winnebago? Not sure what you mean by adding four solar cells.I have been pleased with absorption refers for over 50 years. All with some minor improvements. Up to replacing the cooling units. The Amish replacement absorption cooling units are far better in design that will out preform and last longer. The photos showing my handheld thermometers readings show the freezer section at zero, while the main box at 28 degrees. The ice cream is hard, plenty of ice cubes, and never any spoiled produce... Even in extreme heat conditions.
Contrary,, my new Winnebago View came with a 10 cu. ft. Norcold refrigerator that is 12 volt compressor-driven. The cooling performance is outstanding even in all conditions. That's saying the coach engine is running, the generator is running, or you're plugged into shore power. The refrigerator kills the battery in no time if not. I have increased the one 100 AH solar cells to four with no better results. Installing bigger batteries didn't solve the problem. If you turn the unit to sleep mode for the night. The freezer craps out and you wake having warm milk for your cereal. When boon-docking, the only solution is having the auto start setting for the generator. Once again the Winnebago designing wizards put the diesel generator directly under the bed.. Need I say more. This refer makes my appreciate the American Eagles propane refer...
I have a 12v compressor fridge in my travel trailer and I can run it all summer on a 200AH lithium battery and 400w of solar. Only time I need to worry about battery power is if I am camping in a really shaded site for a few days.
ntsqd
Well-known member
That is why I asked if his Norcold possibly used an inverter, because it's power demand is far in excess of what I've experienced. I have seen the phrase "swing compressor" used in the literature about the fridges that I've installed. That might be significant to the power demand.
ETA: I looked at my previous link and they do carry some Norcolds, that largest of which is 2.7 cuft. It draws 3.6 amps, so ~60% more power for a fridge that is ~23% smaller than mine. That's significant!
ETA: I looked at my previous link and they do carry some Norcolds, that largest of which is 2.7 cuft. It draws 3.6 amps, so ~60% more power for a fridge that is ~23% smaller than mine. That's significant!
Last edited:
SilverJimmy
Well-known member
The NorCold fridge that was OEM in our Arctic Fox camper was never reliable, almost every trip it would start not cooling properly. I tried everything to fix it, extra fans inside and out, took apart the entire burner assembly, would work perfectly for days and then suddenly over 70 degrees! Might be why NorCold filed for bankruptcy last year, I bet the warranty claims were killing them!
SilverJimmy
Well-known member
Sorry for the hijack of your thread Mike, now patintly waiting for the pictures of the bounce house and the slip-n-slide for the 4th of July festivities with your grandkids! Happy 250th for all of us!
OP
zmotorsports
ALLIANCE MEMBER
Sorry for the hijack of your thread Mike, now patintly waiting for the pictures of the bounce house and the slip-n-slide for the 4th of July festivities with your grandkids! Happy 250th for all of us!
Not hijacking Sterling and no bounce house or slip-n-slide this year. Maybe when the grandkids are a bit older, who knows?

I hope everyone had a fantastic Fourth of July on this 250th birthday of our great country of ours. While some may not think so or even criticize, it is the only one I know personally and the one that has allowed a non-college graduate and his lovely wife to work hard, follow their dream, raise a family and live a nice life. We may not have everything or what an Instagram life looks like, but what we have we have been allowed the opportunity to work for it and appreciate it. And most importantly, appreciate those who sacrificed, risked and gave everything so me and my family could live the life we are today. I don't take that lightly as I am so very grateful.
Happy 250th America and thank you all for following along on my thread.

OP
zmotorsports
ALLIANCE MEMBER
It's been a busy weekend here as I have been able to get several items crossed off of my to do list. Funny, somedays I think I am going backwards when I mark one thing off and two more things get added to the list. I told the wife the other night that I wonder if I'll ever be caught up, it's not looking promising.
We took Friday off as we had some vacation time to use or lose so I was able to get to the couple of cosmetic things on the wife's Acura TL.
Be warned, the next several posts will be heavily laden with pictures.
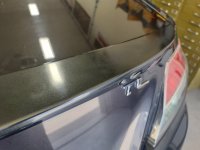
It may be hard to see, but if you look towards the right at the top flat portion of the rear spoiler, you can see where the clearcoat is becoming so thin it is allowing the base to come through. You can see how foggy and unclear the reflection is comparted to the deck lid. The UV really got the clearcoat over the past 13 years and 215k miles.

Evident just above the TL lettering on the top flat surface.
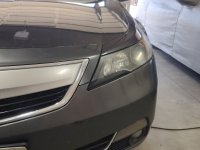
In addition, the headlights were fogging back again. As much as the wife drives in the dark during her commute, I have tried to keep her headlights polished for clarity and safety. I can't count how many times I have polished her headlights over the past 10 or so years of ownership. I have had people recommend clearing them, but after the initial time stripping all of the factory UV protection, they really aren't too bad to run a light polish over them once or twice a year.
However, I have sanded and cleared a couple sets of lights now and the results are better than I ever expected, so I have been wanting to clear the headlights on her Acura. I thought I would just mix up a little extra clear when I redo the hood on my 2006 Silverado, but then I noticed the rear spoiler on her car a few months ago and opted to just correct both issues at the same time.
Masked off the first time to avoid scratching any surrounding painted surface while wet sanding the spoiler.
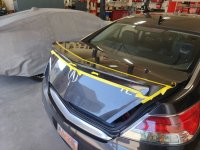
Camera and rear hatch button masked.
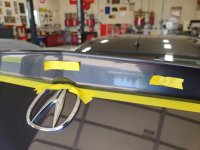
Then using a fine razor to trim around the perimeter of each.
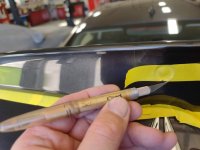
That should protect them against sanding scratches.
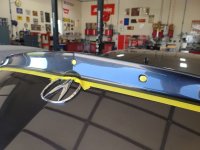
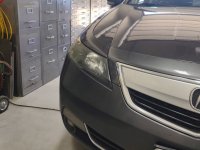
Same with the headlights to avoid scratching what I don't want scratched. A tip to get the masking tape under or around various components. Stick one end to the razor's point.

Slide it under the lip or gap.
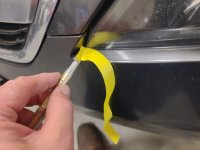
Then simply press the masking tape down to adhere. All of this is done after a thorough wiping of the components and surrounding areas with Wax & Grease Remover to remove anything that can interfere with the painting process.
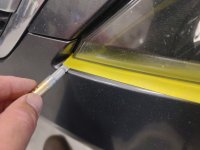
While I was masking I got my 600-grit wet paper into the water to become more flexible and added a couple drops of Dawn dish soap which really aids in keeping the sandpaper from clogging so easily.
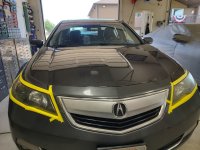
Rear spoiler sanded and prepped for paint.

Unmasked, blown off to remove ALL water from the nooks and crannies or it will flow out at the most inopportune time, like when the paint gun is laying down the color or clear. Don't risk it, if you're not 100% certain the water is removed, wait until it dries or even the next day. The cost of paint isn't worth the gamble here.
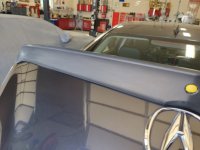

More pictures to follow.
We took Friday off as we had some vacation time to use or lose so I was able to get to the couple of cosmetic things on the wife's Acura TL.
Be warned, the next several posts will be heavily laden with pictures.
It may be hard to see, but if you look towards the right at the top flat portion of the rear spoiler, you can see where the clearcoat is becoming so thin it is allowing the base to come through. You can see how foggy and unclear the reflection is comparted to the deck lid. The UV really got the clearcoat over the past 13 years and 215k miles.
Evident just above the TL lettering on the top flat surface.
In addition, the headlights were fogging back again. As much as the wife drives in the dark during her commute, I have tried to keep her headlights polished for clarity and safety. I can't count how many times I have polished her headlights over the past 10 or so years of ownership. I have had people recommend clearing them, but after the initial time stripping all of the factory UV protection, they really aren't too bad to run a light polish over them once or twice a year.
However, I have sanded and cleared a couple sets of lights now and the results are better than I ever expected, so I have been wanting to clear the headlights on her Acura. I thought I would just mix up a little extra clear when I redo the hood on my 2006 Silverado, but then I noticed the rear spoiler on her car a few months ago and opted to just correct both issues at the same time.
Masked off the first time to avoid scratching any surrounding painted surface while wet sanding the spoiler.
Camera and rear hatch button masked.
Then using a fine razor to trim around the perimeter of each.
That should protect them against sanding scratches.
Same with the headlights to avoid scratching what I don't want scratched. A tip to get the masking tape under or around various components. Stick one end to the razor's point.
Slide it under the lip or gap.
Then simply press the masking tape down to adhere. All of this is done after a thorough wiping of the components and surrounding areas with Wax & Grease Remover to remove anything that can interfere with the painting process.
While I was masking I got my 600-grit wet paper into the water to become more flexible and added a couple drops of Dawn dish soap which really aids in keeping the sandpaper from clogging so easily.
Rear spoiler sanded and prepped for paint.
Unmasked, blown off to remove ALL water from the nooks and crannies or it will flow out at the most inopportune time, like when the paint gun is laying down the color or clear. Don't risk it, if you're not 100% certain the water is removed, wait until it dries or even the next day. The cost of paint isn't worth the gamble here.
More pictures to follow.
OP
zmotorsports
ALLIANCE MEMBER
Continuing on.
Sanding the headlights.

Sanded and inspected for missed areas. Make certain the perimeter is sanded well, this is where the clear can begin to peel if it doesn't have a mechanical tooth to bite into.

Everything unmasked after wet-sanding.

And remasked. This time a little more time is spent getting the tape slightly under the lip to ensure no paint bleeds. A little extra time spent here is the difference between the repair being undetectable vs. one that can be seen across the parking lot.
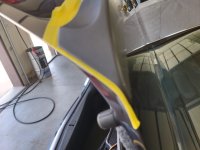
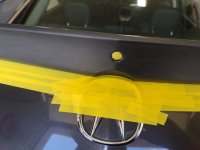
I use a plastic trim tool to slightly lift the spoiler to where I can slide the tape under the edge to create a nice undetectable transition between the two.

Masking completed and gone over one last time to ensure no tape edges have lifted which can result in a paint bleed.

Backed outside and bagged.

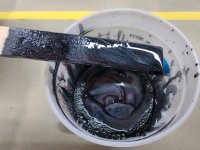
Paint mixing station prepped.

For metallics I like to use a wet bed, so I mixed up a small amount of base clear. In this case PPG DBC 500.

Then the PPG DBC color is mixed as per the spec. sheet and I also like to activate my base with a little activator.

Beautiful color. Graphite Luster Metallic.
Wet bed laid down and them immediately the base color to help orientate the metallic flakes.
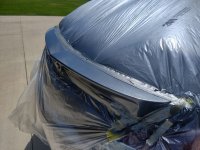
Second coat of base color and blended out across to the driver's side.
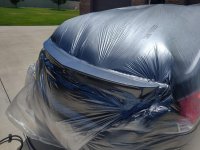
Stay tuned for more.
Sanding the headlights.
Sanded and inspected for missed areas. Make certain the perimeter is sanded well, this is where the clear can begin to peel if it doesn't have a mechanical tooth to bite into.
Everything unmasked after wet-sanding.
And remasked. This time a little more time is spent getting the tape slightly under the lip to ensure no paint bleeds. A little extra time spent here is the difference between the repair being undetectable vs. one that can be seen across the parking lot.
I use a plastic trim tool to slightly lift the spoiler to where I can slide the tape under the edge to create a nice undetectable transition between the two.
Masking completed and gone over one last time to ensure no tape edges have lifted which can result in a paint bleed.
Backed outside and bagged.
Paint mixing station prepped.
For metallics I like to use a wet bed, so I mixed up a small amount of base clear. In this case PPG DBC 500.
Then the PPG DBC color is mixed as per the spec. sheet and I also like to activate my base with a little activator.
Beautiful color. Graphite Luster Metallic.
Wet bed laid down and them immediately the base color to help orientate the metallic flakes.
Second coat of base color and blended out across to the driver's side.
Stay tuned for more.
SilverJimmy
Well-known member
I’m sure you have a valid reason for doing the headlights on the car, but wouldn’t it be easier to just pull them for painting? Or are the Acura/Honda lights really difficult to R&R?
signcrafter
Well-known member
- Joined
- May 9, 2012
- Messages
- 12,463
A rare Sunday post from Mike!
Mike, I know very little about painting. When you say you you mixed up base clear for a wet base, you're saying that you first lay down a coat of clear and then top coat? Is that just so the metalic flakes to evenly spread out better like you mentioned? Is base clear different then your top coat clear? Normally you need to let each coat flash over a little before laying down another coat or it will cause issues right? But in this case you spray the color right after the base clear?
Sorry for all the questions, I'm just curious.
Mike, I know very little about painting. When you say you you mixed up base clear for a wet base, you're saying that you first lay down a coat of clear and then top coat? Is that just so the metalic flakes to evenly spread out better like you mentioned? Is base clear different then your top coat clear? Normally you need to let each coat flash over a little before laying down another coat or it will cause issues right? But in this case you spray the color right after the base clear?
Sorry for all the questions, I'm just curious.
OP
zmotorsports
ALLIANCE MEMBER
Continuing on.
First coat of clear on the headlights.
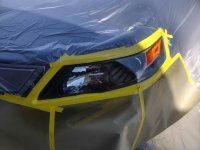

First coat of clear on the rear spoiler.
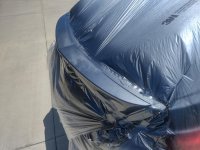
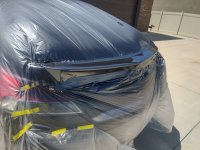
After the first coat of clear I wanted to give it about 30-minutes, but in the outside heat, it was more like around 20-minutes before I shot the second coat.
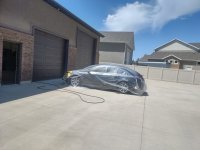


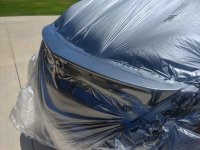
After the second of coat of clear I gave it a full 30-minutes and grabbed a bite to eat.

I stopped at two wet coats of clear on the headlights.
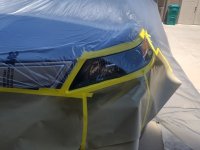
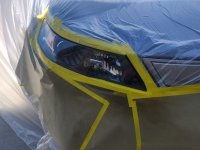
But applied a third coat on the rear spoiler, then let it sit for about 45-minutes before unmasking and pulling into the shop.
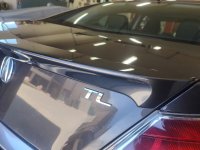
Here you can see the much improved reflection.
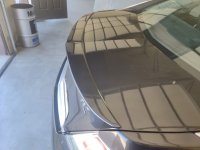
The reflection in the spoiler now is pretty much the same as the deck lid.
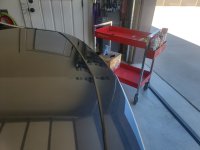
The headlights look better than new.

Stay tuned for more.
First coat of clear on the headlights.
First coat of clear on the rear spoiler.
After the first coat of clear I wanted to give it about 30-minutes, but in the outside heat, it was more like around 20-minutes before I shot the second coat.
After the second of coat of clear I gave it a full 30-minutes and grabbed a bite to eat.
I stopped at two wet coats of clear on the headlights.
But applied a third coat on the rear spoiler, then let it sit for about 45-minutes before unmasking and pulling into the shop.
Here you can see the much improved reflection.
The reflection in the spoiler now is pretty much the same as the deck lid.
The headlights look better than new.
Stay tuned for more.
Attachments
OP
zmotorsports
ALLIANCE MEMBER
Continuing on.
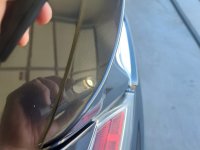
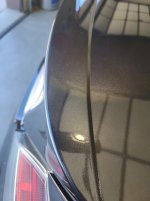
Before closing up the shop for the afternoon, I grabbed the sun gun out of curiosity. It turned out well.

That was where I left off Friday afternoon and just let it cure overnight in the shop.
Before closing up the shop for the afternoon, I grabbed the sun gun out of curiosity. It turned out well.
That was where I left off Friday afternoon and just let it cure overnight in the shop.
OP
zmotorsports
ALLIANCE MEMBER
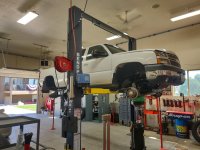
Saturday I needed to give the car a good washing, but before that I pulled the truck into the shop to give it a LOF service and tire rotation, plus I had a new PPE transfer case support brace that has been sitting on the shelf for nearly 8 months that I finally wanted to make time to install.
Truck racked and tires removed so I could rotate them.
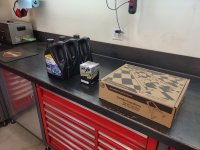
Oil, filter and TC brace at the ready.
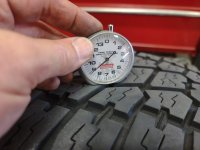
These Nitto's are wearing very well. They are wearing flat and true.

Still sitting at 9/32" with 50k miles on the tires. I am very pleased with how these G2's are wearing and the ride quality is still very good.
Oil draining.

New drain plug washer installed and torqued to spec.

PPE transfer case support brace ready for installation.

Transfer case brace installed and all fasteners torqued to spec. This was a bit more difficult to reach the driver's side fasteners than when we installed one on my son's 2002 due to my 52-gallon fuel cell that really limits access on the driver's side of the transfer case.

With the truck nearing completion it was time to get the car ready to wash.
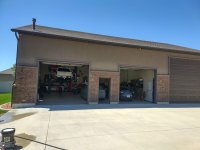
That concludes the work on the truck.
Truck racked and tires removed so I could rotate them.
Oil, filter and TC brace at the ready.
These Nitto's are wearing very well. They are wearing flat and true.
Still sitting at 9/32" with 50k miles on the tires. I am very pleased with how these G2's are wearing and the ride quality is still very good.
Oil draining.
New drain plug washer installed and torqued to spec.
PPE transfer case support brace ready for installation.
Transfer case brace installed and all fasteners torqued to spec. This was a bit more difficult to reach the driver's side fasteners than when we installed one on my son's 2002 due to my 52-gallon fuel cell that really limits access on the driver's side of the transfer case.
With the truck nearing completion it was time to get the car ready to wash.
That concludes the work on the truck.
OP
zmotorsports
ALLIANCE MEMBER
Continuing on.
Thorough cleaning of the car after the paint work.


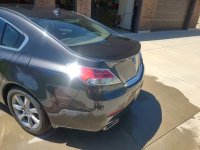
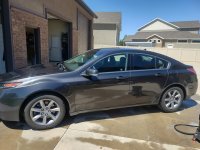


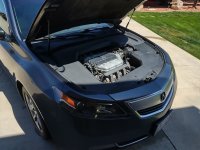
Thanks for looking.
Thorough cleaning of the car after the paint work.
Thanks for looking.
OP
zmotorsports
ALLIANCE MEMBER
I’m sure you have a valid reason for doing the headlights on the car, but wouldn’t it be easier to just pull them for painting? Or are the Acura/Honda lights really difficult to R&R?
Sterling, yes the lights would have been easier to sand and paint with them removed, however, the whole front bumper and valance needs to come off in order to remove the headlight housings. I waffled, but figured it would be better time wise to do on the car, especially where I could easily mask around them.
Same with the rear spoiler, the time it would have taken to remove was more than just masking to do the work on the car. Especially when you take into account all of the push pins on these panels that have to be disturbed when removing things like bumper covers and spoilers. Sometimes the trim clips get damaged or broken and often they simply just don't fit back in the same manner as they did from the factory so to avoid dealing with that possibility, I chose to just perform the work on the car.
A rare Sunday post from Mike!
Mike, I know very little about painting. When you say you you mixed up base clear for a wet base, you're saying that you first lay down a coat of clear and then top coat? Is that just so the metalic flakes to evenly spread out better like you mentioned? Is base clear different then your top coat clear? Normally you need to let each coat flash over a little before laying down another coat or it will cause issues right? But in this case you spray the color right after the base clear?
Sorry for all the questions, I'm just curious.
Scott, the clear base is the same composition as the base color only without any pigments, just clear so it is mixed at the same ratio and shot the same as a base color. The wet bed gives a uniform and even bed in which aids in the metallics laying flat and orientating properly to avoid tiger stripes, which are common when spraying metallics over different substrates and/or base finished.
The base clear is nothing like the topcoat clear, which is a high solids clear and required being mixed equal parts clear to activator. The topcoat clear has all of the UV protection, whereas the base clear has none, much like a base coat color.
I prefer to put a wet bed of base clear down and then a lighter coat of base color before the clear base fully flashes. You do not want to put a wet coat of base color down over the clear base however as piling too much base down can result in solvent popping if applied to heavily and not enough time to allow the solvents to properly flash off. It becomes a balancing act, but after that first coat of base color is down, you can gap the coats a litter more. That first coat of base color down on the wet bed is the most crucial for metallic orientation. Many people don't use a wet bed with metallics, but I have had excellent results doing that for many years now.
signcrafter
Well-known member
- Joined
- May 9, 2012
- Messages
- 12,463
Thanks for explaining all that Mike. There is so much to painting and I was curious.Sterling, yes the lights would have been easier to sand and paint with them removed, however, the whole front bumper and valance needs to come off in order to remove the headlight housings. I waffled, but figured it would be better time wise to do on the car, especially where I could easily mask around them.
Same with the rear spoiler, the time it would have taken to remove was more than just masking to do the work on the car. Especially when you take into account all of the push pins on these panels that have to be disturbed when removing things like bumper covers and spoilers. Sometimes the trim clips get damaged or broken and often they simply just don't fit back in the same manner as they did from the factory so to avoid dealing with that possibility, I chose to just perform the work on the car.
Scott, the clear base is the same composition as the base color only without any pigments, just clear so it is mixed at the same ratio and shot the same as a base color. The wet bed gives a uniform and even bed in which aids in the metallics laying flat and orientating properly to avoid tiger stripes, which are common when spraying metallics over different substrates and/or base finished.
The base clear is nothing like the topcoat clear, which is a high solids clear and required being mixed equal parts clear to activator. The topcoat clear has all of the UV protection, whereas the base clear has none, much like a base coat color.
I prefer to put a wet bed of base clear down and then a lighter coat of base color before the clear base fully flashes. You do not want to put a wet coat of base color down over the clear base however as piling too much base down can result in solvent popping if applied to heavily and not enough time to allow the solvents to properly flash off. It becomes a balancing act, but after that first coat of base color is down, you can gap the coats a litter more. That first coat of base color down on the wet bed is the most crucial for metallic orientation. Many people don't use a wet bed with metallics, but I have had excellent results doing that for many years now.
OP
zmotorsports
ALLIANCE MEMBER
Thanks for explaining all that Mike. There is so much to painting and I was curious.
Happy to answer any questions Scott. Hope the information was helpful. That being said, keep in mind I'm not as much up to speed on current practices if they differ from my old school methods. I just seem to stick with what works for me and I don't necessarily follow the same guidelines as collision repair. I seem to stick to the old school restoration/custom methods where my background lies.
signcrafter
Well-known member
- Joined
- May 9, 2012
- Messages
- 12,463
Well I would say your methods work pretty good from the pictures. I was just curious about the details, my brain starts thinking about all the details and questioning things. Even things like this when I doubt I'll need to know because I don't see myself painting metallics anytime soon. LOLHappy to answer any questions Scott. Hope the information was helpful. That being said, keep in mind I'm not as much up to speed on current practices if they differ from my old school methods. I just seem to stick with what works for me and I don't necessarily follow the same guidelines as collision repair. I seem to stick to the old school restoration/custom methods where my background lies.
ajohno
Well-known member
Great job on the car Mike.
bugnut
ALLIANCE MEMBER
Mike ditto on your 4th of July post. And the vehicles are looking sharp!
madison069
Well-known member
Soon I’ll be taking your tips and applying it to the cars around here. With all of the paint corrections I have to do, I also have some painting to do.
swsman
Well-known member
Meticulous.
What do you sand with, kit or whats on hand?
Clear is via spray can or via sprayer?
I have used off the shelf different kits, like 3M or Turtle Wax and such.
Each time bucket of water for sanding sponges and to keep things wet.
Have not used power tools, just by a hand and some elbow grease.
Some results were better vs others.
What do you sand with, kit or whats on hand?
Clear is via spray can or via sprayer?
I have used off the shelf different kits, like 3M or Turtle Wax and such.
Each time bucket of water for sanding sponges and to keep things wet.
Have not used power tools, just by a hand and some elbow grease.
Some results were better vs others.
OP
zmotorsports
ALLIANCE MEMBER
Meticulous.
What do you sand with, kit or whats on hand?
Clear is via spray can or via sprayer?
I have used off the shelf different kits, like 3M or Turtle Wax and such.
Each time bucket of water for sanding sponges and to keep things wet.
Have not used power tools, just by a hand and some elbow grease.
Some results were better vs others.
Thank you.
All of the sanding on the wife's car was done by hand using 600-grit wet with semi-flexible backing pad. No kit, just tools and supplies I've collected over the years.
Clear was SPI's Universal Clear sprayed through my Iwata gun with a 1.4 tip.
Thank you for stopping by and checking on my projects.
swsman
Well-known member
Thanks for sharing.Thank you.
All of the sanding on the wife's car was done by hand using 600-grit wet with semi-flexible backing pad. No kit, just tools and supplies I've collected over the years.
Clear was SPI's Universal Clear sprayed through my Iwata gun with a 1.4 tip.
Thank you for stopping by and checking on my projects.
I am planning on redoing one of the vehicles.
Trial run.
Clear I plan to use a spray can.
Was thinking 3 stage grit, 600-800-1000 for the wet dry paper.
OP
zmotorsports
ALLIANCE MEMBER
Thanks for sharing.
I am planning on redoing one of the vehicles.
Trial run.
Clear I plan to use a spray can.
Was thinking 3 stage grit, 600-800-1000 for the wet dry paper.
For clear to bind properly I wouldn't go any finer than 800-grit when prepping the surface to be painted. Too fine and it won't have a good mechanical tooth to bite into the substrate.
I only use 1000-grit when peppermint an area I am going to blend into doing an open blend.
Grant Gunderson
Well-known member
Mike I got a ton of catching up to do on your thread. I’ve seen you post this set before and I have a few questions about it. I need to install a lot of bearings and seals over some long shafts. None of my bearing specific drifts can manage the depth over the shafts. SKF makes a set as does KUKKo but they both appear to be mostly plastic and stupid expensive.These next pictures are for Scott, aka @signcrafter , as he was asking how I replace the spark plug tube seals.
I grab a corresponding driver from my ATM EZ-Driver set that will allow the seal's bore to be supported.
Then place it under the rocker cover around the seal.
This next bit of tool **** is for Scott. You know you need this set, don't tell yourself you don't.
Thanks for looking.
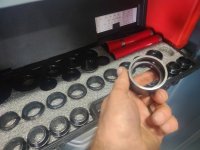


Curious as to what the ID / OD range and over shaft depth that your setup can cover and where best to order? What’s your thoughts on using it to do bearings as well as seals? Obviously I only want to be pressing on the bearing races.
I’d be mostly using it in my large arbor press.
I can always 3d print custom drifts, but that’s a time consuming project, and given the amount of bearings I press every week I’d prefer a set made of metal.
Thanks!
OP
zmotorsports
ALLIANCE MEMBER
Mike I got a ton of catching up to do on your thread. I’ve seen you post this set before and I have a few questions about it. I need to install a lot of bearings and seals over some long shafts. None of my bearing specific drifts can manage the depth over the shafts. SKF makes a set as does KUKKo but they both appear to be mostly plastic and stupid expensive.
Curious as to what the ID / OD range and over shaft depth that your setup can cover and where best to order? What’s your thoughts on using it to do bearings as well as seals? Obviously I only want to be pressing on the bearing races.
I’d be mostly using it in my large arbor press.
I can always 3d print custom drifts, but that’s a time consuming project, and given the amount of bearings I press every week I’d prefer a set made of metal.
Thanks!
Grant, I will get you the smallest and largest of the driver sizes when I get home. This set is actually designed for driving transmission bearings over shafts rather than seals, but it works so well and is so versatile I find myself using it for a myriad of tasks. There are three hollow tubes that can be used individually or connected for pressing bearings over very long shafts. I generally use these with my hydraulic press as I've shown in my thread on numerous occasions, but they also work well for driving in seals with a hammer. I despise driving bearings with a hammer however.
Grant Gunderson
Well-known member
Thanks! I appreciate it! Did you buy it direct from ATM?Grant, I will get you the smallest and largest of the driver sizes when I get home. This set is actually designed for driving transmission bearings over shafts rather than seals, but it works so well and is so versatile I find myself using it for a myriad of tasks. There are three hollow tubes that can be used individually or connected for pressing bearings over very long shafts. I generally use these with my hydraulic press as I've shown in my thread on numerous occasions, but they also work well for driving in seals with a hammer. I despise driving bearings with a hammer however.
OP
zmotorsports
ALLIANCE MEMBER
Thanks! I appreciate it! Did you buy it direct from ATM?
Yes, I purchased my set directly from Arizona Transmission and Machine about 8 or 9 years ago.
They had been having them produced and marketed by Mayhew for a short time and I kept putting of buying one until my new shop was built. Then when I went to buy one I could no longer find them through my original source so I called ATM directly and was told they took production and marketing back over from Mayhew so I went ahead and bought the set at that time.
I believe they are now available through ATSG (Automatic Transmission Service Group).
Grant Gunderson
Well-known member
Is this it! I find it odd that They list the beating sizes in inches when all beatings are metric!
larry4406
Well-known member
I thought beatings were measured in number of lashes?Is this it! I find it odd that They list the beating sizes in inches when all beatings are metric!

Finallygotit
ALLIANCE MEMBER
Until morale improves, yes?I thought beatings were measured in number of lashes?

Grant Gunderson
Well-known member
Haha correct. Damn hard to type on a tiny phone with big fingers!I thought beatings were measured in number of lashes?
OP
zmotorsports
ALLIANCE MEMBER
Is this it! I find it odd that They list the beating sizes in inches when all beatings are metric!
Yes Grant, that is the one.