To avoid these ads, REGISTER NOW!

ZMotorsports Shop Projects 2.0

OP
Z

zmotorsports

ALLIANCE MEMBER
Joined
Oct 20, 2009
Messages
21,549
Location
Northern Utah
I thought that was SOP to lower a vehicle on a hoist when left overnight or unattended for any long period. Every local shop that I've worked in or been around does/did that.

I would think it was SOP's as well Thom, but I know a lot of local shops that it is not the normal practice.

I learned my lesson because I would almost always lower them down and then in March 2020, we had the entire suspension gutted from my son's WJ while we laid out the placement of the axles, links, etc. and when we closed up shop for the night I wasn't as concerned about lowering it as I should have been with all of the plumb bobs and masking tape layouts still intact. The next morning is when the Wasatch Front shook, so I try not to make that mistake again. :oops:


I do the same with mine. In my mind if something fails, however unlikely, I'd rather it fall one foot instead of six.

Agreed. Or there's an earthquake. :dunno:
 
To avoid these ads, REGISTER NOW!

fouckhest

Well-known member
Joined
Jul 24, 2013
Messages
1,910
Location
Greer, SC
At a minimum I leave anything on the locks, but after spending so much time at my buddies local shop they always had one car on the lift and one under for overnight/inside storage.

....however, guess now I have one more thing to think about before closing up shop! hahah
 
OP
Z

zmotorsports

ALLIANCE MEMBER
Joined
Oct 20, 2009
Messages
21,549
Location
Northern Utah
At a minimum I leave anything on the locks, but after spending so much time at my buddies local shop they always had one car on the lift and one under for overnight/inside storage.

....however, guess now I have one more thing to think about before closing up shop! hahah

Mike, I agree with ensuring they are on the locks. I don't walk under mine at all unless it is firmly on a lock.

I love the new Bendpak APX12 lift as I have two locks above where my old Ammco 10k lift was, but I wish it had a lock between the floor and the first lock as the first lock is a little higher than I prefer. I shared my feedback with Bendpak, but don't think it was taken into account.
 

fouckhest

Well-known member
Joined
Jul 24, 2013
Messages
1,910
Location
Greer, SC
Mike, I agree with ensuring they are on the locks. I don't walk under mine at all unless it is firmly on a lock.

I love the new Bendpak APX12 lift as I have two locks above where my old Ammco 10k lift was, but I wish it had a lock between the floor and the first lock as the first lock is a little higher than I prefer. I shared my feedback with Bendpak, but don't think it was taken into account.

Mike I actually almost commented on how lot it looked like you lift sat on the lowest setting. I was curious about mine b/c it doesnt seem that low to me, compared to your beast of a lift.

Mine is a little over 22", maybe its just an illusion b/c your lift and shop are bigger, same with the Jeep
55414312223_c867c3c89f_c.jpgUntitled by fouckhest, on Flickr
 
OP
Z

zmotorsports

ALLIANCE MEMBER
Joined
Oct 20, 2009
Messages
21,549
Location
Northern Utah
Mike I actually almost commented on how lot it looked like you lift sat on the lowest setting. I was curious about mine b/c it doesnt seem that low to me, compared to your beast of a lift.

Mine is a little over 22", maybe its just an illusion b/c your lift and shop are bigger, same with the Jeep
55414312223_c867c3c89f_c.jpgUntitled by fouckhest, on Flickr

That is very similar to mine, around 2'. I wish it had a lock closer to the 16"-18" range. The Jeep or truck isn't too bad because the tires are so large, but on the smaller cars/SUV's, a slightly lower first lock would be very nice.
 

fouckhest

Well-known member
Joined
Jul 24, 2013
Messages
1,910
Location
Greer, SC
That is very similar to mine, around 2'. I wish it had a lock closer to the 16"-18" range. The Jeep or truck isn't too bad because the tires are so large, but on the smaller cars/SUV's, a slightly lower first lock would be very nice.

Interesting! I definitely agree, working on smaller front engine cars on that lock all that ideal of a position.
 
OP
Z

zmotorsports

ALLIANCE MEMBER
Joined
Oct 20, 2009
Messages
21,549
Location
Northern Utah
Interesting! I definitely agree, working on smaller front engine cars on that lock all that ideal of a position.

That is exactly where I've noticed that a lower first lock would be beneficial. Doing jobs where you are working in the engine bay part of the time and need it low, but you don't necessarily want it sitting back on the tires. Timing jobs, water pumps, etc. are perfect examples of where I spend time both under the car as well as in the engine bay and a lower first lock would be great.
 

SilverJimmy

Well-known member
Joined
Apr 14, 2012
Messages
1,716
Location
Prescott/Flagstaff, AZ
4” heavy wall square tubing could be your friend. Weld end caps on it, cut to the length you want, and then heavy rubber pads for scratch prevention. Placed underneath the lift carriage on both sides these would hold a vehicle right where you want it while you’re doing that project when a lower height would be handy. Then for overnight storage lift it up to the first lowest lock position. Just a quick idea, maybe it’d work for you?
 

bigdave_185

Well-known member
Joined
Feb 14, 2021
Messages
444
Location
Utah
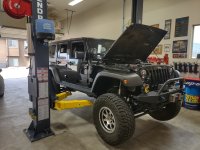
Pulled the Jeep into the shop last night and racked it to perform some routine maintenance before the next few trips.

Raised slightly to check ball joints and wheel bearings before tires/wheels are removed.
jeep1.jpg

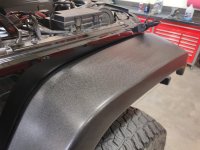
I am glad Dave, aka @bigdave_185 talked me into another round of treatment of the fenders with the Solutions Finish within a few weeks of the initial application. They haven't looked this good since we bought the Jeep 15 years ago. I guess I have to eat my words about the 303 Aerospace, because this stuff kicks its ****. They have a nice semi-gloss finish and absolutely no oily residue or feeling left behind. The last trip I noticed that the fenders didn't attract any more dirt or dust than the rest of the Jeep and it easily washed off. All positives.
jeep2.jpg

jeep3.jpg

Fluids at the ready. Jeep will get standard LOF service as well as a transfer case drain and fill as well as a brake fluid flush this service. The transmission only has a little over 14k as well as the diffs so they are only getting inspected and fluid levels checked, not a fluid replacement this time.
jeep4.jpg

I was able to get the engine oil drained and filter replaced, driveshafts greased, transfer case fluid replaced, emergency brake shoes adjusted out just a little and a thorough chassis inspection before lowering the Jeep and closing up the shop. All that is remaining is brake fluid flush, a few more suspension components need greasing, install tires/wheels and add engine oil and she's ready for a test drive.
jeep5.jpg


Thanks for looking.
You don’t need to discredit the 303 product, its vary versatile tool for many things. You could even try using the 303 on top of the solution finish. Like you I had to learn about the SF from someone a few years ago and I have loved it.

The next thing I need to talk you into is Cq Quartz ceramic on your paint and plastics and it will really blow your mind and drastically cut down exterior maintenance
 
OP
Z

zmotorsports

ALLIANCE MEMBER
Joined
Oct 20, 2009
Messages
21,549
Location
Northern Utah
Mike, I took a couple measurements of mine last night so I had a more accurate post and not pulling it from memory.

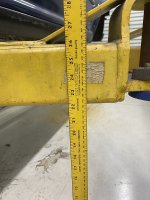
My first lock is similar to yours at nearly 2' off the floor. The flat where the pad resides is near the middle of the arm so I'm going to call it 24" arm height because that's where it meets the vehicle. On a truck or larger SUV this height seems to work fine. However, on a sedan or smaller SUV, this is too high for my liking.
lift1.jpg

Personally, this is where I would like to see the first lock, in the 14"-16" range.
lift2.jpg


I sent the same information to Bendpak as they asked for my opinion after the install and I haven't heard back yet. Not sure if that is something they can incorporate into future models or not, but thought I would provide them my feedback.

In the meantime, I just cut a couple of 6" x 6" blocks and put them under the carriage in those few occurrences where I want to work on the vehicle a little lower. Not ideal, but it works.
 
OP
Z

zmotorsports

ALLIANCE MEMBER
Joined
Oct 20, 2009
Messages
21,549
Location
Northern Utah
The new Cole Hersee master switch arrived for my coach yesterday. I found some interesting information and wonder if the original one installed in our coach was just their "generic" 2484 switch or the -09. When searching for a part # 2484 there are a lot of places that sell it and prices are all over the place. It wasn't until I started looking closer at the spec's that I realized not all 2484 switches are created equal.

The most common one I found showed an inrush of 350 amps with 175 continuous. That is nowhere near high enough amperage rating where the starting circuit being the engine spec's state having around 1000-1100 CCA available. I found a chart online showing the various different sub-models of this part number and determined that a 2484-09 is the one that can carry 1000-amp inrush, so that is the one I ordered.
coach1.jpg

Old switch removed.
coach2.jpg

New switch installed.
coach3.jpg

I had applied some NOCO battery gel on the terminals so I took some brake cleaner and removed the gel as well as hit the lugs with a wire brush to ensure a clean metal to metal contact on the studs. I will reapply some NOCO gel after the connections are tight and secured.
coach4.jpg

Connections made.
coach5.jpg

Before applying the NOCO gel, I wanted to perform another voltage drop test to ensure the switch was not inducing any unwanted resistance into the circuit.
coach6.jpg


Testing using MIN/MAX function:

In a previous post someone had asked about voltage drop testing and someone asked how I performed it, by disabling the ignition or some other means, so I thought I would explain here and maybe assist others to become proficient at this task.

Voltage drop is such a valuable measuring process to incorporate into basic electrical diagnosis because it tests the circuit under load, unlike just testing for resistance. For a voltage drop test to work, there must be current flow to load the circuit.

On a circuit such as a starter circuit where the testing period is relatively short, yes, you could disable the engine from starting, but a much faster means of performing the test is simply using the MIN/MAX function on your VOM. Most meters have this function but I have found many don't use it or know how to use it.

Turn you VOM on to whatever setting you wish to measure, in this case Volts DC. I also don't like to use the "AUTO" range for this as sometimes the reading can be skewed as the meter is seeking to find the correct range, so I generally force the meter to read the way I want it to by hitting the range function until the decimal moves to where I want it. In this case I want to measure millivolts so that is the range I am focused on.

Then hit the MIN/MAX function on your meter. For some reason Snap-on chose to deviate away from the norm and throw a new term into the mix called "RECORD", but it is basically the same as MIN/MAX on every other meter out there. Once that is pushed it turns on that feature and you can go about your test.

Once the test is complete, you push the MIN/MAX (or RECORD on Snap-on) and it will recall the readings that it recorded during the test. One push for minimum another push of the button for maximum reading. If you want to return to real time readings, you can either turn the meter off and back on, or push and hold the MIN/MAX (or RECORD) for about 3-seconds and it will turn the MIN/MAX feature off on the meter.


So I ran the test on my starter circuit and determined that this issue has been corrected. The initial reading I had was 677 millivolts (.677 volts) and it now shows 12 millivolts (.012 volts) which is very much well within the acceptable range for a voltage drop test.
coach7.jpg


I hope that was helpful.

Thanks for looking.
 
OP
Z

zmotorsports

ALLIANCE MEMBER
Joined
Oct 20, 2009
Messages
21,549
Location
Northern Utah
Mike, seems like there must be some unspoken or unknown to us industry standard that puts the first lock at that ~2ft range, I could ask my buddy with a Mohawk to check his.

6x6 blocks are a good idea, I will have to keep that in mind.

Mike, not sure if it's an industry standard or if it's done for costs savings or what the reasoning is, but the lock on my Ammco was a bit lower, but I don't think I ever actually measured it. I just know that with the new lift it was one of the first things both me and my son noticed was how high that first lock was.
 
OP
Z

zmotorsports

ALLIANCE MEMBER
Joined
Oct 20, 2009
Messages
21,549
Location
Northern Utah
After finishing up the coach, and getting out of the RV bay where there is absolutely no air movement, I went back to the main part of the shop to finish up the work on the Jeep, at least I have fans in the shop and there is decent air movement.


I finished greasing the rear driveshaft and the suspension then turned my attention to the brake fluid. I like to replace my brake fluid on the Jeep every other year, which is a bit excessive, but I do it right before our annual Ouray, CO Jeeping trip.

I think I have said this before, but SW Colorado terrain is what I use as my proving grounds because it will push a vehicle and each of its individual systems to the extreme. The climbs are so severe, steep and relentless that the cooling system, transmission, TC and steering all need to be in top condition, then driving down the other side requires the same systems PLUS the braking system.

If any of these systems are compromised or not up to par, that area will reveal them. Other areas we wheel in may present us with warmer ambient temperatures, but a short climb or obstacle here or there in near 100-degree temperatures may push engine temps to 215 degrees or so and maybe make the transmission work a little harder for a quarter mile or so and transmission temperature may rise to 180~ish, but on a climb from 8k feet to over 12k in a matter of a couple miles really pushes both the engine's cooling system as well as the transmission's cooling abilities. It is not uncommon for me to see 230-233 degrees coolant temperature and 195 on the transmission temp. While these temperatures are well within the designed range of the engine and fluids, that is about as high as I ever really see in all of our off-road excursions. I have seen so many vehicles overheat or have other problems in the San Juan Mountains each year so while I look forward to this trip each and every year, I am also nervous each and every year.

I was so pleased when we built my son's WJ several years back that it came out of the shop and performed so well in the mountains around Ouray, CO. The only issue we had on his was that his transmission temperature climbed a little higher than we like to see. He paid close attention to it and notified me when he thought he should pull off and let things cool, which he did and then upon returning home we added some extra transmission cooling to it. But the engine and suspension performed flawlessly. I was really anxious because we had gutted the entire suspension and axle sub assemblies and built the suspension and replaced the axles with JK axles geared to match his engine/transmission and everything performed just as we had hoped. Adding a little extra transmission cooling ability was minor and we still considered it a win.

I generally replace brake fluid every 3-4 years in our relatively arid climate, but the Jeep I do it twice as much just because of Colorado wheeling. I tested the fluid just before sucking out the reservoir and it is still in pretty good condition.
jeep2.jpg

Then went about pulled all of the old fluid out until I see fresh new fluid at each wheel.
jeep1.jpg

After the brake fluid flush. I am surprised that even new fluid isn't a bit closer to zero, but it is what it is I guess. I also don't think these pen style testers are as accurate as I would like them to be. I use them more of a guide than an actual specification if I'm being honest. Even not being 100% accurate, they will help to see trends and give a "fair" indication as to the overall health of the fluid and moisture content.
jeep3.jpg

With the Jeep finished up, tires/wheels reinstalled and torque to spec, it was time for a road test.
jeep4.jpg

jeep5.jpg


Thanks for looking.
 
OP
Z

zmotorsports

ALLIANCE MEMBER
Joined
Oct 20, 2009
Messages
21,549
Location
Northern Utah
Mike I'll have to dig back into your posts on the mudflaps. If I had to complain about the Mickey's it's that they like to retain rocks. Seeing that pic just reminded me.


Keith, I did a video a few years ago showing my rock guard setup on my Jeep after a lot of questions. Here is a link to the video. Hope it is helpful.
 

ScepterToad

Well-known member
Joined
Nov 9, 2023
Messages
350
Keith, I did a video a few years ago showing my rock guard setup on my Jeep after a lot of questions. Here is a link to the video. Hope it is helpful.
Thanks Mike! I'd watched that before, but I'll do a refresher for sure. I really like the front flaps you did. I don't currently have rock chips on the back of the coach and I'd like it to stay that way. The front is bad enough.
 
OP
Z

zmotorsports

ALLIANCE MEMBER
Joined
Oct 20, 2009
Messages
21,549
Location
Northern Utah
Thanks Mike! I'd watched that before, but I'll do a refresher for sure. I really like the front flaps you did. I don't currently have rock chips on the back of the coach and I'd like it to stay that way. The front is bad enough.

Happy to help Keith. I was hell bent on finding a solution before painting our coach and I can happily report that since the addition of these rock guards I have not incurred a single rock chip on the back of the coach in over 50k miles now. But yeah, I do have a few on the front of the Jeep from normal driving. I may have to repaint my hood and grille at some point, but currently it's not bad. My truck on the other hand.....it needs a hood repaint desperately. Just waiting for the temperatures to cool a bit here along the Wasatch Front.
 
To avoid these ads, REGISTER NOW!

madison069

Well-known member
Joined
Nov 5, 2010
Messages
4,321
Location
Monroeville, PA
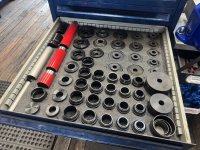
IMG_0049.jpeg
Mike thanks for the recommendation for the Arizona Transmission bearing drift set. Just got it and it’s very well made. I hate blow molded cases tho.
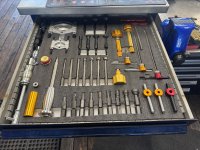
IMG_0083.jpeg
So added it to the drawer with other set of larger drifts.
IMG_0086.jpeg
Combined with my Enduro set I have a pretty complete range covered now!
IMG_0078.jpeg

I guess I need to step my game up, I’m over here using sockets, pipes, and pieces of wood to drive home bearings, 😗

I’ve been eyeballing those bearing sets but the price vs how many bearings I’m installing isn’t justified at this time.
 

Grant Gunderson

Well-known member
Joined
May 17, 2013
Messages
2,340
Location
Bellingham, WA
I guess I need to step my game up, I’m over here using sockets, pipes, and pieces of wood to drive home bearings, 😗

I’ve been eyeballing those bearing sets but the price vs how many bearings I’m installing isn’t justified at this time.
I’ve done a lot with sockets and threaded rod in the past. I’m doing several thousand dollars worth of bearings every week, so having a full set of proper tools makes it a hell of a lot quicker and more precise. No matter what you use, just be sure you always press and never hammer bearings in / out.
 

madison069

Well-known member
Joined
Nov 5, 2010
Messages
4,321
Location
Monroeville, PA
I’ve done a lot with sockets and threaded rod in the past. I’m doing several thousand dollars worth of bearings every week, so having a full set of proper tools makes it a hell of a lot quicker and more precise. No matter what you use, just be sure you always press and never hammer bearings in / out.

That’s the biggest change in my garage, buying a press to change my habit of hammering things in.
 

ntsqd

Well-known member
Joined
Jan 22, 2005
Messages
1,018
Location
Lower left coast
I don't have a problem with using a hammer and a brass drift (usually a piece of bar stock out of the rems bin) to set bearing races. Done well it is a slow process, so for that reason alone I wouldn't do it on someone else's dime. Seals are a lot tougher to install that way without distorting them and I try not to do it.

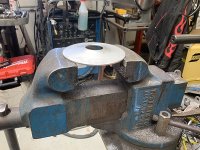
The used Nugier press that I bought came with a bunch of special tools. One is marked "Lola Rear Hub" in yellow paint pen. That might have been for the T70 that I heard about, but never saw. I make another such tool when none of those in the bin match what I need to do. I used one of them to form conic shape in the top and de-aeration discs for my remote PS reservoir.
i-976sxwJ-S.jpgi-FjDw2QH-S.jpg
 

PhantomEB

Well-known member
Joined
Feb 6, 2006
Messages
6,889
Location
Medicine Hat, AB, Canuckistan
Parker, happy to help and glad to hear the turbo job went well.

Looks like a fun trip to the Rubicon. That is actually on my list of trails that I want to do, but just can't seem to convince the wife we need to stay in a tent for a couple of nights. :unsure: I keep hearing it is getting more difficult each year and if I wait much longer I may have trouble, even on 37's. Afterall, 37's are now the new 35's and 40's are the new 37's. I will never go up to anything over 37's so I may be screwed if I wait much longer. :dunno:

I appreciate your continued support and for following along. Thank you.
Mike. I am actually starting to think the other way around now my bronco been out and about.

I kinda am planning to drop down to 40s but may keep my 42s for winter wheeling.

Rubicon is high up on my list but I think next year will be Verna, UT with the bronco safari and the Bronco RoundUp in Florence Utah. Wife free on both. Shes just happy with a trip somewhere with water around.
 

SilverJimmy

Well-known member
Joined
Apr 14, 2012
Messages
1,716
Location
Prescott/Flagstaff, AZ
Cody, have you ever tried heat, both hot and cold? At the race shop last week one of the projects was getting a new wheel speed reluctor ring installed onto the front axle of the VW Rabbit pickup. With the new turbo diesel it was decided to upgrade the axles and CV joints after one failed during the May El Mirage meet. The new CV was larger so a new reluctor wheel needed to be pressed onto it. After trying to only heat the ring and failing to get it on we tossed the CV joint into the freezer and then went to lunch. After a couple hours in the freezer the CV joint had shrunk to the point that heating the reluctor ring a bit allowed that ring to fall into position, no tapping or pressing required. During my career as a steam plant mechanic we really tried to never press things together, preferring to use heat to expand and or contract materials that had an interference fit. The really fun stuff was when we used liquid nitrogen! 😝
 

madison069

Well-known member
Joined
Nov 5, 2010
Messages
4,321
Location
Monroeville, PA
Cody, have you ever tried heat, both hot and cold? At the race shop last week one of the projects was getting a new wheel speed reluctor ring installed onto the front axle of the VW Rabbit pickup. With the new turbo diesel it was decided to upgrade the axles and CV joints after one failed during the May El Mirage meet. The new CV was larger so a new reluctor wheel needed to be pressed onto it. After trying to only heat the ring and failing to get it on we tossed the CV joint into the freezer and then went to lunch. After a couple hours in the freezer the CV joint had shrunk to the point that heating the reluctor ring a bit allowed that ring to fall into position, no tapping or pressing required. During my career as a steam plant mechanic we really tried to never press things together, preferring to use heat to expand and or contract materials that had an interference fit. The really fun stuff was when we used liquid nitrogen! 😝
Yep! I’ve done some with the torch, but didn’t have a freezer. Now I can say the fridge is another tool in the shop! 😂
 

ntsqd

Well-known member
Joined
Jan 22, 2005
Messages
1,018
Location
Lower left coast
Cody, have you ever tried heat, both hot and cold? At the race shop last week one of the projects was getting a new wheel speed reluctor ring installed onto the front axle of the VW Rabbit pickup. With the new turbo diesel it was decided to upgrade the axles and CV joints after one failed during the May El Mirage meet. The new CV was larger so a new reluctor wheel needed to be pressed onto it. After trying to only heat the ring and failing to get it on we tossed the CV joint into the freezer and then went to lunch. After a couple hours in the freezer the CV joint had shrunk to the point that heating the reluctor ring a bit allowed that ring to fall into position, no tapping or pressing required. During my career as a steam plant mechanic we really tried to never press things together, preferring to use heat to expand and or contract materials that had an interference fit. The really fun stuff was when we used liquid nitrogen! 😝
I don't recall my '84 Caddy having a tone ring anywhere?

A friend used to work for a custom joint prosthesis company. Hip joints were a titanium spike into the top of the femur, the ball at the top was cobalt. No idea how they machined a round blind hole in a cobalt ball, but the Ti spike went into liquid N2 and was then pressed into place. The interference fit must have been something remarkable!

I am envious of Mike's bearing heater. I looked into buying one and decided that I needed to keep an eye out for a used one!
 

SilverJimmy

Well-known member
Joined
Apr 14, 2012
Messages
1,716
Location
Prescott/Flagstaff, AZ
Cody, I have an old toaster oven that I use to heat bearings. I set it to the lowest setting and then check the temp with my infrared temp gun. I try not to heat stuff over 225 degrees which is usually the bearings normal operating temperature. Not going to hurt anything at that low a temperature, at least not anything without seals. I also like to use the oven to heat as it’s an even heat and not localized heat like you get with a torch, no matter how careful you are.
@ntsqd this Caddy is the world‘s fastest, almost 200 mph at Bonneville when it was running a VR6 and now has a 2.0 TDI shooting for 175 @ SpeedWeek next week running on a 171.992 mph record!
 

madison069

Well-known member
Joined
Nov 5, 2010
Messages
4,321
Location
Monroeville, PA
Cody, I have an old toaster oven that I use to heat bearings. I set it to the lowest setting and then check the temp with my infrared temp gun. I try not to heat stuff over 225 degrees which is usually the bearings normal operating temperature. Not going to hurt anything at that low a temperature, at least not anything without seals. I also like to use the oven to heat as it’s an even heat and not localized heat like you get with a torch, no matter how careful you are.
@ntsqd this Caddy is the world‘s fastest, almost 200 mph at Bonneville when it was running a VR6 and now has a 2.0 TDI shooting for 175 @ SpeedWeek next week running on a 171.992 mph record!

When I used the torch, I would spin the hub or what ever on a punch in a vise. This way I heat evenly as possible as I’m spinning the hub. If I do it right, the race just falls off when removing them as I’m heating. I also have a toaster oven for heating bearings too, but I haven’t had to do many where it would slide on a spindle. Most of the time it’s driving them into a hub situation which freezing would have helped them.
 

ntsqd

Well-known member
Joined
Jan 22, 2005
Messages
1,018
Location
Lower left coast
@ntsqd this Caddy is the world‘s fastest, almost 200 mph at Bonneville when it was running a VR6 and now has a 2.0 TDI shooting for 175 @ SpeedWeek next week running on a 171.992 mph record!
Driver must be slight of stature or a contortionist. My 5'11" ~200 lbs frame didn't fit comfortably over the long term. Can't imagine how cramped it is with a cage in there.
 
OP
Z

zmotorsports

ALLIANCE MEMBER
Joined
Oct 20, 2009
Messages
21,549
Location
Northern Utah
IMG_0049.jpeg
Mike thanks for the recommendation for the Arizona Transmission bearing drift set. Just got it and it’s very well made. I hate blow molded cases tho.
IMG_0083.jpeg
So added it to the drawer with other set of larger drifts.
IMG_0086.jpeg
Combined with my Enduro set I have a pretty complete range covered now!
IMG_0078.jpeg


Nice Grant. Glad you like it. I like the way you situated it into your Vidmar cabinet. I have mixed feelings on blow molded cases, I do not care for them in my main toolbox as they are space wasters. However, for things used less frequently I do like them for storing vertical in my cabinets for easy access.


I guess I need to step my game up, I’m over here using sockets, pipes, and pieces of wood to drive home bearings, 😗

I’ve been eyeballing those bearing sets but the price vs how many bearings I’m installing isn’t justified at this time.

That’s the biggest change in my garage, buying a press to change my habit of hammering things in.

Cody, I used sockets, pipes, old bearing races turned down and engine wrist pins for many years. I generally just turned down what I needed at the time, but the ATM EZ-Driver set is a game changer. It's so much nicer to walk to the cabinet and grab the size I need vs. scrounging through past adaptations or have to modify something at the time needed. I still find myself needing to do that on occasion, but these days it is the exception rather than the rule.

I also agree about having a hydraulic press being a gamechanger. Growing up on the farm, we beat all bearings and races into position regardless of the application. I can only remember a handful of times that my dad packed things up to run up to my uncle's shop to use their press. When I started my career as an industrial maintenance mechanic, having access to a hydraulic press daily in the shop was both good and bad. Good when I needed it, but bad when I needed one at home and didn't have access to one because once I got away from hammering on bearings, races, bushings, etc. I didn't want to go back, especially after a few vendor sponsored classes on bearings. When I had the opportunity to purchase the same Nugier hydraulic press I had been using since 1988 when I started my career, I jumped on it.


I don't have a problem with using a hammer and a brass drift (usually a piece of bar stock out of the rems bin) to set bearing races. Done well it is a slow process, so for that reason alone I wouldn't do it on someone else's dime. Seals are a lot tougher to install that way without distorting them and I try not to do it.

The used Nugier press that I bought came with a bunch of special tools. One is marked "Lola Rear Hub" in yellow paint pen. That might have been for the T70 that I heard about, but never saw. I make another such tool when none of those in the bin match what I need to do. I used one of them to form conic shape in the top and de-aeration discs for my remote PS reservoir.
i-976sxwJ-S.jpgi-FjDw2QH-S.jpg

Thom, I agree that I will use a hammer and brass or bronze drift on bearing races, but I refuse to drive bearings on. Seals? Kind of hit and miss depending on application and/or access. When I drive them on I will pack the back around the spring with grease to prevent the tension spring from coming off.

I noticed you mentioned Nugier press, that is what mine is also. I purchased my Nugier 20-ton hydraulic press back in about mid-90's when our company purchased several new air over hydraulic 40-ton presses. It leaked out of the cylinder and I had to replace the packings and straighten the bridge, but overall it is still in excellent condition. I think when I bought it the thing was already 15-20 years old and I've had it now for 30 years, so it's probably in the 40-50 year old range. One of the best hydraulic presses I have used.
 
OP
Z

zmotorsports

ALLIANCE MEMBER
Joined
Oct 20, 2009
Messages
21,549
Location
Northern Utah
I forgot to post these pictures from last week.

I had cut the Cole Hersee rotary switch apart to see where my high resistance originated. I think it is pretty evident where it started. :unsure:

switch1.jpg

switch2.jpg

switch3.jpg

switch4.jpg


Although a totally sealed switch would probably withstand the environment a bit better, I still can't complain for being 24 years old.
 

ntsqd

Well-known member
Joined
Jan 22, 2005
Messages
1,018
Location
Lower left coast
Remarkable how crude they are, isn't it? It works, why put more cost into them than needed? I'd be surprised if my preferred marine switches are any less crude inside, just perhaps (hopefully) more heavily built.

The hermetically sealed switches that I suggested have a back-fill gas in them that inhibits arcing. Some may even have arc suppression magnets in them, I don't recall if that feature made it over to the manual switches or not. They are in the contactors made by both companies, which is why they have a polarity marked on them. When you see that kind of marking on a contactor (when it shouldn't matter otherwise) the usual reason is because of those magnets.

My press was part of a purchase of all of the machine tools, except the LeBlond lathe which had been cherry-picked, out of the vintage racing / touring car shop that I worked in. Started out that I was using them while storing them while the shop was in hiatus during the owner's dealing with health problems, but when he went to re-open it in a new location (old one was sold) his main customer told him to just source new to him equipment and he'd foot the bill. So I was offered an exceptional deal. I've had it since '01 and it wasn't young then. I do wish that it had the 2 speed pump that the bigger presses got, but I don't think Nugier offered that on the 20t's.
 
OP
Z

zmotorsports

ALLIANCE MEMBER
Joined
Oct 20, 2009
Messages
21,549
Location
Northern Utah
I hope everyone had a great weekend. I'm not gonna lie, I got absolutely nothing accomplished this past weekend, other than a bit of reflecting and maybe even realizing I have a little regret. :unsure:


I was contacted a few weeks ago about the Stag's Car Club's open house/car show on Saturday. The Stag's Car Club is a local car club that was established back around late 50's, 1957 if memory serves. I was a member of the Stag's in the early 90's, around 1990-1995 while I was building our 1940 Chev coupe. I was young and was just building my first "hot rod" from the ground up. There were a couple of club members that were decent to me, but being young and not driving anything "cool" at the time I was kind of pushed by the wayside and not really welcomed into the club the way I had hoped nor allowed to work on the club's race car. I stood by and figured I had to buy my time while learning and figuring out where I fit in the group, but in 1995 when I finished my street rod and it was a hit I realized that many of these same guys who didn't give me the time of day now all of a sudden started wanting things from me, and of course something for nothing, so I left the club and sought out another local club that seemed to be a bit more family oriented. I also left that club around 2002 as well when I completely stepped away from the local car scene altogether.

All that being said, back in late 2016 when the wife and I were buying our forever home and getting ready to build my dream shop, we were buying some new flooring from a local flooring store where we had purchased hardwood and carpet for our last home. I was talking to the guy arranging installation and I had asked him if he knew any good house painters as we wanted to have the house painted before flooring was done and before moving in. He gave me a name, and I realized it was a gentleman from the Stag's Car Club whom I had known many years prior, he and his son had a house painting business. I called him and he came out to give me an estimate where he recognized me immediately and we hit it off, again.

Fast forward and he has reached out to me each summer to let me know about the club's open house and when he called this year I actually said I might take him up on it. Well, I had forgotten all about it until Friday evening when I was home mowing my lawn and my cousin called to see if I was planning on going to the Stag's Car Club's open house the next morning. He is a member of the Beehive A's Car Club and his club was planning on showing a presence there. I looked at the car under the cover and thought, well, maybe I'll just take the Jeep over for a couple of hours. The wife had a luncheon with a friend on Saturday, so she told me I should go.

Saturday morning rather than taking the Jeep, I pulled the cover off the Camaro, gave it a dusting and wipe down, thinking that maybe we'd go for a drive in the car afterwards. I told her I wasn't going to be long and just go for an hour or two. Well, I ended up being there a lot longer than I expected.

Car shined up as departing.
sat1.jpg

sat2.jpg

I got there a half hour early and was shocked at how many vehicles were there already.
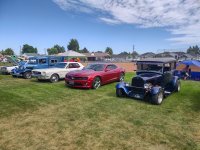
sat3.jpg

I heard later in the day that the count had exceeded 400 cars.
sat4.jpg

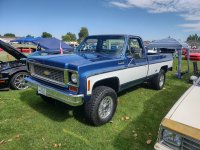
This immaculate old '78 K20 caught my eye and I had to snap a picture for my son.
sat5.jpg

This clean Tudor belongs to a friend of my cousin. He actually purchased my engine hoist last year as well.
sat6.jpg

This was a unique build.
sat7.jpg

Can you count the spark plugs? :bounce:
sat8.jpg

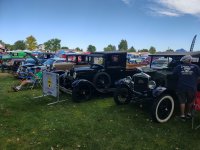
My cousin's 1927 touring sedan and his wife's 1929 Model A pickup were front and center at their club's display.
sat9.jpg

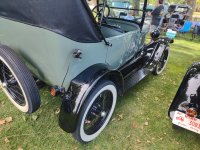
My cousin bought this in boxes back in the late 90's. He insisted in keeping it original. He and his dad, my uncle who got my wife and I involved in RV's did all of the work. I did a little welding on some cast iron parts and machined a few shafts and bores for seals in the powertrain as well.
sat10.jpg

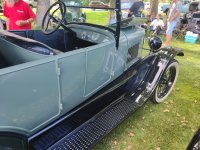
My uncle did most all of the sheet metal work and my cousin painted it. I think it was 2005 when my cousin completed it because he mentioned he was able to give his wife one ride in it just before she passed away from cancer.
sat11.jpg

This is the club's race car that they have raced for several decades now. It was white with purple flames in the early 90's when I was a member.
sat12.jpg


I was kind of surprised at how many people I recognized as well as hearing of how many had passed or were in poor health. Several I recognized them, but couldn't remember their names and more than I expected remembered me. It was nice to visit with them, but for the most part I didn't do much but stand back and observe more than anything. I find myself much more of an observer these days in groups rather than participating in the discussions, so it was interesting to stand back and make some observations.

One thing really struck me and gave me reason to pause. The one thing that really bothered me all those years ago at car shows was the same people coming up to me and telling me the same stories of their past and telling me that they would have done things differently on my car that what I did. After listening to that for several years I got fed up with it and walked away in 2002. However, watching and listening to people now, it finally hit me. These people are reminiscing of days gone by and keeping memories alive by telling their stories. It hit me like a brick. I listened to my cousin tell stories to people that I have heard at least a dozen times and I'm sure many of them had heard these stories already as well, but they politely stood there and listened to each and every one.

I decided to sit over with the Beehive A's as they had shade, and it was over 100-degrees on Saturday. I have done some work for several guys from my cousin's car club so I knew a few of them and they were a welcoming group of people. As my cousin introduced me to people, some knew me, some knew of me and others were happy to meet me. I have not participated in a car show in nearly 25 year so I was very anxious about going, but this group made me feel right at home.

As I was sitting in the background and trying to stay cool, several members from the Stag's came up to me and said hello. I had a guy make a comment about he thought I had packed up and left the state. Another said he wondered where I disappeared to. When we walked up the food wagon to grab a hot dog, I was with about a half dozen guys from my cousin's club and one of the Stag's members whom I remembered well from the early 90's came right up to me and said he "thought I fell off the face of the earth".

After visiting with him for about 10-minutes and walking back to the shade, my cousin asked me what these people meant by disappearing and falling off the face of the earth. I told my cousin that when I left the local car scene, I completely walked away and didn't look back.

I had built the yellow 1936 that I've shown in my thread previously for a local gentleman who owned a business in Ogden. He is the gentleman who recently passed away a few months back. He came to me shortly after our street rod came out in Street Rodder magazine and asked that I build his car, which I agreed to, and it entered my shop in mid-1997 when I first obtained my business license. I completed that car in early 2000 so he could hit the local car show circuit throughout 2000. His was the first street rod I built completely from the frame up once I got my business license in 1997. After completing his street rod, he had me do some smaller odds & ends and then quite a bit of work on his 1957 Bel Air around late 2001 and early 2002 where we put a crate 502 and Tremec 6-speed in it, along with some chassis work. I had fabricated some motor mounts, transmission mounts, modified clutch pedal and added a hydraulic clutch for him. I remember him coming to me again in late summer of 2002 asking me to do another build that he was bouncing around in his head, but I had just lost my dad in July of 2002 and was wanting to get more into the sand toys. I remember telling him I was walking away from cars and focusing on sand toys and bikes at the time and that was when I completely walked away from the car scene.

I thought the sand toys were something that we as a family would continue to embrace for many, many years to come and I thought by shifting attention that direction would allow me to focus more specifically on sand quads and sand rails. Unfortunately, when my son got tired of sand toys and wanted to shift gears into Jeeps when he acquired his driver's license, we ended up getting completely out of the sand toys as well. In 2012 we sold everything sand related.

Upon doing some reflecting over the weekend, I think I may have made a mistake and although I'm not one for regrets, I think regret is the best way to describe the feeling I am having.
 
OP
Z

zmotorsports

ALLIANCE MEMBER
Joined
Oct 20, 2009
Messages
21,549
Location
Northern Utah
Clubs are for seals...😉


Screenshot_20260727_072832_Chrome.jpg

I guess I should have been more clear Scott. I'm not regretting leaving either of the clubs that I have been a part of, I do think I regret walking away from the car scene however. Both of the local car clubs I was a part of got under my skin as far as poeple wanting something for nothing once they saw what I had to offer. It was the exact same with the local Jeep club I became a member of decades later. It was especially troubling and frustrating during the pandemic when every idiot came out of the woodwork to buy a Jeep and go off-roading, which is why I dropped out of that club in 2023. The national Jeep club we are a part of is "ok", but the wife and I are only able to participate in one or two gatherings a year, so not all that involved.

I'm not wanting to get back into any clubs, but I am wishing I wouldn't have completely walked away from the car scene all those years ago. Now that I am wanting to build something else, I am at the point of all our discretionary funds going towards paying the house off as soon as possible for retirement and boosting our portfolio, so I can't bring myself to "splurge" on a car project at this time.
 

fouckhest

Well-known member
Joined
Jul 24, 2013
Messages
1,910
Location
Greer, SC
I can understand and appreciate using the term, "regret," Mike. Clubs are tricky and it seems that no matter what the genera, I saw it in our local VW/Audi club before that imploded, I've heard about it in the local hot rod clubs, I think its unavoidable.

All that to say, now that you have a grandson that seems to be into all things with wheels and motors, combined with the fact you have a cool Jeep and new muscle car, it should be easy to dip your toes back into going to local shows, cars & coffee type events, etc.

I would view it as a learning experience and while sometimes cold turkey is a great move, lessons can always be learned.
 
To avoid these ads, REGISTER NOW!
Top Bottom