Now we hop in the Wayback Machine and travel to Fathers Day.
MGT knew that the graveyard of furniture occupying an entire wall of the shop had annoyed me for some time. Every time she upgrades a desk or a nightstand or a dresser or an end table, the piece that gets replaced is "temporarily" stored against one wall of the shop. There wasn't anything there, anyway, but what this has effectively done is shrink the width of the shop by a bit in the only open work area. It's been a problem for so long that I'd given up and just started using these random pieces of furniture for temporary storage or work tables. You know, flat surfaces on which to pile stuff and then walk away.
She decided to do something about it for Fathers Day. And, because she's smart, she asked first instead of taking the surprise route. She knows how picky I am with certain things. I told her it was a fantastic idea and I'd love to have some actual shop furniture lining that wall. A row of steel cabinets under the windows, capped with a nice worktop. I could easily fit a dozen feet of cabinets in that space, so some careful shopping was in order to avoid the project budget ballooning out of control.
Of all places, she found that the cheapest matching steel cabinets with a combination of drawers and shelves are mail order items from Target. I had no idea what I was in for until I saw the boxes that they came in. Boxes impossibly small for large cabinets.
Turns out these things wouldn't have been out of place coming from Ikea. Complete assembly required, all screwed together instead of welded/riveted. I spent an entire afternoon watching both the men's and women's soccer teams play friendlies (both 2-0 losses) while assembling four cabinets, so no small task. Once assembled, I was decently surprised at how strong they were, but there was a problem: I wanted these cabinets stacked side by side like a single unit, but they couldn't be shoved flush together because the sides were a scatter plot of domed screw heads. My solution was spacer strips of birch ply between cabinets to hide the gaps and screw heads, with sheetmetal screws keeping the cabinets attached to each other:

I think this took a whole extra afternoon.

Once they were all attached together into one big unit, I used a laser and bolts screwed into the caster mounting locations to level them on my wavy floor. Also annoying and time-consuming.
My first plan for a worktop was butcher block, but the long and narrow shape of this row of cabinets was going to mean having to buy and discard a lot of extra. It was going to be pretty costly. Concrete and rebar is pretty cheap, though, and I do like a concrete countertop...
I decided countertop mix would be overkill for this, opting instead for relatively cheap high strength crack resistant mix. This would end up being a huge mistake, but I wouldn't know that for some time because of how long and tedious of a job it was getting things formed up and ready:

My next biggest mistake was in caulking the gaps. Or, more accurately, not caulking all of them. I caulked every seam between cabinet and form board, but it didn't occur to me that these cabinets were only screwed together: There were seams in the tops of the cabinets themselves. Not caulking
those seams was about to cause me a LOT of cleanup, which I discovered immediately after I started dumping wet mix into the forms:
You can barely see some of the drips running down the inside of the cabinets and pooling on the bottom. This picture was taken after quite a bit of cleanup, then returning the next day. One aspect of the pour that I was pretty happy with was my improvised ******** that I made by hollowing out some random plastic stock and pressing it onto an SDS bit:

This might have worked a bit TOO well! Or maybe I just mixed my concrete a bit too wet. Hit it with the SDS, and there would almost instantly be a puddle on top. Regardless, I was pretty happy with the rough result after taking off the forms and wiping things down a bit more:

There'll always be a haze on the inside of the cabinets, but I'm not too bothered by it. What I was bothered by was what happened when I came back several days later and tried diamond-polishing the surface with diamond pads on the RO sander. This worked really well for my bathroom countertop, but the only thing it achieved here was making another huge mess:

It pretty much instantly evaporated the sand and cement but had zero impact on the aggregate, leaving the surface even rougher than before. I have several theories as to why it didn't work this time:
- Wrong mix. You don't want tufts of fiberglass on your countertop surface. Also, aggregate is bigger.
- Too much water in the mix, plus all of that moisture vibrated to the top before polishing.
- Too soon. Not fully cured before polishing.
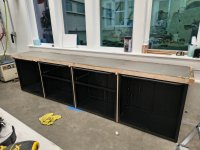
If I had to guess, it was a bit of column A, a bit of column B, and a lot of column C. In the end, though, I was out less than $700 for about 10 feet of cabinets and countertop, and I figured I'd just coat the countertop in polyurea to smooth it out and be done with it. Here's as far as I got on the project before I had to put it off for more pressing problems:

I wish I could say that they still look like that, ready to be finished and filled with various sundries, but instead they look like this:

That's MGT's battlestation, on the big butcher block desktop that I made her, on my new cabinets. Until I finish rebuilding her office, this is where she'll be doing her work. And since this work is photo editing, it means that the lights can't be on while she's working. Which means I'm frequently without a shop until her office is rebuilt. Which is nice.
I still haven't even gotten around to putting anything in three out of the four cabinets...