To avoid these ads, REGISTER NOW!

Atlas Model 53 Drill Press Restoration - Lots of Pictures

OP
C

chargedmr2

Well-known member
Joined
Sep 18, 2019
Messages
229
Location
WA
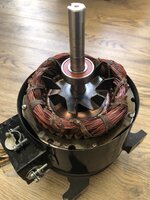
And here’s the motor after a little cleaning. Overall it really looked good inside:
IMG_5143.jpeg

IMG_5145.jpeg

The old bearings were shielded MRC bearings and I’m glad I opened the motor since both bearings, but especially the bottom bearing, had a bit of play. They could possibly be repacked with grease and put back into service, but I don’t have experience with that. So, I went ahead and ordered replacement Nachi bearings. Here are the old ones, which I believe were original:
IMG_5144.jpeg

I opted for sealed bearings and the current model numbers are 6203 and 6301. Once they arrive, I’ll get this motor back together and hopefully it will be good to go for a nice long time.
 
Last edited:
To avoid these ads, REGISTER NOW!
OP
C

chargedmr2

Well-known member
Joined
Sep 18, 2019
Messages
229
Location
WA
The correct bracket and depth stop gauge arrived yesterday thanks to a gentleman who agreed to part with it. I located his Atlas 53 drill press for sale on FBMP in ME. After a USPS trip to the opposite side of the country (WA), I got it cleaned up and installed. Much better than the one my DP came with:
DSC03575.jpeg
 
OP
C

chargedmr2

Well-known member
Joined
Sep 18, 2019
Messages
229
Location
WA
Couple more updates. This has been a fun project, and part of the fun has been tracking down replacement parts.

With a lot more digging around, I found a small business that specializes in servicing Walker Turner tools out in CT. I’m missing the cover on my motor for the wiring junction box, so I reached out, and to my surprise they had one. My motor pulley is worn out, and it turns out they had the exact Atlas pulley (part 53-30) in excellent condition as well. So, both parts are on the way.

Also, I cleaned up the rotor, which is waiting for the new bearings that should arrive in a few days.
DSC03578.jpeg
 
OP
C

chargedmr2

Well-known member
Joined
Sep 18, 2019
Messages
229
Location
WA
The bearings for the motor came in the mail today, so I made a little more progress.

I bought some more Nachi bearings:IMG_5204.jpeg

I picked these bearings since they’re made in Japan and have a good reputation. But, looks like they are not all made in Japan after all. The one on the left is clearly marked Japan on the box and bearing, but the one on the right has zero indication of where it was made (nothing on the box or on the bearing, itself). I’m pretty sure we can guess what country it came from. Oh well. I’ll just trust that Nachi operates quality manufacturing plants in China and hope for the best.

Anyhow, here they are installed with the rotor and stator core back in place.

IMG_5199.jpegIMG_5201.jpeg

I soldered the capacitor back on and closed everything up. Spins nice and smooth by hand but I’ll have to wait until tomorrow to wire the rest up and take it for a spin.
IMG_5202.jpeg

I finally did get around to figuring out how things work in these electric motors. I came across a good video that shows how centrifugal switches work, so now all of those mysterious parts under the rotor make good sense to me. Really a pretty cool design. Here’s that video if anyone is interested: LINK
 
OP
C

chargedmr2

Well-known member
Joined
Sep 18, 2019
Messages
229
Location
WA
Ok, I was going to wait until tomorrow to power this motor up, but I decided to go ahead and get it done tonight.

Earlier in this thread I said the motor purred like a kitten. Well, I was completely wrong.

The new bearings made a huge improvement. Now it runs nearly silent, save for a very slight electrical hum. Rewarding to see this WWII era machine running like new. I had to turn that motor on and off more than a couple times to hear it effortlessly spinning in silence.

New motor pulley should be here Wednesday, so hopefully it’s good to go after that.
 
OP
C

chargedmr2

Well-known member
Joined
Sep 18, 2019
Messages
229
Location
WA
My replacement motor pulley showed up a couple days ago along with the cover for the electrical junction box:
IMG_5216.jpeg
IMG_5217.jpeg

Got them both installed and cobbled together a nice sturdy stand for the drill press’ new home. IMG_5230.jpeg

Still need to sort the spindle taper and get a new chuck. Almost ready for service.
 

FrankLee

Well-known member
Joined
Sep 13, 2010
Messages
3,631
Location
seMI, 48317
I guess I had too much fun getting this drill press restored. I came across this Model 64 and couldn't resist, so I'll have to post a new thread when I get around to restoring this one as well:
You'll like that improved return spring design.
 
To avoid these ads, REGISTER NOW!
OP
C

chargedmr2

Well-known member
Joined
Sep 18, 2019
Messages
229
Location
WA
You'll like that improved return spring design.
Agree, adjusting the tension on the Model 53 is kind of a pain.

Also looking forward to having the collar on the column just under the head. I already had a project I was working on with the Model 53 where it would have helped:

IMG_5259.jpeg
 

tubes_rule

Well-known member
Joined
Dec 12, 2023
Messages
46
I just found your beautiful project, I have the exact atlas but mine is just like yours lacks the atlas badge on the body and it has the aluminum badge on the spindle cover. That was the reason I was doing some research. Most be a reason.
 

hpmachining

Member
Joined
Aug 12, 2026
Messages
8
Wow, thanks so much for this thread! I just picked up one of these. I posted a picture in the introduction threads. This thread will help me a lot. I do want to comment about the wiring for the switch. It looks like you have the neutral running to the switch and the hot directly to the motor. If so, I think that should be the other way around.
 
OP
C

chargedmr2

Well-known member
Joined
Sep 18, 2019
Messages
229
Location
WA
Wow, thanks so much for this thread! I just picked up one of these. I posted a picture in the introduction threads. This thread will help me a lot. I do want to comment about the wiring for the switch. It looks like you have the neutral running to the switch and the hot directly to the motor. If so, I think that should be the other way around.
I had a blast with this restoration. It was my first one. I ended up restoring that second Atlas drill press that I posted above, and when I did, I realized the wiring was not the same as the first. It (correctly) had the hot running to the switch as you mentioned. Anyhow, I did end up going back and reversing this on the first drill press, so they are now both as you described.

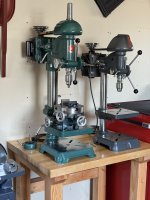
Here they are on the table I built for them both just recently. I'll check out your thread on yours.

IMG_8339.jpeg
 

hpmachining

Member
Joined
Aug 12, 2026
Messages
8
Nice! Not only did you do a fantastic job restoring those drill presses, that's a sweet looking bench you made for them! I was thinking of making a bench top like that for mine by laminating pieces cut from pallet studs and putting it on a harbor freight stand that I have. I'm jealous of yours :)
 

Placeholder17

Well-known member
Joined
Feb 25, 2024
Messages
107
Location
Maryland
Regarding removing stuck ball bearings in housings, if you can't get a puller in:

  • Heat the housing with a torch (heating only needed if original bearings were press-fit, not slip-fit and just frozen by dried grease)
  • Bang on the perimeter of the housing with a wooden mallet if aluminum housing, or a ball peen hammer if steel/cast iron. Hammer in the OPPOSITE direction that you want the bearing to move.
  • The cyclical movement of the impact energy wave actually moves the bearing towards you, opposite your hammering.
  • I never would have thought this would work till I saw a random Youtube restoration video, but I've used it incessantly on random power tools and gear boxes ever since. It will even get a press-fit stator to back out of an aluminum housing from a hand-held power tool like a drill, saw, or angle grinder.
 
To avoid these ads, REGISTER NOW!
Top Bottom