To avoid these ads, REGISTER NOW!

Questions for Cutting Framing for a new NM-B run (old work)

Reborn

Well-known member
Joined
Dec 31, 2017
Messages
120
Location
SoCal
This weekend warrior is tackling another project, and as usual, I've got questions. I'm sure I'm overthinking a lot of this, but I'd rather make decisions with the right information.

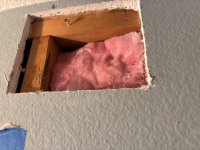
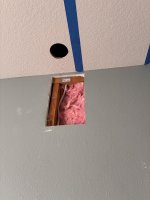
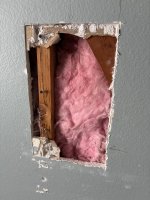
I'm adding a ceiling box for a light fixture into the ceiling of a bedroom. For the new NM-B run, I'm traversing the ceiling and going down a wall to tap into the switched outlet. This wall is shared with the garage. This bedroom is on the first floor, and the second story of the house is above. The second story extends over the garage a bit (approximately 20% of the garage depth). To give the lay of the land, the first photo is taken from the center of the room. You can see my drywall cuts for running the NM-B. The next photo is from the ceiling cut where I will install the box at the center of the room toward the wall in question. The 3rd photo is the same photo taken from the ceiling hole near the wall. In the wall, there is a standard 2x4 stud and 2 stacked 2x4s for the top plate - I need to drill through this top plate to run the wire.

1.) Any kind of description on the construction above my ceiling/what I'm looking at would be helpful. I assume the top OSB is the subfloor of my second floor?

Answered: I-joists/engineered joists

2.) Updated: see schematic. This is a cross-section view: imagine rotating your view 90 deg from the way the photos are taken, and looking through all the materials - that's what I tried to sketch. Based on the posts thus far, the black rectangle represents my proposed hole. Any structural issues with this? I would make the hole near the stud that is visible in my first photo. And do I still need nail plates even if it's the top plate? The schematic is to scale, only exception being that I guessed on the widths of the I-joist based on what I could measure (the width closest to the proposed hole).

3.) Switching gears to the ceiling box, it's looking like I need to add blocking to the joist running along the right side in the images to properly attach the box. There is only 9/16" of joist flange until the OSB gets in the way, so I need to cut an opening on the OSB to stick my blocking into the correct position. Any concerns or anything else I need to do here? Perhaps fire-rated greatstuff expanding foam when I'm done? I am planning to secure the blocking from below the ceiling (through the drywall, then patch the screw holes).

Anything else I'm not thinking about that I should? Thanks in advance!
 

Attachments

  • IMG_4807.jpeg
    IMG_4807.jpeg
    118.8 KB · Views: 62
  • IMG_4803.jpeg
    IMG_4803.jpeg
    42.3 KB · Views: 57
  • IMG_4804.jpeg
    IMG_4804.jpeg
    80.9 KB · Views: 57
  • sketch.jpg
    sketch.jpg
    134.9 KB · Views: 39
  • IMG_4808.jpeg
    IMG_4808.jpeg
    135 KB · Views: 45
Last edited:
To avoid these ads, REGISTER NOW!
OP
R

Reborn

Well-known member
Joined
Dec 31, 2017
Messages
120
Location
SoCal
That was already super helpful and at least limits my 'options' I was evaluating, so thank you very much. Please let me know what I can make more clear - I really want to make sure I don't muck up anything structural.
 

larry4406

Well-known member
Joined
Jan 27, 2006
Messages
20,216
Location
Northern Virginia
That was already super helpful and at least limits my 'options' I was evaluating, so thank you very much. Please let me know what I can make more clear - I really want to make sure I don't muck up anything structural.
I need to look at this on my desk top monitor vs phone!

I will try after dinner. Bear with me.
 
OP
R

Reborn

Well-known member
Joined
Dec 31, 2017
Messages
120
Location
SoCal
No rush at all. I made those cuts yesterday, and the project is on pause at least for the rest of the day. I appreciate it!
 

dscheidt

Well-known member
Joined
Apr 26, 2017
Messages
2,952
Don't cut your subfloor if you can do the work through the drywall. Drywall is much easier to fix. I'm not clear what you're saying about the top plate, though. a better picture or a sketch would help.
 

yatg

Well-known member
Joined
Aug 16, 2019
Messages
2,901
Location
Southern Oregon
You could use a ceiling fan retrofit box and skip any blocking.

You only need to cut a hole for the size of the box. The bar goes into the hole, expands to lock between the joists. pull wire out hole, secure to box, attach box to bar.

If it doesn't feel secure enough because only the legs are pushing on the bottom 2x4 flange, put a short piece of 1x4 on top of the bottom 2x flange on either side against the osb to fill the gap and give the end prongs something to bite info.
you can use caulk or construction adhesive to temporarily hold the 1x, heck, even some double sided tape would work for a the couple minutes you need to expand the locking bar.

easy peasy since you don't have any insulation to fight with.

1786311417576.png
 
OP
R

Reborn

Well-known member
Joined
Dec 31, 2017
Messages
120
Location
SoCal
First post updated with schematic/revised questions to try to make things more clear.


You could use a ceiling fan retrofit box and skip any blocking.
...
Good suggestion. I agree, I'm leaning on going this route or even just doing a recessed can in the center of that ceiling cavity (which coincidentally is dead center for the room) and save myself some headache.
 
To avoid these ads, REGISTER NOW!

larry4406

Well-known member
Joined
Jan 27, 2006
Messages
20,216
Location
Northern Virginia
At the day job with new construction, we use Arlington brand fan boxes, cut sheet attached. Cleaver box as it sits flush to blocking or a joist via a small screw, then larger lags are driven home into the blocking/framing to secure the fan bracket while the cavity to the side contains the wires.

I have used these in remodeling by inserting blocking up thru the drywall hole cut for the bracket, driven blocking screws thru the drywall, and then a small amount of patch and paint.

I have not had good luck with the old work bracket shown in Post 7.

Looks to me like you have a straight shot down the joist bay from the fan to the wall double top plate. Your cross section drawing looks accurate to me.

At the wall, there is a short section of matching joist material that is perpendicular to the joists and parallel to the wall. This is referred to as a blocking panel. It is used to provide roll resistance to joists which span over a wall (you can see insulation behind it thru the gap). Had the joists ended at the wall, rim board material (band board) would have been used.

The flanges on blocking panels can be be drilled if needed though it looks like you have plenty of sill plate forward of the blocking panel flange.

1786359067665.png
 

Attachments

  • Fan Box FB442 Arlington Industries.pdf
    876.9 KB · Views: 7
OP
R

Reborn

Well-known member
Joined
Dec 31, 2017
Messages
120
Location
SoCal
At the day job with new construction, we use Arlington brand fan boxes, cut sheet attached. Cleaver box as it sits flush to blocking or a joist via a small screw, then larger lags are driven home into the blocking/framing to secure the fan bracket while the cavity to the side contains the wires.

I have used these in remodeling by inserting blocking up thru the drywall hole cut for the bracket, driven blocking screws thru the drywall, and then a small amount of patch and paint.

I have not had good luck with the old work bracket shown in Post 7.

Thanks. I generally agree, I tried to stay away from that style box. I originally wanted to go with the style you suggested, actually, but thought screwing in from the side would make my life easy when it was time to ensure it was within 1/4" of the drywall. In a prior post, you said very explicitly not to drill the flange of the engineered joist - presumably, based on this post, you meant a bored hole. Is it ok to drive screws into it (for attaching the blocking)? And is it ok to simply use wood screws? If I stick with wood screws, I'll have enough real estate to affix the blocking on the top of the flange without having to go through the OSB. Honestly, though, this is my least concern - if things get really lazy, I can just go with a recessed light can and make this extremely easy. I'm not putting a fan in here (I'd like to, but the room is too small).

There are also the wing-tip round boxes for attaching to drywall. I considered using one since I'll not have a heavy light fixture, but since they're not rated for ceiling lights, I decided to avoid them.

Looks to me like you have a straight shot down the joist bay from the fan to the wall double top plate. Your cross section drawing looks accurate to me.

At the wall, there is a short section of matching joist material that is perpendicular to the joists and parallel to the wall. This is referred to as a blocking panel. It is used to provide roll resistance to joists which span over a wall (you can see insulation behind it thru the gap). Had the joists ended at the wall, rim board material (band board) would have been used.

The flanges on blocking panels can be be drilled if needed though it looks like you have plenty of sill plate forward of the blocking panel flange.

This is wonderful information, thank you for educating a noobie. So it sounds like I'm all clear to go ahead and make my hole in the top plate, off-centered without any concerns for structural integrity. My life will be easy to run the cable if I can completely avoid the blocking panel and stay "inside" the bedroom. What about the nail guards - I'm guessing it's strictly to code to place them, and it's not like it's hard. I'm just trying to see if I really need to remove another sliver of drywall :)
 
Last edited:

OccupantRJ

Well-known member
Joined
May 15, 2009
Messages
11,491
Location
Eastern North Carolina
I have a DeWalt 90 degree battery drill that my son and I both have used on occasion to drill down through top plates in tight quarters. I have also drilled at an angle upward through an opening similar to yours. If you want a nail plate without it telegraphing through the small drywall patch area you could trim away the back of the drywall patch or recess a spot in the top plate for the nail plate to remain flush.
 

larry4406

Well-known member
Joined
Jan 27, 2006
Messages
20,216
Location
Northern Virginia
Thanks. I generally agree, I tried to stay away from that style box. I originally wanted to go with the style you suggested, actually, but thought screwing in from the side would make my life easy when it was time to ensure it was within 1/4" of the drywall. In a prior post, you said very explicitly not to drill the flange of the engineered joist - presumably, based on this post, you meant a bored hole. Is it ok to drive screws into it (for attaching the blocking)? And is it ok to simply use wood screws? If I stick with wood screws, I'll have enough real estate to affix the blocking on the top of the flange without having to go through the OSB. Honestly, though, this is my least concern - if things get really lazy, I can just go with a recessed light can and make this extremely easy. I'm not putting a fan in here (I'd like to, but the room is too small).

There are also the wing-tip round boxes for attaching to drywall. I considered using one since I'll not have a heavy light fixture, but since they're not rated for ceiling lights, I decided to avoid them.


This is wonderful information, thank you for educating a noobie. So it sounds like I'm all clear to go ahead and make my hole in the top plate, off-centered without any concerns for structural integrity. My life will be easy to run the cable if I can completely avoid the blocking panel and stay "inside" the bedroom. What about the nail guards - I'm guessing it's strictly to code to place them, and it's not like it's hard. I'm just trying to see if I really need to remove another sliver of drywall :)
Correct - do not bore holes thru the flanges of an engineered joist.

We use the Arlington fan box and attach to engineered joists if the joist happens to be on the desired fan center location.

When this does not occur, we install blocking between the joists and either use the Arlington box or a metal pancake box.
 
OP
R

Reborn

Well-known member
Joined
Dec 31, 2017
Messages
120
Location
SoCal
Help bring me home, guys...

Shall I put fire-rated greatstuff expanding foam in the bored holes in the top plate and the stud? This wall is shared with the garage, but I'm not sure if it's fire-rated/necessary. Probably overthinking this, but I read that the foam could 'squeeze' the wiring in the hole, but I also read the consensus is that is nonsense. I already have the can of foam, if that helps push it one way or another.

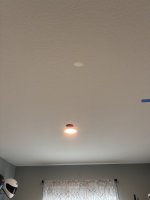
The other 2 photos are for fun. I was getting caught up by that diagonal member when fishing the wire and my stud detector was going nuts. I assumed I had a fire block there, only to cut the hole and see I added some work for no good reason. And let there be light! I got lazy and used a spring loaded led light fixture.
 

Attachments

  • IMG_4848.jpeg
    IMG_4848.jpeg
    672.1 KB · Views: 20
  • IMG_4850.jpeg
    IMG_4850.jpeg
    533.8 KB · Views: 19
  • IMG_4849.jpeg
    IMG_4849.jpeg
    652.5 KB · Views: 19
  • IMG_4852.jpeg
    IMG_4852.jpeg
    541 KB · Views: 20

75gmck25

Well-known member
Joined
Jul 21, 2014
Messages
1,345
Location
Alexandria, VA
IIRC, in my AHJ you are required to foam or caulk around any top and bottom plate penetrations to provide fire blocking. Its a really easy item to inspect when they look at the rough-in, and they seem to love catching the error.
 
To avoid these ads, REGISTER NOW!
Top Bottom