To avoid these ads, REGISTER NOW!

Between 705 & 1200 SQ/FT The Hobby Shop - Down in the Holler (24'x32')

Workspaces between 705 and 1200 squarefeet.
OP
M

Magneto

Well-known member
Joined
Mar 10, 2013
Messages
256
Location
"Relocated from VT to Middle TN"
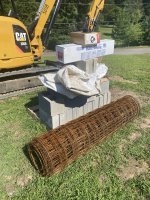
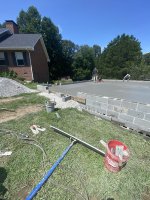
Installed the electrical/CAT6 conduits. Purchased the Pella windows.

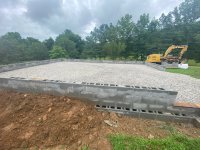
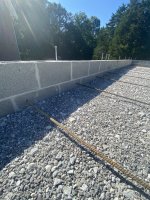
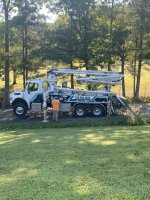
Acquired three estimates to have a 32’ X 24’ slick 4” slab poured at 4000psi (about 10 yards) The requirements of the estimates needed to include the following; check for final grade (I have a pile of 1/2” stone if any areas need leveling), pumper truck needed, fill the interior of the cinder blocks not already done (3 to 4 yards), All 3 estimates range between $6500 to $6900. WOW! Frankly, I wasn’t expecting that much.

IMG_2319.jpegIMG_2315.jpegIMG_2312.jpeg
 
To avoid these ads, REGISTER NOW!

madison069

Well-known member
Joined
Nov 5, 2010
Messages
4,427
Location
Monroeville, PA
Installed the electrical/CAT6 conduits. Purchased the Pella windows.

Acquired three estimates to have a 32’ X 24’ slick 4” slab poured at 4000psi (about 10 yards) The requirements of the estimates needed to include the following; check for final grade (I have a pile of 1/2” stone if any areas need leveling), pumper truck needed, fill the interior of the cinder blocks not already done (3 to 4 yards), All 3 estimates range between $6500 to $6900. WOW! Frankly, I wasn’t expecting that much.

IMG_2319.jpegIMG_2315.jpegIMG_2312.jpeg
I'd be all over that price for that much concrete. That works out to $9 a sqft. But I would go thicker for the floor, at least 5".
 
OP
M

Magneto

Well-known member
Joined
Mar 10, 2013
Messages
256
Location
"Relocated from VT to Middle TN"
I'd be all over that price for that much concrete. That works out to $9 a sqft. But I would go thicker for the floor, at least 5".

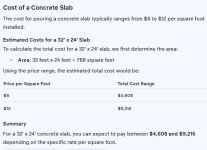
I played around with the DUCK browser AI program after your response and it agrees with you. $9 bucks a sqft is in the medium range. The estimates I received appear to be on point. How the times/costs have changed since my last build in 2013. I'm considering your recommendation of a 5" slab. It would be an additional 2 yards of cement. The benefits of 5" vs. 4" are appealing.


slab.jpg
 

madison069

Well-known member
Joined
Nov 5, 2010
Messages
4,427
Location
Monroeville, PA
You couldn’t compare 2019 prices with today’s price. I cringe about how much i will spend on concrete compare to what it would have cost in 2019.
 

Overboost44

Well-known member
Joined
Apr 29, 2020
Messages
132
Location
MD
Done spreading stone. We are on the money. Slab pour scheduled for next Monday. That should give this last layer of stone some time to settle in. Getting closer to framing.

dd.jpg

d.jpg
How much stone did it end up taking? What depth? Are you tamping it or did they do that for you? My garage will be 26x32, so I am watching with interest.
 
OP
M

Magneto

Well-known member
Joined
Mar 10, 2013
Messages
256
Location
"Relocated from VT to Middle TN"
How much stone did it end up taking? What depth? Are you tamping it or did they do that for you? My garage will be 26x32, so I am watching with interest.
LOTS OF STONE! About 60 ton. There were 3 tri-axle dump truck loads each carrying 20 tons of 3/4”stone that dropped their loads on a level lot down the road from me. My concrete driveway would not support that much weight without damage. That stone was shuttled with a smaller dump truck driving across my lower driveway and up the front lawn to minimize any driveway damage. So far, so good. The back of my shop is 8 block courses high (64”) and the front is 3 blocks. The stone was inserted in stages over a course of 10 days. Each layer was watered with sprinkler or rain which helps the stone to settle. There is a positive drain on the back wall. The Mini-X did the compacting. It’s a strong base. We also brought in a load of 1/2“ stone for final grade if the cement guys need it.
 

Overboost44

Well-known member
Joined
Apr 29, 2020
Messages
132
Location
MD
LOTS OF STONE! About 60 ton. There were 3 tri-axle dump truck loads each carrying 20 tons of 3/4”stone that dropped their loads on a level lot down the road from me. My concrete driveway would not support that much weight without damage. That stone was shuttled with a smaller dump truck driving across my lower driveway and up the front lawn to minimize any driveway damage. So far, so good. The back of my shop is 8 block courses high (64”) and the front is 3 blocks. The stone was inserted in stages over a course of 10 days. Each layer was watered with sprinkler or rain which helps the stone to settle. There is a positive drain on the back wall. The Mini-X did the compacting. It’s a strong base. We also brought in a load of 1/2“ stone for final grade if the cement guys need it.
That's a lot of stone. An internet calc shows me that I need about 23 tons to fill 26x32 at 6" deep. 17 yards. Your actual usage makes me question the internet :unsure:
 
OP
M

Magneto

Well-known member
Joined
Mar 10, 2013
Messages
256
Location
"Relocated from VT to Middle TN"
That's a lot of stone. An internet calc shows me that I need about 23 tons to fill 26x32 at 6" deep. 17 yards. Your actual usage makes me question the internet :unsure:

i stand corrected, my GC told me it was 92 tons of stone. While I was on my 2 week motorcycle trip he had 2 more tri-axle dump loads. Also the 2 large slabs of concrete driveway that was removed and placed inside the foundation.
 
OP
M

Magneto

Well-known member
Joined
Mar 10, 2013
Messages
256
Location
"Relocated from VT to Middle TN"
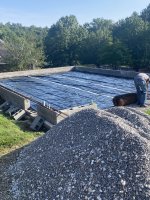
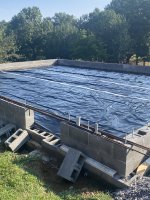
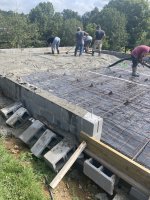
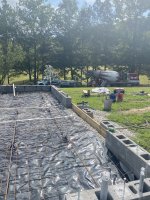
Prepping for the slab. Cut rebar and drilled holes in block for placement. Installed 3 anchor plates with 6 foot all-thread rods through the back wall to tie into the rebar and slab.

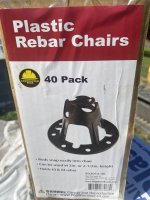
Plastic vapor barrier will go down first. The grid metal will be rolled out on top. The rebar will go next supported by plastic rebar chairs. All will be tied together with wire. Overkill??

All this will be encased in 5” (Thanks Cody) of 4000 psi concrete. The remaining cavities in block wall will be filled with concrete.


IMG_2337.jpegIMG_2339.jpegIMG_2336.jpegIMG_2342.jpegIMG_2343.jpeg
 
Last edited:

Overboost44

Well-known member
Joined
Apr 29, 2020
Messages
132
Location
MD
Prepping for the slab. Cut rebar and drilled holes in block for placement. Installed 3 anchor plates with 6 foot all-thread rods through the back wall to tie into the rebar and slab.

Plastic vapor barrier will go down first. The grid metal will be rolled out on top. The rebar will go next supported by plastic rebar chairs. All will be tied together with wire. Overkill??

All this will be encased in 5” (Thanks Cody) of 4000 psi concrete. The remaining cavities in block wall will be filled with concrete.


IMG_2337.jpegIMG_2339.jpegIMG_2336.jpegIMG_2342.jpegIMG_2343.jpeg
I haven't seen the all-thread rod used before. Is that just to tie the walls in? I don't see a vapor barrier yet, or did you just lay this down to get an idea of the finished product. What are you using for vapor barrier? Are you putting down any insulation?
 

madison069

Well-known member
Joined
Nov 5, 2010
Messages
4,427
Location
Monroeville, PA
Prepping for the slab. Cut rebar and drilled holes in block for placement. Installed 3 anchor plates with 6 foot all-thread rods through the back wall to tie into the rebar and slab.

Plastic vapor barrier will go down first. The grid metal will be rolled out on top. The rebar will go next supported by plastic rebar chairs. All will be tied together with wire. Overkill??

All this will be encased in 5” (Thanks Cody) of 4000 psi concrete. The remaining cavities in block wall will be filled with concrete.


IMG_2337.jpegIMG_2339.jpegIMG_2336.jpegIMG_2342.jpegIMG_2343.jpeg

Not overkill, just be sure the rebars are not in a place where you might want to anchor to the floor one day. Looking good!

Here is what my floor looked like before the pour. 7” of concrete in the rear with 2 rows of rebar and wire panels. Then as it progressed to the front it was 5” of concrete at the garage doors and only wire panels used in the front half of the floor. No cracks except at the expansion joints I saw some before sealing and it’s been 2 years now.
IMG_4326.png
 
To avoid these ads, REGISTER NOW!
OP
M

Magneto

Well-known member
Joined
Mar 10, 2013
Messages
256
Location
"Relocated from VT to Middle TN"
I haven't seen the all-thread rod used before. Is that just to tie the walls in? I don't see a vapor barrier yet, or did you just lay this down to get an idea of the finished product. What are you using for vapor barrier? Are you putting down any insulation?
Exactly, using all-thread to just tie everything together. Vapor barrier is just regular construction grade 6mil plastic. Debated on the insulation, I didn’t use it on my first shop build and heating & cooling efficiency/costs were all good. Passed on it this time as well.
 

Overboost44

Well-known member
Joined
Apr 29, 2020
Messages
132
Location
MD
Exactly, using all-thread to just tie everything together. Vapor barrier is just regular construction grade 6mil plastic. Debated on the insulation, I didn’t use it on my first shop build and heating & cooling efficiency/costs were all good. Passed on it this time as well.
Understood on the insulation. I calculate it will be $2400 for my 900 sq ft.
 
OP
M

Magneto

Well-known member
Joined
Mar 10, 2013
Messages
256
Location
"Relocated from VT to Middle TN"
Not overkill, just be sure the rebars are not in a place where you might want to anchor to the floor one day. Looking good!

Here is what my floor looked like before the pour. 7” of concrete in the rear with 2 rows of rebar and wire panels. Then as it progressed to the front it was 5” of concrete at the garage doors and only wire panels used in the front half of the floor. No cracks except at the expansion joints I saw some before sealing and it’s been 2 years now.
IMG_4326.png
I’m about 10 pages into reading your shop build thread. Very nice job! The decision I need to make before Monday is, do I want control joints cut into the floor. I had them in my old workshop and never had any cracks in the 10 years before I sold it. My GC said I can guarantee you two things about concrete, it will get hard and it will crack. I built my house in VT in 1990 and the unheated garage slab (fiber enforced) never had any cracks, no control cuts, despite the extreme temps in that state. Maybe I was lucky.
 
Last edited:

madison069

Well-known member
Joined
Nov 5, 2010
Messages
4,427
Location
Monroeville, PA
We knew my floor was going to crack due to the two differences in sub bases. As expected it cracked along that expansion joint that’s on top of the middle wall. Hasn’t gotten bigger since I filled the expansion joints.
 
OP
M

Magneto

Well-known member
Joined
Mar 10, 2013
Messages
256
Location
"Relocated from VT to Middle TN"
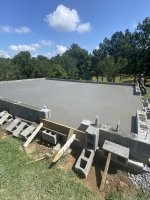
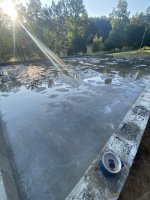
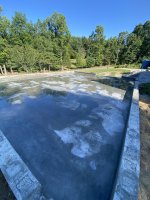
Slab done. Decided to throw some 10 mil vapor barrier under it vs. the 6 mil. I know, but it made me feel better. :unsure: The pour was 5+ inches with some areas (corners) closer to 7”. About 18 yds. That also covered filling the remaining block core. The mason filled about half of them with 2 pallets of bagged mix. Overall, slab looks good. Discovered two spots, in same corner, where the ends of the rolled wire just broke the surface. Should not have happened, but I will Dremel it flat and rust coat it before sealing floor. I’ll spend the next 5 days keeping this slab watered throughout the day to slow down the cure in this TN sun.


.IMG_2421.jpegIMG_2422.jpegIMG_2426.jpegIMG_2430.jpegIMG_2431.jpegIMG_2432.jpegIMG_2433.jpegIMG_2434.jpegIMG_2445.jpegIMG_2448.jpeg
IMG_2439.jpegIMG_2438.jpegIMG_2437.jpeg
 
Last edited:
OP
M

Magneto

Well-known member
Joined
Mar 10, 2013
Messages
256
Location
"Relocated from VT to Middle TN"
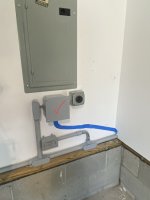
Dang! I been nursing this slab with hourly soakings from sunrise to sunset for the past few days. I didn't want this to bake too fast, so I been spending the time. News today is the trusses are built and sitting at the lumber yard with the wood package, should be delivered by end of week. The framers are scheduled for early next week. Now we'll see some progress. The weather next week is mid 80's, good nail banging weather. I spent some time in the crawl space this weekend running a feeder cable from my garage main panel to the far corner of my house, into a junction box, where it will exit and go underground for about 15 feet to the shop. I also played around with ChatGPT program to see if it would give me a photo rendering of what the workshop will look like. It's not entirely to scale, but it's close. Amazing program. I never played around with it before with photos, only text inquiries. I had fun altering some pics from my recent motorcycle trip out west. I even had it clean up & colorize some old black & white photos from the early 60's. So cool.


before elec.jpegIMG_2455.jpegjunc box.pngIMG_2068.jpegIMG_2069.jpegIMG_2063.jpegIMG_2064.jpegRich3yos.PNG
 
OP
M

Magneto

Well-known member
Joined
Mar 10, 2013
Messages
256
Location
"Relocated from VT to Middle TN"
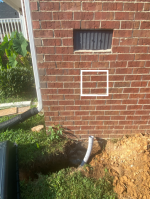
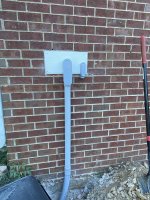
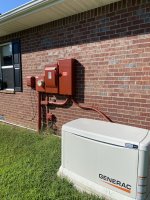
Popped out one of crawl space vents and replaced with a piece of 3/4” pvc for the workshop sub-panel feeder line & CAT6 cable. I don’t use the vents, crawl space is climate controlled. I’ll probably paint it to match the house service panels. I don’t like the Navy ship gray color. Been there, done that for 2 years on the Med. Still watering the slab…..sighhhhhhhh🥱


IMG_2458.jpegIMG_2459.jpegIMG_2463.jpegIMG_2460.jpegIMG_2462.jpegIMG_2457.jpegIMG_2461.jpeg
 
Last edited:

madison069

Well-known member
Joined
Nov 5, 2010
Messages
4,427
Location
Monroeville, PA
I used 15mil vapor barrier for the concrete slab. So, no issues with going with the 10mil for sure!

How was the heat coming off that concrete? It was interesting to sit in the bunker while having the heat radiant off the slab as it cured.
 
OP
M

Magneto

Well-known member
Joined
Mar 10, 2013
Messages
256
Location
"Relocated from VT to Middle TN"
I used 15mil vapor barrier for the concrete slab. So, no issues with going with the 10mil for sure!

How was the heat coming off that concrete? It was interesting to sit in the bunker while having the heat radiant off the slab as it cured.
It was throwing some good heat the first couple days. Today is cloudy and we have some rain, so I got a reprieve from watering.
 
To avoid these ads, REGISTER NOW!
Top Bottom