To avoid these ads, REGISTER NOW!

What did you do "IN" your garage today?

Beerhippie

Well-known member
Joined
Oct 13, 2023
Messages
10,510
Location
Far NE Oregon
@Beerhippie....

Over time and thru testing when a 6v gets to the 5.7v range it fails to do the job. I have been pleasantly surprised with the life of the lithium AA in a pair of test feeders. And a shout out to @Outlawmws for the pointing to lithium, which has stopped the battery leakage from ruining trail cameras, flashlights and feed slingers.

....
[/QUOTE]
Bug: I learned about the EverReady disposable lithium AAs many years ago. I used them in all my high-draw field gear--GPS, radios, etc. Not only do they not die from shelf life, they never leak, they weigh less than half of an alkaline AA and they last three times as long under heavy draws--for twice the price of alkaline, it's a win.

Back to the 6V cubes, I made an adapter to use CR 18650s in one. It's just for a flashlight, so no idea how those would work for your feeders.

Seems to me that a solar panel and battery--like used with electric fences--would be the ideal PS for the feeders. Kinda surprised they don't come with 'em. I rolled my own solar charger/battery PS for some yard lighting here that was too far to run power to and it works well for nine months out of the year--someone let the trees grow too tall so the panels get no sun in the depth of winter--which is when we need lights the most.
 
To avoid these ads, REGISTER NOW!

GirchyGirchy

Well-known member
Joined
Nov 14, 2011
Messages
10,048
Location
Central Indiana
Our house: installed an auto-dimming Homelink mirror in the 'new' Mazda6. Found that the Homelink portion doesn't work.

That follows the success rate of recent auto work, other than the brakes on the Mazda3. I ordered hood struts for the 6, realized I'd accidentally ordered a kit for a 3, so those were sent back for an exchange. Next, I started messing with the factory cross-bars on the 3 to get it ready to sell, and found that none of the cylinders turn. Hell, I can't even get the key into two of them. I pulled the broken bits from one, did some research, found that Thule cores fit. I borrowed one from my Thule bike rack, now I can't get that cylinder out. But hey, at least it works in the cross bars!

In-laws' house: got the push mower started! That leaves the seemingly seized Manta's Honda 4-stroke, and the unknown status of the snow blower.
 
Last edited:

Metallitubby

Well-known member
Joined
Aug 12, 2019
Messages
26,801
Location
ATL OTP North
  • Removed a trapped hummingbird
  • Cleaned the prototype ZTR
  • Distressed and stained a scrap board, and then installed it on the bolt bin that I bought from fellow GJ'er @Lookin4'67Galaxieconv
  • Started cleaning and updating the free Snap-On blast cabinet (also planning where it will live in the shop)
 
Last edited:

Beerhippie

Well-known member
Joined
Oct 13, 2023
Messages
10,510
Location
Far NE Oregon
Came in this AM to help get ready for a big wedding we're hosting today. Put in a few hours and now it's me time.

First thing to do was to wander on over to the going-out-of-business yard sale next door. Today is "it's all gotta go" day.

Picked up one item for the brewery:

55498278593_61404e6490_b.jpg

always good to have a spare hops scale on hand.

Then it's time to putter with the Brick.

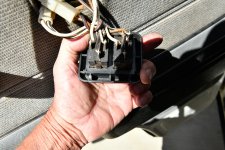
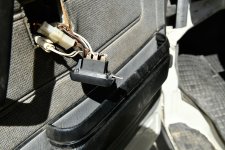
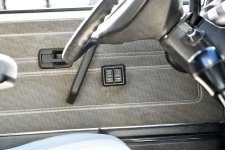
This is getting irritating:

55498253813_f80f3e2ec7_b.jpg

While it still works just fine to roll the windows up and down, it would be nice if it were mounted in the door card.

55498150056_b859abf45f_b.jpg

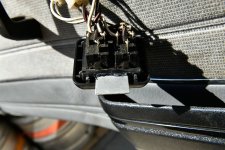
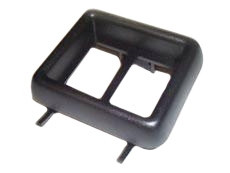
There were once little plastic tabs on the bezel pointing towards my palm. They have since parted ways with the bezel.

I'll replace them with this:

55498150036_486f2efdcd_b.jpg

I'll use the Dremel to cut the web on the bezel so the piece of angle fits.

Some roughing up and some JB Weld and:

55497158747_465144e5bb_b.jpg

55497158752_1474f21f69_b.jpg

I mixed up a bit more JB Weld to enlarge the fillet and stuff the rest of the cavity in the bezel. Once that sets, I'll use the Dremel again to shorten the "tab" I've made.

Hope this works. New bezels are unobtanium.
 

rcktpwrd

Well-known member
Joined
Mar 5, 2008
Messages
1,145
Location
Raleigh, NC
Worked on the tool box wheels, hung a light and fixed my mechanics chair.

A bolt for the seat has been missing a long while. I dug through my fastener collection and found a couple bolts that might work, then found the actual bolt that belongs in there!
IMG_4667.jpg
IMG_4666.jpg

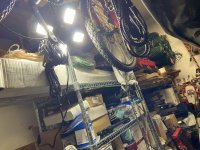
My wife bought this four panel LED for me a while back, its supposed to be hung from the ceiling but I decided to hang it from the rack facing towards what ever might be parked in the garage, normally her truck. It came with a chain that I looped over the rod on the shelving rack. Theres an on/off switch on the power cord.
IMG_4662.jpg

IMG_4663.jpg

IMG_4665.jpg

IMG_4664.jpg
 

M.Brane

ALLIANCE MEMBER
Joined
Feb 11, 2024
Messages
1,984
Location
1 hr N/W of LA LA Land
Swept the floor. Un-boxed my new motorcycle tires.

Say what?

I've been buying motorcycle tires online for nearly 30 years, and this is the first time they've ever been shipped in boxes. Were they out of pallet wrap?

IMG_2742.jpegIMG_2743.jpeg

You can see the last set I bought from the same vendor sitting under the table because that bike still has a little life left on the rubber.
 

WisJim

Well-known member
Joined
Dec 20, 2010
Messages
2,384
Location
Menomonie, WI
Bore a block the exact size of the shaft. Bandsaw the block in half lengthwise and use those 2 half round shells as jaw holders for the shaft.
I have an assortment of maple and oak block pairs, marked on the side with magic marker, for just that kind of task. I try to mark them so I don't need to make new blocks the next time.
 

OccupantRJ

Well-known member
Joined
May 15, 2009
Messages
11,525
Location
Eastern North Carolina
Worked on the tool box wheels, hung a light and fixed my mechanics chair.

A bolt for the seat has been missing a long while. I dug through my fastener collection and found a couple bolts that might work, then found the actual bolt that belongs in there!
IMG_4667.jpg
IMG_4666.jpg

My wife bought this four panel LED for me a while back, its supposed to be hung from the ceiling but I decided to hang it from the rack facing towards what ever might be parked in the garage, normally her truck. It came with a chain that I looped over the rod on the shelving rack. Theres an on/off switch on the power cord.
IMG_4662.jpg

IMG_4663.jpg

IMG_4665.jpg

IMG_4664.jpg
I can see under the hood from Goldsboro now!😜
 

GrayFlattop

Well-known member
Joined
Jan 18, 2018
Messages
1,057
Location
Chicago
Cleaned up the woodshop a bit, sorted and put away a bunch of insert bits and router bits.

Cut to size a glue-up that will become a new threshold in the house. Unfortunately, the garage started getting too warm / humid, but I decided to press on. Then I started to layout a router template for my new (in progress) table saw outfeed table.

Honestly, it got too uncomfortable for me so I locked up and switched gears to working on small projects in the house. Next week appears to be have 90’s and high humidity in the forecast, so it looks like basement projects are on the menu.
 

Beerhippie

Well-known member
Joined
Oct 13, 2023
Messages
10,510
Location
Far NE Oregon
Trimmed the new tab on the window switch after the epoxy had set. Had to explain to several people that I left the damned driver's door open for a reason--so the epoxy job was in the sun to speed setting.

55498509373_03dc0b0e60_b.jpg

Mucho mo' betta'. I may have to pull the door card if I ever need to remove it again. Big deal.

Ordered a new memory battery for my vintage Garmin GPS 12XL. $4 battery, $8 shipping. I need a spot welder for batteries--it's just a 1220 with tabs.
 
To avoid these ads, REGISTER NOW!

WisJim

Well-known member
Joined
Dec 20, 2010
Messages
2,384
Location
Menomonie, WI
Spent an hour looking at a house on the other side of town that my wife discovered online. It's advertised as a 2400 SF house with 3400 SF garage and shop area. Not quite an acre lot and neighbors all around, but I'm not longer interested in having 80 or 100 acres--been there, done that, and have the bad back and knees to show for it. The actual current shop area is about 20 x 40 feet and open a 30 x 60 garage area, plus another 2 car garage area walled off from the rest, all connected to the house. Ten foot ceilings in the garage/shop and enough wall space to display some of my tool collections. So now wife wants to see about getting a loan for it and is talking about what furniture would go where in the house. Moving seems more tempting than it did a week ago, but it would still be in Wisconsin with frigid winters. Not in my garage but potentially a future garage.
 

Fordguy1964

Well-known member
Joined
Mar 3, 2015
Messages
3,932
Location
Houston County, Alabama
I got a little energetic over the weekend. I went and looked at 2 more 64 Fairlanes. I made the decision on one of them. This will give me all of the needed parts for the K code. Then I went ahead and for the most part finished putting the engine back together.
44548.jpg
Then I got the carb completely disassembled. I was shocked at how dirty it was inside. Even with a pair of Wix 33003 fuel filters in line AND the factory Ford canister type filter the carb still ended up with a lot of garbage in it. I'm baffled. The fuel line have all been blown out so I know there was nothing in the tank. I dropped the tank and looked inside the filler neck and the bottom of the tank looked clean.
44550.jpg
It wasn't until I pulled the sending unit that I figured it out. There must be a good 1/8" thick of varnish on the bottom of the tank! The filter neck area must have only been clean because the fuel splashed that area clean when filling it. Currently I have 2 gallons of acetone in the tank dissolving the varnish. I have a gas tank sealer kit also on order. Does anyone know from experience if muratic acid will eat varnish or am I just wasting my time? I have 2 gallons of muratic acid that I am planning on putting into the tank after I'm done with the acetone. I don't know what acid comes with the gas tank sealer kit but that would come after the muratic acid.

Thoughts?
 

Beerhippie

Well-known member
Joined
Oct 13, 2023
Messages
10,510
Location
Far NE Oregon
Does anyone know from experience if muratic acid will eat varnish or am I just wasting my time?
I doubt Muriatic acid (HCl) will remove varnish--but it will leave you with an instant-rusting gas tank. Chloride ions + iron = rust. I use HCl to "age" steel and iron when I need to match it to rusty stuff outside (wrought iron work, etc). It works in seconds and keeps doing so for years. I've had steel rust from sitting near an unopened jug of HCl.

Lye removes varnish and leaves a clean surface on steel--it won't etch or cause it to rust. I use it for cleaning varnish out of antique Coleman tanks and founts w/steel bottoms and have done so for about twenty years now.

A good solution would be one 16 oz bottle of lye--Red Devil drain cleaner at the hardware store--in a gallon or two of hot water. Always add the lye to the water to prevent a nasty eruption! The hotter the water, the faster it will work.

Nasty as lye is--it will dissolve flesh--it's not as nasty as Muriatic acid.
 
Last edited:

KwikFab

Well-known member
Joined
Jul 27, 2024
Messages
1,354
Location
Central Valley, CA
Trimmed the new tab on the window switch after the epoxy had set. Had to explain to several people that I left the damned driver's door open for a reason--so the epoxy job was in the sun to speed setting.

55498509373_03dc0b0e60_b.jpg

Mucho mo' betta'. I may have to pull the door card if I ever need to remove it again. Big deal.

Ordered a new memory battery for my vintage Garmin GPS 12XL. $4 battery, $8 shipping. I need a spot welder for batteries--it's just a 1220 with tabs.

ASA works really well to resist heat and UV rays if you decide to 3D print a replacement.
 

KwikFab

Well-known member
Joined
Jul 27, 2024
Messages
1,354
Location
Central Valley, CA
So I need to buy a 3D printer to fix my window switch? Build an addition to the shop to have somewhere to put it?

Oh, yeah--this is Garage Journal. ;)

Just doing my due diligence and spending other people's money, as is tradition here :lol:

But really I bet you could get someone to print it free for you if you modeled it up.

Think my ASA was $19 for 1kg, and that small panel looks like it'd take between 50g to 150g.
 

Fordguy1964

Well-known member
Joined
Mar 3, 2015
Messages
3,932
Location
Houston County, Alabama
I doubt Muriatic acid (HCl) will remove varnish--but it will leave you with an instant-rusting gas tank. Chloride ions + iron = rust. I use HCl to "age" steel and iron when I need to match it to rusty stuff outside (wrought iron work, etc). It works in seconds and keeps doing so for years. I've had steel rust from sitting near an unopened jug of HCl.

Lye removes varnish and leaves a clean surface on steel--it won't etch or cause it to rust. I use it for cleaning varnish out of antique Coleman tanks and founts w/steel bottoms and have done so for about twenty years now.

A good solution would be one 16 oz bottle of lye--Red Devil drain cleaner at the hardware store--in a gallon or two of hot water. Always add the lye to the water to prevent a nasty eruption! The hotter the water, the faster it will work.

Nasty as lye is--it will dissolve flesh--it's not as nasty as Muriatic acid.
Good info. That is why I came here first before I did it. The cleaning kit arrived today between the time of my last post and now. I don't believe it comes with enough of the solution to get this all clean. I will go pick up the lye that you suggested and give that a shot. I just came back from the garage and dumped it the acetone. It was totally brown from the varnish and now the tank rattles from the loose rust. That tank was silent before because the varnish had trapped the rust. So... I'm making progress! I'm going to flush the tank with a lot of water tomorrow then sit out in the sun to dry with a blower running into it. I will then filter the acetone and put it back into the tank for round 2. After that comes the lye.
 

Outlawmws

Well-known member
Joined
Aug 9, 2011
Messages
39,561
Location
The Badlands
Not a dang thing. the big Flea market and added local garage sales took it out of me this AM/ near 4 hours of walking (>12,000 steps) took it out of me and I fell asleep in my easy chair for a couple hours!

But really I bet you could get someone to print it free for you if you modeled it up.

The model may exist and be available for DL for free already. that was how I got the model for the blade posiitoner I just posted.
 

KwikFab

Well-known member
Joined
Jul 27, 2024
Messages
1,354
Location
Central Valley, CA
Not a dang thing. the big Flea market and added local garage sales took it out of me this AM/ near 4 hours of walking (>12,000 steps) took it out of me and I fell asleep in my easy chair for a couple hours!


The model may exist and be available for DL for free already. that was how I got the model for the blade posiitoner I just posted.

Looked around, and didn't find any other than replacements for $10 to $15


Looks like a really simple model/design
 

SMOKEYBEAR

Well-known member
Joined
Jan 3, 2016
Messages
498
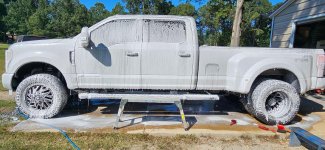
Dually - Fuel filters, rotate the tires( Tucked my skirt in for this), and a decent washing with the foam cannon setup.

Excursion - Oil and filter, fuel filter. It gets cleaned tomorrow, ran out of time/ gas today.
 

Attachments

  • Today21.jpg
    Today21.jpg
    202.6 KB · Views: 10
  • Today22.jpg
    Today22.jpg
    149.1 KB · Views: 10

Beerhippie

Well-known member
Joined
Oct 13, 2023
Messages
10,510
Location
Far NE Oregon
Good info. That is why I came here first before I did it. The cleaning kit arrived today between the time of my last post and now. I don't believe it comes with enough of the solution to get this all clean. I will go pick up the lye that you suggested and give that a shot. I just came back from the garage and dumped it the acetone. It was totally brown from the varnish and now the tank rattles from the loose rust. That tank was silent before because the varnish had trapped the rust. So... I'm making progress! I'm going to flush the tank with a lot of water tomorrow then sit out in the sun to dry with a blower running into it. I will then filter the acetone and put it back into the tank for round 2. After that comes the lye.
What kit did you get? I've been underwhelmed by Caswell's and POR 15 degreasers--the hot lye solution beats them. For a great prep before sealing, use some ~10% phosphoric acid solution--probably easiest to find at a body shop--as the last step before sealing. Keep it moving for a few minutes, dump out and let air-dry. Leaves a good surface for adhesion--I learned this from an old-school panel-beater (who was the father of a high school sweetie).
Looked around, and didn't find any other than replacements for $10 to $15


Looks like a really simple model/design
FFS! I'm just about a stockholder in Van Cafe after all I've bought from them lately, and that didn't even come up in my searches. For $10, no reason to make my own.

But I'll stick with my job until it falls to pieces.
 

Fordguy1964

Well-known member
Joined
Mar 3, 2015
Messages
3,932
Location
Houston County, Alabama
What kit did you get? I've been underwhelmed by Caswell's and POR 15 degreasers--the hot lye solution beats them. For a great prep before sealing, use some ~10% phosphoric acid solution--probably easiest to find at a body shop--as the last step before sealing. Keep it moving for a few minutes, dump out and let air-dry. Leaves a good surface for adhesion--I learned this from an old-school panel-beater (who was the father of a high school sweetie).
This is the one I got. It will be a few days before I'm ready for it.
44553.jpg
 

Motorman55

Well-known member
Joined
Apr 10, 2016
Messages
2,688
Location
South Jersey
Moving along in the garage

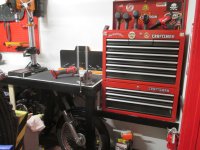
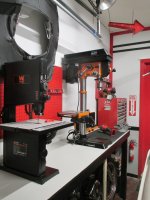
Not much time to work in the garage today, but I did manage to get some more of the bench painted. Just have to do a couple small spots to finish and add a bigger center support leg and aluminum edging. I left the old red pegboard in place.

Once the paint dried, I put the big WEN drill press and its accessory table along with the small WEN Bandsaw on top. Also added a rubber mat next to the tool boxes and hung up one fire extinquishers near the entry door.

The small gray vice is not mounted, just checking to see if its a good spot to mount one. I'm on the fence on this one. I have a couple bigger size vices. Not sure if I want a bench top vice or maybe pick up a side mount one. No hurry to decide.

Have to start thinking about some upper wall shelving or cabinets. Looks like a HD run tomorrow, so I'll get some measurements together.

Well back to work....1788143789818.jpeg1788143639142.jpeg1788143615856.jpeg
 
To avoid these ads, REGISTER NOW!
Top Bottom