

jacksonracingengines
New member
I have been reading the forum for years, and I finally have a project of my own to share.
One of my main sources of inspiration was the Olsen garage. It showed me what a small budget but resoursefullness can do to change a space.
The Olsen garage reminded me of where I worked in Japan. The green toolboxes and cream floors and walls were very reminiscent of my time in Japan.
I really like blue, so my theme will be blue, grey, and white.
Let's get into it!
My wife and I moved back to America in August 2024, bought an 1870's house, and started renovating.

Before we moved in, we decided to rip out all the carpet and bring the original "soft" wood floors to life. We think they are the original yellow pine wood floors.


Being Ignorant and going into this, I figured it would take me about 3 days to sand and prep these floors for some Bona Traffic GO
The varnish was so thick I had to go all the way down to 18-grit sandpaper on the drum sander, which, of course, the rental place didn't sell anything below 24, so I had to overnight it.
Meanwhile, waiting on the 18 grit sand paper I had to make some patches for some missing boards. I am not a woodworker or carpenter or anything like that; my home is the machine shop, and wood takes a whole different skill set and patience.

I was able to steal these boards from the attic, which I assumed was the same yellow pine... Spoiler: It's not. The attic's floorboards are also all different widths, making finding the right width boards long enough to fix the first floor pretty hard to do.

I had to change the sand paper pretty often as the varnis was gumming the paper up super fast.
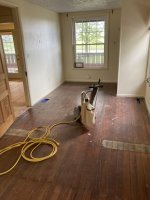

I watched what felt like 100 hours of people doing this on YouTube. There seems to be a divide on going 45° in the early stages, but I was desperate to get the varnish off, and the diagonal seemed to work. ^^This is after the 18-grit paper.
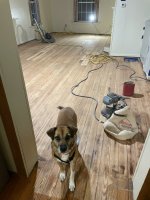
My helper was not happy with all the sounds during this process...
It's been almost 2 years since I did this, so my memory may be a bit fuzzy, but I think once I got to like 80 grit or 100, I switched over to a walk-behind orbital sander

It was about this time I realized that the attic boards were not the same... and my patches would be quite visible.
I called around to some flooring shops and some guys on Facebook who salvage floorboards from these old houses. There was some wood available in the area, but time was running out on our apartment lease and my wife's and my patience, since this sanding process took us maybe 7 days in total.
We had to make the hard call to just keep on going with the mismatched patches; this is a 150-year-old house, after all- what's a little character, right? Thats what I have to tell myself.
Here are some post-sanding, pre-finish photos.


Far from perfect, but in much better shape than they were in. We were just excited to be done with sanding and in the cleanup phase.
In total, we sanded about 800 sq ft. I only have photos of two of the 3 rooms we did. Now on to the primer and traffic-go application.
I elected not to fill my floorboard gaps with sawdust mixed with glue becuase there is nothing under these boards other than floor joists, so there would be quite a mess in the basement. The floor moves a lot under our feet; the joists are not up to today's standards, so there is some flex when walking through the rooms. This made me think that filling all the gaps would just eventually crack open, and we would be dealing with glue breaking out from between the boards for the rest of our lives.
Since we did not fill the gaps, the traffic rep at the store recommended we roll the primer and finish onto the floors to minimize the amount leaking through the cracks.
I have to hand this one to my wife, as she did all the primer and finish, since I had to return to work.

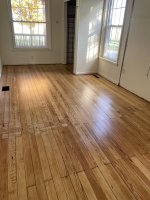

Overall, we were quite pleased with how the floors turned out. We made a lot of mistakes, and the floors are far from perfect, but we did it ourselves, and everyone who comes over compliments the floors. So that's a bonus!
I know this didn't start with the garage, but I will get to that eventually! Im at the limit for photos on this post, so I will end the first post here.
One of my main sources of inspiration was the Olsen garage. It showed me what a small budget but resoursefullness can do to change a space.
The Olsen garage reminded me of where I worked in Japan. The green toolboxes and cream floors and walls were very reminiscent of my time in Japan.
I really like blue, so my theme will be blue, grey, and white.
Let's get into it!
My wife and I moved back to America in August 2024, bought an 1870's house, and started renovating.
Before we moved in, we decided to rip out all the carpet and bring the original "soft" wood floors to life. We think they are the original yellow pine wood floors.
Being Ignorant and going into this, I figured it would take me about 3 days to sand and prep these floors for some Bona Traffic GO
The varnish was so thick I had to go all the way down to 18-grit sandpaper on the drum sander, which, of course, the rental place didn't sell anything below 24, so I had to overnight it.
Meanwhile, waiting on the 18 grit sand paper I had to make some patches for some missing boards. I am not a woodworker or carpenter or anything like that; my home is the machine shop, and wood takes a whole different skill set and patience.
I was able to steal these boards from the attic, which I assumed was the same yellow pine... Spoiler: It's not. The attic's floorboards are also all different widths, making finding the right width boards long enough to fix the first floor pretty hard to do.
I had to change the sand paper pretty often as the varnis was gumming the paper up super fast.
I watched what felt like 100 hours of people doing this on YouTube. There seems to be a divide on going 45° in the early stages, but I was desperate to get the varnish off, and the diagonal seemed to work. ^^This is after the 18-grit paper.
My helper was not happy with all the sounds during this process...
It's been almost 2 years since I did this, so my memory may be a bit fuzzy, but I think once I got to like 80 grit or 100, I switched over to a walk-behind orbital sander
It was about this time I realized that the attic boards were not the same... and my patches would be quite visible.
I called around to some flooring shops and some guys on Facebook who salvage floorboards from these old houses. There was some wood available in the area, but time was running out on our apartment lease and my wife's and my patience, since this sanding process took us maybe 7 days in total.
We had to make the hard call to just keep on going with the mismatched patches; this is a 150-year-old house, after all- what's a little character, right? Thats what I have to tell myself.
Here are some post-sanding, pre-finish photos.
Far from perfect, but in much better shape than they were in. We were just excited to be done with sanding and in the cleanup phase.
In total, we sanded about 800 sq ft. I only have photos of two of the 3 rooms we did. Now on to the primer and traffic-go application.
I elected not to fill my floorboard gaps with sawdust mixed with glue becuase there is nothing under these boards other than floor joists, so there would be quite a mess in the basement. The floor moves a lot under our feet; the joists are not up to today's standards, so there is some flex when walking through the rooms. This made me think that filling all the gaps would just eventually crack open, and we would be dealing with glue breaking out from between the boards for the rest of our lives.
Since we did not fill the gaps, the traffic rep at the store recommended we roll the primer and finish onto the floors to minimize the amount leaking through the cracks.
I have to hand this one to my wife, as she did all the primer and finish, since I had to return to work.
Overall, we were quite pleased with how the floors turned out. We made a lot of mistakes, and the floors are far from perfect, but we did it ourselves, and everyone who comes over compliments the floors. So that's a bonus!
I know this didn't start with the garage, but I will get to that eventually! Im at the limit for photos on this post, so I will end the first post here.
