
You are using an out of date browser. It may not display this or other websites correctly.
You should upgrade or use an alternative browser.
You should upgrade or use an alternative browser.
Between 265 & 485 SQ/FT The Time Machine: Rebuilding a PNW 1.5 car garage from 1946
- Thread starter Tim_with_a_T
- Start date
Workspaces sized between 265 and 485 squarefeet.
Boosted1
Well-known member
Very nice work on your garage.
I like your vintage cars too
I like your vintage cars too
xtremek
Well-known member
Looks nice. Going to paint, urethane, or varnish the shelves?
Thisistimm
Well-known member
- Joined
- Jun 3, 2021
- Messages
- 60
Cool!
Have you seen the new versions of the bench top band saws via Porta band? A lot of them are now coming with like a drawer to catch the chips.
I’d be curious what solution you could come up with in a similar light for grinding dust. I’ve been thinking maybe an aluminum bench top and then a magnet in a zip lock bag could work. I use such a strong magnet I keep magnetizing everything I’m trying to clean up lol
Have you seen the new versions of the bench top band saws via Porta band? A lot of them are now coming with like a drawer to catch the chips.
I’d be curious what solution you could come up with in a similar light for grinding dust. I’ve been thinking maybe an aluminum bench top and then a magnet in a zip lock bag could work. I use such a strong magnet I keep magnetizing everything I’m trying to clean up lol
OP
Tim_with_a_T
Well-known member
Looks nice. Going to paint, urethane, or varnish the shelves?
I’m going to attempt to stain/poly them to match the windows. Wish me luck!
Cool!
Have you seen the new versions of the bench top band saws via Porta band? A lot of them are now coming with like a drawer to catch the chips.
I’d be curious what solution you could come up with in a similar light for grinding dust. I’ve been thinking maybe an aluminum bench top and then a magnet in a zip lock bag could work. I use such a strong magnet I keep magnetizing everything I’m trying to clean up lol
This grinder has dust collector ports cast in, which is one on the reasons I was looking for this particular one. In theory, I will have my shop vac mounted outside next to the compressor with a dust collector, then piped into the garage through some piping overhead, with a couple of drops in key areas and some corrugated hose to get me the rest of the way to point of use. My shop vac, while small, has been working great and has a Bluetooth switch built into the handle, so I like that feature (I can control on/off from in the garage with the vacuum located outside).
Thisistimm
Well-known member
- Joined
- Jun 3, 2021
- Messages
- 60
Fancy!
NealinCA
Well-known member
I like what you've done there. The shape of the shelves is a great look. Way better than square ends.
67CarGuy
Well-known member
Hope the absence has been for the right reason(s)! The T looks like it's plenty of fun, and your design aesthetic has obviously struck a chord with us.
OP
Tim_with_a_T
Well-known member
Hope the absence has been for the right reason(s)! The T looks like it's plenty of fun, and your design aesthetic has obviously struck a chord with us.
Thank you. Absence has been a mixed bag. I’ve been busy with work and other things, feeling frustrated with the lack of forward progress and accumulation of gigantic messes. I finally reached a tipping point and just halted all projects until I can get the messes under control.
I guess I can provide a small update, not really garage related. Last year, the city approached me about doing some street improvements in the neighborhood, describing the need for ADA compliant crosswalks, one of which would be across the street in front of my house, ultimately zero impact to me. The guy described the plan, explained what would be done, and everything sounded fine to me.
Fast forward a few months, and they are jack hammering the sidewalk in front of my entryway, which was not the plan… broke out my front step, effed up my fence posts, and pergola. I went out to talk to them, and it was pretty clear I was not going to get anywhere with them. Despite reassurances they would put everything back as it was, the results were trending towards the opposite of that, so I told them to leave once they were done with the sidewalk portion. I don’t have time to go argue with the city over things they are going to do anyway, and it does no good to yell at the guys on the front line doing the work, so I was left pretty frustrated.
When it was all said and done, I have crooked fence posts, crooked pergola, a gate that no longer closes, a curb poured in front of my entryway, and not one, but two No Parking signs in front of my house…. The only street parking I had is now gone. To say I was pissed is an understatement….
And if anyone from the city of Vancouver reads this, shame on you guys! Be better.
Again, I do not have time to go hunt these people down to make things right. I am buried in projects and I don’t expect them to be competent enough to fix anything anyway. At least they know how to raise taxes. So we got that going for us. Anyway, this rant is leading up to the how and why of the next post, which I will make over lunch break. Standby…
OP
Tim_with_a_T
Well-known member
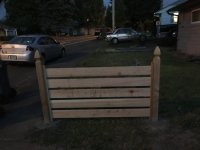
Moving back in time, I wanted a non-typical fence. I initially drew what you see drawn below, then realized after pricing materials the cost would be significant. I did some adjusting and came up with what you see built below. Essentially, I made 5/8” wide x 3/4” deep x 5 1/4” long slots into 2x2s with a plunge router, then squared off the ends with a chisel. I set the posts in concrete, mounted the 2x2s to the posts using screws inside the slots, then soaked fencing with water - cut 1.5” wider than the distance between 2x2s. I inserted one end of the fencing into the slot made with the router, then bent/hooked the other end to the opposite side. Once in place, each fence board is floating inside the 2x2 slots. This took significant time. I then stained it with a solid color, cedartone, or something to that effect.



OP
Tim_with_a_T
Well-known member
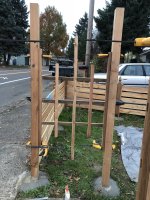
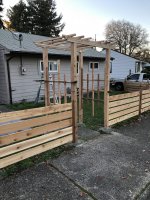
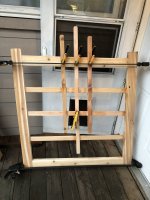
The pergola and gate were made in a similar manner.


With the scraps I made my house numbers.


With the scraps I made my house numbers.
OP
Tim_with_a_T
Well-known member
So the pergola and the fencing are a crude mortise and tenon joint, with the tenons floating.
Needless to say, the city jackhammering this all to hell really pissed me off.
The gate went to the dump. It doesn’t fit the opening anymore because the city, after breaking out the posts in their demo, and after me explaining as best as possible that they need to go back in the EXACT same spot, and even left some 4’ levels out there for them to use when they re-set the posts… well I’ll skip the details but that didn’t happen and they got re-poured crooked. NEAT. Super neat.
I put things back as best I could, but I needed to just move on and fix my front step. You now had to step over a curb they poured onto loose gravel and broken concrete, loose pavers. It was like that for a year. I’ve said it before, but I have no effing time for this ****.
Summer basically came and went this year in a blink of an eye. I came to the realization that if I don’t set aside time, this isn’t gonna just magically get done. So I took a week off work and scienced out a plan.
I wanted to try a paver inlay concrete step…. With no real experience doing that. So I just pretended. And it turned out ok. Next time I will do it a little different. But I’m happy with the result.
Anyway, I need to just show the damn step. Here is where things ended up.


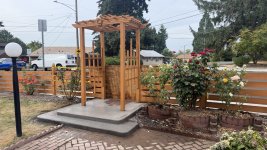
Needless to say, the city jackhammering this all to hell really pissed me off.
The gate went to the dump. It doesn’t fit the opening anymore because the city, after breaking out the posts in their demo, and after me explaining as best as possible that they need to go back in the EXACT same spot, and even left some 4’ levels out there for them to use when they re-set the posts… well I’ll skip the details but that didn’t happen and they got re-poured crooked. NEAT. Super neat.
I put things back as best I could, but I needed to just move on and fix my front step. You now had to step over a curb they poured onto loose gravel and broken concrete, loose pavers. It was like that for a year. I’ve said it before, but I have no effing time for this ****.
Summer basically came and went this year in a blink of an eye. I came to the realization that if I don’t set aside time, this isn’t gonna just magically get done. So I took a week off work and scienced out a plan.
I wanted to try a paver inlay concrete step…. With no real experience doing that. So I just pretended. And it turned out ok. Next time I will do it a little different. But I’m happy with the result.
Anyway, I need to just show the damn step. Here is where things ended up.
OP
Tim_with_a_T
Well-known member
I think a couple pictures got out of order, but that’s the only progress to show. Not really garage related, but something to feed the thread.
yhprum
Well-known member
Looks great!
Sorry to hear about the council induced pain. That stinks big time.
Sorry to hear about the council induced pain. That stinks big time.
drivesitfar
Well-known member
Sorry to hear about the issues with the city and their crew but new work looks even better than before.
I hope you managed to find a good short term or maybe long term job solution too.
Welcome back!!
I hope you managed to find a good short term or maybe long term job solution too.
Welcome back!!
M.Brane
ALLIANCE MEMBER
They just put all those ADA ramps in my neighborhood. They gave us notice they would be grinding, and paving the day they started working. Thanks for the heads-up idiots....
BORING HOP YARD
Well-known member
Nice work!
It looks great.
It looks great.
67CarGuy
Well-known member
Glad you're still making cool art deco-inspired improvements, and sorry to hear about the ineptness of the city. Keep making lemonade! Or omelettes, whichever.
Old-Soul
Well-known member
Just stumbled on your thread yesterday and am now caught up.
Your attention to detail did not come as a surprise to me as I am familiar with your work via the HAMB, but ******** man you are one productive SOB...and skilled at that!
The garage is turning out great, the yard is the stuff of dreams and although the city can go to hell you found a way to make lemonade. I am not nearly as productive or skilled BUT I can find inspiration in what you are doing, so keep doing!
Your attention to detail did not come as a surprise to me as I am familiar with your work via the HAMB, but ******** man you are one productive SOB...and skilled at that!
The garage is turning out great, the yard is the stuff of dreams and although the city can go to hell you found a way to make lemonade. I am not nearly as productive or skilled BUT I can find inspiration in what you are doing, so keep doing!
rd65
Well-known member
I used to work in Pubic Works for Everett, retired last month, the concrete crews in Streets will spend their careers doing ADA ramps. That would **** huge. The way they explained it all to me is if they do any kind of work in an area that is not up ADA standards that work needs to be included with whatever drainage/water/sewer work they are doing. ***** they couldn't make your posts straight, they have more than enough of the proper tools to do it correctly - the specs for ramps are crazy precise. I would fire off an email or several to the Mayor, PW head, etc.
OP
Tim_with_a_T
Well-known member
Digging up (pun intended) pictures of the fence reminded me of all the other yard projects. You guys seem to enjoy them, so I’ll share.
I never really thought I would care about how my yard looked, how it felt. I bought this house because it was the cheapest one I could find inside a radius I was willing to commute to work, and because it had a detached garage that was already wired with a sub panel. There were a few other things I will share later, but those were my main requirements. This yard had ZERO potential in my eyes. And I mean that wholeheartedly.
I mentioned earlier in the thread that I had some drainage issues when I first moved in. More or less, the front yard was bowl shaped. Every heavy rain meant water under the house. I have zero prior experience with any of this, but my thinking was to build up the grade next to the house and reshape the yard. An experienced person would tell you to build it up AND slope it away from the house. I would probably do that next time, but I don’t have any issues with it being flat, so mission accomplished.
One of the other things I needed to address was the water supply line. I figured before I made everything nice, better dig up that thing and replace it. I don’t think I covered this yet. If so, apologies. Anyway, called 811, pulled permit, dug trench, found out the guy who ran the gas line (same trench as water and sewer) decided on an artistic flare at the end…. Pulled the old water line out of the ground in pieces, ran new 1” pex sleeved in conduit with a blue tracer wire, had it inspected, closed it up. I was not brave enough to do the sewer line myself, and I’m not sure if I would even be able to do the gas line myself. So it was just the water. The other two are a problem for future Tim.
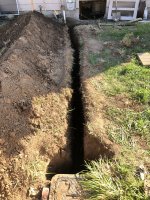


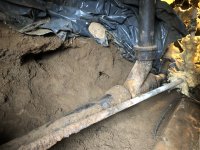



I never really thought I would care about how my yard looked, how it felt. I bought this house because it was the cheapest one I could find inside a radius I was willing to commute to work, and because it had a detached garage that was already wired with a sub panel. There were a few other things I will share later, but those were my main requirements. This yard had ZERO potential in my eyes. And I mean that wholeheartedly.
I mentioned earlier in the thread that I had some drainage issues when I first moved in. More or less, the front yard was bowl shaped. Every heavy rain meant water under the house. I have zero prior experience with any of this, but my thinking was to build up the grade next to the house and reshape the yard. An experienced person would tell you to build it up AND slope it away from the house. I would probably do that next time, but I don’t have any issues with it being flat, so mission accomplished.
One of the other things I needed to address was the water supply line. I figured before I made everything nice, better dig up that thing and replace it. I don’t think I covered this yet. If so, apologies. Anyway, called 811, pulled permit, dug trench, found out the guy who ran the gas line (same trench as water and sewer) decided on an artistic flare at the end…. Pulled the old water line out of the ground in pieces, ran new 1” pex sleeved in conduit with a blue tracer wire, had it inspected, closed it up. I was not brave enough to do the sewer line myself, and I’m not sure if I would even be able to do the gas line myself. So it was just the water. The other two are a problem for future Tim.
OP
Tim_with_a_T
Well-known member
Last post, 4th picture down… badger sized hole under the house. Without getting into details, MULTIPLE species of creature has taken up residence under the house. That’s a post for another day.
OP
Tim_with_a_T
Well-known member
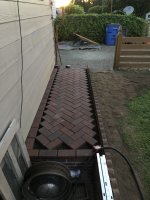
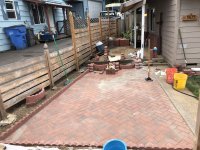
Making yard better- I started by turning what used to be flower beds into pavers, and I built a small little crawl space entry. The hole in the wall previously existed - I just made it more usable. I used 3/8” minus gravel as the foundation for these areas. After that, the rest of the paver work got 5/8” crushed gravel, followed by a bed of sand. I found that that combo was easiest to work with.
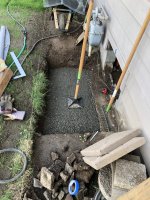




OP
Tim_with_a_T
Well-known member
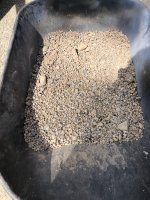
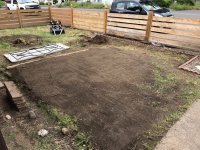
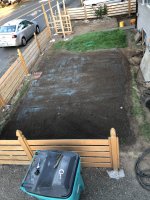
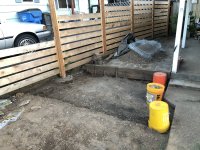
You can see in the post above, kinda see anyway, that the yard grade is being built up. Well I did that about the dumbest way possible, by sifting rocks out of the dirt in an area of the yard that used to be a parking spot. There were so many rocks in the soil that were sifted out, that I used them as flower bed coverage throughout the entire front yard. But with the screeded soil, I slowly spread that across the yard, building up the grade. These photos show the digging out of the old parking spot.




OP
Tim_with_a_T
Well-known member
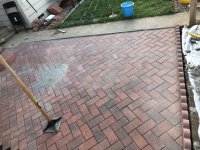
A lot of this was the perfect storm of events. I needed to build up the grade, I didn’t want a muddy mess under the house, and I needed to replace the water line. I was pricing the big box stores for options on all this, and Lowe’s seemed to have the best deal. About 4x/yr their pavers would go on sale, and I would buy 2-3 pallets at a time, which would take me about 2-3 months to use up, and conveniently there would be another sale.
When I first started out, I was cutting the bricks at the edges with a concrete blade in a circular saw. Some dude was driving by and saw me doing this. He couldn’t believe it. He was like, “You’re going to cut in all that edging like that?!?” And I don’t know any different so I’m like, yep! Better than the hammer and chisel idea I tried previously… fast forward a few minutes and the guy comes back with a new in box Harbor Freight tile saw. I tried to low ball him with the money I had in my pocket, but the deal was good enough I walked down the hill to the atm at the gas station.
LET ME TELL YOU GUYS, that saw is an absolute unit. I have put that thing through hell. I’ve burned up 2 belts, 2 blades, my neighbor borrowed it and did a full tile bathroom remodel, I’ve cut retaining wall blocks with it, a whole bunch of pavers… it is loud as hell but man that thing is a beast.
When I first started out, I was cutting the bricks at the edges with a concrete blade in a circular saw. Some dude was driving by and saw me doing this. He couldn’t believe it. He was like, “You’re going to cut in all that edging like that?!?” And I don’t know any different so I’m like, yep! Better than the hammer and chisel idea I tried previously… fast forward a few minutes and the guy comes back with a new in box Harbor Freight tile saw. I tried to low ball him with the money I had in my pocket, but the deal was good enough I walked down the hill to the atm at the gas station.
LET ME TELL YOU GUYS, that saw is an absolute unit. I have put that thing through hell. I’ve burned up 2 belts, 2 blades, my neighbor borrowed it and did a full tile bathroom remodel, I’ve cut retaining wall blocks with it, a whole bunch of pavers… it is loud as hell but man that thing is a beast.
OP
Tim_with_a_T
Well-known member
After I had that saw, it was game on.


OP
Tim_with_a_T
Well-known member
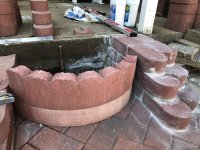
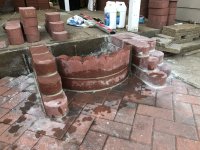
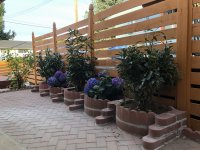
I eventually demo’d the front concrete walk, and I wanted to do some sort of planter that looked tasteful. There was a rose bush in the yard that I dug up and split, then put into these what I’m calling pocket planters.




OP
Tim_with_a_T
Well-known member
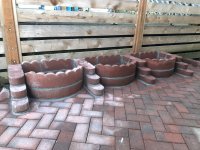
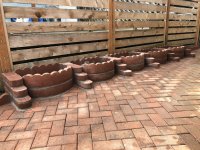
I really liked how these turned out, but they absolutely destroyed me. I am not a mason. I do not have proper training or form or technique etc. If I was going to do this again, I would need to engineer my way out of it. So I made some mortar templates, which cut the time from days of fiddling to hours.


OP
Tim_with_a_T
Well-known member






OP
Tim_with_a_T
Well-known member
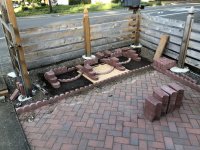
I modified the forms to make a larger format. They stopped making the curved concrete edging (scalloped tree rings), so I wasn’t able to keep going beyond what you see. But I’ve hoarded a handful of used ones I’ve found here and there for future projects. That’s all I have to share for now. I would kill for this kind of free time once again.




Attachments

Adaylate
Well-known member
Tim, you have really transformed your yard!
I love the look of pavers. Years ago my wife and I did a rectangle patio using brick salvaged from a local railroad platform. I wasn't brave enough to try herringbone! Our youngest daughter bought the house and still enjoys the patio.
I love the look of pavers. Years ago my wife and I did a rectangle patio using brick salvaged from a local railroad platform. I wasn't brave enough to try herringbone! Our youngest daughter bought the house and still enjoys the patio.
yhprum
Well-known member
Very nice. You have a great design style and quite the work ethic to pull it off!