To avoid these ads, REGISTER NOW!

What did you do "IN" your garage today?

Outlawmws

Well-known member
Joined
Aug 9, 2011
Messages
39,592
Location
The Badlands
So I stopped the test after 12 hours. I stated just after 6AM - both coolers had sat out overnight, and the day was mid 70's or maybe a bit more and in tree shade (oak trees - not 100% but close)

Only a little of the block remaining in the PiK-Nik cooler I guessed maybe half in the Coleman. The Pik-Nik had a slight mishap in the first hour as the aluminum parts inside were against the block and melted into it, so that speeded its melting up slightly:

Pik-Nik-Ice-Test-Oops.jpg

Coleman 1 hour in:

Pik-Nik-Ice-Test-Coleman.jpg

Both at the end:

Pik-Nik-Ice-Test-Coleman-end.jpg

Pik-Nik-Ice-Test-PN-end.jpg


So I took those and dropped them into Pyrex for measuring to see what remained. I would guess the Pik-Nik ice lost close to 1/2 cup to the oops in the first hour. so 1 cup vs 5 remaining; out of about 7-8 cups:

Pik-Nik-remaing-Ice-Water-after-12-Hours.jpg


My rough conclusion is that the Coleman should go about 2X the Pik-Nik, or 2-3 days for the Pik-Nik Cooler.

I think I can improve on that with a piece of Styrofoam under it during transport and use, and by making a cover from one of those shiny mylar bubble sheets. Also if Plastidip is available in white (It is), I might/could paint that inside so the bare aluminum isn't in contact.

It occurs to me I didn't show both cooler chests overall. the angle of the shot makes the Coleman look shorter, but its actially about 2" taller at 18" the Pik-Nik is 16" tall:

Pik-Nik & Coleman 70 qt coolers front.jpg Pik-Nik & Coleman 70 qt coolers Side.jpg
 
To avoid these ads, REGISTER NOW!

Beerhippie

Well-known member
Joined
Oct 13, 2023
Messages
10,555
Location
Far NE Oregon
Came in early and installed the "goof plate".

55506919457_e1cfda51fc_b.jpg

It fits right in! I also moved the front license plate (because Oregon) to a solid mount that isn't in front of the radiator.

Then spent the rest of the day driving around my old haunts with the out-of-town friends. My real camera wouldn't cooperate, so I used my cell for some pics--now I need to recover my text **** so I can send them to myself.

Having a quick fumita in the shop and then back to talk story with the old buddies up front. Beer is good!
 

ambenz

Well-known member
Joined
Dec 12, 2010
Messages
4,274
Location
NW Chicago Suburbs
For 15+years, I NEVER ONCE had to use my generator and I store it underneath my workbench.
It has become such a fixture there that it became out of site, out of mind.
I bought it back in 2011 when a storm snapped a tree limb down the block and snapped our service line....
linedown1.jpg
Photo circa 2011

Oh sure, I HAVE heard you have to run them "every so often" or the winding do something...or this or that...but eh, life comes first.
I even printed out a service manual for the thing...where it sat, on top of the fuel tank, under the bench.
WELL....you know where I am going with this already, don't cha?!?!
Yup...."BOOM!" 100F/39C outside, AC running full tilt and we loose power.
No power to 2 sump pumps, 2 critical refridgerators, no GJ as the internet died....OMG. LOL!
Called to find maybe power will return in 2+ hours.
So I figured....NO TIME LIKE THE PRESENT to inspect and fire up the generator....
....not fully realizing it's been 15 years since it last started!
I poured some gas it it, flipped "ON" switch, turned gas valve to "OPEN", ....choked it...
...pull....

...pull...


...pull...


...unchoked...

...pull....


....pull..


........................................"VROOOOOM!" ....SHE FIRED RIGHT UP!!!! WOO HOO!!!!!

So I stuck my incandescent test bulb on the left side of 110vac outlet......LIGHTS BRIGHT!
................................................................on the right side of 110vac outlet.....NO LIGHT AT ALL!!

Checking the breaker, I find it has broken away from the faceplate and is recessed into the plastic box surrounding the electronics.
Badbrkbutton.jpg
This will have to be repaired along with a full oil change, but not today...too hot out, 100F/39C, as I mentioned earlier...document okay.
I get a screwdriver and realign it with the hole and press it, retest the right side outlet and it now WORKS!
I was very happy the generator is still able to work...and shut it down immediately!!!!!!
Documented the issues, pulled the fuel tubing off the carb and drained the tank, refitting the tube on the carb.
Added a ounce of Stabil and Marvels Mystery Oil to the tank, shook it up as there was a bit gas left in the tank ridges and started up the gene again until it ran dry and sputtered out.
fixit1.jpg

Well, another repair to add to a pretty small list....just waiting for the weather to cool down to I can open up the plastic electrical box to investigate how those breakers are secured to the faceplate.
MY GUESS is a bimetal clip rusted out and stopped holding the breaker...stay tuned.
Also looking through the manual for oil specs, it said to check the engine specifications manual...the manual I didn't download!
However the internet found the engine from the gene's model number and the oil needed to replace the stuff in there from 15+years ago is.....
"Recommended Oil Type (Viscosity)
Choose your oil based on the outdoor temperature where you operate the generator:
  • Above 40°F (4°C): SAE 30 high-quality detergent oil. This is the standard, most common choice for warm-weather operation. [1, 2, 3]
  • All Temperatures / Best Protection: Synthetic SAE 5W-30 or 10W-30. Full synthetic oils offer the best engine protection across both extreme cold and hot operating climates without increased oil consumption. [1]
  • Below 40°F down to 0°F: SAE 10W-30 or 5W-30. Avoid using standard SAE 30 in freezing weather, as it makes the engine very difficult to pull-start. [1, 2, 3]
  • Capacity: 36 fluid ounces (approx. 1.1 quarts or 1.06 liters).
  • Note: Do not overfill. Buy a standard 32 oz. quart and a smaller 10–12 oz. bottle, or a larger multi-quart container so you have enough to reach the full mark on the dipstick.
So thats works for me, I can do that and also will know when the crankcase is totally empty too.
Now the circuit breaker they show for replacemtny looks like this....

209872GS
I will be suprised if the right one that pulled away from the faceplate, looks the same...will know when I open the plastic housing up.
Might be a updated part for the exact same reason this one pulled apart.

So I got my marching orders....will let the "Dog Daze of Summer" pass by before I tackle this.
 
Last edited:

KwikFab

Well-known member
Joined
Jul 27, 2024
Messages
1,387
Location
Central Valley, CA
Wasn't going to do anything since I've been getting over a bad cold. Well the 4" die came in (2 day air surprisingly) for my press brake so thought I'd give it a shot with this specific bracket my business partner needs bent.

20260904_133534.jpg

My tooling consists of a 4-way setup for the bottom die, which forces me to create parts with a specific minimum distance between flanges.
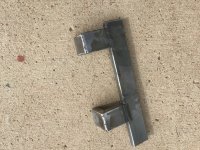
20260904_171446.jpg

Because of that, I had to do this in a way I've never done before.

In order to bend this setup, I had to first do a 45 degree bend (red), followed by hitting a 90 degree close to the base (green), and lastly follow up with hitting the initial bend again to finish the 45 to 90 (blue).

20260831_130514.jpg

This is time consuming and it can lead to inaccurate parts.

With the new die, I was able to perform a 90 right off the bat for the flanges at the end as well as the ones at the base without issue.

20260904_171457.jpg

20260904_165511.jpg

20260904_165502.jpg

I don't have any more to bend as these two were samples to try out. Now he can make the adjustment needed and cut a bunch so I can bend them all up.
 

Skyman

Well-known member
Joined
Nov 9, 2021
Messages
1,283
Location
Central Maryland
Wasn't going to do anything since I've been getting over a bad cold. Well the 4" die came in (2 day air surprisingly) for my press brake so thought I'd give it a shot with this specific bracket my business partner needs bent.

20260904_133534.jpg

My tooling consists of a 4-way setup for the bottom die, which forces me to create parts with a specific minimum distance between flanges.

20260904_171446.jpg

Because of that, I had to do this in a way I've never done before.

In order to bend this setup, I had to first do a 45 degree bend (red), followed by hitting a 90 degree close to the base (green), and lastly follow up with hitting the initial bend again to finish the 45 to 90 (blue).

20260831_130514.jpg

This is time consuming and it can lead to inaccurate parts.

With the new die, I was able to perform a 90 right off the bat for the flanges at the end as well as the ones at the base without issue.

20260904_171457.jpg

20260904_165511.jpg

20260904_165502.jpg

I don't have any more to bend as these two were samples to try out. Now he can make the adjustment needed and cut a bunch so I can bend them all up.

Nice work, as always.
 

Beerhippie

Well-known member
Joined
Oct 13, 2023
Messages
10,555
Location
Far NE Oregon
Wasn't going to do anything since I've been getting over a bad cold. Well the 4" die came in (2 day air surprisingly) for my press brake so thought I'd give it a shot with this specific bracket my business partner needs bent.

20260904_133534.jpg

My tooling consists of a 4-way setup for the bottom die, which forces me to create parts with a specific minimum distance between flanges.

20260904_171446.jpg

Because of that, I had to do this in a way I've never done before.

In order to bend this setup, I had to first do a 45 degree bend (red), followed by hitting a 90 degree close to the base (green), and lastly follow up with hitting the initial bend again to finish the 45 to 90 (blue).

20260831_130514.jpg

This is time consuming and it can lead to inaccurate parts.

With the new die, I was able to perform a 90 right off the bat for the flanges at the end as well as the ones at the base without issue.

20260904_171457.jpg

20260904_165511.jpg

20260904_165502.jpg

I don't have any more to bend as these two were samples to try out. Now he can make the adjustment needed and cut a bunch so I can bend them all up.
And why I buy stuff like bumpers and receiver hitches made by folks like you who know their ****!
 
Last edited:

LeonardY

Well-known member
Joined
Apr 16, 2011
Messages
5,231
Location
Southern California
Finished up the electrical for the mini split. As always, I under estimate how long this is going to take.

First thing that was needed was a hole from the inside to the outside. Inside was easy. Hole saw through drywall.
Outside, I had to go through about an inch and half of stucco/brown coat, lath and 1/2 plywood. I needed the holes to line up too.

I tried drilling straight from the inside to the outside. Got a pilot hole. I inserted a tube into the drywall and looked. I was about 1/4 inch high where the bit went through. A lot of drilling through stucco and swearing.
I used a hammer drill with a 3/8 inch masonry bit, a chisel and a 1 inch grinding wheel.
1788577715968.png
Lined up pretty well.
1788577761871.png
I then spent the rest of the day pulling wire and connecting everything.

It's done and everything works.

Cleaned up and putting this a check mark for this adventure.
 

Motorman55

Well-known member
Joined
Apr 10, 2016
Messages
2,690
Location
South Jersey
Worked on the right side of the garage today.

Removed the 30 dawer cabinet. With the cabinet and 5' bench gone, the lower wall is clear all the way to the overhead door.

Next I attached my small end locker to the big tool box. It fit perfect into the open space that the drawer cabinet blocked. I set it down low which gives me a drawer size openng on top, which I may leave open or possibly build a drawer to fit in it. I just have to add a vertical piece of trim on the right end and paint it red to finish.

Patched the walls a bit and painted the upper section white primer. Next I attached a piece of previously painted black plywood to the wall and then attached the two small parts boxes. Made a temporary shelf for them to sit on till I get a chance to build a better one.

I called up the kid that I've been giving stuff to and he came within a half hour for the 30 drawer cabinet and 5' bench. Also gave him most of my pnuematic tools and a bunch of stuff that was in the cabinet drawers. I'll have at least one more load of stuff for him next week. Happy to see it all going to a good place.

Next up I have to snap a line down the length of the wall and paint the lower section light gray then pick up some lengths of trim boards, paint them black and install between the two colors. That will basically finish the walls color theme and I can move onto other things like cleaning up the mess I made, organizing stuff, adding wall art, signs and decals, etc.

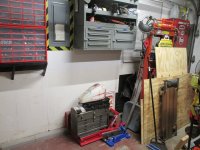
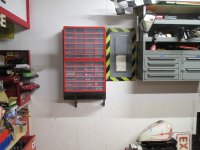
Here's a couple pics...1788579017433.jpeg1788578925785.jpeg1788578902849.jpeg
 
Last edited:

KwikFab

Well-known member
Joined
Jul 27, 2024
Messages
1,387
Location
Central Valley, CA
Finished up the electrical for the mini split. As always, I under estimate how long this is going to take.

First thing that was needed was a hole from the inside to the outside. Inside was easy. Hole saw through drywall.
Outside, I had to go through about an inch and half of stucco/brown coat, lath and 1/2 plywood. I needed the holes to line up too.

I tried drilling straight from the inside to the outside. Got a pilot hole. I inserted a tube into the drywall and looked. I was about 1/4 inch high where the bit went through. A lot of drilling through stucco and swearing.
I used a hammer drill with a 3/8 inch masonry bit, a chisel and a 1 inch grinding wheel.
1788577715968.png
Lined up pretty well.
1788577761871.png
I then spent the rest of the day pulling wire and connecting everything.

It's done and everything works.

Cleaned up and putting this a check mark for this adventure.

Want to come install one in mine? :lol:
 

KwikFab

Well-known member
Joined
Jul 27, 2024
Messages
1,387
Location
Central Valley, CA
They are so easy, even an old lady can do it in a day. Actually I installed 2 in a day for the Mid Hudson Woodworkers new building. It does help to have a second body when feeding the lines through the wall. But the rest is pretty much one person.

Sometimes it's the pre-requisites that make us not get something done :lol:

I'll have to make room and move stuff around to place it where I want it unfortunately. I put off buying a large press brake just because I didn't want to get the ZX buttoned up and running, which was followed by another pre-requisite - selling the F250!
 

LeonardY

Well-known member
Joined
Apr 16, 2011
Messages
5,231
Location
Southern California
Want to come install one in mine? :lol:
They are so easy, even an old lady can do it in a day. Actually I installed 2 in a day for the Mid Hudson Woodworkers new building. It does help to have a second body when feeding the lines through the wall. But the rest is pretty much one person.

I didn't install mine. I had my AC guy do it.
I just did the electrical.

I looked into installing my own. Seemed pretty straight forward. Some come with pre-charged lines. Which meant your stuck with however long they are. The ones that don't come with pre-charged lines have to be charged by and HVAC guy.
I was looking at Costco and was seeing a lot were DOA or units are damaged in shipping. After looking at the price and the time it would take me to do it by myself.
I opted for to have my AC guy get the unit and install it. They were done in 5 hours. He's a buddy and charged me $2800. Well, worth it.
 

LeonardY

Well-known member
Joined
Apr 16, 2011
Messages
5,231
Location
Southern California
I'll have to make room and move stuff around to place it where I want it unfortunately.
I had to do that and then clear all the tools out of the way so it could be installed

My AC guy is great but sometimes he goes way cheap. I had a hole in the drywall from where a security camera used to be. The main unit was going to be just below it. He said, "I can just stuff a rag in it." I told him to give me five minutes. I patched the hole with a piece of drywall. He's worker said, "Wow, that's fast." My AC guy said, "He one of the few customers that I like to have around during an install."

High praise indeed.
 
Last edited:
To avoid these ads, REGISTER NOW!

finn

Well-known member
Joined
Mar 27, 2005
Messages
16,656
Location
The UP, God's country
My shop has osb wall covering for the lower 8’, with steel for the upper 8 feet. When I bought the place around 12 years ago, my wife graciously offered to repaint the osb, but I declined since we were rehabbing a project house at the time and I knew that if I diverted from that task, it would never be completed.

Well, 12 years later and our internet service provider goes belly up, so I bite the bullet and installed Starlink in the corner where I have the tv, my workbench, easy chair, vice, press, and drill press.

It’s a mess, with osb walls that were partially painted (I think the previous owner had a parts washer in that corner and never completely painted behind it.). I decided to clean up the wiring and rehang the cobbled up LED light over the workbench, and one thing led to another…

It just so happened that when we dropped off some items at the local Habitat Restore, I stumbled across a display of interior paint in various shades, priced at $20/gallon, so I bought a gallon.

I don’t know how it will hold up, but it covered ok, and, considering it’s osb, looks looks pretty good.

I went back and bought a few more gallons. Ends up it is new paint they buy from the manufacturer. Must be an end of run or something because he told me to try to match batch numbers for a color match.

Of course, as I said, one thing leads to another and I have a week into fixing and painting this one little corner.
 
Last edited:

kbeefy

Well-known member
Joined
Sep 14, 2013
Messages
3,532
Location
Harington, Eastern Washington
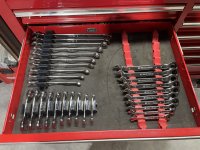
Screwed with the tool box layout. Not satisfied. Toolbox widget is okay but I either need more or go in another direction.
Zim
IMG_4388.jpeg


IMG_4389.jpeg

I bought some of the widgets when they were on kickstarter, I'm not a huge fan. I use them for wrenches that other holders don't work on, like ratcheting stubbies. There are other holders that offer much higher density.

20231008_104238.jpg

0828220840_HDR.jpg
 

WisJim

Well-known member
Joined
Dec 20, 2010
Messages
2,392
Location
Menomonie, WI
Took all the wife's product buckets and loaded them in the truck.

Now sitting at a craft fair while she sells her wares.
I do this on occasion for my wife. She has a replica of an antique circular knitting machine and she makes wool socks (her actual antique machine has worn out from over 100 years of sock making). A couple of totes of merchandise, table and display things, her machine and the table to clamp it on, and then I set things up and find something to do for the day.
Some days are fun, some are boring, some are just okay. I always have a book to read if needed.
 

Beerhippie

Well-known member
Joined
Oct 13, 2023
Messages
10,555
Location
Far NE Oregon
he told me to try to match batch numbers for a color match
SOP with housepainters: If you have to use more than one can/bucket of paint for a job, "shake" them--get a larger bucket, pour all the paint in, mix it well, then pour back into the original cans. Now all your paint is guaranteed to match!

Even matching batch numbers don't insure an exact match when you start a new can halfway across a wall.
 
Last edited:

Outlawmws

Well-known member
Joined
Aug 9, 2011
Messages
39,592
Location
The Badlands
SOP with housepainters: If you have to use more than one can/bucket of paint for a job is to "shake" them--get a larger bucket, pour all the paint in, mix it well, then pour back into the original cans. Now all your paint is guaranteed to match!

Even matching batch numbers don't insure an exact match when you start a new can halfway across a wall.

HUGE :+1:
 

finn

Well-known member
Joined
Mar 27, 2005
Messages
16,656
Location
The UP, God's country
SOP with housepainters: If you have to use more than one can/bucket of paint for a job is to "shake" them--get a larger bucket, pour all the paint in, mix it well, then pour back into the original cans. Now all your paint is guaranteed to match!

Even matching batch numbers don't insure an exact match when you start a new can halfway across a wall.
Don’t think it will matter since I’m painting (well, actually my wife is) over OSB.

It’s sort of a love / hate relationship with OSB. On one hand it goes up fast and is easy to hang things on , although adding a reinforcing board on the surface is best, as fasteners can’t otherwise hold much without tearing up the substrate.

Cons are it darkens with age and is impossible to keep clean. It also doesn’t really take paint well because its topography is so rough. In my case being previously painted helps.
 

Beerhippie

Well-known member
Joined
Oct 13, 2023
Messages
10,555
Location
Far NE Oregon
Woke to this yesterday:

55508029713_9a605534aa_b.jpg

It feels like we skipped fall and went straight to winter. My out-of-town friends were camped up at the base of the mountains and woke to snow on their tent.

Anyhow, today I tried to remove the center section of my front bumper to drill and tap for the last two screws on my "goof plate":

55506919457_e1cfda51fc_b.jpg

I discovered that my "mistake" was not a mistake--even 'though it was. I can't remove the bumper section with out removing the goof plate first--it's not a bug, it's a feature!

So those two rear screws will remain missing, as I can't reach them even with the lower grille removed. I could probably use a right-angle screwdriver, but I hate those things, and don't have one in P3, anyway.

Now I'm sitting here getting cold and wondering where our traditional Indian Summer got off to. September-October are usually the nicest months here.

Also trying to figure out what the hell Google did to my phone. I finally got it to boot, got it set up with a new Google account, and started building my contacts list again--but now I can't get photos off the phone. I've always just emailed them to myself, but now that doesn't seem to work. When I try to plug the phone into my computer, it shows up as an empty drive. Tried using the Import Photos function, and it doesn't work.

I hadn't budgeted for a new phone, but it looks like it's in the offing. One thing is certain: it won't be a Google Pixel--never again.
 

Outlawmws

Well-known member
Joined
Aug 9, 2011
Messages
39,592
Location
The Badlands
So those two rear screws will remain missing, as I can't reach them even with the lower grille removed. I could probably use a right-angle screwdriver, but I hate those things, and don't have one in P3, anyway.


Button head socket screws - washer if needed?


I hadn't budgeted for a new phone, but it looks like it's in the offing. One thing is certain: it won't be a Google Pixel--never again.

Take a look at the Kyocera phones... more rugged than many other phones too.
 
Last edited:

niget2002

Well-known member
Joined
Oct 2, 2012
Messages
11,506
Location
Josephine, TX
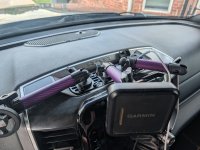
Finally got around to swapping out the phone mount on the truck.

Upgraded to the "rubigrid". The window mount for the tps for the travel trailer broke and this will let me mount it to the dash with the other stuff.

2944.jpg
 

niget2002

Well-known member
Joined
Oct 2, 2012
Messages
11,506
Location
Josephine, TX
I do this on occasion for my wife. She has a replica of an antique circular knitting machine and she makes wool socks (her actual antique machine has worn out from over 100 years of sock making). A couple of totes of merchandise, table and display things, her machine and the table to clamp it on, and then I set things up and find something to do for the day.
Some days are fun, some are boring, some are just okay. I always have a book to read if needed.
It was 95f when we were packing up and little breeze. It was hot.

I put an earbud in my ear and listened to collage game day.
 

KwikFab

Well-known member
Joined
Jul 27, 2024
Messages
1,387
Location
Central Valley, CA
Early morning getting the kid to soccer practice

20260905_091309.jpg

Seeing as how it's been nice all day, thought I'd weld up the last 2 kits I had left over in the garage

20260905_134531.jpg

20260905_134628.jpg

I'm not completely 100%, but I had to take advantage of the weather. That and the other 4 kits are already packaged and ready to ship.

Easy weekend since my wife insists I keep it easy; birthday is this Labor Day.
 

LeonardY

Well-known member
Joined
Apr 16, 2011
Messages
5,231
Location
Southern California
Early morning getting the kid to soccer practice

20260905_091309.jpg

Seeing as how it's been nice all day, thought I'd weld up the last 2 kits I had left over in the garage

20260905_134531.jpg

20260905_134628.jpg

I'm not completely 100%, but I had to take advantage of the weather. That and the other 4 kits are already packaged and ready to ship.

Easy weekend since my wife insists I keep it easy; birthday is this Labor Day.
Happy Birthday.

It's hard to sit idle. But you need to every now and then.
 
To avoid these ads, REGISTER NOW!
Top Bottom