To avoid these ads, REGISTER NOW!

What did you do "IN" your garage today?

finn

Well-known member
Joined
Mar 27, 2005
Messages
16,667
Location
The UP, God's country
SOP with housepainters: If you have to use more than one can/bucket of paint for a job, "shake" them--get a larger bucket, pour all the paint in, mix it well, then pour back into the original cans. Now all your paint is guaranteed to match!

Even matching batch numbers don't insure an exact match when you start a new can halfway across a wall.
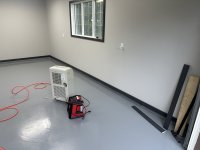
My wife is doing some more painting in the shop. W’ll get the entire wall up to the man door, at least. My job is to remove the wall hangers, eg old headers and valve covers, etc screwed to the osb walls, then paint any shelves a contrasting darker shade.

I was talking to my wife about the $20/gallon paint from Restore we’re using.

She said there was a sign in the Restore by the display saying it was, indeed, recycled paint.

I looked it up, and yup, recycled paint is a thing.

Processors gather unused and partially used cans from recycling centers, paint producers, contractors, etc, screen for mold and rust, separate into color groups, filter and screen it, add pigments and fungicides, reblend, and package.

For $20/ gallon I have no complaints. We’ve used parts of two different shades of grey so far, and it’s ok on the previously painted osb.

It’s satin though, which isn’t the best choice for shelves.
 
To avoid these ads, REGISTER NOW!

Beerhippie

Well-known member
Joined
Oct 13, 2023
Messages
10,583
Location
Far NE Oregon
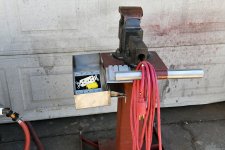
I've been meaning to fix a major problem with my portable vise stand: No where to set tools or parts down. Since today is a Fed. holiday, I may as well get 'er done.

Quick cruise through the boneyard--that'll work! No idea what it came from.

55514125046_0abf84e12b_b.jpg

55514125026_a99512b40b_b.jpg

Plenty stout enough for a few tools or small parts.

Gotta exercise Mr. Sparky occasionally or he gets out of shape. Slapped some red primer on the bare parts and welds and now it's ready for knife sharpening this afternoon.

Now I'm thinking of adding a double-gang outlet box and extension cord... if I have the parts, seeing as everything is closed today.
 

finn

Well-known member
Joined
Mar 27, 2005
Messages
16,667
Location
The UP, God's country
Most of the Restores around me sell recycled paint, as no one wants to deal with an almost empty can.
This is a little different than the opened and partially used paints you sometimes find.

It’s more properly, in my opinion, described as reprocessed and reblended, in a factory, put in new cans, labeled, and sold through Restore and probably other retailers.

Color selection is limited, with at least four shades of grey, plus maybe five or six cans of reds and other colors, but there was perhaps only one gallon of each on the shelves.

I’m ok with grey in the shop.
 

Beerhippie

Well-known member
Joined
Oct 13, 2023
Messages
10,583
Location
Far NE Oregon
IMG_4823.jpeg
Gotta do something about that mandoor step. ;)

Maybe weld up a nice steel one? Expanded metal with a tray underneath to catch mud would be nice around here.
 

Beerhippie

Well-known member
Joined
Oct 13, 2023
Messages
10,583
Location
Far NE Oregon
55514436018_3a233d17ec_b.jpg

Most of what I needed was in the Connex.

55514710065_f75fa20d82_b.jpg

Almost done. I only had one outlet and two #10 24 screws for the cover. I chose the outdoor box and cover to keep grinding dust out--as much as possible. Being under the shelf should help, too. I'd rather I had a 12 AWG cord, but the 14 AWG will be fine for one small hand tool at a time at 16' long.

No more trying to balance things on the mounting plate of the vise.

I can't believe how perfectly that tray fit--it's like it was made for this.

Now to see how long it takes for the tray to get filled with orphaned fasteners, off-cuts, tools and grinder dust.
 
Last edited:

Outlawmws

Well-known member
Joined
Aug 9, 2011
Messages
39,607
Location
The Badlands
This is a little different than the opened and partially used paints you sometimes find.

It’s more properly, in my opinion, described as reprocessed and reblended, in a factory, put in new cans, labeled, and sold through Restore and probably other retailers.

Color selection is limited, with at least four shades of grey, plus maybe five or six cans of reds and other colors, but there was perhaps only one gallon of each on the shelves.
I’m ok with grey in the shop.

We painted a buddy's grandmothers house interior ones using paint we all brought over from leftovers, (4 or 5 sources) and it all got mixed up - no matter what the color - in a big 5 gallon bucket. mixed like that it all becomes beige (which was the "grey" of the era) and painted every room in her house,. it looked good!


Now to see how long it takes for the tray to get filled with orphaned fasteners, off-cuts, tools and grinder dust.

Knock a hole in the bottom in a corner and put some screen on it from the bottom (epoxy). that gives the grinder dust a place to drain while preserving the "valuable" fasteners...

1788813962975.png

Front/user end needs a hanger for that angle grinder; make sure the handle clears the tool/parts bin.

The back needs a mini "hose rack hanger" for the extension!

Last, a hanger for the beater hammer, and a steel block on the corner of the mounting plate for a slide saver. :evil:
 

Beerhippie

Well-known member
Joined
Oct 13, 2023
Messages
10,583
Location
Far NE Oregon
We painted a buddy's grandmothers house interior ones using paint we all brought over from leftovers, (4 or 5 sources) and it all got mixed up - no matter what the color - in a big 5 gallon bucket. mixed like that it all becomes beige (which was the "grey" of the era) and painted every room in her house,. it looked good!


Knock a hole in the bottom in a corner and put some screen on it from the bottom (epoxy). that gives the grinder dust a place to drain while preserving the "valuable" fasteners...

1788813962975.png

Front/user end needs a hanger for that angle grinder; make sure the handle clears the tool/parts bin.

The back needs a mini "hose rack hanger" for the extension!

Last, a hanger for the beater hammer, and a steel block on the corner of the mounting plate for a slide saver. :evil:
I'm ahead of you for the drain hole:

55513441492_146283df76_b.jpg

'Though I was thinking more for rain water when I space out and leave it out or get a surprise downpour.

Seems a 3/4" slot cut about 3/4" deep in the front edge would make for a great hanger for the grinder.

The handle works just fine for the cord hanger.

I've already thought of a hammer manger mounted in one of those existing holes on the side of the tray.

I don't use the slide for an anvil. When I need an anvil on the vise, I clamp my RR rail anvil in the jaws.

55514472066_9e9677e0c3_b.jpg
 

2001ZR2

Well-known member
Joined
Jan 4, 2018
Messages
454
Location
Kansas City
4467.jpg4466.jpg
What started with as the link for my rear sway bar had rusted in place on both sides.

4467.jpg
After using a dremel to die grind around the shaft and a 3 lb persuader hamer.
4469.jpg

Evaporust and wire wheel time before paint. Also lost the can of paint I wanted to use...it showed up after I started using tge new ones I bought.
 

spamfreemenke

New member
Joined
Nov 23, 2019
Messages
3
Location
College Park
I haven't logged in for ages... but I spent half the day in my garage. Earlier this summer I tried my hand at vinyl siding rather than deal with the flaky paint and dryrotted wood gable. Roughed in for a light that'll eventually run off a small camper solar panel. Set the groundhog kill box in the rafters for the season, we hope.

And I began stripping an antique medical cabinet. It came from a mortuary in NJ, via ebay, and will hold my wife's cut flowers in the dining room where the cats can't knockIMG_8288.jpeg over and eat the poisonous ones. This will be a project- one pane of the original glass was cracked and I was just able to finish the job in my attempt to get it out. So I have to track down some wavy glass.

The basic plan is to strip it and repaint with my airless sprayer, polish up the hardware, and hopefully fit some adjustable sliders into where the crusty old wooden wheels are crumbling out of. I watched a couple videos this afternoon of the grit progression to set up for a nice paint finish. Many of the 'restored' ones you see look very gloppy because people didn't have the nerve to strip the old lead paint and just sprayed over the ragged spots. Two pluses- original hardware is still there, and it was stored somewhere so wet that 1/4 of the paint was already gone. If you've got thoughts, let me know.
IMG_8289.jpegIMG_8290.jpeg
 

Mike S.

Well-known member
Joined
Jan 16, 2022
Messages
278
Location
Charlotte, NC
I got fed up with my old garage door opener and finally replaced it. Took a lot longer than I had expected . My garage door is 7' 10", so I had to make a trip back to Lowe's to buy the extension kit. Then another trip to buy some angle iron to hang the new motor. Even with the extension it's still a good ~6" shorter than the old opener.

20260907_204231.jpg

Those of you familiar with these Genie door openers might recognize that I have the carriage on upside down. I recognized that too after I tried hanging it the first time.
 
To avoid these ads, REGISTER NOW!

Outlawmws

Well-known member
Joined
Aug 9, 2011
Messages
39,607
Location
The Badlands
Made up 3 fresh liters of the home brew de-rusting solution, and started getting caught up on on the GS backlog:

An hour of so of soaking in the USC, did pretty well for most of it. The hatchet head got real black however. I should have used latex glove handling that one!

DeRusto b.jpg


The second pair of slip joints down are really trashed. K16 Motor Spec. and IIR came from a stove that was underwater for a while seasonally. the copper plating si showing in places and there is deeply etched rust pitting...

You can see the inlaid hardened blade edge on the hatchet head real clear here:


DeRusto a.jpg


The Olympic emblem is still pretty hard to read. I need to try chalking it again. Slso there is a bit of tar or something in one spot. needs something stronger on that.

DeRusto c Olympic hatchet head.jpg
 

Old Man Roger

Well-known member
Joined
Apr 6, 2017
Messages
18,380
Location
Palm Coast Florida
Weeded a few beds, mowed the lawns, dropped/bucked/cut two trees, repaired a quarter window track on the '65 Skylark, lubed the front suspension on the '81 Chenowth, then put another 5 hours into removing the undercoating from the '73 Mustang.

effba0d2-9145-471f-8fba-19af3d4a5e4b.jpg
Slacker. You kids are so lazy nowadays. :sneaky:
 

dwasifar

Well-known member
Joined
May 28, 2017
Messages
2,119
Power washed the front of the garage where the lights attract bugs, and the bugs attract spiders; and the front porch, ditto. Also the gutters, which always get grubby looking in that area. While I had it out, I also power washed the undersides of the lawn mowers. Lopped off a couple of scrub trees that were starting to grow up through the bushes. Then I pulled my wife's BRZ out and gave it a proper 2-bucket hand wash and tire treatment. While I had the hood open to wipe the edges of the engine compartment, I got out the battery checker and did a quick test.

A while back we had a bird trying to nest on the front porch light. Didn't want that, but if you get rid of the nest they'll often try again in the same spot. So I put a tennis ball in it to prevent the bird from using it. That worked fine, and today I got rid of it.

Also, I'm probably the last person on earth to come up with the idea of drying wheels and tires with a leaf blower. Saved my back and knees today .
 

kaymccampbell

Well-known member
Joined
Feb 27, 2015
Messages
29,933
Location
Upstate New York
Rode the chair. Started the war with the Escape brakes. Sledge hammer removal of one rotor. Found out they sent me 2 different front rotors. Started the return and resend process. Finished the one front. Went to start on the rears. The car is refusing to retract the ebrakes. I tried every stupid pet trick I could think of. It's possible that the TPMS error is blocking the ebrake. I had something like that on the Journey. Tried the scan tools, which are supposed to work. Nope. The box lied. Well eff me. I was too disheartened and exhausted to continue. Tomorrow I'll try refreshing the TPMS modules. And I also bought a new updatable scanner and whatnot device. I'm going to win one way or another.
 

Beerhippie

Well-known member
Joined
Oct 13, 2023
Messages
10,583
Location
Far NE Oregon
Lopped off a couple of scrub trees that were starting to grow up through the bushes.
Use some broad-leaf herbicide, full strength on the freshly-cut (like minutes fresh) stumps and those will never grow back. Apply with a chip or acid brush and use PPE.
Rode the chair. Started the war with the Escape brakes. Sledge hammer removal of one rotor. Found out they sent me 2 different front rotors. Started the return and resend process. Finished the one front. Went to start on the rears. The car is refusing to retract the ebrakes. I tried every stupid pet trick I could think of. It's possible that the TPMS error is blocking the ebrake. I had something like that on the Journey. Tried the scan tools, which are supposed to work. Nope. The box lied. Well eff me. I was too disheartened and exhausted to continue. Tomorrow I'll try refreshing the TPMS modules. And I also bought a new updatable scanner and whatnot device. I'm going to win one way or another.
30-year-old+ rigs. Never a problem--until 30-year-old isn't old enough anymore.
 

Murby

Active member
Joined
Aug 26, 2026
Messages
39
Made up 3 fresh liters of the home brew de-rusting solution, and started getting caught up on on the GS backlog:

An hour of so of soaking in the USC, did pretty well for most of it. The hatchet head got real black however. I should have used latex glove handling that one!

DeRusto b.jpg


The second pair of slip joints down are really trashed. K16 Motor Spec. and IIR came from a stove that was underwater for a while seasonally. the copper plating si showing in places and there is deeply etched rust pitting...

You can see the inlaid hardened blade edge on the hatchet head real clear here:


DeRusto a.jpg


The Olympic emblem is still pretty hard to read. I need to try chalking it again. Slso there is a bit of tar or something in one spot. needs something stronger on that.

DeRusto c Olympic hatchet head.jpg
Interesting.. What's the home made solution? I usually just use phosphoric acid or the sandblast cabinet.. Or sometimes electrolysis in special circumstances.
 

Motorman55

Well-known member
Joined
Apr 10, 2016
Messages
2,692
Location
South Jersey
The cleanup comtinues....

Spent most of the day out shopping with the wife. Picked up a bunch of supplies for the garage/shop including wood trim, paint, tape, screws, etc. as well some cardboard boxes.

Once I got back to the garage, I spent some time boxing up a lot of the loose supplies, parts and tools laying in front and on top of the 56" tool cabinet. Before I knew it, I had the top of my box back and access to all the drawers.

That's about all I had time for today, so tomorrow I'll get a fresh start. Plans are to paint the 3" wood trim I purchased today, satin black, then nail it to the right side wall where it will devide the top white and lower gray colors continuing the color theme. After that I'll play it by ear.

Hmmmm....every time I look at my logo sign, it reminds me I still need to finish pinstriping the outlines of the wings.

Couple pics....1788839836053.jpeg1788839707808.jpeg
 
Last edited:

Murby

Active member
Joined
Aug 26, 2026
Messages
39
Its a mix of Citric acid, Washing Soda, and a dash of Dawn dish washing soap - I got the formula from this YouTube vid, and it works great!:

That's pretty cool.. I've always used Phosphoric acid because it doesn't remove the rust, it converts it from iron-oxide into iron-phosphate. The iron phosphate turns gray in color and acts as its own rust preventative. Modern cars are dipped into either zinc phosphate or iron phosphate before painting because not only does the treatment eliminate any microscopic rust that can't be seen with the naked eye, but it also grows a crystal substrate on the metal, which allows paint to stick much better than just a base metal.

The big drawback is that it turns the metal a dull gray-ish color.

And when the solution of phosphoric acid is used up, I add 100ml to a gallon of water and pour it in my garden for big veggies..
 

Wrench97

Well-known member
Joined
Jun 23, 2018
Messages
12,414
Location
Southeastern Pa
Rode the chair. Started the war with the Escape brakes. Sledge hammer removal of one rotor. Found out they sent me 2 different front rotors. Started the return and resend process. Finished the one front. Went to start on the rears. The car is refusing to retract the ebrakes. I tried every stupid pet trick I could think of. It's possible that the TPMS error is blocking the ebrake. I had something like that on the Journey. Tried the scan tools, which are supposed to work. Nope. The box lied. Well eff me. I was too disheartened and exhausted to continue. Tomorrow I'll try refreshing the TPMS modules. And I also bought a new updatable scanner and whatnot device. I'm going to win one way or another.
They are a simple dc motor, if you unplug it and apply power and current the motor will either retract or apply if it is not retracting switch + and -. Make sure the key is off and remains off while the motor is unplugged so no codes set. When you are done simply apply and release the p brake and you are done.
The TPMS should not be effecting the P brake.
 
To avoid these ads, REGISTER NOW!
Top Bottom