
You are using an out of date browser. It may not display this or other websites correctly.
You should upgrade or use an alternative browser.
You should upgrade or use an alternative browser.
Underground Lair of the Squankum
- Thread starter Squankum
- Start date

Old pic.
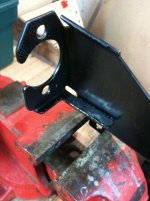
034 Motorsport clutch master cylinder firewall brace for Audi 4000 Quattro and friends. I had trouble making mine fit.
The hole you see down where the vise is holding it, that's for a bolt that goes from steering rack to wheel well. There are two holes where the master cylinder bolts to the firewall. They're pretty obvous here if you have any idea what I'm talking about.
Below the lower hole is where you should be seeing a triangular gusset. Not easy to see, since it's all black, and I painted it after I chopped out most of the triangle, but here it is when I'm done.
One of the four steel brake lines just wanted to be there. And that's more important than anything. Had I been installing this in a parking lot, I may never have noticed that it was bumping against the steel brake line, pushing against, bending it, chafing and rubbing long term, I might have just forced the bracket into place, tightened bolts, gone on my merry way.
Others haven't had this issue with this part. I saw it (from underneath the car) and, alas, felt I had to cut a notch in the majority of the gusset that.... did the most to make this bracket strong and useful. Oh well.
Firewall flex at this spot may be more of a problem for those who have salt issues. Me, I was in changing the clutch master cylinder, figured now was the time.
Attachments
Last edited:


Oh dear, not as accurate as I thought.
Thanks to this forum, lots of Milton-y goodness in this project. I never would have known about Milton and started seeking out their stuff, if not for you guys.
Also, too: cheap cast iron pipe fittings from Lowe's, only one of which leaks. More pics of the project to come. Apparently, Thailand isn't the place for precise metallurgy just yet.
Last edited:
Buzz Lightyear
Well-known member
They look the same to me. A little bit of tidying up and she'll be good to go. 


Ah, things are taking shape now.
This will hang from some floor joists, the vast majority of the load bearing is happening way up high. I intended to have it be 100% suspended, but wound up using a masonry screw and bracket or two at the bottom just to hold it tight against the wall.
This will hang from some floor joists, the vast majority of the load bearing is happening way up high. I intended to have it be 100% suspended, but wound up using a masonry screw and bracket or two at the bottom just to hold it tight against the wall.
Attachments


Huzzah!
Those are metal garden hose hangers, which sure aren't as cheap as the plastic ones. They're screwed to the 2x2's. In fact, when I was done, I wondered, Why pegboard?
I eventually learned to loop the lower hose in big loops, it's a lot fewer go-rounds when putting the hose back.
Not knowing anything about regulators, and being content with what came on the compressor, for now, there's no high quality regulator on this setup. So far, so good.
Although I live in a humid zone, I've yet to see any moisture come out of the Milton filter/water trap, or the big ball joint at the bottom of the pipes. Maybe it's because I drain the bottom of the big tank frequently, dunno.
Attachments

Last edited:
Interlude: A Tale of 7mm Wrenches
When I moved out of the apartment, I found out I had more tools than I realized! There were a few shoeboxes in the closet that had become backwaters, with non-metric things in them, and, I found, things I didn't even remember owning. Yeesh, time flies.
From left to right:
Sears Craftsman Professional long-pattern. These are my go-to combo metric wrenches. SK-made from about 15 years ago.
Sears Craftsman raised panel: RP's were my go-to wrench set for many years. In fact, I thought I'd started there, but my memory was mistaken.
Just plain Sears made in Japan, 1980's: I had forgotten I ever owned these! Looking at them now -- and a box-only set I apparently bought in that era, too, I am impressed. They're pretty well made, it seems.
New Sears Craftsman ignition wrench: these are kinda cheap, like they were stamped, but what the hey, when you need a wee wrench, you need a wee wrench. They've come in handy once or twice so far.
Which ones did I use to tussle with the bleeder on the slave cylinder of that 5 cylinder contraption? I forget. I think I wound up using a 7mm deep socket to crack it loose.
Silly tale: one of my '80's cars spent its first years in the 80's in a potholed rustbelt city. Lots of crash, bang, boom, and sometimes, suspension noises, just 'cuz. One noise was a "tinka tink tink" over bumps with the RF suspension. One day, I finally noticed: Heyyyyy.... there's a 7mm wrench on the bleeder screw on the RF caliper! You dummy! You put the dust cap on the ****** and forgot about the wrench! So the Japanese Sears wrench above, I think, has about 10,000 miles on it.
That was back when I changed my brake fluid every 2 years like a good little German car boy should. Oh, the energy of youth.
Attachments

Last edited:
What can I make out of a furring strip? Ch. 2
Quick 'n dirty shelving unit was made by some previous tenant. I just added the furring strip and two paper towel holders. Sometimes I enjoy using a minimal amount of material, time, effort. This has worked out great.
Remember metal paper towel holders that worked? I'm going to bite my tongue and not go on an old-man tirade. I did find out that Rubbermaid's plastic holder is pretty great, but it costs a bit more than all the other plastic junk, and ya know what? If they just made metal ones the way they used to... oh wait... I said I wouldn't. Okay, then.
Attachments

Last edited:
HSpencer
ALLIANCE MEMBER
Cool---those are paper towel holder holders. I like it!!!
Enjoyed the label posts. Yes, thumbs up on Akro Mills.
You have a knack for problem solving. Maybe you might want to run for Congress?
(Just Kidding, I know no one in their right mind would do that).
Best Regards
Herb Spencer
Enjoyed the label posts. Yes, thumbs up on Akro Mills.
You have a knack for problem solving. Maybe you might want to run for Congress?
(Just Kidding, I know no one in their right mind would do that).
Best Regards
Herb Spencer
And then in the Fall of 2011, did this older cat come into my life. About 11 years old. Her name is Fuzz. Later pictures someday will explain why.
Her attitude that first week: I don't like it here. I don't like you. Go away. I want nothing from you. I think I'll cram myself under this bookcase for now.
Her attitude that first week: I don't like it here. I don't like you. Go away. I want nothing from you. I think I'll cram myself under this bookcase for now.
Attachments

Last edited:

More compressor fun.
Anti-vibration rubber feet, in hopes of keeping the noise down. Mason Industries, bought via the ENCO catalog, like $8ish on sale. The instructions give you all sorts of instructions about where the nuts go. Uh, yeah. I put all the nuts on the high side of the studs because the compressor would wind way off vertical if I did it their way. (I just put the unneeded nuts there for safekeeping, maybe someday I'll be in a different garage and doing a permanent mounting.)
Anti-vibration rubber feet, in hopes of keeping the noise down. Mason Industries, bought via the ENCO catalog, like $8ish on sale. The instructions give you all sorts of instructions about where the nuts go. Uh, yeah. I put all the nuts on the high side of the studs because the compressor would wind way off vertical if I did it their way. (I just put the unneeded nuts there for safekeeping, maybe someday I'll be in a different garage and doing a permanent mounting.)
Attachments

You have a knack for problem solving.
Thanks! I think one of the best things about GJ is the simple little tips we pick up from each other. That's why I'm not shy about posting picayune projects.

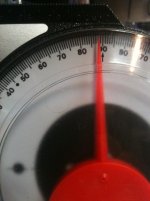
After the rubbery feet were installed, the compressor started to lean back. Okay, a whole whopping two degrees according to this finest quality HF device. But it gets worse as the tires lose air.
It may seem to be minor, but I get gray ooky oil blowby from the drain vent when it's tilted, and don't seem to get it when it's level.
I've since put scraps of plywood under the tires to level it.
It may seem to be minor, but I get gray ooky oil blowby from the drain vent when it's tilted, and don't seem to get it when it's level.
I've since put scraps of plywood under the tires to level it.
Attachments
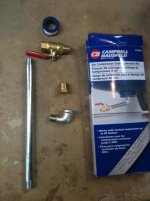
Campbell Hausfeld compressor tank drain kit, #PA3005.
Just under $20 at Tractor Supply. I guess I could have done it by tracking down the bits elsewhere, but this was fast, easy, and reasonably priced.
I didn't know about the pull-toggle type drains at the time, those are pretty neat. What I do like about this one is getting to see the water come out, see when it's stopped blasting out, and see if it's white and clean, or ooky. If you don't mind kneeling and bending, the C-H kit here is just fine.
Attachments
Rusty ******** from the bottom of the tank, which I took out for the drain project. Doesn't need to come out, I don't think. (This was two winters ago.) Original drain valve goes in the center of this, this screws into the tank. C-H kit, elbow screws into this, then pipe screws into elbow.
Rusty ******** also dances Friday and Saturday nights at the Manhole down in the Castro district.
Rusty ******** also dances Friday and Saturday nights at the Manhole down in the Castro district.
Attachments

Last edited:
Outlander
Well-known member
And it's up. Pardon the murky lighting, no flash on my cam.
I'm inspired 1.0 (doesn't take much does it?)
furring strip and two paper towel holders. Sometimes I enjoy using a minimal amount of material, time, effort. This has worked out great.
I'm inspired 2.0 (really looking for garage time excuses!)
Okay, a little late, here's what I made for the yard for the trick-or-treating yute: a yardsquatch.
It's 8 feet tall. Kinda intimidating when you're looking up at it.

I'm now nervous about walking the neighborhood! My wife loves halloween - if she saw this I would be sent to the garage to make one. It's alive...it's alive!
The C-H drain on its business end. It is not connected to the axle, it's only connection as at the elbow in the bottom of the tank.
It does not scrape the floor when you tilt the compressor back on its tires to move it. How? Geometry. Well, as long as the tires aren't too deflated.
It does not scrape the floor when you tilt the compressor back on its tires to move it. How? Geometry. Well, as long as the tires aren't too deflated.
Attachments

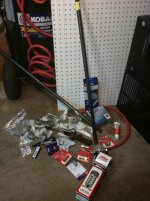
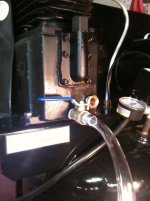
I put an on/off ball valve between the compressor and the stuff on the wall. Given that one of the cast iron pipe thread joints over on the wall unit leaks, that turned out to be a good thing.
For some reason, a ball valve for the pipe threads involved seemed small and puny for my big hands, and I wanted to go up a size. I'm glad I did, when it comes to the size of the lever, it's easy to grab.
The downside to this was the adapters I needed to step up, and then back down, to the size needed. (I think it was from 1/4" NPT to 3/8" NPT to 1/4" NPT.) I would call them adapters, but the world of plumbing & fittings call them "bushings."
I started with one from Lowe's/Kobalt (made in China? I think.) It leaked. I took it apart and used more teflon tape, repeatedly. I think I tried liquid pipe dope compound at some point. Nothing would make it seal.
Then I bought a Milton bushing, made in America, and with tape, it did not leak. Between this and a frustrating situation witih the ATF fittings on buddy's aluminum Chinese radiator for his Jeep, I've concluded that mainland China doesn't really grasp thread dimensions yet.
I got the Milton bushing from Harry J. Epstein. I had placed an order, and forgotten to ask them about that, and emailed them the next day or so and told them, and they wound up just tossing it in a wee padded envelope and mailing it US mail, no extra shipping charge. All hail HJE!
Oh, and there's a 3" section of wee black iron pipe in this picture, and having the valve that far away from the pressure regulator would be too much stress on the regulator and friends, so I reinforced it all by carefully crafting two wooden blocks with just the right size diameter half-a-hole, one for the grab handle's diameter, one for the black iron pipe's diameter... and then I tightened them together with a bigassed zip tie. It works! If I was a machinist or welder, I could make something sexier, but... it works!
Attachments

Last edited:
I'm now nervous about walking the neighborhood! My wife loves halloween - if she saw this I would be sent to the garage to make one. It's alive...it's alive!
Go for it! The woodworking on this took well under an hour. I swear I jigsawed it in 20 minutes, racing the sun at sundown. All freehand, some sketching with a carpenter's pencil, etc etc.
The missus painted it later. I think she spent more time quibbling with paint store clerks about "Yes, I want BROWN PAINT", than she did painting the front side of it.
Last edited:

I say you put ears on that there squatch for Easter.
And a big rastafarai hat on it on 20 April.
IE, I think you should leave it out year round.
Year-round? What?! And be the neighborhood weirdo? Oh... I see... hmm....
Oh, I had thought of bunny ears, a basket full of comically big eggs. If/when/once I get a sewing machine, a little pink fabric and some fuzzy white furr fabric, that'd be easy to put over a coathanger... not sure about where to get big eggs. Do they still sell pantyhose that way? (I don't lurk in that part of the department store anymore, what with all the security cameras.)
As for a Rastasquatch, I had not thought of that!
I'd rather not tempt fate with Sgt. Stadanko, the local SWAT team, the FBI, DEA, etc etc. That I'm straight edge and have been for decades (since before the term existed) doesn't mean jack **** when a federal prosecutor gets a hold of you!
Also, since I've got the beard, all I need now is the right hat for a July 4 Uncle Squatch.
Last edited:
Power cord for compressor is thick, unruly, was occupying needed space. The sheet metal here is the furnace/air handler.
I had more sophisticated plans for these office supplies (technical term, "magnetic bull clips"), but once I tried to take them apart, I realized that that plan was not going to fly, and zip ties were the solution. They've worked out great. There are four in total, three on the furnace, and one on the side of the air tank.
Thus concludes this Sunday's Picayune Shop Tips, a-men.
Attachments

Maybe a year later...
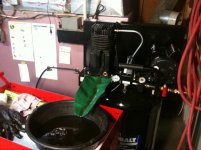
I decided that given the compressor's past, being unknown, maybe it was time for an oil change. It's straightforward. (Except for the fill hole, which has a breather valve in it, remove breather.)
Pictured here: Green thing is a Form-a-Funnel, a nice gadget which is a soft plastic casing around a sheet of lead. You'll find uses for it, but maybe you should keep your wallet closed; somebody on GJ pointed out that if you need a FAF, some aluminum foil will do fine, too.
For those of you with this Kobalt compressor with the inline-2, oil change capacity is 0.6 liter. Sticker on my compressor said to use autmotive synthetic 10W-30, so that's what I used.
Attachments
Last edited:
Now, my next oil change on this compressor will be slick!
I put Fumoto valves on the missus's vehicles, and they quickly spoiled me.
Here, for 1/3 to 1/2 the price of a Fumoto, is the Ace Hardware version of that. A ball valve and two short adapters. (I forget the plumbing term. Threaded male on each end, and very short.) One adapter connects valve to crankcase, the other gives you a ****** to slip the clear tubing over. (Tubing also an Ace Hardware purchase.)
I very clearly labelled this valve as OIL DRAIN, lest some helper in the shop try to get air pressure and...
OK, I think I've pummeled the subject of my compressor into the dust.")
I put Fumoto valves on the missus's vehicles, and they quickly spoiled me.
Here, for 1/3 to 1/2 the price of a Fumoto, is the Ace Hardware version of that. A ball valve and two short adapters. (I forget the plumbing term. Threaded male on each end, and very short.) One adapter connects valve to crankcase, the other gives you a ****** to slip the clear tubing over. (Tubing also an Ace Hardware purchase.)
I very clearly labelled this valve as OIL DRAIN, lest some helper in the shop try to get air pressure and...
OK, I think I've pummeled the subject of my compressor into the dust.
Attachments
Ive got an old Clarke cart similar to that,that I use as a "utillity cart" I dont use it for tools, usually,but its great for dropping transfer cases,or storing parts on a big job! Ive even put a few trannies on it. That craftsman looks a little more solid than mine.
Haveblue, that picture made me chuckle. You're a pro with a lift. I may have a transfer case removal in my future, and to put it on my cart, first I'd have to get up off of the floor, drag it out from underneath, then pick it up, and put it on the cart. Different worlds!
I don't suspect the Sears has any thicker metal, if yours is okay with a 75 lb (?) transfer case.
Another thing I like about keeping the cart nearby is, placing tools on radiator supports, flat spots, cowls, etc etc, is a great way for tools to go for a ride and never be seen again!
Locktite the hardware .
On the gas pedal extender, or the tool cart?
I used Nylock nuts on the pedal extender.
I went and checked, the cart doesn't have lock washers like I remembered, it has flange nuts with serrated edges on the faces where they meet the painted surface. Which are a form of lock washer, right?
Another reason the cart has come in handy is the shop is long. Lots of trips, unless I can load the cart with foresight.