To avoid these ads, REGISTER NOW!

Between 265 & 485 SQ/FT New 20 x 20 garage/shop in Seattle

Workspaces sized between 265 and 485 squarefeet.
To avoid these ads, REGISTER NOW!
OP
R

RSwannabe

Well-known member
Joined
Dec 17, 2009
Messages
403
Laurie71 - Yah, I love how much light I get in the shop. Its great to be working at my bench and at the same time be watching and interacting with my daughter playing in the backyard.

wmrra12 - It'll take a few years to get full coverage, but I too really look forward to seeing the garage all covered with the jasmin. It'll also smell incredible. Every time I walk past the jasmin I'm struck by the wonderful smell.

drivesitfar - Sounds like you've got a nice location. I'd love to be on the water or have a water view. I am the third generation of a commercial maritime family here in Seattle and an ex merchant marine engineer. Can't afford it though. Luckily my office is right on the water's edge on the ship canal, I'm out racing my Thistle on Lake Washington on Wednesday nights, and get out on other boats frequently as well.

My garage was engineered from the ground up to carry 14 tons of roof load (70 lbs/sf) not including live loads, snow loads, or earthquake loads. I don't think it'd be easy to retrofit a roof to do what I am doing without some major engineering.

R. Deschain - Thanks! I'm quite pleased with how the elevated play area for my daughter turned out and it gets lots of use. She recently decided she wants the playhouse to be her science laboratory, so a project for this weekend is to build a lab bench to fit into the bay window.

dhubbard422 - We've got a lot going on in a little space, but it feels really nice and is very functional. The layout also allows it to feel private and somewhat secluded, which is a bit of a feat given we have neighbors using the yards on all three sides.
 
Last edited:
Joined
Nov 24, 2015
Messages
8
Location
Reno, NV
How is the turf holding up? Thinking about that route rather than sod in the backyard for our new home. We do have a dog and were wondering if you had input on the durability?
 
OP
R

RSwannabe

Well-known member
Joined
Dec 17, 2009
Messages
403
The turf is holding up fantastically so far. It's been in a year with zero issues and no signs of wear and tear. It's great to be able to leave a slip'n'slide or other kids toys out on it for weeks and not worry about killing the grass.
 
OP
R

RSwannabe

Well-known member
Joined
Dec 17, 2009
Messages
403
Also, we are about to be redoing our front yard and are going to be using more turf to replace the grass there too. I'm all about the low maintenance.
 
Last edited:
Joined
Nov 24, 2015
Messages
8
Location
Reno, NV
Also, we are about to be redoing our front yard and are going to be using more turn to replace the grass there too. I'm all about the low maintenance.

I really enjoy a good lawn as well as doing the yard work to go along with it, however, we'll be in a desert climate and I'll be traveling more for work and won't have as much time to do it.
 
OP
R

RSwannabe

Well-known member
Joined
Dec 17, 2009
Messages
403
I really enjoy a good lawn as well as doing the yard work to go along with it, however, we'll be in a desert climate and I'll be traveling more for work and won't have as much time to do it.

Your desert comment does bring to mind one issue with the turf that might be important to you. The turf has silica (glass bead) infill that holds the turf fabric down and the strands of "grass" upright. The silica also holds moisture amongst it and helps keep the turf cool as it evaporates. After a few really hot days we might have to wet the turf down for a few minutes to replenish that moisture and help keep it cool or it starts to get too hot to walk on comfortably barefoot. This is when temps are in the upper 80's and above.
 
Last edited:

drivesitfar

Well-known member
Joined
Oct 23, 2013
Messages
35,997
Location
Pacific Northwest
RS: i know this is a garage thread, but if you have pictures of your boat or the sights you see when having fun not garage related that would be fun to see too if you have time.

any updates on the raised beds?
 

BiTurbo228

Well-known member
Joined
Jun 13, 2016
Messages
252
Location
South of England
Just checking in to say that I really like this garage and grounds. Really hits a chord with the amount of space I have available (13x21, but 16' tall).

I'd absolutely love a 2-post lift with the modifications you've made for storage, but sadly that's a bit of a luxury purchase that will have to wait for quite a while I feel.

Also, I really like the green 911. The seats especially, as that's very similar to what I plan to do for my Spitfire :) I'm going for MacBeth modern tartan though to match the Valencia Blue paintwork (I don't have any connection to the eponymous 'Scottish play' however...).
 
OP
R

RSwannabe

Well-known member
Joined
Dec 17, 2009
Messages
403
The planters are coming along. I installed all the drain board liners in them, which took a lot longer than I anticipated. I then leveled the gravel, lag bolted the planters to each other in their final positions, and installed the weed block fabric inside them. The weed block will keep the soil in the planters and prevent it from flowing out over time and clogging the gravel drain layer underneath.
 

Attachments

  • IMG_4193.jpg
    IMG_4193.jpg
    148.3 KB · Views: 194
  • IMG_4194.jpg
    IMG_4194.jpg
    153.6 KB · Views: 202
  • IMG_4307.jpg
    IMG_4307.jpg
    146.7 KB · Views: 261
  • IMG_4309.jpg
    IMG_4309.jpg
    147.9 KB · Views: 190
OP
R

RSwannabe

Well-known member
Joined
Dec 17, 2009
Messages
403
The light weight planter soil was delivered last Friday by hose truck. It was nice not to have to carry 12 cubic yards of soil from the front of the house and up one story! We kept the mess to a minimum by covering the planter we were filling with a canvas painters drop cloth that contained the soil to the individual planter as it was being blown out. I then cleaned up the extra soil that did escape (I'm taking pains to keep the gravel drainage layer clean and clear so it actually drains well and things can't grow there in the long run) and covered the planters with chicken wire to keep cats from pooping in them and other critters from digging up plants later. The chicken wire will get covered by a layer of compost later and not be visible.

I then started installing the teak tiles in the walkway areas. I'm about half done with that right now. Once the teak tiles are done I'll trim out the tops of the planters with cedar 1x4's for a finished appearance.
 

Attachments

  • Planters with tiles going in.jpg
    Planters with tiles going in.jpg
    147 KB · Views: 259
Last edited:
OP
R

RSwannabe

Well-known member
Joined
Dec 17, 2009
Messages
403
Drivesitfar - I don't have any current shots of my boat, but here is one from a few years ago while racing at Yale Lake down by Mt St Helens.
 

Attachments

  • Racing Thistle at Yale Lake.jpg
    Racing Thistle at Yale Lake.jpg
    105.4 KB · Views: 242
OP
R

RSwannabe

Well-known member
Joined
Dec 17, 2009
Messages
403
Biturbo - Thanks! Tartan seats are fun and comfortable. I was on a road trip through central California with my green 911 a couple of years ago and the temps were over 100 degrees. I was travelling with a group of vintage 911's, none of which had AC, and all the guys with vinyl and leather seats got out of their cars with their backs soaked with sweat, but not me. The wool tartan was wonderful. Great in cold weather too!
 

drivesitfar

Well-known member
Joined
Oct 23, 2013
Messages
35,997
Location
Pacific Northwest
RS: i totally love your raised beds and looking forward to seeing what you grow in them. very good idea trying not to get any excess dirt on the roof while loading the bins too.

thanks for the boating picture and looks like a blast. since you probably are in ridiculously good shape how about visiting my/our weight loss thread and handing out some workout or diet tips? here's the link:

http://www.garagejournal.com/forum/showthread.php?p=5848329&posted=1#post5848329

i posted a the pics of your raised beds on it because we were just talking about them.

keep up the great work and don't forget to have fun as you have time too.
 

sean Buick 76

Well-known member
Joined
May 7, 2013
Messages
3,221
Location
Edmonton Alberta
WOW, I just found this build today and I went through the whole thing in one sitting! Very impressive! I love the ingenuity and creativity in your projects, well done! I sent a Private message about your lift attachments...

Oh and if you use "photobucket" to post your pics they will show full sized and never up-side down...

Sean
 
OP
R

RSwannabe

Well-known member
Joined
Dec 17, 2009
Messages
403
Sean, I responded to your PM. I'll look into photo bucket for posting in the future. Thanks.
 
Last edited:
OP
R

RSwannabe

Well-known member
Joined
Dec 17, 2009
Messages
403
I haven't posted an update in a while as not much new work has been on one the shop for the last few months. We had a big reunion at our place in late July, and then tore the whole roof off our house in August. It still had the 106 year old original wood shingle roof under two layers of composite shingles and needed a full strip off, new sheeting, vents, shingles, ext. We went with a composite shingle for most the roof, but popped for standing seam metal on the front and rear porches.
 

Attachments

  • Metal front porche roof 2016.jpg
    Metal front porche roof 2016.jpg
    150.5 KB · Views: 326
  • New Roof 2016.jpg
    New Roof 2016.jpg
    86.8 KB · Views: 305
To avoid these ads, REGISTER NOW!
OP
R

RSwannabe

Well-known member
Joined
Dec 17, 2009
Messages
403
Prior to replacing the roof, we had to empty everything out of the attic as it was going to be very messy (it was). Unfortunately that meant it all ended up in my shop while the roof was redone, and then we were on vacation, and then I was cleaning the attic, adding more plywood flooring, adding more lighting, and rerouting ducting. In other words, my shop has been full of all the junk from the attic for a lot longer than I would like. Its on its way back upstairs now though.

We had previously added pull down stairs to our attic space, put down plywood throughout most of it (about 500 SF worth), and hung some fluorescent light fixtures. With everything out of there, I added another 240 SF (7.5 sheets) of decking up there and another light into a dormer we hadn't previously decked. I also rerouted the heating ducts up there to maximize storage area.

It wasn't a fun project. It was hot, dirty, and hard on my knees, but at least it was an excuse to buy myself a HEPA shop vac (Festool CT26) to clean up all the old coal dust and the like. :beer:
 

Attachments

  • festool_CT26_lead.jpg
    festool_CT26_lead.jpg
    24 KB · Views: 117
OP
R

RSwannabe

Well-known member
Joined
Dec 17, 2009
Messages
403
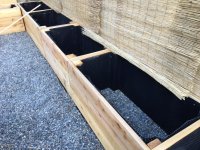
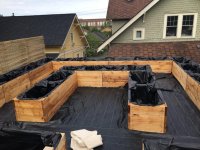
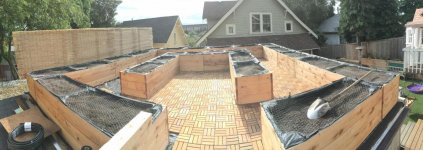
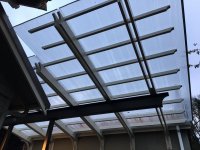
OK, here comes the next major project on the garage: the car port/trellis/patio cover. I always planned to build a covered area off the front of my garage that looks like a trellis, but had a clear cover over the top to provide a dry area. It will overlap the roof on the rear porch of my house, thereby providing a covered area of my patio (for grilling in the rain), dry passage between the kitchen/backdoor of the house (primary entry and exit for us in practice) and the garage, and to the covered parking spot in front of the garage door for my wife. It will also double as an outside dry workspace for setting up the table saw and the like.

The driveway in front of the garage is not very wide, and I did not want to lose any useable area to a post to support the carport. I had originally planned on dropping a post on my property line next to my neighbor's garage (the yellow building) to support the carport structure. When I poured the new driveway I put a footing in for this use in the future. However, I have come to the conclusion I just could not spare the little bit of room in the driveway for such a post. It prevents any car parked there from being right up against the side of my neighbor's garage and thus allowing the most room possible on the driver's side (we back out a bit to let someone get in on the passenger side).

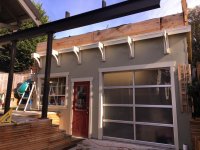
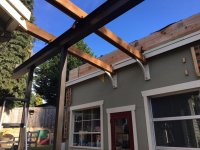
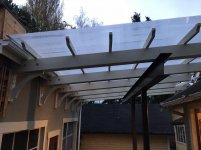
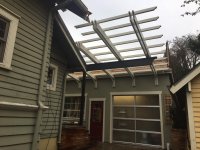
Thus I designed a steel structure with two columns that land on my concrete retaining wall and support a 19' long beam, half of which cantilevers out over the driveway. Then joists will attach to knees on the front of my garage, land on top of the beam, and cantilever out beyond the beam. Total covered area will be about 250 SF.

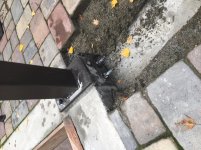
Here is the steel being installed. Note the north of the two columns will be seeing uplift forces due to the cantilever of the beam, so the column foot wraps around the side of the retaining wall to have two bolts anchor into the side. I had to pull up a section of the paving stone patio I laid down last year. It was a ***** to get the stones out, even using a 6' steel pry bar with my full weight on it. I done built it good!
 

Attachments

  • IMG_4659.jpg
    IMG_4659.jpg
    150.2 KB · Views: 420
  • IMG_4672.jpg
    IMG_4672.jpg
    148.5 KB · Views: 387
  • IMG_4673.jpg
    IMG_4673.jpg
    141.5 KB · Views: 357
  • IMG_4674.jpg
    IMG_4674.jpg
    144.8 KB · Views: 369
Last edited:
OP
R

RSwannabe

Well-known member
Joined
Dec 17, 2009
Messages
403
Here are the knees I made and me test fitting some of the joists. The knees are made out of PT 2x6 and incorporate a 2" wide section of 8"x8"x0.5" 6061 aluminum angle bracket. The knees are secured to the garage by 6" long 3/8" lag bolts. The joists are 12' long PT 2x8's in the area where they overlap the roof on the house, and 16' long PT 2x8's over the driveway. Joists are just being test fit and measured in these picture prior to detail cuts being made and painting.

Final picture is with all six knees in place on the garage.
 

Attachments

  • IMG_4688.jpg
    IMG_4688.jpg
    143.7 KB · Views: 403
  • IMG_4682.jpg
    IMG_4682.jpg
    143.6 KB · Views: 370
  • IMG_4677.jpg
    IMG_4677.jpg
    144.6 KB · Views: 348
  • IMG_4676.jpg
    IMG_4676.jpg
    141.9 KB · Views: 364
OP
R

RSwannabe

Well-known member
Joined
Dec 17, 2009
Messages
403
I then cut all the decorative ends on the joists and the 2x4's that will run crosswise above the joists. Then I needed to paint them. However, some were fairly wet and needed to dry out prior to painting. Thus I ran the arms on my car lift to max height (about 6.5") and laid out all the wood on edge on the arms with air gaps between them. I left the heat on in the shop so they could dry out while I paint groups below them. It worked out well.

Edit: Replaced photos with ones that are right side up!
 

Attachments

  • IMG_4705.jpg
    IMG_4705.jpg
    136.7 KB · Views: 316
  • IMG_4706.jpg
    IMG_4706.jpg
    141.2 KB · Views: 319
Last edited:
OP
R

RSwannabe

Well-known member
Joined
Dec 17, 2009
Messages
403
So, finished the assembly of the trellis structure this weekend and installed the Polygal 10mm polycarbonate roofing. I worked till well after dark on Sunday, but got all the roofing on. Just need to finish up with some aluminum trim strips around the edges and track down a couple leaks in the gutter. Pretty happy with how this came out though.
 

Attachments

  • IMG_4745.jpg
    IMG_4745.jpg
    135.1 KB · Views: 407
  • IMG_4744.jpg
    IMG_4744.jpg
    142.3 KB · Views: 352
  • IMG_4743.jpg
    IMG_4743.jpg
    141.1 KB · Views: 369
  • IMG_4735.jpg
    IMG_4735.jpg
    137.4 KB · Views: 326
  • IMG_4737.jpg
    IMG_4737.jpg
    149.8 KB · Views: 350
  • IMG_4728.jpg
    IMG_4728.jpg
    139.5 KB · Views: 357
  • IMG_4730.jpg
    IMG_4730.jpg
    143.4 KB · Views: 408

drivesitfar

Well-known member
Joined
Oct 23, 2013
Messages
35,997
Location
Pacific Northwest
RS: i love the new trellis and the cover to get you another dry spot in your yard. WELL DONE!!

how did your raised bed gardens work this year? i bet you got lots of veggies from them and i can't recall what you were growing so do tell if you would?

i've seen a few great woodworkers using Festool sanders with that vac attachment that seems to work great. do you have any of the tools and which ones and how do you like them?

I helped start a thread for Woodworking on GJ so some of us that would like to become more a Woodworker instead of a wood butcher might learn from some of the members like you about the skill. if you have time check out the thread and feel free to post pictures of your raised beds, trellis and any of the other cool wood projects you've been doing this past year or two (if you have time to). the link is in my sig line

cheers
 

Justind97

Well-known member
Joined
Oct 6, 2014
Messages
691
Location
Ottawa, Canada
Beautiful work!

I read through the entire thread and when I got to the part of the 12 yards of earth on top of the garage, I started calculating and had to go back and look at the design of the trusses to see what I missed. Those beams are HUGE! They look the cats *** though!

The cars are something else, out of this world! Seats are a treat and they look pristine! I have a line on two right now, been chasing them for 2 years, hopefully I can get the owner to finally give them up as they have been sitting for as long as I have known him, 12 years, and they had piles of dust on them before that!

Cheers to you!
 
OP
R

RSwannabe

Well-known member
Joined
Dec 17, 2009
Messages
403
Thanks for all the complements. I'm really pleased with the aesthetics of the whole thing, but I need to work out a few issues with where it dumps into the gutter along the face of the garage. It should be relatively easily remedied though.

Drivesitfar - The planters on the roof did not get planted this year. That is my wife's bailiwick and she was not able to get to it this year. That should happen in the spring. As for wood working, I am no expert. I'm a half way competent wood butcher, but not a finish carpenter. Still, I'll check out the thread you started.

Justin - good luck on getting those Porsches!

Sean - I have used Polygal polycarbonate sheeting on a number of commercial projects and it is a great product. It is UV protected on the side that goes up, so it does not age and craze like untreated polycarb does. It comes in different colors, thicknesses, insulation factors, ext. I used the regular 10mm clear.
 
Last edited:

drivesitfar

Well-known member
Joined
Oct 23, 2013
Messages
35,997
Location
Pacific Northwest
RS: for starters tomatoes and basil are easy to plant and other than stringing up a few branches on the tomato plants. i know you'll love eating them with a little mozzarella and olive oil and good bread. if you (or your wife) wants any other easy gardening ideas just PM me with your email or ask on the thread and i'll try to look for them.

i just had a couple cherry tomatoes yesterday walking down a path where we planted a couple and here's a little planter i made that has trellises that might work well in your planter boxes. one of our basil areas is across from this little brick planter next to the fence i'm in process of re building.

cheers and good luck with the new roof fix.

your place is amazing and it just keeps getting better.

WELL DONE!!
 

Attachments

  • WP_20160820_014.jpg
    WP_20160820_014.jpg
    158.9 KB · Views: 193
OP
R

RSwannabe

Well-known member
Joined
Dec 17, 2009
Messages
403
I remounted the trellis sections on the garage face between the knee braces, and then the carport was tested with its first snow load last night. 3" of snow and then rain to make it wet and heavy. For those of you not familiar with Seattle, that's about the biggest snow load it'll ever have to worry about. No problems at all.
 

Attachments

  • First Snow.jpg
    First Snow.jpg
    150.8 KB · Views: 457
Last edited:
To avoid these ads, REGISTER NOW!
Top Bottom