To avoid these ads, REGISTER NOW!

Between 485 & 705 SQ/FT A very conventional residential 2-car garage build in WI.

Workspaces between 485 and 705 squarefeet.

Andx0r

Well-known member
Joined
Oct 2, 2006
Messages
68
So a while back I posted a thread here about building a long, narrow 16x36 garage to try and minimize the amount of green space I'd be losing in my backyard.

I've since decided that green space is for squares, and that I'd be better off building a garage of the same square footage, but in a standard 24x24 shape, so that's what I'm having put up.

While all of this is going on, I'm having the same contractor who's doing the garage slab also replace my gravel drive with a concrete one, and also pave the area between the garage and the house, removing some junk old concrete in the process.

As of this morning, this was where things sat:

IMG_2555.JPG

And I'm sure when I get home tonight, things will be further along. My understanding is that the garage slab and the area between the garage and house are getting poured tomorrow, and the driveway will be done after the garage is.

Critical specs:

- 24x24x8
- curbed reinforced concrete slab built to local code. No provisions for a lift because I'm not getting one.
- 2x4 stick construction
- 16x7 insulated door
- man door on the front
- standard 4/12 trusses. gable roof.
- vented 12" soffits, asphalt shingles, ridge vent, gutters and downspouts
- OSB sheathing everywhere
- vinyl siding
- 6/3 pulled out to the garage with a panel. I only need about 50 amps out there. build will be completed with minimum of lighting and outlets per code.
- Liftmaster opener.

The additions I will be personally making:

- chute, insulate, and sheet the ceiling
- insulate and sheet the walls with 3/8 plywood (assuming the prices on that stuff ever comes down from the stratosphere)
- prime walls and ceiling with zinser 3 and then paint.
- RaceDeck CircleTrac or similar flooring
- Mitsubishi mini-split heat pump. I thought I was done with residential HVAC equipment when I started my current job and started working on bigger stuff, but I guess you never really escape it. I used to work at a Mitsubishi 'Diamond' dealer and always liked the product.
- LED lighting.
- wall outlets will be surface-mounted with conduit so I can move them around as I need/see fit. others will most likely be flush.

I've owned a few modest toys in my time, but currently the only future resident of this garage I own is a Japanese-market 1994 Nissan Caravan 'Silkroad'. A 15' long cabover, body-on-frame passenger van with a diesel 4-cylinder and a 5-speed manual gearbox:

IMG_2433.JPG IMG_1894.JPG

I'm sure I'll eventually find a friend to keep it company in the other garage space. My 2002 Silverado pickup truck will have to stay out on the driveway, though.

And, as for me, I'm just a 36-year-old worker drone from SE WI. I'm living in my first house, and this garage will also be my first. Can't wait for it to be finished!
 
To avoid these ads, REGISTER NOW!

Bogie1632

Well-known member
Joined
Feb 18, 2018
Messages
1,303
Location
Southeastern Wisconsin
Nice. I hope the pour goes well. There have been some nightmare threads that pop up from time to time about bad pours, sloped wrong, cracking, etc. They all seem to have one regret... They weren't there to watch the pour and/or stop it if they sway something wrong.

Are you going to look over the forms and be there for the pour?

Sounds like you'll have a nice work space. Good luck going forward.

V/R
Bogie
 
OP
A

Andx0r

Well-known member
Joined
Oct 2, 2006
Messages
68
After today I am off for the rest of the week so I'll be able to watch the rest of the week's progress. I'm not terribly worried though, since I'm the one who selected the concrete contractor and he's someone who's done a lot of excellent work around town. The owner is also on the jobsites.
 
Last edited:

Bogie1632

Well-known member
Joined
Feb 18, 2018
Messages
1,303
Location
Southeastern Wisconsin
No replies or updates... Hmmm. It either went really well and you're so stoked your hands shake and you can't type or it went really poorly and you don't want to talk about it...and your hands are shaking for a different reason.

V/R
Bogie
 
OP
A

Andx0r

Well-known member
Joined
Oct 2, 2006
Messages
68
Everything turned out great! They came today to do their final cuts and cleanup, but I had to take off before they finished and haven’t made it back home yet, so here’s a shot from yesterday.
E3E18619-E64C-4F24-A74A-A50152CE79AA.jpeg003F54BB-DB81-4A55-A76F-878A58F36993.jpeg
 

Bogie1632

Well-known member
Joined
Feb 18, 2018
Messages
1,303
Location
Southeastern Wisconsin
Very nice. And bonus...they didn't leave foot prints cured into it. :rocker:

Best of luck with the rest of the project. Hope.to see some pics soon.

V/R
Bogie
 
OP
A

Andx0r

Well-known member
Joined
Oct 2, 2006
Messages
68
Not much had happened since the last week due to the holiday weekend and a heat wave. But, there was a pretty good flurry of activity yesterday and this is where we sit as of this AM:

IMG_2669.JPG

Just waiting for the sparky to do his thing now. And I should probably get some more topsoil for out back :lol:
 
OP
A

Andx0r

Well-known member
Joined
Oct 2, 2006
Messages
68
Almost ready for playtime! Do you have a layout plan for workbenches, tools and shelves?

I haven't committed to anything in a way I can't go back on, because these sorts of projects always seem to change, but

I have figured out how I want to run power around and which outlets I want switched. I plan to have a line of switched outlets along the upper edge of the west wall for fun stuff like neon or other junk I've got. The business outlets will be around the back and side walls about 3' up off the floor. I was originally planning to run surface outlets with conduit for those, but if plywood prices don't come down, I'll probably just put them in new work boxes so I'm not waiting until the walls are up to have power.

I'm planning to put a 10 or 12 foot long by one foot deep shelf on the east wall (if you're facing the front of the garage from the outside, that's the left hand wall) with brackets, and may add more later as needed. I also plan to put a high-ish corner shelf in for the stereo receiver I'll be putting out there.

I don't need a massive workbench, so I've got a few 6' ones I want to look at, which I'll outfit with a vise and some peg board but not much else. That, along with the two toolboxes I plan to buy will be along the back wall. I don't plan on having a ton of pegboard because I prefer to keep my hand tools in boxes.

Immediate goal once the sparky has power run and the panel in, and the city does their final inspections is to do my wiring and get insulation in.
 
OP
A

Andx0r

Well-known member
Joined
Oct 2, 2006
Messages
68
I haven't updated in a while just because life kept me too busy to play in the garage. But a couple of weeks ago I did manage to wire it finally. I ended up with

- Duplexes every 4 feet around 3 sides, all of them 2 feet off the floor. Two 20-amp circuits.

- 3 Duplexes 1 foot down from the ceiling on the east wall. Mostly there so I'll have some power available on my shelves.

- Duplexes every 4 feet on the south wall and six double-duplexes on the west wall, all 1 foot down from the ceiling and all on a switch by the door. The 'fun stuff' receptacles. 20amp circuit.

- 3 switched duplexes on the ceiling for linkable LED shop lights.

- 25A 230v circuit and disconnect for mini-split.

All wiring done in 12ga except for the mini-split circuit, which is 10.

Now I need to focus on insulation. I'm planning to pick up plastic vent chutes soon and stapling those up. Then I'll just be installing R38 faced batts in the ceiling and R15 faced batts in the walls.

The mini-split I'm planning to use is currently out of stock so that'll probably have to wait until next summer. And yeah, I decided to ditch my plan to surface-mount stuff in conduit. Everything is flush.
 
Last edited:
To avoid these ads, REGISTER NOW!
OP
A

Andx0r

Well-known member
Joined
Oct 2, 2006
Messages
68
While I haven’t done much with the garage itself since it was built, I have done some garage things out there.

Glow plugs and rebuilt injectors for my Nissan diesel:
8149956C-74C2-4ABE-A39F-498D51E0A814.jpeg


Figured out a fuel flow problem:
30C16047-5C21-44C6-AAC8-2195807AB580.jpeg

Changed the MTF and rear axle oils. Smelled great!
7AC12CB2-9925-4374-BED9-A45D2B44B578.jpeg

Dressed up the interior with a MOMO wood wheel, LED lights, and checkered floor mats for proper JDM cruising:
8EC67BFA-99B8-4E0F-8825-0EFA1358EB9E.jpegB6C9FA55-72E6-41BB-8AC9-8671422BBF63.jpeg411B1485-C581-4DBE-871D-A63EA8A50AC0.jpeg

I bought a HF tool cart on sale for temporary tool storage until I can get a bigger box:
93FF4B8F-6CA3-49BB-BD2E-6072AB88344A.jpeg

And for fun, I bought a 1978 EXIT sign from Yahoo Japan to hang above the man door once the walls are up. I gutted the 100v Japanese stuff in favor of a simple line voltage LED:
EFF4A1F7-68F7-462D-801B-D5ED126F7988.jpeg

F627B041-203F-48F2-B330-4C95C1A6481E.jpeg
 
OP
A

Andx0r

Well-known member
Joined
Oct 2, 2006
Messages
68
The Nissan Caravan had to earn its keep by hauling home a massive several pounds of rafter vents.
CDC6532E-34E6-406B-9161-4E25CB35344F.jpeg37FF4752-8D10-47E8-8638-ABEACD000C92.jpeg

I have to say I like these plastic ones better than the foam, which I seem to be good at breaking.
 
OP
A

Andx0r

Well-known member
Joined
Oct 2, 2006
Messages
68
We’ll find out I guess. I plan to work on the walls this weekend and I’ve taken some time off next week and wrangled a second pair of hands to help with the ceiling.

Most of the insulation company websites (Knauf, JM, OC etc) state that their faced insulation is an adequate vapor retarder on it’s own? I’m sure that’s been a hot topic around here in the past…
 
OP
A

Andx0r

Well-known member
Joined
Oct 2, 2006
Messages
68
welp, I finished insulating yesterday, and I'm out of money until payday, so I guess I'll just hang out on garagejournal since I've got the next 3 days off :ROFLMAO: I did quick go over all of my insulation to remove any gaps/bunches.

Next plan is to sheet the ceiling and install lights. Not sure if I'll take that on before winter or just let it go until spring.
 
OP
A

Andx0r

Well-known member
Joined
Oct 2, 2006
Messages
68
Things have been stalled out on the garage for winter, but spring i here so I got back at it today.

The Caravan is sitting on the drive waiting for a new battery, so it made a good storage container for random garage flotsam:

caravan1.jpg

I started hanging OSB (it was half the price of plywood so that made my decision for me, lol) on the ceiling:

ceiling1.jpg
ceiling2.jpg
ceiling3.jpg

I'm using coated 2" deck screws to hang it.

I made it as far as I could working with the door open. Next time I go out there I'll be into the door bracketry and will have to work with the door closed. Turned out to be 8 (out of 18) sheets on the ceiling. Carpentry is not my favorite thing (the opposite in fact) so I didn't need my arm twisted too hard to call it a day :ROFLMAO:

The Amazon panel lifter I bought was $75 cheaper than Harbor Freight's and boy does it show. Once this job is done I don't think I'm keeping it.

Unforseen problem: Slippery floor. It was 65 and humid out when I opened the door to go in, but thanks to the insulation the inside of the garage was like a fridge. As soon as the warm air from outside hit the concrete it condensated like crazy. At least the sawdust helped!

Once the ceiling is sheeted I'm going to prime and paint it and install LED lights before tackling the walls.
 

captain14

Well-known member
Joined
Dec 19, 2012
Messages
7,119
Location
Near College Park Maryland 20740
Lots of people buy a panel lifter for one or two projects then send it on its way to the next owner via CL/FB or whatever method you choose.

Do you plan on working around the garage door hardware and filling with scrap pieces or dropping the hardware and throwing a full sheet up?
I don’t envy you either way you do it.
 
OP
A

Andx0r

Well-known member
Joined
Oct 2, 2006
Messages
68
I managed to get all of the overhead door bracketry and wiring moved/removed as needed today and also got six more sheets of OSB up before other obligations came calling. Did you know there's a holiday coming up? :ROFLMAO:

Only 4 more to go on the ceiling.

Also, hacks like me are the reason they make XXL wall plates :ROFLMAO:

IMG_4476.jpg

Not even sure if the biggest one will save me there!
 
OP
A

Andx0r

Well-known member
Joined
Oct 2, 2006
Messages
68
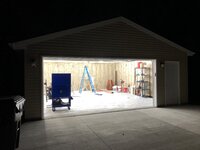
And that’s a wrap on the ceiling panels. Only a couple of boards came out with a slightly shoogly alignment. Measure three times, cut five! Some sanding, a touch of caulk, and I’ll be able to prime and paint.

C861C6BF-CA14-42EC-B038-6BB1E30D0FAD.jpeg

I had to put a cleat up and heft the last panel into place by hand since my lift failed as I was lowering it after securing the second to last panel. 😳. The quarter inch of tiny booger weld holding the axle tube to its mounting plate apparently wasn’t enough 🙄. Who could’ve guessed. Luckily it was empty when the wheel came off in my hand.
 
OP
A

Andx0r

Well-known member
Joined
Oct 2, 2006
Messages
68
That oil Kilz really is what the doctor ordered when it comes to getting OSB fit for paint.

Got the second coat of Kilz on the ceiling today.

My local source for Benjamin Moore products closed on me so I can’t use their Scuff-X paint like I hoped. Great paint, and what we spec for use in the buildings I work in. Wonder how thsts going to shake out when work needs paint in the future…

Plan B is Behr Ultra Scuff Defense, which is a good product too. My local store didn’t have it in fivers, so I ordered some and it will be here Wednesday.

I hope that’s the case because I have Th-Fri off next week!

B8BD45AB-F4EB-49E4-B548-46AE4A2EC048.jpeg
 
OP
A

Andx0r

Well-known member
Joined
Oct 2, 2006
Messages
68
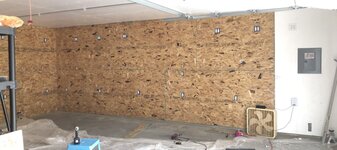
Got two walls up yesterday. I may or may not go out today and finish the final one, which is partially done. Doing this without the help of a panel lifter was a chore.

graj.jpg
 
OP
A

Andx0r

Well-known member
Joined
Oct 2, 2006
Messages
68
Impressive, fast progress on getting things done, it looks great.

Wondering why you didn't go with a bellcrank garage door lift?
What kind is that? The one that mounts right next to the door? The lift I got is just 'what the builder specced', I didn't make any requests there.

I guess that's the worst part done. I'm taking the rest of the weekend off.
graj2.jpg
 
OP
A

Andx0r

Well-known member
Joined
Oct 2, 2006
Messages
68
I got my rubber base in today and couldn’t resist putting some in place. I like how it looks against the white wall. I’ll start gluing it up on Saturday, hopefully!

The color is ‘ruby rouge’ from VPI industries, manufactured Just up the shore in Sheboygan.
6D53CE52-885B-442C-AE8B-F25E09549DDD.jpeg
 
To avoid these ads, REGISTER NOW!
Top Bottom