To avoid these ads, REGISTER NOW!

Above 1200 Sq/FT Garage build in South West B.C

Wokspaces above 1200 squarefeet.

dmittz

Well-known member
Joined
Dec 2, 2016
Messages
1,298
Hi Friends,

I live in southwest British Columbia, Canada. So Housing prices here are comparatively high however, I always wanted a little piece of land with a decent workshop on it.

My wife and I both grew up on small acreage property, but of course we couldn't afford that right away after university. Anyway we lived frugally in a very 'middle class' 1980's era subdivision for 10 years including in our own basement suite for the first 6 years and did a full down to the studs reno on that house during that time. I was happy to have that place and made it about as nice as it could be, but it was never somewhere I was excited about. Finally in our early/mid 30's it became a financial reality to make the long awaited move to a property we actually would want to live in.

Of course the housing market in our area in 2021 was very active and competitive, and it took a couple tries but we were finally able to buy a suitable property. As It was when we purchased it, this place was certainly not our 'dream home' but is checked the essential boxes and with a lot of work I could see the potential.

Details of the place:

-1 acre lot in excellent 'semi-rural' location, on dead end street.
- Amazing like-minded friendly neighbors on all sides, I really lucked out there!
-5 min in either direction to urban/commercial centers
-5 Min to the Hwy
-Very near our Son's school
-Older, but good functional septic system
-30ft deep well, the last 2 summers it has always had a minimum 8ft of water in the well
-Excellent sandy loam soil on whole property, not a single stone when you go to dig anywhere and never any standing water even heavy rain
-Property is located on high ground (no risk of flooding)
-3,020sqft split entry mid-1970's home with 6 bedrooms and 3 bathrooms, the home is not my favorite style but had a decent opened up floor plan, updated kitchen, nice hardwood flooring, covered deck and even a half-decent 2 bedroom basement suite, as it just so happened some friends of ours needed a home to rent right when we bought this house so they live downstairs which has been great!
-Older but decent 10 person hot tub, and a large lower deck/ party area.
-The property also came with a very old dirt floor barn (approx.) 20x20 which was almost fully covered in brambles and had a railway ties (or something) for a foundation, a 10x16 'cedar sided' shed on blocks with a rotten roof, and another 8x10 wreck of a shed which was almost totally concealed inside a small lilac tree and bramble forest.
-Fairly flat property with no creeks etc...

Now onto the Garage...Well the home has an attached 24x28, double bay attached garage on the side of the home, which i'm sure used to be a carport. oddly the only internal access is through the basement suite. The garage isn't perfect but has a lot more space than the 20x21 garage in our last home! Another nice bonus i the driveway is paved and quite wide, I imagine you could fit a good 10 cars (probably more) on it not including the garage.

Anyway although the 24x28 existing garage is a decent upgrade, it Isn't something i'm going to do much with for a bit because as I mentioned my goal was always to have a proper workshop and although this home didn't come with one there is ample space to build one, it was just going to take a LOT of work, planning and permitting to get my workshop.

Moving day, saying goodbye to our old home of 10 years
20210711_164513_resized.jpg
20210710_130402_resized.jpg

This was my 'old yard', very private but no room for a workshop!!!
20210709_125631_resized.jpg

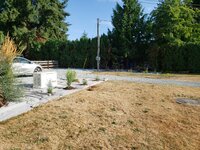
Now the Journey to getting my workshop could begin...The 'new to us' place the day we took possession.

20210712_130026_resized_1.jpg

So another good feature of this place (sort of) is that there was going to be a lot of work to do outside...So instead of hiring someone, I decided it would be more fun to buy a new toy and do a lot of the work myself. I always wanted a tractor, and my dad told me he wished he had gotten a tractor much earlier as it would have saved his back. So I purchased a brand new John Deere 2032R with lots of options and took delivery a few days before we moved in.


20210713_140910_resized.jpg

So that 24x28 garage can actually fit a bit in it, with a whole bunch of yet to be unpacked stuff, a my CTS-V sedan, my wife's SUV, a Fridge and Freezer etc...I could still park the tractor in the front!
20210713_144805_resized_1.jpg
It turned out parking the tractor this way was to much of a chore, but it is possible. I ended up just parking my car outside for ease of access.

Now with our friends moving in 3 days after us there was a lot of work to do in a short amount of time to get the place workable!

First up was to get a second driveway installed as you can't access the back from the existing driveway with a vehicle, I applied for a permit but told the city I was just going to build it now and deal with any fall out later, since there was a major wait time for even a simple permit like that, they seemed ok with that...

First order of business was to clear out the mess of a lilac trees and brambles and shed buried under all that that turned out to be full junk
20210714_112541_resized_1.jpg
Given my tractor was a new machine and I had limited tractor seat time there was a learning curve and it took a lot longer to do this project than it would now take me, but I got it done.

My dad even brought his tractor over to help...
20210718_114352_resized_1.jpg
We Dug down about 6 inches to ensure the driveway had a good base. Had to get 4 Bins in to remove all the trees and junk that was buried under them.

20210716_160817_resized_1.jpg
Digging out the parking area for my tenants/friends (I didn't want to share a driveway/parking area.
20210715_163913_resized_1.jpg
 
To avoid these ads, REGISTER NOW!
OP
D

dmittz

Well-known member
Joined
Dec 2, 2016
Messages
1,298
At first I only built the driveway to a bit back from the property line, as technically I didn't need a permit as long as it didn't connect to the road, that was fine in the summer but as the fall wore on it started getting soft near the road and the darn permit still hadn't been issued after 4 months so eventually I did just extend it to the road and let things fall were they may with the city.

20210718_172217_resized_1.jpg

20210719_150827_resized_1.jpg

Well as you can see with the lilac trees and brambles gone we had a nice hole in the hedge left behind and there is also a mid-sized cedar tree on the neighbors property shading that section. I did later plant some yews there which will eventually fill in and also some other shrubs.

Next up, the house only had a 100amp service and 3 sub-panels. with a suite, a hot tub and a shop planned 100 amps wasn't going to cut it. So I made arrangements to upgrade to 400 amps (200 for the house, 200 for the shop).

Here is my private power pole being installed...the utility company no-longer allows you to hang wires from the house and won't go underground directly from their pole on the street, so you must have a private pole, but they do pay for up to 100ft of wire to my private power pole, which landed it right across the 2nd driveway parking area across from where the main panel on the house is, perfect.

20210726_084943_resized.jpg
Then the electricians came and did the prep work...
20210726_100848_resized.jpg

My father in Law offered the use, of any of his excavators so I had him (and my toddler) do the excavation for the underground power cable to the house

20210731_100946_resized.jpg
It may be hard to see but we went down about 4ft with this cable, there is a conduit under the driveway so my tenants could continue to use there parking area until the service upgrade.
20210731_170452_resized.jpg

My electrical contractor knocked it out of the park on the service upgrade they had a crew of 9 guys there for 13 hours but got it all done in a day so we were not left without power overnight!
20210806_115050_resized.jpg

20210806_161336_resized.jpg

20210806_110111_resized.jpg

20210806_090620_resized.jpg
 
Last edited:
OP
D

dmittz

Well-known member
Joined
Dec 2, 2016
Messages
1,298
20210806_092620_resized.jpg

20210806_110028_resized.jpg

We had a lot of power outages at our last home (probably at least 1 day a month), and we were done with the inconvenience of that, so while the service upgrade was being done I had a NG powered Generac 24kw backup generator with ATS and serge protector installed, which also meant an upgraded gas meter and gas line had to be installed too...
20210803_102834_resized.jpg

I poured the re-enforced concrete pad myself for the generator it is about 10inches this and 3ft x 5ft, the generator is bolted down to it with bolts only accessible when the locked cover is open

20210806_092550_resized_1.jpg

20210806_092556_resized.jpg
20210811_094734_resized_1.jpg

20210806_224945_resized.jpg

I won't bore you guys with a million pictures of the home reno's we did, but after the new panel was in we added a bunch of much needed electrical to the home, did a bunch of upgrades to the basement suite, re-did 2 bathrooms, painted the whole interior and I totally redid the rec room in the basement in 'farm style' and this panel area is now all nicely finished and inside a small room of its own. This was just a picture of the day install was done.

I used the tractor to close up the parking area right after the electricians were Done...
20210806_200457_resized.jpg

Shortly after the electrical service upgrade I also had this A/C unit installed on the house

20210806_105930_resized.jpg
Then with the help of our friends/tenants we installed this nice little patio area, which gave them easy access to their parking area from their lower deck area.
20210804_115424_resized.jpg
Our Friends thst live downstairs are really great, they often help me with doing projects around the property, very nice people.

More to come on my Journey to getting my workshop...
 
Last edited:
OP
D

dmittz

Well-known member
Joined
Dec 2, 2016
Messages
1,298
So thought i'd share the vehicle that's going in my future workshop.

My 1988 Corvette i've had it since 2003 and its been through many 'illiterstions' since then. Its a 'resto-mod' and currently is powered but a 530hp Built Aluminum LS engine, backed my twin disc clutch and T56 Magnum, in the rear end its got a built dana 44 with eaton true trac and cryo treated axles.

Its painted C8 Corvette 'red-Mist Metallic' with exta non-tinted clear coats.

UpgradedC6 Z06 brakes, with C5 Z06 18×10.5 wheels and 315 sized tires on all 4 corners.

The suspension is all redone and custom.

20220702_201619.jpg

20220212_154318.jpg20220422_155131.jpg

20220422_160541.jpg

20211006_221350.jpg


I'm really looking forward to getting the Corvette in my new workshop.

Up until now I have used the 40x40 barn at my parent's place for a workshop and I was greatful for it, but it had its limitations, being not at my house, rough brushed finished concrete floor, rodent issues and only a 7ft ceiling so I could never get a lift there and was always crawling under cars.

My New workshop is going to have nice tall ceilings and after talking about it with my father in law, he told me he had found a working hydralic lift locally for $200. So We went and he helped me pick it up and kindly agreed to store it in the yard at his place until my worshop was done.

20220209_134449.jpg

It Mart not be fancy, but it all worked when we checked it over and all it will need is a new cable, which are avaliable.
 
OP
D

dmittz

Well-known member
Joined
Dec 2, 2016
Messages
1,298
So aside from a few shurbs in one flower bed out front this property literally had no landscaping at all, so that needed to change.

20210818_145704_resized.jpg
20210818_173423_resized.jpg

20210818_173341_resized.jpg

I looked at the landscaping at a friends place and he had done some very nice 'rock' flower beds that were said to be very low maintance. I liked the look of them and the idea of 'low maintance'. So I decided to create my own versions.

2 loads of stone, 4-9inch rock for around the outside and 1.5-3inch to fill the center.

20210818_145532_resized.jpg

20210825_164558_resized.jpg

20210831_180533_resized.jpg
20210831_180538_resized.jpg

20210830_091738_resized.jpg
 

Attachments

  • 20210907_125932_resized.jpg
    20210907_125932_resized.jpg
    466.4 KB · Views: 25
  • 20210818_173341_resized.jpg
    20210818_173341_resized.jpg
    529.3 KB · Views: 16
OP
D

dmittz

Well-known member
Joined
Dec 2, 2016
Messages
1,298
I also re-did the flower bed right in front of the house in similar style.

20210912_174510.jpg


The plants in these beds did well and filled out nicely and I later added more roses and other flowers too.
 
OP
D

dmittz

Well-known member
Joined
Dec 2, 2016
Messages
1,298
So It was around sept 2021 (2 months after moving in) That I had hired a friend who is a contractor to build my workshop, I finalized the design with the architect and had the drawings engineered. We Then submitted the permits to the city expecting a 4 month wait...In reality it Took a full 9 Months to get permits!!!

So the Absolute Maximum size allowed for 'outbuildings' in my zoning is 1,453 square feet. with a maximum average roof height of 24 ft tall. So Basically I went for the Max Allowed size, in dimensions that I thought would work best for me.

Restrictions aside I would have done 40x50 but, that wasn't allowed so I ended up settling on a shop that is 48 feet wide x 30/32ft deep with a double tall 17'6 ceiling. Two 10ft x 12ft doors and one 10ft x 7ft door.


The Workshop is situated 15ft from the south side of the property and 15ft from the back (east side). I could have gone closer to the property lines, but choose to leave bit more space that way accessing the back of the building (with machinery) in the future would be easier and there will be room to park cars, or a trailer beside it on the southside.

I had a big fight with the city about plumbing, despite nothing prohibiting plumbing in there bylaws they refused to allow any plumbing in the building, like not even a hose bib without the installation of a permitted septic field authorized by the local health authority. This lead to several changes in both the submitted plans and my own plans for the Workshop.

So as a result there is now a bathroom planned to go in the 'storage room' of the shop.
 
Last edited:
OP
D

dmittz

Well-known member
Joined
Dec 2, 2016
Messages
1,298
During The fall, winter and spring I worked on several projects concurrently, so i'll break those down by project rather than in chronological order. The first was some substantial home reno's in the suite, both upstairs bathrooms, basement rec room and painting. I won't bore you with those but it took a lot of my time, (an money), but the house is now much improved.

The other major project was the 10 x 16 'cedar shed', originally given the sagging rotten roof I had planned to demolish it. However, when talking with my tenants they asked if since I wasn't going to use the shed could they use it for storage? without thinking much about it I said 'sure'.

As the first summer drew to a close, I started to look at the roof on that shed and got worried it was going to collapse in and destroy all their stuff...

It was at that point I realized, both as their friend and landlord I had inadvertently made it my responsibility to repair that shed that I had originally planned to demolish! But that's ok, they are nice people, good friends and very helpful often contributing free labor to assist me with my projects around the place.

So down the shed rabbit hole I went...

20210922_160856_resized.jpg20210922_161058_resized.jpg
20210922_165304_resized.jpg


20210924_140254_resized.jpg

20210924_140306_resized.jpg

20210923_155934_resized.jpg
20210924_112702_resized.jpg20210925_090843_resized.jpg

20210925_090824_resized.jpg

So the first project was to replace the rotting and sagging cedar shake roof.

a long time ago my dad used to be a carpenter and then a home builder before changing careers, so I recruited him to help me figure this out. and after sizing it up for about 30 min he came up with a repair plan. My tenant/friend Bob also helped us.

So We determined the roof was sagging 6 inches in the center and the walls bowed 3 inched out in the center!

After removing the roof we pulled the walls back in line then re-enforced the roof massively, then put on a new metal roof.

Both my dad, and bob are in their 60's so of course I was the 'roof guy' and they passed supplies up to me. I was real glad for their help.
 
OP
D

dmittz

Well-known member
Joined
Dec 2, 2016
Messages
1,298
some time later I added pvc trim boards, followed by cedar (fence boards) sofits and venting.

20220415_174342_resized.jpg

20220415_174355_resized-jpg.1714102
 

Attachments

  • 20220415_174355_resized.jpg
    20220415_174355_resized.jpg
    205.2 KB · Views: 1,752
OP
D

dmittz

Well-known member
Joined
Dec 2, 2016
Messages
1,298
The sofits were followed by insulation of the walls, and attic venting/insulation
20220415_174409_resized.jpg

T 20220420_105054_resized.jpg
 
OP
D

dmittz

Well-known member
Joined
Dec 2, 2016
Messages
1,298
And since I was going that far I did the rough electrical, which will be run off the main panel in the shop.

The electrical is wired up for 4 circuits. there are 3 plugs down each long wall, each bank of plugs has its own 15 amp circuit, another circuit for 4(x) 6in interior pot lights and a fourth circuit for 4(x) 4in exterior pot lights that will be on a timer to go on in the evening. We are running a 50amp cable and subpanel into the shed once the workshop panel is installed.


20220419_104413_resized.jpg

Next, was dealing with the particle board door. I made new cedar skin for the door (out of cedar fence boards), added foam board insulation and an interior 1/8in sheet of mahogany to complete the door.

20220503_203121_resized.jpg

20220504_212751_resized.jpg

20220506_110114_resized.jpg

The insulation, electrical and door was followed by cladding the interior of the shed in 3/8 plywood. I even did a little insulated attic hatch.

20220814_140204_resized.jpg

Well its not fancy but its nice for a little shed and now its a decent storage/workshop area for my tenants, especially once its has power to it.
 
OP
D

dmittz

Well-known member
Joined
Dec 2, 2016
Messages
1,298
Well, not realizing the permits would take so long at the beginning of December I had all my lumber and re-bar delivered. We then built some fabric sheds over them to keep them protected. At the time I expected permits to come through a the end of January or start of February and didn't want lumber to be a hold up. Little did I know permits wouldn't come through until the end of June and then it would take until mid-August to actually get any concrete!

20211208_092729_resized.jpg

20211208_095509_resized.jpg
 
OP
D

dmittz

Well-known member
Joined
Dec 2, 2016
Messages
1,298
So, as I mentioned earlier at the back of my property there was a dilapidated old barn and the back 30- 40 feet was solid brambles and ivy 7 feet tall the entire width (150 ft). So I went to work in the winter clearing all that out.

What I didn't Realize was that under all that was massive amounts of junk that you couldn't see, including a lot of broken up old concrete and Bricks! ugh!

Well 8 Bins later I got all that junk cleared out.

20220219_170915_resized.jpg

20211122_124405_resized.jpg

20211121_140654_resized.jpg

20211123_103321_resized.jpg
20211122_132907_resized.jpg
 
OP
D

dmittz

Well-known member
Joined
Dec 2, 2016
Messages
1,298
Next up was to take down one cotton wood tree, which I did just before a new bylaw was passed that prohibited tree cutting for any reason.

20211129_085915_resized.jpg

20211129_095130_resized.jpg

20211129_104736_resized.jpg

20211203_101338_resized.jpg
 
OP
D

dmittz

Well-known member
Joined
Dec 2, 2016
Messages
1,298
All that work was finally followed by regrading the back of the property

20220306_120651_resized.jpg

20220306_121232_resized.jpg

20220306_090659_resized.jpg

It was a major undertaking but finally the back of the property was cleared and graded! Only problem is I spent the next 6 months and still am pulling out blackberries and Ivy that keep re-growing.
 
Last edited:
OP
D

dmittz

Well-known member
Joined
Dec 2, 2016
Messages
1,298
Well at that point I was still waiting on permits, so I decided to get rid of the rotten old tree house that I had inherited from the old owners, The tractor made quick work of it.

20220402_172405_resized.jpg
 
To avoid these ads, REGISTER NOW!
OP
D

dmittz

Well-known member
Joined
Dec 2, 2016
Messages
1,298
So as winter turned into spring I was still waiting for permits, so I carried on with all the other projects planned for the property.

And of course now the rotten tree house (and yet another junk bin) were gone, the question became what to do with the 8 mature western red cedars smack in the middle of the property?

They are nice enough trees 50-60 feet tall, my neighbor planted them in 1975 (he tells me) at the request of the lady he sold my property to back when he subdivided. The issue is they are all in a straight line each about 12ft apart, sort of an odd look IMO. Well the new city bylaw prohibits cutting of trees for any reason (except for very specific exemptions), Worse yet the grass would not grow under them either.

So I figured I would put done dark colored mulch down and then plant lots of native ferns and and shrubs plus a few dozen 'imported' species and turn it in to a 'forest themed' shade garden.

20220407_164826_resized.jpg

20220407_195911_resized.jpg
20220410_160938_resized.jpg

20220521_150206_resized.jpg20220410_161105_resized.jpg

And with a few months time and lots of hand watering here's what it looks like now...I can't wait to see it next year.

20220814_091418_resized_1.jpg

20220814_091422_resized.jpg
20220815_111832_resized.jpg
 
OP
D

dmittz

Well-known member
Joined
Dec 2, 2016
Messages
1,298
As Spring turned into summer, I finally started to get some calls from the city in regards to inquiries about my permit which meant I was getting close to the front of the line! However, the calls weren't pleasant. The first fight was about tree protection, even though there are no trees near the construction site! Well guess what? that little shade bed I put in helped convince them that I valued the trees and wouldn't hurt them, so NO arborist study/ report was require nor did I have to do any protective fencing around all the trees on the property :cool: There was also some questions about what happened to that cottonwood I cut down, so I sent them the permit they (tree protection) had issued the previous fall and tree protection finally signed off.

Next I fought with the building department about that little cedar shed, they wanted it removed because 25 years ago it was installed without a permit. After appealing that and having a long discussion with the head of the department, somehow that shed was 'grandfathered' in writing but I had to sign a legal declaration not to rebuild it if it were ever destroyed. Great!

The final fight was the building department not wanting to allow any plumbing in the shop, not even for just a hose bib, because it was an 'unfinished' garage without a septic field. They wouldn't budge so I had to give in and agree to install a permitted septic field within two years and in exchange they granted me the option to do plumbing in the building, which meant i'm going to do more than originally planned (bathroom etc...) since I had to do a septic field.

At that point I thought I was in the clear... Nope the driveway came back to bite me as the next call I got was from engineering.

My front Yard is basically flat and there is NO ditch and according to my neighbor who has lived there for 62 years there has never even been a ditch. Yet when they finally came out to inspect the driveway, they said the driveway was 'blocking the drainage ditch'.
I asked the inspector if he could show me the ditch because I didn't see one...
He told me to lower the level of the driveway 1 inch and call for reinspection and then left.

ok,,,glad I had a tractor

20220427_183751_resized.jpg20220427_183846_resized_1.jpg
20220428_104239_resized.jpg
20220428_104210_resized.jpg
20220428_104153_resized_1.jpg
Well I wasted a bit of my time and lowered that driveway 1 inch :unsure: then called for re-inspection and they passed it.

And just like that my next day my building permit was Finally issued!!!
 
OP
D

dmittz

Well-known member
Joined
Dec 2, 2016
Messages
1,298
I didn't want to waste any time so a few days later I had m father in law come over with his larger excavator...
20220619_122006_resized.jpg
20220616_102525_resized.jpg
Neither of us had ever excavated a foundation but I rented a laser level and did our best
20220617_121034_resized.jpg
20220617_121038_resized.jpg
I ran the level while he did the digging then later a hooped on my tractor and started moving dirt around and spreading it.
20220617_152841_resized.jpg
I ran my tractor full tilt all afternoon trying to keep up with that excavator, it didn't miss a beat.

20220617_172603_resized.jpg

20220617_172503_resized.jpg
In the end it wasn't perfect but we were 1 inch either way of level. My contractor said it was 'good enough'.

Oh and we also took out that cottonwood stump as it was where the shop was going, and yet one more bin went to the dump, lol
 
OP
D

dmittz

Well-known member
Joined
Dec 2, 2016
Messages
1,298
A few days after excavating my contractor started putting the forms up.

20220629_195533_resized.jpg

20220704_105620_resized.jpg
20220712_184923_resized.jpg
20220714_171301_resized.jpg

The city came out and did a survey and a form inspection and passed it.

Following that the site sat for 3.5 weeks with nothing at all happening as we waited to get concrete.
 
OP
D

dmittz

Well-known member
Joined
Dec 2, 2016
Messages
1,298
When backfilling I noticed a void in the foundation between where the two large doors are going...
20220812_161214.jpg

My contractor sent his guys out to patch it up with some sort of special compound...let hope it works as well as he says it will.
20220815_111928.jpg
 
OP
D

dmittz

Well-known member
Joined
Dec 2, 2016
Messages
1,298
And this pretty much brings us up to where I currently am.

Before finishing the driveway to shop and putting the road pack inside, I needed to get a water line from my well in the front and also run the main power line from the meter on my private power pole.

My father in-law wasn't avaliable to do the excavating this time, but thankfully I have a friend that owns an excavating business and just so happened to be working at a farm just down the road. So he delivered his 'little baby excavator' as he calls it, yesterday evening.

20220815_204251.jpg

20220815_204334.jpg

I hand dug a little trench under the coner of the shed so the excavator could easily tie into it without undermining the blocks under the shed.
20220815_204227.jpg
 
OP
D

dmittz

Well-known member
Joined
Dec 2, 2016
Messages
1,298
Found another old well for a bygone era, I believe this one was from the 1920's home that was here before my neighbor subdivided his 5 acre property in the 1970's, interestingly near the back of the property last year I also found an really ancient brick well likely for an mid-late 1800's farm that used to be here long, long ago.
20220816_141812.jpg
The one issue is this one is about 6 inches under the driveway, so fairly soon I need to pop the top off and see if it was properly filled in or if I need to fill it to avoid a vehicle ever going through the top.
 
OP
D

dmittz

Well-known member
Joined
Dec 2, 2016
Messages
1,298
The plumbers came this morning and got 250ft of water line to the shop laid in the trench and all hooked up and pressurized.

20220817_124334.jpg

20220817_124345.jpg
The electricans are running the communications conduit this afternoon.

The main power cable to the shop and the line to the 'cedar shed' will be run on thursday morning. Unfortunatley, wheb doing the quote a year ago I guess the electrical guy just 'eye ball' guessed the length of cable to be only 120ft. in actuallity it turns out we need owr 200ft which also meant upsizing the cable to prevent voltage drop. End of the day the cost of cable is almost triple what they quoted! not much choice but to pay up at this point.
 
OP
D

dmittz

Well-known member
Joined
Dec 2, 2016
Messages
1,298
The 1in communications conduit was installed yesterday. The heavy main power cable is being delivered soon and will be installed before the end of the day as will the power cable from the shop's main panel back to the 'cedar shed'.

20220818_081305.jpg

The water line was all pressure tested and is functional. I actuslly have water out at the Contruction sit now, will be handy after the slab is poured for keeping the concrete hydrated!
 
OP
D

dmittz

Well-known member
Joined
Dec 2, 2016
Messages
1,298
Now That the water line is all in I was able to backfill the first 50ft or so of the 250ft trench. i'll proabbly wait a few weeks for the weather to cool down before I spread grass seed.
20220817_202059.jpg
The little 6in deep hole you see is a water shut off box for the shop. I assume they will also put another one inside the shop once the slab is poured but this one is handy to have I guess in case that 250ft water line should ever leak! My only complaint is I wished they had the lid at the surface and not down 6inches.
 
To avoid these ads, REGISTER NOW!
Top Bottom