
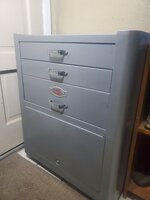
Hi guys, I picked up this vintage 1950's Craftsman toolbox over the weekend. It's in somewhat rough shape and I could use some advice putting it back to it's former glory.
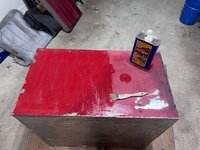
As you can see, someone's rattle canned it red. I found it in the 1955 Sears catalog, and according to the description it's supposed to be 'machine gray'. Indeed, I found traces of gray under the side handle. The interior of the box and the rear portions of the drawers are grey as well.
Here's what got me confused: The paint under the side handle seems to have a hammered finish, but the stuff on the inside is a flat grey that looks like what you'd find on an old time file cabinet. Does anyone know what the original finish would be? I picked up gray and silver hammered paint from Ace, and the gray is close to the original color but not exact (original color seems to have been a touch more bluish) The silver is too bright.
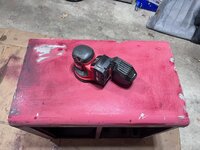
Anyway, my plan is to strip off all the old paint using chemical strippers and sanders, use a very thin coat of bondo to fill in all the shallow dents and repaint it. If anyone knows what the original finish and color would have been, that would be super helpful. Thanks in advance!
In pics: S - Silver, G - Gray. The last picture shows the back of the drawer with what I believe is the original finish
As you can see, someone's rattle canned it red. I found it in the 1955 Sears catalog, and according to the description it's supposed to be 'machine gray'. Indeed, I found traces of gray under the side handle. The interior of the box and the rear portions of the drawers are grey as well.
Here's what got me confused: The paint under the side handle seems to have a hammered finish, but the stuff on the inside is a flat grey that looks like what you'd find on an old time file cabinet. Does anyone know what the original finish would be? I picked up gray and silver hammered paint from Ace, and the gray is close to the original color but not exact (original color seems to have been a touch more bluish) The silver is too bright.
Anyway, my plan is to strip off all the old paint using chemical strippers and sanders, use a very thin coat of bondo to fill in all the shallow dents and repaint it. If anyone knows what the original finish and color would have been, that would be super helpful. Thanks in advance!
In pics: S - Silver, G - Gray. The last picture shows the back of the drawer with what I believe is the original finish


.jpeg")

.jpeg")


