OP

You are using an out of date browser. It may not display this or other websites correctly.
You should upgrade or use an alternative browser.
You should upgrade or use an alternative browser.
Between 265 & 485 SQ/FT 1950s Craftsman Garage retro remodel
- Thread starter Red Leader
- Start date
Workspaces sized between 265 and 485 squarefeet.


OP
Red Leader
Well-known member
Okay! So I've gotten a lot of work down out there! Here is the update!
So I mixed the paint I got from Habitat for Humanity. One color was really white and the other was a yellowish desert tan. I made a concoction out of the two and started cutting the corners:

By daveamy at 2011-05-27

By daveamy at 2011-05-27

By daveamy at 2011-05-27
This was my 'trouble' wall - for some reason, it kept getting indents every time I would prime it. I kept using joint compound to fill it in completely. I must have used 4-5 extra coats of mud. This is it on #2 or 3:

By daveamy at 2011-05-27
As I was waiting for that wall to stop being dumb, I started filling in the top portions on the other walls:

By daveamy at 2011-05-27

By daveamy at 2011-05-27

By daveamy at 2011-05-27

By daveamy at 2011-05-27

By daveamy at 2011-05-27
It turned out rather nice. At first, when I started on the walls, I thought that maybe I had made the paint a little too dark. Those fears quickly subsided once I added the second color, which look perfect together...keep scrolling...
This was my 'trouble' spot - which cleared up after 4-5 coats of drywall compound. Still don't know what the heck was going on, but the saga is over:

By daveamy at 2011-05-27
Before I attacked the bottom half of the walls, I wanted to do something with these concrete footers. I decided they would look nice in the bottom paint color, so I taped off the floor (note to self: do that much, much, much earlier in the process). I also taped off the gas pipe to keep things clean:

By daveamy at 2011-05-27

By daveamy at 2011-05-27

By daveamy at 2011-05-27

By daveamy at 2011-05-27
I've heard (see a few posts above) folks having success with wetting the concrete and just applying paint, but when I went to make a run at the borg, I saw a quart of zinzer 123 primer and figured it would make things easier: It did, but MAN was I pushing it with just 1 quart...I was struggling to make it last near the end, but it all worked out for the better, and it lived happily ever after:

By daveamy at 2011-05-27

By daveamy at 2011-05-27
Okay, so I took a break after several swear words about getting this line for the tape for the second coat right and took the wife to dinner. Back on track, got the tape up.
Here was my procedure for getting a nice clean tape line. After you have made your marks for the tape line (and swore after realizing that measuring from the concrete doesn't work because the concrete isn't level), put on the tape, next step is to throw up a tiny bead of caulk on the tape line:

By daveamy at 2011-05-27
Next, smooth it down with your finger:

By daveamy at 2011-05-27
Then go behind your finger with a damp rag and get the excess off. The idea is to have a tiny amount of caulk in the tape seam to keep the paint from creeping up in there:

By daveamy at 2011-05-27
Time to rock and roll!

By daveamy at 2011-05-27
Pretty much within 2-5 minutes, start pulling that tape off:

By daveamy at 2011-05-27
And whala!! Nice clean tape line. Leaving it on until the paint's dry means that the paint wants to pull up with the tape (if you are using latex), so get it off right away.
Just be sure not to do this:

By daveamy at 2011-05-27
Or this:

By daveamy at 2011-05-27
oops lol.
I was doing this when the tan paint probably hadn't TOTALLY dried yet, so after this happened, I decided to just wait until tomorrow to do the rest of the tape line. Lesson learned

However, even after goofs like that, here is what things were shaping up to look like:

By daveamy at 2011-05-27
SUPER happy with the colors - I think the complement each other perfectly and give a nice retro tone.
So since I couldn't do the tape line, I concentrated on the concrete footer:

By daveamy at 2011-05-27
And here is what things are currently looking like:

By daveamy at 2011-05-27
To be honest, I'm stoked. I'm not a professional, I don't do this stuff for a living, and its just me out there running around out there pretending to know what I'm supposed to be doing. I think it will turn out really nice.
When I saw the teal color in the Habitat for Humanity store, I was instantly drawn to it, since I wanted to try and find a paint that was close in color proximity to the color I was deciding to refurbish my tools with (and it was $10 for a 5 gallon bucket).
Here is a slighly-glamour shot. Pretty close don't ya think?

By daveamy at 2011-05-27
More work to be done tomorrow! Next up will be finishing the tape lines, adding the elusive 'racing stripe', and start playing around with trim! Stay tuned!!!!
So I mixed the paint I got from Habitat for Humanity. One color was really white and the other was a yellowish desert tan. I made a concoction out of the two and started cutting the corners:
By daveamy at 2011-05-27
By daveamy at 2011-05-27
By daveamy at 2011-05-27
This was my 'trouble' wall - for some reason, it kept getting indents every time I would prime it. I kept using joint compound to fill it in completely. I must have used 4-5 extra coats of mud. This is it on #2 or 3:
By daveamy at 2011-05-27
As I was waiting for that wall to stop being dumb, I started filling in the top portions on the other walls:
By daveamy at 2011-05-27
By daveamy at 2011-05-27
By daveamy at 2011-05-27
By daveamy at 2011-05-27
By daveamy at 2011-05-27
It turned out rather nice. At first, when I started on the walls, I thought that maybe I had made the paint a little too dark. Those fears quickly subsided once I added the second color, which look perfect together...keep scrolling...
This was my 'trouble' spot - which cleared up after 4-5 coats of drywall compound. Still don't know what the heck was going on, but the saga is over:
By daveamy at 2011-05-27
Before I attacked the bottom half of the walls, I wanted to do something with these concrete footers. I decided they would look nice in the bottom paint color, so I taped off the floor (note to self: do that much, much, much earlier in the process). I also taped off the gas pipe to keep things clean:
By daveamy at 2011-05-27
By daveamy at 2011-05-27
By daveamy at 2011-05-27
By daveamy at 2011-05-27
I've heard (see a few posts above) folks having success with wetting the concrete and just applying paint, but when I went to make a run at the borg, I saw a quart of zinzer 123 primer and figured it would make things easier: It did, but MAN was I pushing it with just 1 quart...I was struggling to make it last near the end, but it all worked out for the better, and it lived happily ever after:
By daveamy at 2011-05-27
By daveamy at 2011-05-27
Okay, so I took a break after several swear words about getting this line for the tape for the second coat right and took the wife to dinner. Back on track, got the tape up.
Here was my procedure for getting a nice clean tape line. After you have made your marks for the tape line (and swore after realizing that measuring from the concrete doesn't work because the concrete isn't level), put on the tape, next step is to throw up a tiny bead of caulk on the tape line:
By daveamy at 2011-05-27
Next, smooth it down with your finger:
By daveamy at 2011-05-27
Then go behind your finger with a damp rag and get the excess off. The idea is to have a tiny amount of caulk in the tape seam to keep the paint from creeping up in there:
By daveamy at 2011-05-27
Time to rock and roll!
By daveamy at 2011-05-27
Pretty much within 2-5 minutes, start pulling that tape off:
By daveamy at 2011-05-27
And whala!! Nice clean tape line. Leaving it on until the paint's dry means that the paint wants to pull up with the tape (if you are using latex), so get it off right away.
Just be sure not to do this:
By daveamy at 2011-05-27
Or this:
By daveamy at 2011-05-27
oops lol.
I was doing this when the tan paint probably hadn't TOTALLY dried yet, so after this happened, I decided to just wait until tomorrow to do the rest of the tape line. Lesson learned
However, even after goofs like that, here is what things were shaping up to look like:
By daveamy at 2011-05-27
SUPER happy with the colors - I think the complement each other perfectly and give a nice retro tone.
So since I couldn't do the tape line, I concentrated on the concrete footer:
By daveamy at 2011-05-27
And here is what things are currently looking like:
By daveamy at 2011-05-27
To be honest, I'm stoked. I'm not a professional, I don't do this stuff for a living, and its just me out there running around out there pretending to know what I'm supposed to be doing. I think it will turn out really nice.
When I saw the teal color in the Habitat for Humanity store, I was instantly drawn to it, since I wanted to try and find a paint that was close in color proximity to the color I was deciding to refurbish my tools with (and it was $10 for a 5 gallon bucket).
Here is a slighly-glamour shot. Pretty close don't ya think?
By daveamy at 2011-05-27
More work to be done tomorrow! Next up will be finishing the tape lines, adding the elusive 'racing stripe', and start playing around with trim! Stay tuned!!!!
Last edited:
I like the colors.
Keep it coming...
Keep it coming...
Stuart in MN
Well-known member
I like the color scheme, good work!
ambenz
Well-known member
COOL Thread!!!!! Subscribed!!!
Love your color choice....someday I'm gonna do my garage interior for that finished look!
Love your color choice....someday I'm gonna do my garage interior for that finished look!
28HopUp
Well-known member
I absolutely love the choice of colors!
OP
Red Leader
Well-known member
MID DAY Update!!!!
Got the racing stripes on (for the most part):

By daveamy at 2011-05-28

By daveamy at 2011-05-28
I still need to do some light touch ups here and there. Notice I said 'for the most part'...
If you look in the first picture, you'll notice there is no stripe on the left hand side.
I did the bottom wall colors and jacked it up something fierce...and I know exactly why.
There were a few areas that had small pock marks from air bubbles in the joint compound. I went over them with a smooth layer of mud and sanded down and re-touched up with primer...but not enough. The paint didn't have enough to stick to and was pulling up in some areas, including almost the entire paint line on that left hand side. I touched it up and will go back over it again with another paint line. Another thing is that I slammed that tape down HARD on those walls, but that was a very BAD idea. This time around (and for the rest of the lines), I'm just feathering the tape on there and the caulk does the rest of the work. Makes it a lot easier to pull up and comes up with much less paint
So...I'm not sure if I'm going to get to the trim today, but here it is:

By daveamy at 2011-05-28
For this project the budget couldn't afford legit trim ($.75 at the cheapest for basically a square) so I go to the borg and find some 1x3.5" furring strips.
Huh?
Yep, furring strips.
Here's the cool thing. They're 'beetle kill' pine - In Colorado especially, the Pine Beetle likes to snack on pine and has been making a mess in our national forests. The trees die and every now and then you come across the lumber - which to some is considered 'exotic', and can be expensive.
Here is another look:

By daveamy at 2011-05-28
For me anyway, the benefit is that I get these cool gray streaks through the wood and it looks neat
I think it will give the garage a slighty rustic edge
I'm going to route out an art deco design on the top edge, finish in a natural/golden color finish, and hopefully install soon.
That's all for now!
Got the racing stripes on (for the most part):
By daveamy at 2011-05-28
By daveamy at 2011-05-28
I still need to do some light touch ups here and there. Notice I said 'for the most part'...
If you look in the first picture, you'll notice there is no stripe on the left hand side.
I did the bottom wall colors and jacked it up something fierce
...and I know exactly why.There were a few areas that had small pock marks from air bubbles in the joint compound. I went over them with a smooth layer of mud and sanded down and re-touched up with primer...but not enough. The paint didn't have enough to stick to and was pulling up in some areas, including almost the entire paint line on that left hand side. I touched it up and will go back over it again with another paint line. Another thing is that I slammed that tape down HARD on those walls, but that was a very BAD idea. This time around (and for the rest of the lines), I'm just feathering the tape on there and the caulk does the rest of the work. Makes it a lot easier to pull up and comes up with much less paint
So...I'm not sure if I'm going to get to the trim today, but here it is:
By daveamy at 2011-05-28
For this project the budget couldn't afford legit trim ($.75 at the cheapest for basically a square) so I go to the borg and find some 1x3.5" furring strips.
Huh?
Yep, furring strips.
Here's the cool thing. They're 'beetle kill' pine - In Colorado especially, the Pine Beetle likes to snack on pine and has been making a mess in our national forests. The trees die and every now and then you come across the lumber - which to some is considered 'exotic', and can be expensive.
Here is another look:
By daveamy at 2011-05-28
For me anyway, the benefit is that I get these cool gray streaks through the wood and it looks neat
I think it will give the garage a slighty rustic edge
I'm going to route out an art deco design on the top edge, finish in a natural/golden color finish, and hopefully install soon.
That's all for now!
036.6turbo
Well-known member
- Joined
- Dec 7, 2009
- Messages
- 149
Very cool, I love the colors! My grandfather had a radial arm, very similar to that one. Oh and by the way, I rode a Husqvarna CR250, back in the day. 1976 model. Loved the bike, hated the left side kick start, and the "tickler" choke, on the Bing carb.
OP
Red Leader
Well-known member
Final update for the day:
Good news: Got the trim made and gave it a cool profile
Bad news: The 'finish' used ***** and took out all the beetle kill grain
Okay, so here is how I made the trim - I have a router table extension hooked up to the Unisaw, so I ran the pieces through that:

By daveamy at 2011-05-28
First profile:

By daveamy at 2011-05-28
Second profile:

By daveamy at 2011-05-28

By daveamy at 2011-05-28
Pre-finish wood:

By daveamy at 2011-05-28
Post-finish wood:

By daveamy at 2011-05-28

By daveamy at 2011-05-28
Honestly, I think it looks awful. It kinda reminds me of that ugly wood siding from the 70s, only a little lighter. And the beetle kill color is gone. When I went to the borg I picked out something that was supposed to be close to a natural finish with a slightly enhanced golden hue. Instead what I got was the weird amber/red coloring that washed out the rest of the natural wood color.
I'm really close to stripping/re-sanding and taking this stuff back and just getting a clear coat.
Oh well. Experience points earned
Thanks for looking!
Good news: Got the trim made and gave it a cool profile
Bad news: The 'finish' used ***** and took out all the beetle kill grain
Okay, so here is how I made the trim - I have a router table extension hooked up to the Unisaw, so I ran the pieces through that:
By daveamy at 2011-05-28
First profile:
By daveamy at 2011-05-28
Second profile:
By daveamy at 2011-05-28
By daveamy at 2011-05-28
Pre-finish wood:
By daveamy at 2011-05-28
Post-finish wood:
By daveamy at 2011-05-28
By daveamy at 2011-05-28
Honestly, I think it looks awful. It kinda reminds me of that ugly wood siding from the 70s, only a little lighter. And the beetle kill color is gone
. When I went to the borg I picked out something that was supposed to be close to a natural finish with a slightly enhanced golden hue. Instead what I got was the weird amber/red coloring that washed out the rest of the natural wood color.I'm really close to stripping/re-sanding and taking this stuff back and just getting a clear coat.
Oh well. Experience points earned
Thanks for looking!
OP
Red Leader
Well-known member
EDIT: I'm an idiot lol
I've got this giant metal container of boiled linseed oil that I completely forgot I had.
I sanded off a part of one of the boards and put some BLO on it and its perfect.
I hate making more work for myself
I've got this giant metal container of boiled linseed oil that I completely forgot I had.
I sanded off a part of one of the boards and put some BLO on it and its perfect.
I hate making more work for myself
colt zantop
Well-known member
wow...the walls look great!
OP
Red Leader
Well-known member
Very cool, I love the colors! My grandfather had a radial arm, very similar to that one. Oh and by the way, I rode a Husqvarna CR250, back in the day. 1976 model. Loved the bike, hated the left side kick start, and the "tickler" choke, on the Bing carb.
Right on! My bike is at my parents house on the east coast, so unfortunately I don't have it out here, but fortunately I don't have to worry about storing it
I absolutely love the sound of those old 2 strokes. Music to my ears.
It sounds a lot like this one (but not quite as pretty). Pure eye/ear candy:
OP
Red Leader
Well-known member
wow...the walls look great!
Thanks! What you cannot see are all the little touch ups where some paint peeled from me kind of doing a bad job in some areas with getting the primer built back up from doing touch ups with the joint compound, but hopefully they'll blend right in
fergus
Well-known member
Nice build man. I'm diggin the vintage machinery...I plan collecting vintage woodworking equipment since buyin a 1950s Dewalt RAS got me kinda hooked on older stuff. Just signed up on OWWM yesterday!
OP
Red Leader
Well-known member
Nice build man. I'm diggin the vintage machinery...I plan collecting vintage woodworking equipment since buyin a 1950s Dewalt RAS got me kinda hooked on older stuff. Just signed up on OWWM yesterday!
Oh my gosh you're going to love it. Be forewarned - "It's a slippery slope" you'll hear a lot of member say. Its true. You will find a wealth of info over there. Also, a lot of these tools can be had on the cheap and many times with inexpensive fixes like new bearings.
OP
Red Leader
Well-known member
Update for the night:
Continued to work on trim. I sanded it down and it actually is looking real good. I have to re-route the contours since the old ones are stained and there is no way to sand them. The side-benefit is that the contours ( the few that I did) are coming out really nice since they are being routed on flat, now-sanded pieces.
Will finish up the trim tomorrow with a clear coat and may even be able to start installing tomorrow.
When I am waiting for the trim to dry, I will be having fun with outlet covers and spray painting misc things flat black (pipe, garage door hardware, lights, etc).
New pictures to come!
Continued to work on trim. I sanded it down and it actually is looking real good. I have to re-route the contours since the old ones are stained and there is no way to sand them. The side-benefit is that the contours ( the few that I did) are coming out really nice since they are being routed on flat, now-sanded pieces.
Will finish up the trim tomorrow with a clear coat and may even be able to start installing tomorrow.
When I am waiting for the trim to dry, I will be having fun with outlet covers and spray painting misc things flat black (pipe, garage door hardware, lights, etc).
New pictures to come!
OP
Red Leader
Well-known member
UPDATE:
So about the trim saga - I re-sanded all of it down, reprofiled it in the router table and here are the results:
Before (ugliness):
By daveamy at 2011-05-28
During:

By daveamy at 2011-05-30
and After:

By daveamy at 2011-05-30
Oh HECK YES!!! I knew there was a reason why I wanted to get rid of that salmon-colored finish of stupidity - look at the natural grain of the wood! It feels like it took forever...sand down (and clean sandpaper every 1-2 min from loading with oil-filled sawdust, reprofile contour 1, re-reprofile contour 1 when first time wasn't deep enough, reprofile contour 2, heavy sand out groove lines and finish on top of trim, fine sand flat sides and top, recoat with spar urethane. But it was all worth it Here is how it accents the wall:

By daveamy at 2011-05-30
So about the trim saga - I re-sanded all of it down, reprofiled it in the router table and here are the results:
Before (ugliness):
By daveamy at 2011-05-28
During:
By daveamy at 2011-05-30
and After:
By daveamy at 2011-05-30
Oh HECK YES!!!
I knew there was a reason why I wanted to get rid of that salmon-colored finish of stupidity - look at the natural grain of the wood! It feels like it took forever...sand down (and clean sandpaper every 1-2 min from loading with oil-filled sawdust, reprofile contour 1, re-reprofile contour 1 when first time wasn't deep enough, reprofile contour 2, heavy sand out groove lines and finish on top of trim, fine sand flat sides and top, recoat with spar urethane. But it was all worth it Here is how it accents the wall:
By daveamy at 2011-05-30
Last edited:
OP
Red Leader
Well-known member
UPDATE:
Decided to mess around with outlet covers and finally get the outlets cleaned out.
A while back I picked up some vintage bakelite outlet covers from the Hab outlet -

By daveamy at 2011-05-30

By daveamy at 2011-05-30
And now we see the progression!
Before:

By daveamy at 2011-05-30
During:

By daveamy at 2011-05-30
After:

By daveamy at 2011-05-30
Glamour shot time:

By daveamy at 2011-05-30
Maybe I should 'splurge' and get some brown outlets to actually match the covers? Or paint covers black?
Thoughts?
Decided to mess around with outlet covers and finally get the outlets cleaned out.
A while back I picked up some vintage bakelite outlet covers from the Hab outlet -
By daveamy at 2011-05-30
By daveamy at 2011-05-30
And now we see the progression!
Before:
By daveamy at 2011-05-30
During:
By daveamy at 2011-05-30
After:
By daveamy at 2011-05-30
Glamour shot time:
By daveamy at 2011-05-30
Maybe I should 'splurge' and get some brown outlets to actually match the covers? Or paint covers black?
Thoughts?
Last edited:
OP
Red Leader
Well-known member


I think the brown/black combo on the outlets looks good. It's a crazy-minor detail -- but this looks like it's going to be a garage with some excellent details.
fergus
Well-known member
I'll agree with Jack on that one...something minor, but those outlets/covers really say "1950s" instead of some modern white ones. Maybe one wouldn't have been able to really pick it out, but something might have seemed mildly out of place.
I just looked at all the pics before I read any captions and was already thinking "hmmm...that kinda looks like Bakelite". Cool.
I just looked at all the pics before I read any captions and was already thinking "hmmm...that kinda looks like Bakelite". Cool.
98TJ
Well-known member
Red Leader,
I have an external motor, belt-driven Craftsman table saw that's dated 8 58.
Might be good for your shop. Works fine, just has a two prong plug. Got it from my neighbor. I thought about refinishing it and keeping it around just for a conversation piece.
I'll get some pics up later.
I have an external motor, belt-driven Craftsman table saw that's dated 8 58.
Might be good for your shop. Works fine, just has a two prong plug. Got it from my neighbor. I thought about refinishing it and keeping it around just for a conversation piece.
I'll get some pics up later.
OP
Red Leader
Well-known member
Red Leader,
I have an external motor, belt-driven Craftsman table saw that's dated 8 58.
Might be good for your shop. Works fine, just has a two prong plug. Got it from my neighbor. I thought about refinishing it and keeping it around just for a conversation piece.
I'll get some pics up later.
98TJ,
I'd love to see pictures of that! They are solid saws. While the Unisaw I have is filling the bill nicely, I'm keeping my out (locally) for a late 1930s Craftsman 9" floor saw made by Atlas which is very rare:
http://vintagemachinery.org/photoindex/detail.aspx?id=10261
and a Craftsman-badged Darra James 95 12" table saw:
http://vintagemachinery.org/photoindex/detail.aspx?id=487
OP
Red Leader
Well-known member
I think the brown/black combo on the outlets looks good. It's a crazy-minor detail -- but this looks like it's going to be a garage with some excellent details.
Thanks Jack, I appreciate your thoughts. I've got a few other outlets that are a more modern shape that I'm still trying to figure out what to do with, as well as some 4-plug outlets. I might try taking two of the bakelite covers and putting them together, as I have several left over.
OP
Red Leader
Well-known member
I'll agree with Jack on that one...something minor, but those outlets/covers really say "1950s" instead of some modern white ones. Maybe one wouldn't have been able to really pick it out, but something might have seemed mildly out of place.
I just looked at all the pics before I read any captions and was already thinking "hmmm...that kinda looks like Bakelite". Cool.
mmm Bakelite
98TJ
Well-known member
98TJ,
I'd love to see pictures of that! They are solid saws. While the Unisaw I have is filling the bill nicely, I'm keeping my out (locally) for a late 1930s Craftsman 9" floor saw made by Atlas which is very rare:
http://vintagemachinery.org/photoindex/detail.aspx?id=10261
and a Craftsman-badged Darra James 95 12" table saw:
http://vintagemachinery.org/photoindex/detail.aspx?id=487
Here ya go. Not the best pics, they're from the camera phone. This was given to me over the weekend and I got to work cleaning it up.


*EDIT*
Here's some pics I found online of what I have.
http://www.shanewhitlock.com/photo/v/misc/craftsmants/
Last edited:
OP
Red Leader
Well-known member
Here ya go. Not the best pics, they're from the camera phone. This was given to me over the weekend and I got to work cleaning it up.
*EDIT*
Here's some pics I found online of what I have.
http://www.shanewhitlock.com/photo/v/misc/craftsmants/
98TJ,
Beautiful saw! That top is looking great! Did it come with the fence? Any other accessories? If you get the chance you should register over at the OWWM forum and post the saw to the registry. The good news about these old Craftsman saws is that since they made many of them, parts are easy to come by and cheap (or free!).
I'm going to try to do a little painting in the garage tonight. I got home late so I didn't want to disturb the neighbors with any sawing. Tomorrow's a late night too so I'm aiming for Friday as a nice night for some trim work.
I have about 5 weeks before the baby comes so 5 weeks is my goal to finish most of everything! (minus the corrugated steel ceiling and epoxy floor).
My next big challenge once I am done with trim is going to be the workbench and the cabinets. I'm going to try out some art deco accents on both but it may take a while. Between now and then I also need to find a jig/sabre saw
98TJ
Well-known member
98TJ,
Beautiful saw! That top is looking great! Did it come with the fence? Any other accessories? If you get the chance you should register over at the OWWM forum and post the saw to the registry. The good news about these old Craftsman saws is that since they made many of them, parts are easy to come by and cheap (or free!).
It came with the rip fence and the miter gauge. No extended work surface or anything like that. Rip fence is laying on the stand in the first pic.
LeonardY
Well-known member
Red Leader looks like my garage. Well, except for all the cool tools. What a great job and inspiration.
I have mostly more modern stuff with the expection of three great machines. One is a Delta combo machine. 14" bandsaw with 4" jointer. My godfather's dad added a horizontal mortiser at some point but I don't have all the parts. The bandsaw and jointer were bought in 1936. I also have a Craftsman 48 inch belt and disk sander and a 6" Craftsman planer (Atlas) from around that era. I restored the bandsaw and use it regularly.
I included a couple of pictures of the bandsaw. Before and after.
Great job!
Leonard
I have mostly more modern stuff with the expection of three great machines. One is a Delta combo machine. 14" bandsaw with 4" jointer. My godfather's dad added a horizontal mortiser at some point but I don't have all the parts. The bandsaw and jointer were bought in 1936. I also have a Craftsman 48 inch belt and disk sander and a 6" Craftsman planer (Atlas) from around that era. I restored the bandsaw and use it regularly.
I included a couple of pictures of the bandsaw. Before and after.
Great job!
Leonard
Attachments


sneakyfast
Well-known member
- Joined
- Mar 25, 2011
- Messages
- 76

OP
Red Leader
Well-known member
Looks great! I can't wait to see it put together now that the paint is done
Guys, I'm loving all these tools.
Leonard, that is a beautiful restore on that Delta bandsaw. Did it originally come with the jointer? If so, I would think that would be a rare machine, I don't think I've seen one before.
Sneakyfast, awesome Uni. I love mine!
I didn't get do really do any updating to the garage last night, but I did clean it for 2 hours. Its funny, because it looks exactly the same. I'm sure many of you know how that goes. Again, since I've got a little over a month, I'd like to get it clean as well as get things done. I came up with a short list of things I still need to do. Here is a summary:
1. Finish paint up near garage door
2. Strip and paint electrical panel cover
3. Trim around electrical panel cover, art deco style (hopefully this weekend)
4. Install trim (again, hopefully this weekend)
5. Install trim around the door (might need 1 to 2 more furring strips)
6. Paint door? It needs it for sure.
7. Paint accents (lights, chains, garage door hardware, etc)
8. Finish outlet covers
9. Paint/Decal garage door opener cover
Now I have you guys to keep me accountable!
csp
Well-known member
Where are you buying the beetle kill pine from?
johnnybentwrench
Well-known member
Those Triumph-inspired Kawasakis are cool. I don't have one but vintage motorcycles are a true passion of mine.
Here's one from the stable-
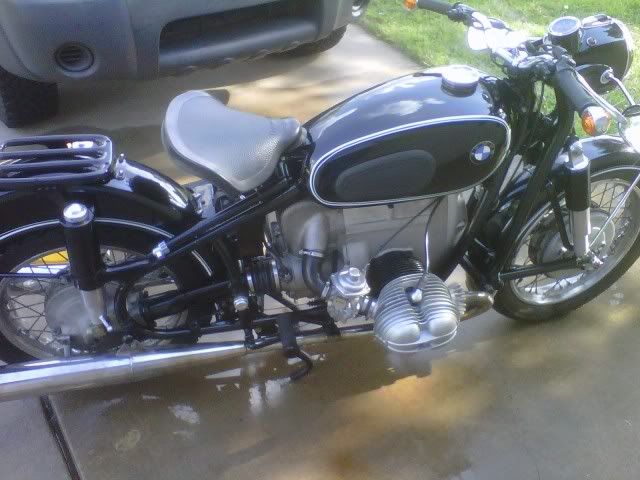
what size engine did you stuff in the /2 frame? I have an R69S almost put back together
OP
Red Leader
Well-known member
Where are you buying the beetle kill pine from?
Honestly I lucked out. I went into the Home Depot on S Gun Club Road/ Smokey Hill and when I went to buy the furring strips (1"X3.5"), there they were. I had to sort through the whole thing to find what I have now. They might have a few left. I asked if they had any more and they brought out a whole new pallet full of strips, but none were beetle kill.
I haven't checked any more HDs, though, so you might check it out. Last time I was at the Parker/Orchard on I should have looked.
I might need to get a few more since I'm also trimming around the door frame and the electrical panel. We'll see if I can find any more. If I do, I'll post here where I found it, as I only need probably 1 or 2 more strips.
LeonardY
Well-known member
Guys, I'm loving all these tools.
Leonard, that is a beautiful restore on that Delta bandsaw. Did it originally come with the jointer? If so, I would think that would be a rare machine, I don't think I've seen one before.
Sneakyfast, awesome Uni. I love mine!
I didn't get do really do any updating to the garage last night, but I did clean it for 2 hours. Its funny, because it looks exactly the same. I'm sure many of you know how that goes. Again, since I've got a little over a month, I'd like to get it clean as well as get things done. I came up with a short list of things I still need to do. Here is a summary:
1. Finish paint up near garage door
2. Strip and paint electrical panel cover
3. Trim around electrical panel cover, art deco style (hopefully this weekend)
4. Install trim (again, hopefully this weekend)
5. Install trim around the door (might need 1 to 2 more furring strips)
6. Paint door? It needs it for sure.
7. Paint accents (lights, chains, garage door hardware, etc)
8. Finish outlet covers
9. Paint/Decal garage door opener cover
Now I have you guys to keep me accountable!
Red Leader,
Yes, it did come with the jointer. I figured out the horizontal mortiser was added on. I passed on a floor standing drill press like the one you have. Can you say "stupid."
I took photos to my God-father just before he passed on. He was so happy when I showed him the photos. It meant the world to me that I could make him happy. Still, I would trade the bandsaw to still have him here.
I'm looking forward to your completion and using you as inspiration to finish mine.
Best,
Leonard
OP
Red Leader
Well-known member
Red Leader,
Yes, it did come with the jointer. I figured out the horizontal mortiser was added on. I passed on a floor standing drill press like the one you have. Can you say "stupid."
I took photos to my God-father just before he passed on. He was so happy when I showed him the photos. It meant the world to me that I could make him happy. Still, I would trade the bandsaw to still have him here.
I'm looking forward to your completion and using you as inspiration to finish mine.
Best,
Leonard
Leonard,
Don't feel too bad - I passed on an Atlas floor press as well...came through the local ads about a week ago for $50

Real tempting, but I'm holding out for a 50's Craftsman floor press, hopefully with either the vari-slow attachment, the table raising mechanism, or both.
OP
Red Leader
Well-known member
LATE LATE night update:
Painted the details up near the front of the inside of the garage around the garage door - will just need to clean up the stripes and I'll be done there. Also did some caulk work and hid the garage door safety sensor wires.
Also I'm 90% done with outlets and covers. I still need to find a solution to a double outlet I have - maybe I can find a vintage cover to match the rest on ebay or something. I'll have to file out 2 others to cooperate with the rectangular GFCI outlets. I will also have to trim around both 220v outlet covers, since they are single outlets in a 2-outlet gang box (needed the space for the huge honkin' wire that is coming to them. If I can pick up 3 dual outlet covers, I'll just get 2 more 220v outlets and throw them in there just to look pretty and have things looking nice and neat.
I'm tired. However, I'll try and take some pictures tomorrow. I'll be able to get off on Friday a little early so I might be able to get a head start on some more of the list.
Stay tuned...
Painted the details up near the front of the inside of the garage around the garage door - will just need to clean up the stripes and I'll be done there. Also did some caulk work and hid the garage door safety sensor wires.
Also I'm 90% done with outlets and covers. I still need to find a solution to a double outlet I have - maybe I can find a vintage cover to match the rest on ebay or something. I'll have to file out 2 others to cooperate with the rectangular GFCI outlets. I will also have to trim around both 220v outlet covers, since they are single outlets in a 2-outlet gang box (needed the space for the huge honkin' wire that is coming to them. If I can pick up 3 dual outlet covers, I'll just get 2 more 220v outlets and throw them in there just to look pretty and have things looking nice and neat.
I'm tired. However, I'll try and take some pictures tomorrow. I'll be able to get off on Friday a little early so I might be able to get a head start on some more of the list.
Stay tuned...
OP
Red Leader
Well-known member
Sweet! Found exactly what I need:
http://cgi.ebay.com/Vntge-Bakelite-...2?pt=Architectural_Garden&hash=item25643cdc8c
Okay going to bed now
http://cgi.ebay.com/Vntge-Bakelite-...2?pt=Architectural_Garden&hash=item25643cdc8c
Okay going to bed now