To avoid these ads, REGISTER NOW!

Between 265 & 485 SQ/FT 1950s Craftsman Garage retro remodel

Workspaces sized between 265 and 485 squarefeet.
To avoid these ads, REGISTER NOW!

omr

Banned
Joined
Jun 1, 2011
Messages
723
im forced to pick the middle one because when i see it i relate it to you because of your avatar
 

Kiwi Kev

Well-known member
Joined
Jun 24, 2009
Messages
185
Location
Ventura, CA
I absolutely love your garage! The vision, the execution.....Spectacular! I can't wait to see it all done with the tools in place.
 

widerberg

Well-known member
Joined
Feb 15, 2007
Messages
245
Location
Down South
2.
GetFile.aspx

I've always loved #2 :thumbup:
 

LeonardY

Well-known member
Joined
Apr 16, 2011
Messages
5,089
Location
Southern California
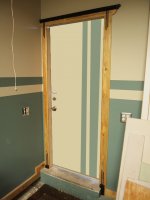
By the way, this front door looks awful:

p7172817.jpg

By daveamy at 2011-07-17

What should I do with it? Paint it to match the wall scheme? All black? All white? All teal? Its this weird fiberboard panel, so I don't think finishing it would look good.

Wood paneling on it would look kinda neat, but that would be pretty time consuming and would use wood I don't have.

Any thoughts?

Red Leader,

2x on the steel door. I would paint it the teal color. Or paint it the wall color (white?) then paint the teal color in vertical stripes. I wouldn't put any trim. Get some fridge magnets in anticipation of all the artwork your son will be giving you.
Since a picture is worth a thousand words. Just my 2 cents.

I go with the #2 for the decal.

Best,

Leonard
 

Attachments

  • door.jpg
    door.jpg
    136.2 KB · Views: 91

tinbender 66

Well-known member
Joined
Mar 23, 2011
Messages
2,294
Location
Western Washington State
Actually, I work for a local non-profit that helps at-risk youth. A far cry from what I know a lot of guys on here do (engineer, construction, etc), but I do love what I do and the garage time gets my 'working with my hands' fix for me:)

By the way, how is your garage coming? Any new updates with the paint or cabinets?

Oh, and thanks for your vote!

Good for you on the job. Not much progress on my place. I only get paid once a month and that comes this week so something will happen. I did go to a barn sale last Saturday and bought a bunch of "stuff". There was an apartment in the barn and I got the cabinets, sink and other stuff for $20. Gotta go uninstall them this week then its off to the Ace paint store.

I did restore an old Navy chair that you might like. It's here http://www.garagejournal.com/forum/showthread.php?t=109695
 
OP
R

Red Leader

Well-known member
Joined
May 15, 2011
Messages
2,689
Location
Denver, CO
Guys,

I've been playing with the logos, and I realized that the middle one (my favorite too), without the aluminum colored 'backing' would look horrible on the black background, as shown here:

craftsmanresize.jpg

By daveamy at 2011-07-18

However, I found this other cool, vintage Craftsman logo. It is from the 1950's-1960's Craftsman floor standing cabinet saws only, but it looks sweet.

I changed the color of the inset paint to match the cabinets and here is what it looks like:

craftsmantablesawlogoco.jpg

By daveamy at 2011-07-18

I'm thinking a real 'photo' of a logo would look pretty cool as a decal, giving it a more realistic vibe.

I can always do the original red, but I kinda like the teal:)

Please, let me know what you think.
 
OP
R

Red Leader

Well-known member
Joined
May 15, 2011
Messages
2,689
Location
Denver, CO
I like the red craftsman logo, it will really pop out the most of the three in my opinion. What are you going to store on those art deco looking shelves?

THAT is a fantastic question. Since the garage will definitely get used, probably some paint cans, power tools (and boxes) and other stuff.

Also, I do plan to do some vintage items. In the middle on the lower shelf, I want to find a Crosley E15 radio to put there:
e15w.jpg

By daveamy at 2011-07-18

Off to the sides, I want to get a vintage 1940's-1950's electric fan. Also, a company called Arvin made some really neat art deco heaters, and I'd probably put one on the other side, opposite the fan.
 

TONE

Well-known member
Joined
Jun 5, 2006
Messages
1,866
I apologize if it's already been mentioned in this thread (I read almost all of it) but is there any word on what type of ceiling will be installed?

Looking great!
 
To avoid these ads, REGISTER NOW!
OP
R

Red Leader

Well-known member
Joined
May 15, 2011
Messages
2,689
Location
Denver, CO
Jack, that looks great!

I've been working on some, too. I took these as pictures from Craftsman tools I have in my garage. Let me know what you think:

cmanlogo2.jpg

By daveamy at 2011-07-18
cmanlogo1.jpg

By daveamy at 2011-07-18

I still really like the look of the one from the table saw, with its chrome finish, but I think what I'll do is have a bunch of decals made, and see which one actually comes out best on the sheet.
 
OP
R

Red Leader

Well-known member
Joined
May 15, 2011
Messages
2,689
Location
Denver, CO
Here is the big one with a crappy simulated black background:

This is still my favorite logo.

craftsmantablesawlogoco.jpg

By daveamy at 2011-07-18

I know it doesn't quite have the same clarity as the others, but it just has the coolest vintage vibe.

I'm for sure going to get a decal made from it and see how it looks.
 

omr

Banned
Joined
Jun 1, 2011
Messages
723
I totally should!!!!!!!!!

It ***** thought, since I'm not a metalworker:D

If someone would make me one I'd put it up:beer: :lol:
in reality all you would have to do is cut the shape out of a piece of aluminum sheet metal and then get vinyl
 
OP
R

Red Leader

Well-known member
Joined
May 15, 2011
Messages
2,689
Location
Denver, CO
in reality all you would have to do is cut the shape out of a piece of aluminum sheet metal and then get vinyl

I'll have to think about that one for sure, since most vintage Craftsman signage is either ultra, ultra rare or no longer exists.

For now though, my offer still stands:D
 
OP
R

Red Leader

Well-known member
Joined
May 15, 2011
Messages
2,689
Location
Denver, CO
I apologize if it's already been mentioned in this thread (I read almost all of it) but is there any word on what type of ceiling will be installed?

Looking great!

Tone,

I think I'm going to go with a corrugated steel ceiling, then trim the edges the same way I did the bottom trim - get some (hopefully beetle kill pine) furring strips, route the deco edge on them, then finish and install.

I just can't bear to put myself through installing more drywall.
 
OP
R

Red Leader

Well-known member
Joined
May 15, 2011
Messages
2,689
Location
Denver, CO
I absolutely love your garage! The vision, the execution.....Spectacular! I can't wait to see it all done with the tools in place.

Thanks Kiwi Kev!!! You're place definitely adds to my inspiration. My place, while is has a vintage theme, is sorta modern in its approach. Your shop is dripping with the real thing:thumbup:


BTW

To all:

I scored a 4x8 sheet of white formica at the hab outlet for $2 today. They also had a metal medicine cabinet for $4 which I didn't pick up (maybe I should have? Oh well). Its a little beat on the edges, but I won't be using the entire 4x8 for the counter top so its fine. I've seen these sheets for as much as $80 each online! Crazy!!! I'll need to pick up the sheet tomorrow, so I'll see if the medicine cabinet is still there. Maybe I'll go in the morning. Does anyone know if they made first-aid/medicine cabinets with rounded edges? This one is just a basic square but it was pretty decent.

Next step (once the workbench is nearly done) is to get some of that polished aluminum ribbed table edging and give it the real vintage treatment. I get excited just thinking about it!!!
 
Last edited:
OP
R

Red Leader

Well-known member
Joined
May 15, 2011
Messages
2,689
Location
Denver, CO
Last post for the night.

Here are some really, really basic sketches of some workbench stations I've been thinking about. I'm trying to nail down the shelving above the bench but the design is pretty fluid at this point. Since I consider the workbench a hallmark of the garage, I really want to spend my time and make it functional yet beautiful. I don't have a ton of 'length' space to work with, so even some of these pictures may be generous along that wall.

You guys will have to let me know what you think. Once the baby comes I'll have a lot more time to just visualize/conceptualize things and I'm sure it will keep getting closer and closer.

I will also have to keep this design modular and movable so that it can accomodate a new floor at some point.

p7182842.jpg

By daveamy at 2011-07-18
BTW- that center table is a 'pull out' design, so that if you need/want more work bench room, you can pull it out, have a floating workbench table, but then it reveals a solid continuous workbench underneath.
 
Last edited:

BUGTHUG

Well-known member
Joined
Nov 12, 2010
Messages
2,960
Location
Kansas
I would think that most of the first aid cabinets from the 20's thru the 50's were probably square, but they made bigger cabinets that were metal and had round sides and some had round on the top front that were used in kitchens for can goods and some cleaning supplies. But wood square was retro.
 

shopnut

Well-known member
Joined
Feb 22, 2006
Messages
4,237
Location
Florida
Last post for the night.

Here are some really, really basic sketches of some workbench stations I've been thinking about. I'm trying to nail down the shelving above the bench but the design is pretty fluid at this point. Since I consider the workbench a hallmark of the garage, I really want to spend my time and make it functional yet beautiful. I don't have a ton of 'length' space to work with, so even some of these pictures may be generous along that wall.

You guys will have to let me know what you think. Once the baby comes I'll have a lot more time to just visualize/conceptualize things and I'm sure it will keep getting closer and closer.

I will also have to keep this design modular and movable so that it can accomodate a new floor at some point.

p7182842.jpg

By daveamy at 2011-07-18
BTW- that center table is a 'pull out' design, so that if you need/want more work bench room, you can pull it out, have a floating workbench table, but then it reveals a solid continuous workbench underneath.
IMHO, the "docking" workbench as shown is the way to go, but I'm kind of partial to those :).

Here's my suggestions on your particular pull-out bench:

1. Make it latch securely to the main bench when docked.

2. Add the quarter round hinging compartments like you built other places (sure you already had that in mind).

3. I didn't see a wood lathe in your pictures but I'm guessing one is on your wish list. Craftsman made a bunch of them. For most people, they are seldom used so I suggest you hide it in either the roll-out bench or the bench that gets covered by the roll-out overhang.

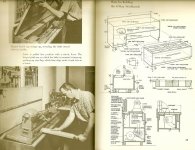
I just scanned the following old picture to insert in my ASYLUM Inspiration thread, but will post it here first because I could picture it working well for you. The lathe hides down in the bench. I've been pondering on this concept for about 5 years now while the ASYLUM is getting finished and want to do this with my metal lathe at one of the window nooks.

For pure functionality, I would hide the lathe in the wall bench since this will be somewhat inaccessible space anyway with the rolling bench docked. On the other hand, it would be nice to roll the lathe out in the middle of the floor and use it when needed (and keep the sawdust isolated away from the main bench).

Home-Workshops-05.jpg

(Even the guy in the picture looks like he might fit in well in your shop!)
 

shopnut

Well-known member
Joined
Feb 22, 2006
Messages
4,237
Location
Florida
One more thing:

4. It probably wouldn't look as good as what you show, but for functionality, I would have the main bench overlap the rolling bench (or change the cantilever on the rolling bench to a swing down wing) so items setting on the main bench don't have to be moved to roll the bench out.
 

widerberg

Well-known member
Joined
Feb 15, 2007
Messages
245
Location
Down South
Here is the big one with a crappy simulated black background:

This is still my favorite logo.

craftsmantablesawlogoco.jpg

By daveamy at 2011-07-18

I know it doesn't quite have the same clarity as the others, but it just has the coolest vintage vibe.

I'm for sure going to get a decal made from it and see how it looks.

I've only gotten down to this post in the thread, so someone may have mentioned it further down, but I think whether you go with this logo or the earlier Craftsman logo (that I like :thumbup:), I'd stick with red instead of teal. There's so much teal and cream in your garage, that I think a little bit of red, especially as a centerpiece like this would really make the room pop and give it some nice contrast. Kind of like Jack's garage--it's mostly green and off-white (tiles, etc.), but what really sets that space off for me are the red tool boxes and the dark counter tops. That little bit of contrasting color draws the eye and really makes the green (and in your case the teal/cream) pop.

Having said that, I'm not a graphic designer so I don't know the theory and all behind it. It just "feels" right to have a little pop of a contrasting color.

Whatever you go with, though, the garage is looking sweet!! :bowdown:
 

Wingnut65

Well-known member
Joined
Apr 21, 2010
Messages
3,170
Location
Tampa Bay, FL
Wingnut,

Please, do tell!... :)

PM Sent.

Man, those workbench sketches are right on target. You have good vision. I love the curves and shelves and the whole flow. Play with it in Sketch-Up. You may want to think about the floating bench sliding over the long bench. It may want to go under, but the look would be different. The reason, right now, you would have to move the wall-o-matic to use the floater. Putting it back means clearing off the bench again. If it slides under, nothing to move. I know its a design thing, but it also needs to be functional. I like it floating, but if it needs to be near the corner, extend it to the wall.

RL, I think I figured out what inspiration your shop reminds me of... Erich Mendelsohn's Einstein Tower, built from 1919 to 1924 in Potsdam, Germany.
einsteinturm.jpg


Mendelsohn designed a lot with the deco curves that you are using.
2901858080_f1ee0d12ab.jpg


Keep up the great work.
 

Jeff_R

Active member
Joined
Feb 23, 2011
Messages
32
RL-

I have been following your thread since the first post, and I love what you have done. It really is an inspiration.

For your door, you could paint it white then put on a print (think Gustav Klimt or another Seccessionist painter) or some shop safety posters from the 50's (can never have too many reminders).

Your workbench drawings remind me a lot of the Popular Mechanics articles from the 50's/60's that showed how to build workbenches/living room furniture. Maybe some of those articles may help. Another idea would be to use tanbar (is that the correct spelling) as a sliding cover for sections to keep them clean. That would still keep the vintage theme, and work with curves.

Best of luck with the baby... they are truly a blessing.

Jeff
 
OP
R

Red Leader

Well-known member
Joined
May 15, 2011
Messages
2,689
Location
Denver, CO
Okay, here is what the final decal sheet is looking like:

garagedecals.jpg

By daveamy at 2011-07-19

I took the suggestion to keep the inside of the logo red to contrast with the garage colors and to make it stand out. I think I am going to go with the far left one just because I like it so much. But, I threw some others up there too, including Jacks, because once I have them in hand, my mind might change:)

I did ask for permission to use the 'Garage Journal' and 'OWWM' logos, but have not heard back...I'm assuming its okay? Its for a good cause and will help show those forums in a good light:thumbup:

I really wanted to give credit to the Garage Journal community because without you guys, this project would not be happening, or at the very least would not be happening at the obsessive, detail-oriented level that it is:D
 
To avoid these ads, REGISTER NOW!
Top Bottom