To avoid these ads, REGISTER NOW!

Where to nail 3-tab shingles at the gable edge?

vtx531

Well-known member
Joined
Jan 6, 2010
Messages
208
Location
Kalamazoo, MI
I'm building a shed and I'm at the point of putting on shingles. I started at the edge of the roof instead of the middle (mistake?).

How do I nail the edge of the shingles closest to the dripedge on the gable end? Do I nail as close as possible to the edge and nail through the drip edge? Nail as close as possible next to the drip edge? No nails on the edge and apply roofing adhesive of some sort instead?

Thanks, Chris
 
To avoid these ads, REGISTER NOW!

nehog

Well-known member
Joined
Jan 2, 2010
Messages
7,935
Location
Jaffrey, NH
Not to sound impolite, but you should find a book on doing roofing... Your questions are so basic that it seems you have no idea (never roofed before) that a book will fill in details that a post here won't.

Start at the edge, work up. Nail where the shingle maker tells you to nail (ONLY), generally just above the slots. Stagger the tabs, and shingles so no overlapping edges. If warm/hot, wear soft shoes to avoid damage to hot, soft shingles. Use proper roofing nails, either hand nail or power nail but roofing nails only, no staples. Set overlap exactly as the shingle maker says to. No need for additional cement. Don't forget the starter strip at the edge.


Roofing felt under shingles, again starting from edge working up. Use only as many staples on the felt as necessary.
 
OP
V

vtx531

Well-known member
Joined
Jan 6, 2010
Messages
208
Location
Kalamazoo, MI
Thank you, I appreciate the advice. You are right- my first time. I was able to read online and on the package all the other stuff but none of it explains...

If the drip edge extends 1/2" beyond the decking edge and the shingles another 1/4" past that, then the nails on the edge of those shingles would be floating in mid air. That's the thing I am trying to figure out how to do.
 

OccupantRJ

Well-known member
Joined
May 15, 2009
Messages
11,264
Location
Eastern North Carolina
I am not a pro, but I nail through the shingle and into the drip edge metal strip so that the nail also goes into the wood roof decking. This is as close as you can get and have a good attachment. Measure the length of the roof and starting in the center of the lower drip edge, adjust right or left so that you will hopefully not end up with really narrow tabs at the ends. Chalk lines to follow to keep shingles straight, lots of them horizontal, and at least one vertically to keep the bond, or stagger of the joints in alignment with each other. Unlike most others, I cut the tabs off the lower starter shingle to give a tar strip at the lower edge for the first exposed shingle to bond to, to help prevent wind uplift. Most pros are not going to take the time to do this, but if you read the installation instructions from the shingle manufacturer, you will likely see this step included. Take your time, read up, and follow proper manufacturer's instructions, and you will do fine. Getting materials on the roof is the hard part. A 2 foot square of foam rubber about an inch thick is your friend, to save on your knees. Use 1-1/4 inch nails to prevent beating up on your fingers. Good luck.
 

Kevin54

MEMBER EMERITUS
Joined
Jan 12, 2005
Messages
29,341
Location
Urbana, Ohio
You'll go through the dripedge where it is nailed to the roof. Just gon't go out too far or you will go through the dripedge and the nail will either push out the vertical portion of the dripedge or it will go through to where it shows on the outside.
 

ssblood

Well-known member
Joined
Aug 3, 2011
Messages
71
Two nails in every shingle near the edge. One in the nail line and one at the top. More wind resistance. Depending on what part of the country you are in you may need to be putting 6 nails on the nail line on every shingle instead of 4 for warranty.
 

petee_c

Well-known member
Joined
Oct 4, 2010
Messages
3,036
Location
KW area, Ontario CANADA
I've only roofed once, it too was a shed. Turned out pretty well for my 1st building. Built from scratch with plans scrawled onto a doodle pad. I did borrow a book from the library on framing buildings though....

http://www.pjbj.ca/labels/shed.html

Anyways. Roofing

At the edge, and work up.
I used tar paper on the whole roof. Small building, and I had to buy a whole roll of tar paper anyways.

Overlap everything on the roof, so it shed water off.
I put drip edge around the entire perimeter of the roof.
2 layers of shingles at the edge. The 1st layer if I remember correctly was upside down? Space the seams to maintain waterproofness.

Follow the instructions on the shingle package.

You might need to use Roofing tar to help the shingles along the ridge...

P
 

55chevr

Member
Joined
Jun 12, 2011
Messages
20
Location
Long Island
I am a roofer ... you start from the bottom left hand side (if right handed) you can use starter strip which looks like 3 tab shingle without cuts but is a continous roll. If you dont have it you can turn 3 tab shingle upside down to do the first course underlay. Dont nail through the drip edge. Keep all you nails in the center long axis of the shingle. They should never show as water will penetrate and dry rot folllows. This stuff is very basic and you could actually read the bundle wrapper ...
 

Bubbles

Well-known member
Joined
Jun 23, 2006
Messages
278
tar the full edge then put a row in upside down, starting at the edge, run a caulk line so its straight with the proper over hang. then start again putting the shingles in the right way.
 

K'ledgeBldr

Well-known member
Joined
Aug 22, 2011
Messages
1,925
Location
Johns Creek, GA
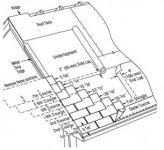
This diagram illustrates the basic configurations for installing composite three-tab shingles.
Although drip edge is not required by the IRC (International Residential Code) it is mandated (amended) by local jurisdictions (convening authorities/building departments) because of either high winds or other weather related events.
The only thing not in the diagram that I have required my roofers to always do is, a starter course along the rake and not just the leading edge at the fascia. Having the starter course on the rake actually accomplishes two things- it reinforces the overhang and actually raises the edge just enough that it prevents water from running over the edge (sort of a trough effect).
As far as the nailing- as mentioned earlier keep the nails within the perimeter of the drip edge.
 

Attachments

  • Roof-Figure-1.jpg
    Roof-Figure-1.jpg
    18.2 KB · Views: 124

ssblood

Well-known member
Joined
Aug 3, 2011
Messages
71
When I was roofing before college 3 tabs always got started somewhere in the middle so it could be nailed on at both sides. We also weave all valleys though. In Nashville no one weaved them. Different techniques depending on region.

Sent from my PC36100 using Tapatalk
 
To avoid these ads, REGISTER NOW!
OP
V

vtx531

Well-known member
Joined
Jan 6, 2010
Messages
208
Location
Kalamazoo, MI
Maybe these pictures will help to explain my question. Am I supposed to nail close to the edge? Otherwise there is about 12" of shingle not attached at the edge in any way... The normal spot on the shingle where the nail goes is overhanging the edge of the roof...


EDIT: THE PIC SHOULD SAY 12" TO EDGE
 

Attachments

  • IMG_2548.JPG
    IMG_2548.JPG
    70.4 KB · Views: 71
  • IMG_2547.JPG
    IMG_2547.JPG
    44.2 KB · Views: 68
Last edited:

Falcon67

Well-known member
Joined
Jun 11, 2009
Messages
18,371
Location
Merkel, TX
I always nail along the tar tack strip under the tab above, just off the edge of the flashing. Far enough that the nail doesn't come into the facia trim. You don't want any nail head exposure.
 

ssblood

Well-known member
Joined
Aug 3, 2011
Messages
71
Nail just to the left of the drip edge. Just don't nail into the fascia board if you can help it.
 

nehog

Well-known member
Joined
Jan 2, 2010
Messages
7,935
Location
Jaffrey, NH
Thank you, I appreciate the advice. You are right- my first time. I was able to read online and on the package all the other stuff but none of it explains...

If the drip edge extends 1/2" beyond the decking edge and the shingles another 1/4" past that, then the nails on the edge of those shingles would be floating in mid air. That's the thing I am trying to figure out how to do.

You typically wouldn't have nails at the very edge. For the edge, just space the nails in a bit and you'll be OK.
 
OP
V

vtx531

Well-known member
Joined
Jan 6, 2010
Messages
208
Location
Kalamazoo, MI
no nails on the edge ... thru the tar line only ... that is self sealing

Supposed to nail just under the tar strip I thought?

Maybe I was overthinking it. I went through and put nails as close to the drip edge as a could and made sure the tab above it was covering it. Good?
 

tcianci

Well-known member
Joined
Feb 7, 2009
Messages
4,242
Location
Walpole, Ma
Like it was previously posted, you should run a starter course up the rakes. It makes the edge stronger and it helps resist wind uplift because an uplifting wind is now acting on a much larger piece of roofing than just the one tab that's out there next to the rake. Also as was posted, the shingle wrapper is your friend and your ticket to a favorable outcome should a warranty issue ever arise. Believe me, once a shingle manufacturer can certify that their product was not installed according to the wrapper instructions, you don't have a leg to stand on as far as warranty claims even if the failure had to do with premature fading or some other issue not even remotely related to installation.

We always try to keep the nails out of the actual rake trim material. So, if you're doing a typical rake board with a 1x2 run along its top edge, you would want to stay a couple inches back of the edge to keep the nails out of the trim material. If you lay out your roofing correctly, you shouldn't have any little bitty tabs near the edge that will require you to nail close to the edge. Also, this is where the starter course along the rake helps you, even without a nail right at the edge, the sealing dots will bond the shingle to the starter course along the rake, ensuring that the tabs stay put.

Rake trim material typically doesn't last anywhere near as long as an average roof. It's likely that you'll be servicing the trim over the life of the roof. This is when nailing into the trim can come back to bite you. You will end up working the nails out of the trim to get it off the building and unless you can get the tabs up high enough to facilitate re-nailing them, you're compromising the attachment of those shingles. If you're using any new cellular PVC trim, while it's unlikely you will be servicing the material at all, it is subject to some serious crawling around on the building during temperature cycles and that will cause the shingle nails to work loose eventually and the job will look like *** or worse, if the movement of the trim is sufficient, it will put undue stress on the shingles and cause the tabs to tear with respect to the rest of the shingle that's nailed to the roof sheathing. I have personally seen long runs of PVC rake trim move up to 3/8 of an inch over the course of a summer day.
I have addressed issues with respect to working with cellular PVC in a post I did a while back called "Azek, while it's still fresh in my mind" or something like that.
Happy roofing.
 
Last edited:

Steves32

Well-known member
Joined
Feb 12, 2011
Messages
845
What about half way up the roof?
I have a 5 yr old roof on a rental & there's 3-4 shingles in 2 rows that need replaced. Actually they are missing> maybe from wind. It was all power stapled down.
Is there a trick or a tool to nail down shingle replacements when sliding them under existing good shingles? Surely you aren't removing shingles all the way to ridge just to replace a few in the middle.
 

K'ledgeBldr

Well-known member
Joined
Aug 22, 2011
Messages
1,925
Location
Johns Creek, GA
Is there a trick or a tool to nail down shingle replacements when sliding them under existing good shingles? Surely you aren't removing shingles all the way to ridge just to replace a few in the middle.

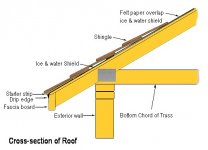
No trick- my roofer always used a flat bar to release the tar strip, locate the nails (or in your case- the staples), then go under that course and pry up the nail. Install new shingle, and nail into place. The nail pattern only nails one ply- thus making repairs easy.
Look at the cross-section diagram-
 

Attachments

  • Roof%20Cross-section.jpg
    Roof%20Cross-section.jpg
    34.7 KB · Views: 20

Kevin54

MEMBER EMERITUS
Joined
Jan 12, 2005
Messages
29,341
Location
Urbana, Ohio
What about half way up the roof?
I have a 5 yr old roof on a rental & there's 3-4 shingles in 2 rows that need replaced. Actually they are missing> maybe from wind. It was all power stapled down.
Is there a trick or a tool to nail down shingle replacements when sliding them under existing good shingles? Surely you aren't removing shingles all the way to ridge just to replace a few in the middle.

You have to use a flat bar to reach under the shingles to looses them. Sometimes you have to use the flatbar to cut the nail if you can't get it to pop. The slide your shingle in and nail above the slot in the tar strip. To do this you have to lift up the tab on the shingle above it. Then raise the tab oabove that shingle you just raised the tab on and nail thru its tarstrip.

To replace shingles in the middle of a roof is kind of a pain because you have to loosen and remove a couple more than what you actually want, but to replace a few shingles shouldn't take you more than half and hour or so.

Just remember to nail the last shingle directly above the one you replaced. By nailing in the tar strips, you actually have 8 nails holding down each shingle.

Another thing to remember, don't try replacing the shingles on a hot day as in midday. Try to do it in the morning just when the sun comes up. This way the shingles will be cold enough to release from the tar strips. If it gets too hot you will tear your shingles. When they are cold, slide a wide blade putty knife or your flatbar under them, give a small jab and they should release.
 
To avoid these ads, REGISTER NOW!
Top Bottom