To avoid these ads, REGISTER NOW!

Between 265 & 485 SQ/FT 1950s Craftsman Garage retro remodel

Workspaces sized between 265 and 485 squarefeet.
To avoid these ads, REGISTER NOW!
OP
R

Red Leader

Well-known member
Joined
May 15, 2011
Messages
2,689
Location
Denver, CO
Now back to better thoughts. RL, I was at the Habitat Re-Store today and a vintage power tool followed me home. He is sitting in my garage right now wondering what will become of him. His tag says 113.29003 and I have decided I need to keep him and rebuild his self confidence. :)

NICE! Don't tell me it came with the bottom 3 drawer cabinet or I will hate you too much:D:D:D

I missed out on a pristine looking one recently due to the general consensus that it is not the most robust design on the market (which is true), HOWEVER, I (inevitably came to the consensus after the fact) that it sure beats having to pull my 1952 radial saw out just to use it because the armature sticks out of the back.

I'm now on the hunt for one that is in nice, unworn shape.

Okay, lets see the pics!!!
 
OP
R

Red Leader

Well-known member
Joined
May 15, 2011
Messages
2,689
Location
Denver, CO
I also started doing some work on the fence:

pa164618.jpg

pa164619.jpg


I'm posting pictures of it for two main reasons:

1) So I don't forget how it goes back together:D
2) I wanted some 'before' pictures because you will not believe this fence when I am done with it. I am grinding, sanding, polishing, painting and who knows what else. I'm not even sure why. I just got an idea in my head to do it up real nice. It will probably be the nicest part on the saw:D


I must apologize to everyone that follows this thread. I've been a little out of sorts this week as you can imagine. However, the work must go on!

A while back I made the above post. Well, tonight I finished most of the fence. I think it looks pretty good.

Here are the progress shots:

p1061327.jpg


scraping off excess paint:

p1061328.jpg


p1061329.jpg


p1061330.jpg

p1061331.jpg


p1061335.jpg

p1061337.jpg

p1061336.jpg

p1061338.jpg


I still need to get a knob for it. I'll see what I can come up with.

Also finished (mostly) the handwheels.

Before:
pb280450.jpg


After:
p1071341.jpg

p1071343.jpg


This saw is going to be coming together VERY soon. The only parts that still need cleaning up are the fence rails/guides and the waffle extension, which still needs paint. Apart from that, I just need to pick up some misc hardware and things will be going back together! I don't think I will restore the motor quite yet. It is non-original to the saw and only 3/4HP so before I invest the time I'll see how it runs first. I'm really looking forward to testing it out.


Also, got a very nice surprise today:

A local OWWM picked up some parts for the Craftsman cabinet saw that were ruckered in from across the country. Guess what they were?


Motor:

p1061323.jpg


And...


Motor mount!!!!

p1061324.jpg

p1061325.jpg


I was very excited to get the motor mount because it is proprietary to this one saw and the saws are pretty rare as-is, let alone trying to find a seldom-separated part. HUGE thanks goes out to BlueMerle from the OWWM forums - you are giving this old saw new life!

Now all I need is the unobtanium belt guard:D

Tomorrow am going to be doing some work, but mainly some security stuff. If there is one thing that having your car stolen will do, its to get you thinking about how you can better be prepared. Taking steps.
 

smschriefer

Well-known member
Joined
May 28, 2009
Messages
842
Location
Yorktown, VA
Hey now, that motor mount says 2 of 3.... are you holding out on us?!! :lol_hitti

The fence restoration looks great, as do the handles. I really like the little handle in the center; it looks so cool. Question on the fence. The adjustment slide looks like it has limits. Does that mean you have to pick up the end of the fence to move it extended distances?

I'll get to uploading a pic of the RAS. The thing I like is it will sit flush to the wall, versus my newer version that sticks out from the wall at leas 6". The price of the new, older RAS was good as well, not free, but pretty darned cheap! I'll resell the other and have money in my pocket for the next purchase. I learned the lesson you gave us on that approach. :thumbup:
 
Last edited:
OP
R

Red Leader

Well-known member
Joined
May 15, 2011
Messages
2,689
Location
Denver, CO
Hey now, that motor mount says 2 of 3.... are you holding out on us?!! :lol_hitti

The fence restoration looks great, as do the handles. I really like the little handle in the center; it looks so cool. Question on the fence. The adjustment slide looks like it has limits. Does that mean you have to pick up the end of the fence to move it extended distances?

I'll get to uploading a pic of the RAS. The thing I like is it will sit flush to the wall, versus my newer version that sticks out from the wall at leas 6". The price of the new, older RAS was good as well, not free, but pretty darned cheap! I'll resell the other and have money in my pocket for the next purchase. I learned the lesson you gave us on that approach. :thumbup:

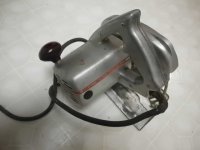
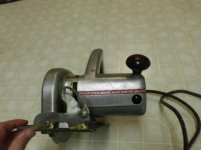
Haha the '3 of 3' was a pulley set for the motor/arbor. I actually had 1 pulley on the arbor that came with the saw but, of course, it was missing on the motor end because the motor was missing. I just know the original motor/motor mount/beltguard assembly is sitting around somewhere...too bad it was never found.

About your radial saw...read up on it, there is a LOT of literature available. Surprisingly, there haven't been a lot of rebuilds of that saw (I'm thinking of the power bronze version, or the 1962 version right after it)...I can only think of maybe 1 or 2 on the entire OWWM site, which is astounding considering the numbers in which Craftsman manufactured them. A lot of people write them off, but if they are properly restored and adjusted, that opinion might change. Throw in a negative hook angled blade (like a Freud or Forrest) and you'll be in business. Check the rail channels that the bearings ride it. I'd actually love to see a picture of that interface...nobody I know of has taken a picture of it and shown it. The machined rail in the arm is machined into the cast iron, I believe, and non-replaceable. My understanding is that when the saw develops play, it is hard or near impossible to get it tight again, but with a closer examination of how the bearings ride in the channel, it might be possible to discover a way to adjust it or modify to adjust.

I'm not exactly sure which part you are referring to when you mention the adjustment slide, but on the inside of the bottom part of the fence, is the micro adjust assembly, which has a +/- adjustment of about 2 inches. If you want to move it beyond that, I believe all you have to do is just loosen the tightening arm and slide it down the table. I don't think you have to remove it to slide it long distances. Now, granted, I haven't used this fence on the table saw yet, so it stands to be seen.

I'm really happy with the way the wheels came out - they will put that nice finishing touch on the saw. I might get a little chance to work on it today, but I've got some other priorities to do out there. Regardless, it is going to be a good work day!

:beer:
 

smschriefer

Well-known member
Joined
May 28, 2009
Messages
842
Location
Yorktown, VA
Well here it is. I am going to have to rededicate myself to my garage page. I haven't added anything since September when I was tiling my garage floor! Anyway, I picked the RAS up at the Habitat ReStore for $25 as I got a discount seeing that it didn't run (MSRP $45). It ended up being the switch, replaced that for $3. So here are a few shots of it the day I got it. Realize it is in pieces at the moment as I restore it. I must say it is looking beautiful in new paint. You got lucky as I took some shots during disassembly showing how the slide works. I can get more detail shots for you as I work on that section of the saw.

DSCN0659.jpg


DSCN0662.jpg


DSCN0667.jpg
 
OP
R

Red Leader

Well-known member
Joined
May 15, 2011
Messages
2,689
Location
Denver, CO
Let's see the new paint!

Agreed! And thanks smschriefer for showing the internals - I've never seen them before on that saw, only parts diagrams.

I'm hoping here soon (tomorrow maybe) to put the motor and motor mount on the Craftsman cabinet saw. Might need to get a small length of power cord to make the connection though.
 

smschriefer

Well-known member
Joined
May 28, 2009
Messages
842
Location
Yorktown, VA
RedLeader, here is a sample of the emperor's new clothes. When I get time, I am going to do a complete write up on the RAS rebuild. I don't want to hijack your thread with it anymore than I have already. Two pieces, one is the angle gauge from the top and the other is the front of the arm, or as my daughter called it - the french toast.

DSCN0679.jpg
 
OP
R

Red Leader

Well-known member
Joined
May 15, 2011
Messages
2,689
Location
Denver, CO
What product/color are you using? Look's great!

I will have to reference your rebuild for sure if I ever exchange out radial saws:thumbup:
 
OP
R

Red Leader

Well-known member
Joined
May 15, 2011
Messages
2,689
Location
Denver, CO
Well,

I said 'goodbye' to the lathe today, partly due to offset the costs of the car hoopla, and partly to reclaim my shop. I would have loved to see it shine, but it will do well in it's new owner's hands. It was a huge piece of arn to have in a 2 car garage, and most likely I would have sold it anyway at some point as I am getting closer to wanting a metal lathe (maybe I'll hold off on that one for now though:D).

p1091366.jpg

p1091367.jpg

p1091368.jpg


I'll be keeping my eye out for more of a 'cute' type wood lathe, something that can fit under a bench and be pulled out to turn a knob for a tool or a lightsaber for junior:)

Next on the chopping block is the Craftsman jointer. I have a buyer for that and that will mean a little more space in the shop.

My friend Keith (the one who helped me with the Atlas cabinet saw arbor) is coming down to pick up his Unisaw on Saturday, so that will be fun.

After that...perhaps the Atlas? After investing so much time into it...can I let it go? I guess we'll find out!:beer:

Planning to get some more work on the garage door done soon as well! Stay tuned!

-RL
 
Last edited:

GirlnAgarage

Well-known member
Joined
Jan 21, 2011
Messages
4,669
Location
Texas
Dave, I know letting it go was hard. I think though you'll run into a great lathe in the future. Same for the saw if you end up letting that go. What goes around comes around :)
 

FritzA

Active member
Joined
May 18, 2011
Messages
30
Location
Denver burbs
Dave,

Don't forget, there is still that small lathe by Companion where you got the tool chest. I would call that a cute lathe. I bet it would go for less than $50.

I think Companion was a brand used by Sears along with Craftsman but for lower quality than Craftsman.
 

SpeedinLemon

Well-known member
Joined
Oct 23, 2011
Messages
307
Location
North Texas
Sorry to see you're having to part with some of your great tools. Here's some good old Craftsman 150 news for you....It hasn't been run since my fire, but I spent some time with a can of WD-40 loosening everything up and think all will be fine....couldn't use the switch as it had melted a little:

View media item 15178
Do you know if that would have been an original swith to that press? I 've spent a lot of time looking over your vintage switch discussions....i had no idea there was so much to talk about....cool stuff! As Shopnut pointed out, you are the go to guy for all things vintage and especially Craftsman!

I did chuck up a sanding disk and plug it directly to an extension cord and it ran great. I didn't run it too long...just enough to help my 8 year old shape his pinewood derby car a little. It was a little noisy, so I won't use it much until I get a change to pull it apart and lube it up good. Here's what we came up with:

View media item 15177
Thanks for all your info and contributions!
 

Wingnut65

Well-known member
Joined
Apr 21, 2010
Messages
3,170
Location
Tampa Bay, FL
Dave, Sorry to hear about the lathe moving on, but consider it a victory that it will still be restored and not put out to pasture again.

SpeedinLemon, nice work on that car. Not your average pinewood derby car. And that switch now has some cool art deco curves. If it can be made to operate safely, it might just fit well on a vintage C'man. :lol:
 

machine_punk

Well-known member
Joined
May 14, 2011
Messages
2,540
Location
Napa Valley, California
You'll be much happier with a metal lathe (but, then again, I am a metal fabricator). You can do small wood projects on a metal lathe (even if it makes the purists groan). Glad to see you are moving forward with a specific direction with your shop.
 
To avoid these ads, REGISTER NOW!

smschriefer

Well-known member
Joined
May 28, 2009
Messages
842
Location
Yorktown, VA
Had to show you an update on the RAS transformation. Things are progressing, but slowed by rain, visitors and a new girlfriend. Oh well, something had to give, right? I am now down to only having the motor to rebuild. So maybe two weeks and it will be done.

Anyway, here is another sneak preview of the new color and a before/after shot so you can better visualize the difference.

I think the new piece looks like something Machine-Punk would like - kind of steam punkish...

After.jpg


Now the before and after shot...

BeforeAfter.jpg


I like the new color, but it is the most tempermental paint I have ever used and will never use it again.
 
Last edited:
OP
R

Red Leader

Well-known member
Joined
May 15, 2011
Messages
2,689
Location
Denver, CO
Thanks guys for keeping this thread alive and moving. My work schedule has changed so I'm not up as late in the night, which has previously been my prime posting time:D

I've also been distracted with finding parts for the car and all that jazz. Not a lot of news on the the garage/tool front, although soon I'm planning on finishing up the garage door turnbuckle system and getting the garage door opening rigged back up and correctly adjusted.

smschriefer you are really doing that RAS justice - probably much nicer than new. More vibrant for sure!

SpeedinLemon - I'll have to do some research on what 'originally' came with the Craftsman drill press, but on the last one I saw (that I unfortunately didn't get), it had the switch located on the motor, much like a grinder. A lot of times, the old tools came with different options and levels - some tools came without motors or switches and you either had the choice to buy them all together or buy just the tool and add your own later.

Those presses are tough, so while that one suffered a little in the fire, I'm sure it will be just fine. An EXL wheel will clean up the exposed metal parts to shine like they were new!
 
OP
R

Red Leader

Well-known member
Joined
May 15, 2011
Messages
2,689
Location
Denver, CO
Dave, Sorry to hear about the lathe moving on, but consider it a victory that it will still be restored and not put out to pasture again.

SpeedinLemon, nice work on that car. Not your average pinewood derby car. And that switch now has some cool art deco curves. If it can be made to operate safely, it might just fit well on a vintage C'man. :lol:

Its kinda funny that just last week I got it all put back together...because I had to take it all back apart again:D

It really needed someone with a lathe to be able to turn new bushings/sleeves on and so while I'm confident that I could have handled it one day...that one day is not today and might not be for a while. So, for now I focus on what is soon down the road (getting back shop space, epoxy floor, etc) and roll with it! :thumbup:
 
OP
R

Red Leader

Well-known member
Joined
May 15, 2011
Messages
2,689
Location
Denver, CO
How did you get those handwheels to polish up so nice?

I did a quick polish with the EXL deburring wheel, then painted, and once dried and wiped down, did a more lengthy polish on the EXL wheel.

I might have some pictures, I'll have to check. EXL wheels ROCK!
 
OP
R

Red Leader

Well-known member
Joined
May 15, 2011
Messages
2,689
Location
Denver, CO

Wingnut65

Well-known member
Joined
Apr 21, 2010
Messages
3,170
Location
Tampa Bay, FL
Red Leader, I like your polished results. Which wheel do you use...3M, Scotch-Brite?

I Googled it and found out that 3M actually makes Scotch-Brite. So, they be one in the same! :thumbup:

I've really got to get me one of these before too many more projects get started. Thanks, Dave for the link.
 
OP
R

Red Leader

Well-known member
Joined
May 15, 2011
Messages
2,689
Location
Denver, CO
My buddy Keith came today to pick up the Unisaw he bought from me, and lo and behold, he brought some goodies into the 1950's Craftsman Garage:

p1141405.jpg

p1141406.jpg


He also gave me a dial indicator gauge on magnetic base that he had a spare of. Keith also gave away his previous table saw to an aspiring new homeowner to make room for the Unisaw. He is that kind of guy.

Thanks Keith:thumbup:
 
Last edited:

geologist

Well-known member
Joined
Dec 14, 2011
Messages
5,326
I might have to pick up one of those deburring wheels to practice on some metal. Do they remove much material?
 

bluebolt

Well-known member
Joined
Dec 28, 2008
Messages
5,441
Location
Benton LA
And I suppose you want it to have the guide bar, an extra blade, the "Do's and Don'ts on sawing wood" pamphlet, the "Care and Maintenance of saw blade" pamphlet, the "Operating instructions and parts list for Dunlap 6 1/14" Electric Hand Saw Model Number 626.25720" pamphlet and the "Special Instructions Form No. 8102A" for the 3 conducter cable as well don't you. Where o where will you ever find that! Who on Garage Journal might have recently picked up one of those:dunno:

The pictures pretty much say all Red Leader! Seems to work fine.
 

Attachments

  • SANY1773.jpg
    SANY1773.jpg
    28.3 KB · Views: 68
  • SANY1774.JPG
    SANY1774.JPG
    145.4 KB · Views: 52
  • SANY1775.jpg
    SANY1775.jpg
    29.7 KB · Views: 55
  • SANY1776.jpg
    SANY1776.jpg
    32.1 KB · Views: 49
  • SANY1777.jpg
    SANY1777.jpg
    24.9 KB · Views: 51
  • SANY1778.JPG
    SANY1778.JPG
    140 KB · Views: 54

flybefree

Well-known member
Joined
May 18, 2008
Messages
1,111
Location
Ohio/Kentucky
Vintage Tool Fever spreads...BEWARE!

http://www.garagejournal.com/forum/picture.php?albumid=1275&pictureid=15450
View media item 15450
RL and friends,

Inspired by all the vintage toolery you have been showing I have been looking for a nice vintage drill press for months...not to exceed $50 is the hard part. I went to an auction and the drill press went for $75 so I bought this little grinder instead. I could not help myself, it weighs about 500 pounds and is a 2HP Queen City grinder, made in Ohio back in the day. I will use it to sharpen lawnmower blades and remind me of the industrial might that built this country. Anyhow, I have obviously lot my mind and I wanted to thank you!

Shaun

PS I passed on the 35" MOAK bandsaw...
 
Last edited:

gts340

Well-known member
Joined
Apr 27, 2007
Messages
60
flybefree, that grinder is AWESOME! What a machine! Don't let it get ahold of you, it looks like it could rip your arm off.
 

Wingnut65

Well-known member
Joined
Apr 21, 2010
Messages
3,170
Location
Tampa Bay, FL
Sweet! Congrats Shaun. Looks like the dark side has dragged another one in, hook, line and anchor! Nice that it seems to have all the parts and both shields. A little paint and that will just shine. (OK, I mean a lot of paint...)
 
OP
R

Red Leader

Well-known member
Joined
May 15, 2011
Messages
2,689
Location
Denver, CO
Re: Vintage Tool Fever spreads...BEWARE!

http://www.garagejournal.com/forum/picture.php?albumid=1275&pictureid=15450
View media item 15450
RL and friends,

Inspired by all the vintage toolery you have been showing I have been looking for a nice vintage drill press for months...not to exceed $50 is the hard part. I went to an auction and the drill press went for $75 so I bought this little grinder instead. I could not help myself, it weighs about 500 pounds and is a 2HP Queen City grinder, made in Ohio back in the day. I will use it to sharpen lawnmower blades and remind me of the industrial might that built this country. Anyhow, I have obviously lot my mind and I wanted to thank you!

Shaun

PS I passed on the 35" MOAK bandsaw...

Wow. Very impressive. Are those 10" grinding wheels on there? That is a serious, industrial machine. Is it 3 phase?

Oh, and about the $50 drill press limit...to be honest, that is my own personal limit (in some instances), and by no means a 'norm' or 'standard'. Some guys would pay $300 what I wouldn't pay $25 for. That's what makes this game so interesting. I came across that really nice power bronze Craftsman 100 floor press and for $100 I'm kind of regretting not picking it up. An original motor says a lot and for me definitely justifies a higher price. I wouldn't hesitate to pay $200 for a very fine condition Craftsman floor press if the table had no holes drilled, had either a slow speed pulley or vari-slo speed control, and option table raising mechanism. At the end of the day, it all comes down to what it is worth for you. If you are okay with spending $75 on a press, then by all means don't let my cheapskate limit deter you:D Also, if certain items are harder to find in your area, it may be worth shelling out a little more. And it reality, $75 for a drill press that originally cost $90 in 1950 would be $834 today. Not a bad deal I would say:D

We've had several $50-$75 presses come through C/L in the past so that is what I used to measure things by. If the cheapest drill presses around you are selling for $150, it might mean something else.
 

flybefree

Well-known member
Joined
May 18, 2008
Messages
1,111
Location
Ohio/Kentucky
I am going to keep on looking...if i do find one with a nice table I might pop for more, but it has become a good little quest to see what I can find.

The grinder is three phase, I am going to put in a converter....but the three phase stuff seems easier to find and cheaper too so I might see what other industrial coolness I can find.

Shaun
 
To avoid these ads, REGISTER NOW!
Top Bottom