

You are using an out of date browser. It may not display this or other websites correctly.
You should upgrade or use an alternative browser.
You should upgrade or use an alternative browser.
Show us your compressor plumbing and manifolds
- Thread starter beater74
- Start date
dragginbalz
Well-known member
Is this what you are looking for?


Here's a link to mine, under construction... don't have any of the finished system
http://haloclub.com/gallery/album12?page=3
http://haloclub.com/gallery/album12?page=3
Dan in Pasadena
Well-known member
Ok balz (now, THAT feels weird to say!) That four tube manifold doesn't appear to be hooked up to anything. Is it for cooling the air and getting the water to condense while still not traveling far from the compressor?
I ask cause I have a 60 gal I will be hooking up soon (waiting to get 220v near it) and I've been thinking how to get as much mositure out of the air as I can before running the air to my standing sand blast cabinetwhich will be right next to the compressor. I figured I'd either have to run a giant loop around my garage only to end up right back near the blaster or just use multiple water separators... but that still doesn't entirely address the cooling of the air.
I ask cause I have a 60 gal I will be hooking up soon (waiting to get 220v near it) and I've been thinking how to get as much mositure out of the air as I can before running the air to my standing sand blast cabinetwhich will be right next to the compressor. I figured I'd either have to run a giant loop around my garage only to end up right back near the blaster or just use multiple water separators... but that still doesn't entirely address the cooling of the air.
bigbluerigak
Active member
sberry
Banned


Dan in Pasadena
Well-known member
bigbluerigak - Same question I had for dragginbalz - Is that a condensation manifold mounted on a black 2x4 frame? VERY nice (if a little complex) looking. HOw well does it work?
It looks like you've got a drop of some kind(?) off the regulator but not a ball valve like at the bottoms of your loops and ANOTHER drop with the same device after the reg before going up to the ceiling loop. Is that correct? Any info appreciated.
It looks like you've got a drop of some kind(?) off the regulator but not a ball valve like at the bottoms of your loops and ANOTHER drop with the same device after the reg before going up to the ceiling loop. Is that correct? Any info appreciated.
rwreuter
Well-known member
ok, dumb question here...but what is up with all the vertical copper pipes?
Dan in Pasadena
Well-known member
Condensation manifold....I THINK!
Allows the air to cool and condension to drop to the bottom for collection/drainage.
Allows the air to cool and condension to drop to the bottom for collection/drainage.
bigbluerigak
Active member
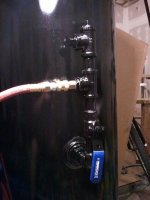
Yep it is connected to the 2x4 black frame. That way all I need to do is disconnect two rubber hoses and I can remove it from the wall. In case of Copper Thieves......
As the Compressor runs it pulls air through the copper and cools them.
As the air passes through it, it cools and moisture drops down. I open the first two traps on the grid and remove water, never had any later on down the run.
It is really humid in Alaska during the summer. I figured I might paint a car one day. Or my Air tools will just last longer.
So it goes like this
Tank > 3/4 Ball Valve > 3/4 Moisture Remover > T > Chicago Disconnect I Think? > Rubber Hose > 40 Feet of 3/4 Copper with 4 ball valves to release moisture > Rubber Hose > 3/4 Ball Valve > T > 150psi in Regulator 90psi out > T > 3/4 copper off to Sand Blaster and 2 Reels.
Each "T" has a small 1/4 ball valve to release moisture.
Last edited:
PCO6
Well-known member
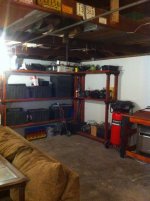
This isn't a very good shot and it was taken while I was putting it together but it gives you an idea of how I mounted mine. The vertical pipie on the left now goes to the ceiling and distributes air throughout my garage.
I plan to add a manifold similar to the ones above behind the compressor and leading to the yellow desicant dryer. I was planning on making it with black pipe. Does any one have any thoughts on whether copper would be any better than pipe for cooling?

I plan to add a manifold similar to the ones above behind the compressor and leading to the yellow desicant dryer. I was planning on making it with black pipe. Does any one have any thoughts on whether copper would be any better than pipe for cooling?
Full Throttle
Well-known member
- Joined
- Nov 8, 2011
- Messages
- 285
This isn't a very good shot and it was taken while I was putting it together but it gives you an idea of how I mounted mine. The vertical pipie on the left now goes to the ceiling and distributes air throughout my garage.
I plan to add a manifold similar to the ones above behind the compressor and leading to the yellow desicant dryer. I was planning on making it with black pipe. Does any one have any thoughts on whether copper would be any better than pipe for cooling?
copper is thinner and conducts energy/temp faster, so yes copper is better for this.
sberry
Banned
I like that setup, real nice, simple. Thats kind of a poster child for home garages and could be easily tapped for additional lines if needed.
Last edited:
Bruce4310TX
Well-known member
bigbluerigek....
The moisture remover (trap) works better further from the compressor like right before your main line. Look at it like a last chance filter, if your removing water at your first 2 traps some is getting thru. if you painted with the current set up you would have water in your paint. the air temperature at the current location hasnt had time to drop so most of the water is still in suspension.
And yes i know this from experience.
Last edited:
Dan in Pasadena
Well-known member
bigbluerigek....
The moisture remover (trap) works better further from the compressor like right before your main line. ... if you painted with the current set up you would have water in your paint. the air temperature at the current location hasnt had time to drop so most of the water is still in suspension.
And yes i know this from experience.
Bruce,
Not to speak for Bigbluerigek but assuming each of those legs on his manifold is 5-6 ft. long, he's got between 50 and 60 feet of cooling before he gets to his regulator/water filter, and THEN it goes to his mai line...assuming his mainline is the one that goes up the wall and runs along the ceiling.
Why WOULDN'T this be enough cooling? How many feet do you think it takes? I ask cause I have a new (to me!) 60 gal I'm gonna install that I'll have to come up with a system for.
Dan in Pasadena
Well-known member
P.S. to Bimmer. Copper pipe comes in different grades or wall thicknesses. There's no issue with bursting of copper pipe in the typical home or small shop installation.
See here for a discussion of copper pipe wall thicknesses:
http://terrylove.com/pipe.htm
And here for a table of actual burst strengths depending on pipe diameter:
http://www.copper.org/applications/plumbing/techref/cth/tables/cth_table5.html
Hope this helps, Dan
See here for a discussion of copper pipe wall thicknesses:
http://terrylove.com/pipe.htm
And here for a table of actual burst strengths depending on pipe diameter:
http://www.copper.org/applications/plumbing/techref/cth/tables/cth_table5.html
Hope this helps, Dan
bigbluerigak
Active member
I 100% agree with you.
Before I do anything painting wise I will be installing a nice 3/4 Frantz filter before the regulator. This will give the air more time and more copper to cool. Thus making the filter more efficient.
I will keep the water filter at the beginning due to the amount of water it traps. The bowl will be half full after a good days worth of running my grinders.
Dan in Pasadena
Well-known member
biblue, do I understand how your system works? And it's TRUE(?) that 50-60 linear feet isn't enough to cool out most of the water? Isn't that a combo reg/separator you have already before your "up & over" mainline?
bigbluerigak
Active member
Coming right off my tank is just a water separator.
Alot like this one but 3/4 inlet and outlet.
http://www.amazon.com/dp/B003CLDT9I/?tag=atomicindus08-20
Now after a days worth of work, body work running air grinders all day, that unit is half full.
Farther down the line, say 30 feet of copper, the next three water traps have a little bit of liquid in them, I just crack the valve and let it out. But past that no water that I can see accumulates.
Just to be sure, before I do any paint work I will put in another water seperator and a smaller micron filter just before the regulator. So that gives it 50 feet of L rated copper to chill.
Now after that I have another 40 feet of copper running to my reels. I have one last valve that I check once and awhile. never had a drop from that one.
Is this the best way, NO, But it looks cool and people who walk into my garage stop and stare...
Last edited:

I found this diagram a while back when I was doing some research... might help.
http://www.tptools.com/StaticText/airline-piping-diagram.pdf
http://www.tptools.com/StaticText/airline-piping-diagram.pdf
Major filter manufacturers recommend 50' of line before filtering out the air to give it the time to cool. Filtering right off the compressor might work if you fill the compressor up and allow the air to cool, then use it, but if using the air straight from the pump it's incredibly hot and won't have enough time to cool.
I think if I were doing a permanent install of a compressor line I would run the line outside and underground to keep the pipes cool instead of hanging a bunch of loops on my wall.
I think if I were doing a permanent install of a compressor line I would run the line outside and underground to keep the pipes cool instead of hanging a bunch of loops on my wall.
Doctor_Ink
Well-known member
Major filter manufacturers recommend 50' of line before filtering out the air to give it the time to cool. Filtering right off the compressor might work if you fill the compressor up and allow the air to cool, then use it, but if using the air straight from the pump it's incredibly hot and won't have enough time to cool.
I think if I were doing a permanent install of a compressor line I would run the line outside and underground to keep the pipes cool instead of hanging a bunch of loops on my wall.
Good idea.
Motofixxer
Well-known member
- Joined
- Oct 10, 2009
- Messages
- 681
I have a drain at the other end of my inwall line that I have yet to install a valve on for draining. But here is the pic of my manifold I threw together. It's all 3/4" from the tank to the inwall pipe right to the T stubbed out where it's reduced to 1/2" then 3/8 for the reel. The stub outs rise from the main line a few inches then the capped line is the lowest end of the main line yet to have a valve installed to drain.
I have amazing pressure and volume at my impact, coupled with my Milton Type V couplers. The lugnuts take about a 1 sec burst and they are literally flying off.
I have amazing pressure and volume at my impact, coupled with my Milton Type V couplers. The lugnuts take about a 1 sec burst and they are literally flying off.
Attachments


Jawn
Well-known member
Somewhere here I saw pics where somebody did a left-right copper zig-zag rather than up-down. The horizontal runs were sloped slightly downstream so that any condensation runs down to the bottom of the whole shebang and only a single drain valve was needed rather than one at the bottom of each loop.
Don't know how much it matters, but it seems like a nice idea.
Don't know how much it matters, but it seems like a nice idea.
R6 Racer
Well-known member

Jawn
Well-known member
Not the exact same pic, but it's the exact same idea!
at some point in the future, i plan to completely remodel my garage. and i always thought about plumbing air lines. but in recent years, i find myself using cordless or corded power tools that seem capable of doing most of the jobs i need done. it makes me wonder if and when i get around to remodel the garage, it might not be as beneficial to have air plumbing as it would perhaps to run some 120VAC and 240VAC outlets all over the place and a wall mounted battery charging station....
GarageEnvy
Well-known member
I'm not questioning the wisdom of these manifolds since I really don't know enough about this......... but has anyone ever installed temperature gauges at the beginning and end to determine how effective these manifolds are? From my uneducated perspective it seems like air would go through there so fast that it would hardly have a chance to cool down.
solar_eclipse2
Well-known member
I'm not questioning the wisdom of these manifolds since I really don't know enough about this......... but has anyone ever installed temperature gauges at the beginning and end to determine how effective these manifolds are? From my uneducated perspective it seems like air would go through there so fast that it would hardly have a chance to cool down.
Yeah air moves something like 200' per second, I posted about this as well. Where you get the majority of the condensation is leaving under higher pressure and coming out at a lower pressure.
One guy did pipe in a radiator type unit with a fan, IIRC inlet temp was 215F and outlet was around 100F. It was very effective. But it was rigged up to take the air from the compressor head and cool it down before it put it in the tank.
I've lately been thinking about making something similar but using an a/c condenser. They are rated for roughly 300 psi IIRC so that shouldn't be an issue.
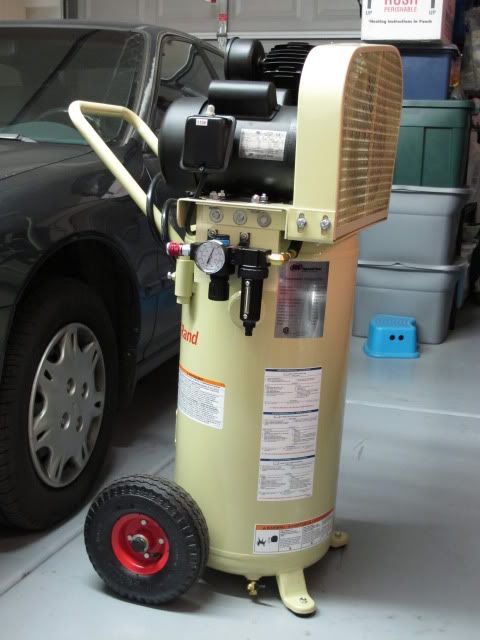
So this is my compressor. It's not a huge oiled two stage deal like you guys have but I'd like to add an oil/water separator and a filter but have no idea how to plumb/mount the stuff.
Can you offer any suggestions?
Black pipe is cheap, has a million adapters at the box store and is easy to work with. Copper is ideal and plastic can usable if properly rated, but for plumbing, go to the plumbing isle. Seriously.
Buy your separator and then walk around lowes with the thing and figure out the black pipe doohickeys you'll need to plumb it. As in most things, the less connections/adapters, bends, etc. the better. Draw it out first.
P.S. to Bimmer. Copper pipe comes in different grades or wall thicknesses. There's no issue with bursting of copper pipe in the typical home or small shop installation.
See here for a discussion of copper pipe wall thicknesses:
http://terrylove.com/pipe.htm
And here for a table of actual burst strengths depending on pipe diameter:
http://www.copper.org/applications/plumbing/techref/cth/tables/cth_table5.html
Hope this helps, Dan
Good stuff, but they've redone their website... here's a new link to table 5:
http://www.copper.org/applications/plumbing/cth/technical-data/tables/cth_table5.html
Note well that the pressures shown in table 5 are 4 to 5 times that allowed by ASME B31. e.g. for 1-inch "L" copper (that's usually the thickest wall you'll find in big box home improvement stores) at 300F (typical air temp coming out of a 2-stage compressor), table 3b shows 825psi maximum internal pressure allowed by the B31 standard, while the burst strength for drawn (the heat used to properly 'sweat' copper with solder shouldn't change its annealing) 1-inch "L" pipe in table 5 is 5115psi.
ah64_ip29
New member
I'm getting ready to install an air compressor in my garage, and so I've been looking through several forums to school myself before I attempt an install. It appears that when cooling manifolds to reduce moisture have been added to the piping systems shown in previous posts, that they have been placed after the air tank and before the rest of the piping system. Wouldn't the most effective location for a cooling manifold for the removal of moisture be between the pump and the tank? Thanks for you thoughts...
AndyA
Well-known member
My compressor has the factory aftercooler. I measure around 300F at the compressor outlet, and maybe 5F above room temp at the aftercooler outlet. The aftercooler is a finned radiator with only about 15 feet of copper pipe. The flywheel provides a crude fan to move air through the aftercooler.
There may also be fins of some sort inside the pipe. I can't tell.
There is also a small intercooler between the compressor stages.
There may also be fins of some sort inside the pipe. I can't tell.
There is also a small intercooler between the compressor stages.
AndyA
Well-known member
Air filter/regulator setup. The unions and valves allow the filter/reg setup to be easily removed if needed. The left side connects to the tank via a 1" hydraulic hose.
With the aftercooler between the compressor and tank, the tank is never more than warm to the touch. So I don't worry about the temperature rating on the hydraulic hose.
Most of the water gets removed via the automatic drain on the tank. I only get water in this trap under very heavy use (sandblasting for more than 30 minutes).
