To avoid these ads, REGISTER NOW!

Above 1200 Sq/FT The ASYLUM - Happy 40th Birthday to Me! (Est. 2005)

Wokspaces above 1200 squarefeet.
OP
S

shopnut

Well-known member
Joined
Feb 22, 2006
Messages
4,237
Location
Florida
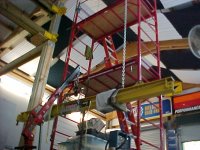
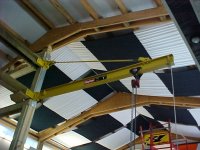
THE CRANE IS READY TO HANG …

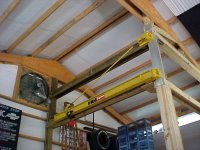
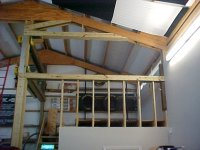
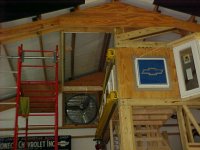
The angle reinforcement and brackets are up there. Next weekend there should be nothing stopping me from installing the crane. The big question at this point is whether my mounts are plum. If I’m lucky, the crane will be level through its entire 180 degree sweep and I’m done. If not, there will be some shimming to do and that involves unbolting some stuff.

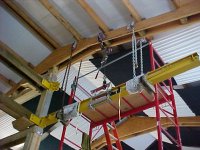
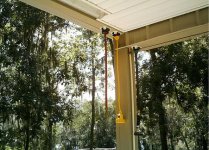
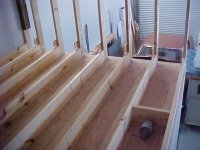
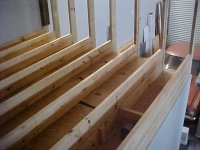
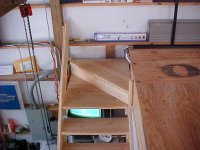
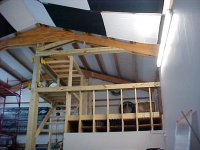
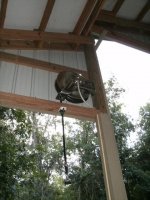
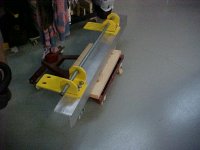
One picture shows the sub-assembly of the brackets and aluminum angle. I used a pipe to keep everything aligned during the drilling process. I then only had to make sure the angle was plum once mounted.

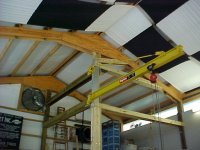
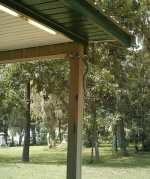
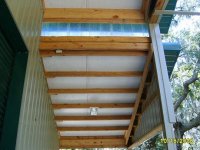
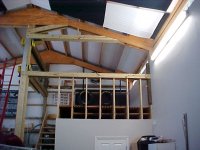
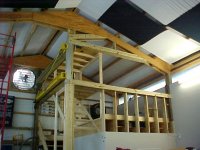
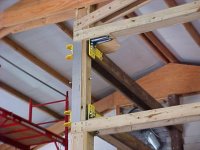
The other picture shows the overall finished product. The blue brackets help transfer the load into the box beams. The plywood corner gussets are just “place holders” until the upstairs office is framed in. They’ll get replaced with larger sheets forming the deck of some storage cabinets (accessible from upstairs).

I have the crane hanging process all figured out and I will try to get some pictures along the way…
 

Attachments

  • Crane42.JPG
    Crane42.JPG
    54.3 KB · Views: 1,038
  • Crane43.JPG
    Crane43.JPG
    55.7 KB · Views: 1,228
Last edited:
To avoid these ads, REGISTER NOW!
OP
S

shopnut

Well-known member
Joined
Feb 22, 2006
Messages
4,237
Location
Florida
THE CRANE IS INSTALLED…

The whole install job went as planned. It took about 4 hour by myself being extra cautious. Then another 2 hours for final leveling and trolley/chain hoist mounting. I’ve attached some “in-process” photos as well as the finished product.

HOW I DID IT…
I was lucky enough to have a main rafter directly above to attach my hand winch to. I used chains on either side as a safety (would hate to see the crater a steel I-beam would create in my concrete from 13 feet). My hand winch only has about 10 feet of cable on it so I first lifted it with my engine hoist as high as possible and then did the hand-off. As it was winched up, I keep taking the slack out of the chains. The crane itself, weighs about 250 lbs.

SOME ADJUSTMENTS…
Once up, the tension rod needed a little bit of adjustment and unfortunately that required pulling the clevis pin at the outer end and screwing the clevis further on or off the rod. No big deal but RH and LH threads would have made it a bit easier.

THEN A QUICK TEST…
No guts, no glory right? I used the heaviest thing I could wheel over to the crane sweep area, a dressed out 454 BBC and hung it on the very outer end of the crane beam. I didn’t weight it but I think it is around 500 to 600 pounds. I swung it the full 180 degrees (hovering inches off the floor, of course) and all seemed fine. Deflection was minimal (I’m guessing about .25”) and next weekend I will do a complete test and get some real measurements. I don’t really intend to lift anything over 1000 lbs, and in those rare instances, it will most likely be in the middle of the crane (where it puts much less stress on the structure) to hoist things into the truck or trailer.

THE FINAL COST…
The 1Ton 10’ span crane was just under $700 from Grainger with my company discount. Posts and lumber were probably around $300 but I have some left over. Fasteners, including a box full of 5/8 dia x 12” long GR5 screws, hundreds of lag bolts, and threaded rod ran about $150. Safety cable, fittings, and eye bolts totaled roughly $100, but again, I have plenty of that left over. Then there’s the special-ordered angle at $100. And it wouldn’t be complete without a trolley for $30 and a chain hoist at another $30. The Grand Total was $1410, about twice the cost of the crane by itself. Ebay helped keep the cost of the small stuff down quite a bit, however.
 

Attachments

  • 49-Crane.JPG
    49-Crane.JPG
    58.9 KB · Views: 1,280
  • 48-Crane.JPG
    48-Crane.JPG
    63.1 KB · Views: 1,088
  • 47-Crane.JPG
    47-Crane.JPG
    75.4 KB · Views: 1,748
  • 45-Crane.JPG
    45-Crane.JPG
    74.1 KB · Views: 1,107
  • 44-Crane.JPG
    44-Crane.JPG
    65.4 KB · Views: 1,259
Last edited:

OldCarGuy

Well-known member
Joined
Nov 29, 2005
Messages
1,983
Location
Ohio
Nice installations! It’s amazing what a single person can accomplish with some imagination, ingenuity and determination. I’m sure you’ll find the crane useful for years to come. :beer:
 
OP
S

shopnut

Well-known member
Joined
Feb 22, 2006
Messages
4,237
Location
Florida
MY SOLUTION TO LUMBER STORAGE – ANOTHER LOFT…

I just realized I never posted pictures of my wood storage loft and thought I might share. I, like some of you folks, end up with misc. lumber from various jobs, and sometimes buy lumber early for a job that I’m getting ready to do. I wanted to have a place to neatly store this material away until it is needed. My main goals were to have the stuff out of the weather, not be in the way while stored, and be readily accessible. This storage loft ended up working great for me. Since the opening is also under roof, I can access materials while it’s raining and not get wet.

THE BASIC LOFT…
One picture shows basically what it looked like before I started, even though it is the opposite side of the roof overhang. The exposed roof purlins were a bit unsightly so I wanted to do something to cover them up. I decided to create a loft to not only store materials but also to finish off the looks of this part of the barn. I framed in a platform between existing walls and then added the doors. I have a pile of siding metal (purchased during barn construction) so it matches the existing siding. I built this loft a bit lower than the ones inside (8’ vs. 10’ high) since the first floor ceiling height is not an issue here and it also gives me the ability to store 12’ long boards rather than 10’ in the higher ones (roof angle affects this). Another picture shows the crude storage rack inside for lumber before I stacked it full. The same white vinyl soffit material used inside the shop was used here to finish the ceiling. I have found the spiders don’t like the vinyl material inside the shop and so far they have been avoiding building webs on this outside surface as well. Definitely a bonus!

AND A FEW EXTRA FEATURES, OF COURSE…
I decided to hide reels in the loft for power, air, and water since I frequently need these outside in this area. The outside air hose comes in handy for inflating tires and blowing off the lawn tractor. Since I had a water line up there, I also plumbed in an outdoor shower will pull-chain valve at the other post. It’s great for those hot dusty days when you need to rinse/cool off. A special cleat allows the water to keep flowing without holding the rope. I also built in four waterproof fluorescent fixtures into the vinyl ceiling (a steal on ebay for $7 each). The loft doors have locking struts (with push-button releases) to hold them open.

FUTURE PLANS…
I would like to build a matching loft on the other side of the building but we’re still trying to decide if we’re going to extend the roof to create a large screened-in patio off the apartment. I have PLENTY of other things to keep me occupied while we’re making up our minds.

Sometime, I will also finish off the tall center section of roof overhang. This will include a storage loft that is accessible from inside the shop via doors above the tall rollup doors and store light-weight bulky items such as body panels. That will be quite a project because of the height involved!
 

Attachments

  • 55-Loft.JPG
    55-Loft.JPG
    57.1 KB · Views: 749
  • 54-Loft.JPG
    54-Loft.JPG
    70.9 KB · Views: 861
  • 53-Loft.JPG
    53-Loft.JPG
    56.9 KB · Views: 827
  • 52-Loft.JPG
    52-Loft.JPG
    71.1 KB · Views: 1,525
  • 51-Loft.JPG
    51-Loft.JPG
    75.8 KB · Views: 758
  • 50-Loft.JPG
    50-Loft.JPG
    77.6 KB · Views: 1,505
Last edited:

cdrewferd

Well-known member
Joined
Apr 5, 2006
Messages
402
Location
Westminster, CO
Very nice. Great touch with all the things you plumbed outside. I'm sure it's nice not having to go into the shop to grab the air hose, or an extension cord.
 
OP
S

shopnut

Well-known member
Joined
Feb 22, 2006
Messages
4,237
Location
Florida
I HAVE STARTED THE BETWEEN-FLOOR STORAGE BINS…

Now that the framework is in for the crane, I am nearly ready to start the second floor office. As mentioned earlier, I intend to raise the second level floor a bit higher so that some long storage bins can be installed between floors. These will be accessible for the shop and store long pipe, lumber, whatever. I’m adding two layers of 2x8’s on 16” centers, each covered with plywood. One picture shows the first layer of 2x8’s fastened in place. Another photo shows the first layer of plywood laid down. A third picture shows an overall view from downstairs looking into the storage bins.

ADDITIONAL SMALL RELATED PROJECTS…

I installed the outside wall damper outlets, but I need to finish the rest of the ductwork for a bathroom exhaust fan and dryer duct. There is an electrical junction box at the very back lower corner of the office space (feeding the apartment circuits) that I want accessible when the office is finished. There will be a lift-out floor panel gaining assess to it. I’m also planning for a “passageway” from either side of the office for routing additional electrical/air lines.

FUTURE PLANS…

A second layer of 2x8’s will lie on top of the plywood shown. This will bring my second story floor level up to the correct height to see perfectly out the existing clerestory windows. To bring the stairs up to the correct height, I will need to add one more tread, at a 45 degree angle to make the turn at the top of the stairs. Soon, I will order the bay window that will look out over the shop. It will be located in between the two larger horizontal beams shown in the overall picture. Then, of course, there is lots of wall framing to do which may end up waiting until the weather cools off in fall.
 

Attachments

  • 58-Office.JPG
    58-Office.JPG
    56.6 KB · Views: 705
  • 57-Office.JPG
    57-Office.JPG
    46.6 KB · Views: 663
  • 56-Office.JPG
    56-Office.JPG
    56.9 KB · Views: 640
Last edited:
OP
S

shopnut

Well-known member
Joined
Feb 22, 2006
Messages
4,237
Location
Florida
THE SECOND LAYER OF THE BETWEEN-FLOOR STORAGE BINS IS COMPLETE…

Even with the heat, I managed to get the next (and last) row of 2x8s laid down and sheathing floorboards fastened down. The floor height is now just right to see the lake out of the clerestory windows. The overall picture from below shows an end view of the bins. The cutout in the back corner shown in another picture is for access to an electrical junction box. The addition of this storage bin raised the floor height 15” above the existing plateau of the stairs, but with my stair tread rise being 8.5”, it works out perfectly and one 45 degree step should do it. Now that the bins are done, I can fill them up - nothing in there will get in the way of the rest of the office build.
 

Attachments

  • 59-Office.JPG
    59-Office.JPG
    61 KB · Views: 555
  • 60-Office.JPG
    60-Office.JPG
    57.4 KB · Views: 566
  • 61-Office.JPG
    61-Office.JPG
    56 KB · Views: 536
  • 62-Office.JPG
    62-Office.JPG
    53.2 KB · Views: 575
Last edited:
OP
S

shopnut

Well-known member
Joined
Feb 22, 2006
Messages
4,237
Location
Florida
That is an excellent idea! :thumbup:

Wish I had someplace in my shop that I could do something similar...

Thanks - I just got sick of seeing all the misc pipe and lumber leaning in the corner or slid underneath the cars. The other similar spots I have built have proven to be very useful for my packrat nature!

Look around - there's always spots to stash odds and ends. For small parts, I have my eye on that otherwise wasted triangular space underneath each stairs tread. I think it will be perfect for small tilt-out storage bins.
 
Last edited:
OP
S

shopnut

Well-known member
Joined
Feb 22, 2006
Messages
4,237
Location
Florida
MORE WORK ON THE STAIRS…

Since I raised the second story floor up 17” with the storage bins, I needed two more steps in the stairs. The picture shows what I came up with. I was never a big fan of circular stairs but sometimes it’s the only thing that fits. In this case, just one 45 degree tread isn’t bad at all for functionality. I struggled with the framing a bit because there was an electrical conduit right where my structure needed to be, but I worked around it. My goal is to have most fasteners hidden after it’s all trimmed out yet still have removable panels to gain full access to the ductwork and other things underneath the floor. The dryer duct that can barely be seen in the picture will be covered with one of the access panels.
 

Attachments

  • 63-Stairs.JPG
    63-Stairs.JPG
    61.8 KB · Views: 656
Last edited:
OP
S

shopnut

Well-known member
Joined
Feb 22, 2006
Messages
4,237
Location
Florida
THE FRAMING CONTINUES ON THE OFFICE…

It was a costly week. I ordered the casements and sliders that will become the bay window ($500), purchased the door that will be at the top of the stairs ($260), and a load of lumber for framing. A prefab bay window in the size I needed was going to be about $1500 so I will be creating my own. Since it doesn’t have to be completely weatherproof, I figured I would save the $1000 and do it myself. So I splurged and paid a little extra to get a door with mini-blinds sandwiched between the glass panes. This has proven its worth in other locations already.

The overall picture shows the progress. The rough door framing is complete. The wall separating the office from the stairwell is started. The storage decking is installed but needs more framing for support. These decks will be finished off and be accessible from the office. The top one would actually make a good sleeping loft. The stairway will have an angled ceiling so that I can use the triangular space directly above the stairs for more hose/cord reels and some other things. The office ceiling will be about 7’ high on the low side and 10’ at the other so it shouldn’t seem to cramped. If you look closely, you can see I started to store things in the between-floor bins.

AND NEXT…

More framing, of course. The bay window parts will be arriving this week so I will have plenty to do. The clerestory windows, which are now translucent fiberglass panels will be replaced with an 18” high by 11’ long row of glass windows. I also need to order the 2 more windows that will be placed in the wall directly behind the crane storage area. These will allow a bit more light to enter the stairway and office.
 

Attachments

  • 64-Office.JPG
    64-Office.JPG
    63.7 KB · Views: 528
  • 65-Door.JPG
    65-Door.JPG
    64.6 KB · Views: 525
Last edited:
OP
S

shopnut

Well-known member
Joined
Feb 22, 2006
Messages
4,237
Location
Florida
IT WAS FINALLY TIME TO DO SOME YARDWORK...

With the summer rains, the grass (well, mostly weeds) are growing quickly. I have been spending too much time working on the office inside and I realized things were getting out of hand outside. With the groundskeeping all done, I snapped a few shots.

The picture with the trailer to the left of the shop is from the vantage point of the future retirement home located down closer to the lakeshore.

You can see the lake in the picture taken from the porch, although the trees do a pretty good job of blocking the view this time of year.
 

Attachments

  • 66-Full.JPG
    66-Full.JPG
    72.4 KB · Views: 1,002
  • 67-Full.JPG
    67-Full.JPG
    71.1 KB · Views: 1,339
  • 68-Porch.JPG
    68-Porch.JPG
    71 KB · Views: 1,085
Last edited:
OP
S

shopnut

Well-known member
Joined
Feb 22, 2006
Messages
4,237
Location
Florida
IT’S HARD TO TELL I SPENT A FULL DAY ON THIS BUT…

If you look closely, you can see the new framing for the stairway ceiling and supporting the storage decks. I’m certainly getting my exercise running up and down the stairs! Windows are coming soon...
 

Attachments

  • 70-Office.JPG
    70-Office.JPG
    60.3 KB · Views: 522
  • 69-Office.JPG
    69-Office.JPG
    62.7 KB · Views: 574
Last edited:

birdman1

Well-known member
Joined
Jul 10, 2008
Messages
74
Location
Erwin, N C
Great pics of the shop/home. I don't know that I would get any work done,I'd go to the door and MAN,look at that lake. What sort of arangment do you consider when laying out car lifts, ceiling heights and a roll up door? Because you can't get the door up if the car is in the air, right?
Green with envy
Mike
 
OP
S

shopnut

Well-known member
Joined
Feb 22, 2006
Messages
4,237
Location
Florida
Great pics of the shop/home. I don't know that I would get any work done,I'd go to the door and MAN,look at that lake. What sort of arangment do you consider when laying out car lifts, ceiling heights and a roll up door? Because you can't get the door up if the car is in the air, right?
Green with envy
Mike

Thanks Mike. The attached picture shows my general plan for the two lifts I want to install. The lifts are in blue and represent Bendpak HD-9XW units, which are a 4-post type. I'm still debating whether I should move one lift under the sweep of the jib crane. The one on the left is in the side bay where the the storage lofts brought the ceiling height down to 10' except in the middle where the roof of the vehicle will be. There, it slopes up to the main bay and affords about 12' where the car roof will be. The lift on the right is in the main bay where there is 20' of ceiling height so there's no concern there.

I recommend you go to the website of the lift you have in mind and get the floor plan. Pay attention to where the lift pillars, and power unit will be and make sure you have clearance to work around the car. If you are tall, pick out one that lifts a bit higher. I believe "normal" overhead doors can be modified to add an extra track section upward, thus giving extra height over the car. I went with the rollups because they where compact and only stick out from the wall about 18". And it will be easy to "hide" their rollup drums at some point in time. I included a picture of the drums of the 12' high doors taken during construction of the shop.
 

Attachments

  • 71-Plan.JPG
    71-Plan.JPG
    32.1 KB · Views: 489
  • 72-DOORS.JPG
    72-DOORS.JPG
    53.2 KB · Views: 500
Last edited:

birdman1

Well-known member
Joined
Jul 10, 2008
Messages
74
Location
Erwin, N C
Thanks for the pics of the doors. We (Lowe's) installed roll up doors at a horse barn and I like the looks of them. I'll have to look at a friends set up, he hauled and installed his own lift but it was winter when I was there and was more interested in his old Mopars and did not notice how he mastered the door and lift combo. Thanks for your help.
Mike
 
OP
S

shopnut

Well-known member
Joined
Feb 22, 2006
Messages
4,237
Location
Florida
Thanks for the pics of the doors. We (Lowe's) installed roll up doors at a horse barn and I like the looks of them. I'll have to look at a friends set up, he hauled and installed his own lift but it was winter when I was there and was more interested in his old Mopars and did not notice how he mastered the door and lift combo. Thanks for your help.
Mike

There's a link in Reply #76 that that will take you to the website of the manufacturer of my doors. There's many colors and options. I don't regret asking for the rollups and paying extra money - won't have it any other way now.
 
To avoid these ads, REGISTER NOW!
OP
S

shopnut

Well-known member
Joined
Feb 22, 2006
Messages
4,237
Location
Florida
THE BAY WINDOW IS INSTALLED…

Never doing something like this, it took me a while to rough in the framing. I mounted 3/4” plywood to the crane support beams to form the sill and ceiling of the window nook with the proper 45 degree profile. Then I framed around them and added vertical supports to keep it from sagging. The side windows are casement style while the middle one is a horizontal slider. I don’t know why there is such a big difference in the width of the vinyl perimeter around the glass but I guess I’ll get used to it.

I intend the sill of the window to become a small workbench. If you look closely at the picture standing inside the room, you will notice that the angled supports will actually become the interior wall and form a recess in the wall beneath the window for my legs while I’m sitting at the workbench.

I starting working on the little “roof” above the window but ran out of time. I’m not sure what I will use yet for roofing material – maybe checkered flag material or corrugated aluminum. Any suggestions? Remember – it doesn’t need to shed water!
 

Attachments

  • 74-office.JPG
    74-office.JPG
    72.2 KB · Views: 765
  • 73-Office.JPG
    73-Office.JPG
    58.4 KB · Views: 785
Last edited:
OP
S

shopnut

Well-known member
Joined
Feb 22, 2006
Messages
4,237
Location
Florida
Any Updates? Look forward to seeing the progress and ideas in motion.

PS. Spectacular shop, one of the best!

Thanks Arcticf7ext - I hope these posts are helping some of you. I'm actually surprised to hear there's someone out there waiting for my next move - the pressure is on:willy_nil

The summer heat has slowed me down some but I made good progress last weekend and will share after I download the pictures.
 

markzrt1

Well-known member
Joined
Oct 6, 2007
Messages
522
Location
MN
[QUOTE
I starting working on the little “roof” above the window but ran out of time. I’m not sure what I will use yet for roofing material – maybe checkered flag material or corrugated aluminum. Any suggestions? Remember – it doesn’t need to shed water![/QUOTE]


How about aluminum soffit. I think they come in 12 foot sections. I think that would be sweet.
 
OP
S

shopnut

Well-known member
Joined
Feb 22, 2006
Messages
4,237
Location
Florida
THE OFFICE SIDE WINDOWS ARE INSTALLED…

Two more windows were framed in and installed this weekend. Even though they are on the same “external” wall, one will provide light into the stairway while the other into the storage nook in the office. A side benefit of these windows will be access to the crane for servicing (I don’t intend to have the scaffold set up in there forever!). Out of one window I can lube the main pivots and check/tighten hardware if needed. The other window allows access to the crane trolley/hoist, adjustment to the tension rod, and I can also reach the exhaust fan on the wall if needed.

The overall picture shows the crane in the storage position. Though the crane tension rod crosses in front of the windows, I don’t find it objectionable. I also spent some time on the bay window roof. I had planned on a 4/12 pitch on this little roof, but standing at ground level, you can't even see it and it looks like something is missing. I think I will bump up the slope a bit to make it visible. I haven’t put the sheathing on it yet, so there is really not much extra work involved changing the pitch.
 

Attachments

  • 75-Office.JPG
    75-Office.JPG
    59.9 KB · Views: 551
  • 76-Office.JPG
    76-Office.JPG
    61 KB · Views: 563
Last edited:
OP
S

shopnut

Well-known member
Joined
Feb 22, 2006
Messages
4,237
Location
Florida
ONE MORE HOSE REEL…

Another one for outdoor water. I can't get enough of these - they are so handy. I’ve had this thing sitting around for awhile and decided it was time to start making use of it. It’s a Reelcraft stainless steel version so it should last forever (or at least until the seals wear out). Plumbing it was fairly straight-forward since there was a water spigot already mounted at the bottom of the 6x6 post. Now that spigot will be used as a drain valve when there’s a threat of freezing (yes, it does happen here sometimes). This one will mainly get used to wash the dogs off after romping in the lake. Eventually, it will be enclosed in a loft like that in reply #85, but for now I can admire that buffed stainless.
 

Attachments

  • 77c-Hose-Reel-04.JPG
    77c-Hose-Reel-04.JPG
    94.5 KB · Views: 246
  • 77a-Hose-Reel-01.JPG
    77a-Hose-Reel-01.JPG
    113.7 KB · Views: 250
  • 77b-Hose-Reel-03.JPG
    77b-Hose-Reel-03.JPG
    94.5 KB · Views: 263
Last edited:

Quiksilver

Well-known member
Joined
Jun 22, 2006
Messages
333
Location
Loveland, OH
Shopnut,

I have really enjoyed following this thread. I really like all of the hidden features (lots of hose reels), The ceiling flag is awesome also, thank you for all the great ideas, and detailed pictures.
 
OP
S

shopnut

Well-known member
Joined
Feb 22, 2006
Messages
4,237
Location
Florida
I starting working on the little “roof” above the window but ran out of time. I’m not sure what I will use yet for roofing material – maybe checkered flag material or corrugated aluminum. Any suggestions? Remember – it doesn’t need to shed water!


How about aluminum soffit. I think they come in 12 foot sections. I think that would be sweet.

Thanks for your input, markzrt1
 
OP
S

shopnut

Well-known member
Joined
Feb 22, 2006
Messages
4,237
Location
Florida
Shopnut,

I have really enjoyed following this thread. I really like all of the hidden features (lots of hose reels), The ceiling flag is awesome also, thank you for all the great ideas, and detailed pictures.

Thanks Quiksilver. I'm glad there are folks out there getting some benefit. I'm sure you'll enjoy the future additions I have planned for this place!
 
OP
S

shopnut

Well-known member
Joined
Feb 22, 2006
Messages
4,237
Location
Florida
SORRY TO ALL YOU FORD AND MOPAR GUYS …

I started attaching the sheathing on the outer walls of the office but got a little side-tracked. I decided to spruce things up a bit by flanking the bay window with some Chevy Bowtie signs that have been sitting around a while (thanks again Dad for the generous contribution!). I think the blue goes very well with the yellow cabinets and will match the color I selected for the floor jacks, jack stands and various other things.

I backlit the signs with coiled-up rope light as the detailed photo shows. This makes for an even distribution of light behind the sign and shouldn’t really require any maintenance (bulb changing). If doing this, make sure you get the type that remains lit even when one of the many bulbs is burned out. The white trim around the perimeter of the signs is “J” trim that will later hold the white vinyl wall siding like the rest of the shop interior. It was much easier to build these up on the floor than standing on the scaffold.

78-Office.JPG 79-Office.JPG 79a-bowties.JPG
 
Last edited:
OP
S

shopnut

Well-known member
Joined
Feb 22, 2006
Messages
4,237
Location
Florida
STILL MORE STORAGE…

In the picture, you can see the light colored framing above the exhaust fan. This will be the floor of another storage shelf accessible from the upstairs office. I hope to hide and quiet down the exhaust fan with some ductwork, and this ductwork will hang directly below this new storage shelf. The duct will extend to the next main rafter (about 12’ out), where an intake grill will be installed above the crane mounts.
 

Attachments

  • 80-Office.JPG
    80-Office.JPG
    58.7 KB · Views: 538
Last edited:

mike's48

Well-known member
Joined
Oct 12, 2008
Messages
52
Location
Evington,VA
I noticed your exaust fan, I plan to install one just like it . Did you use the shutter that is suppose to lay flat like the ceiling or what did you use? Thanx,
Mike
 
OP
S

shopnut

Well-known member
Joined
Feb 22, 2006
Messages
4,237
Location
Florida
I noticed your exaust fan, I plan to install one just like it . Did you use the shutter that is suppose to lay flat like the ceiling or what did you use? Thanx,
Mike

The shutter closes flat when the fan isn't blowing. Gravity keeps it shut. BTW, the fan is 36" diameter model with thermostatic control. It's a single speed and I would rather it be variable. It does move a lot of air though.
 

mike's48

Well-known member
Joined
Oct 12, 2008
Messages
52
Location
Evington,VA
My fan has a thermostat also but I was gonna try a ceiling fan speed controll and c if that would work and not heat the motor up and keep some of the noise down.
BTW,
Would you have any more of those "BOWTIES"that you would part with for cash or trade? I would be happy with just 1,
I have 2 skylites (VELUX)I decided not to install in my garage and would love to trade or sell them if you could use them or know of someone who could.the sizes are 21"x24" (still in box) and one is 21"x27"Thanx,

I like "BOWTIES" too
Mike
 
Last edited:
OP
S

shopnut

Well-known member
Joined
Feb 22, 2006
Messages
4,237
Location
Florida
My fan has a thermostat also but I was gonna try a ceiling fan speed controll and c if that would work and not heat the motor up and keep some of the noise down.
BTW,
Would you have any more of those "BOWTIES"that you would part with for cash or trade? I would be happy with just 1,
I have 2 skylites (VELUX)I decided not to install in my garage and would love to trade or sell them if you could use them or know of someone who could.the sizes are 21"x24" (still in box) and one is 21"x27"Thanx,

I like "BOWTIES" too
Mike

Let me know how the fan speed controller works out.
I'm sorry - I only had these two Bowtie signs and was saving them for a special spot. I can't wait to get the white siding up to really make the blue stand out.
 
To avoid these ads, REGISTER NOW!
Top Bottom