
You are using an out of date browser. It may not display this or other websites correctly.
You should upgrade or use an alternative browser.
You should upgrade or use an alternative browser.
Virginia Retirement Garage/Shop Build
- Thread starter John in OH
- Start date
Mmfh
MEMBER EMERITUS
Nice looking shop! If the inside is going to look anywhere near as nice as the outside, awesome. I'm keeping an eye on your project now to see what you do inside.
Mm
Mm
OP
John in OH
Well-known member
Looks good! Are you planning to install a lift? When is the rest of the insulation going in?
Thanks, Mr. Welsh. I don't currently plan to install a lift since they aren't too useful for antique tractor work; however, the 12' ceilings will allow for a lift installation if my hobby objectives change.
The wall insulation will be done on a piece-meal basis depending on what I decide to install on a given wall section and as finances allow. Same will go for the drywall work ... money and work objectives will drive the process. The priority insulation and drywall areas will be inside of the compressor enclosure under the stairs so I can get the compressor set up and in service.
OP
John in OH
Well-known member
For the ceiling I considered drywall, but for many reasons ... quick, one-step & it's done, no sanding, no painting, ... no muss, no fuss, I decided to go with steel panels. Plus, I like the clean, sharp appearance of the steel.
I installed regular faced insulation in the ceiling as you can see in some of the photos. Don't know if the vapor barrier is required or not, but using the staple flanges on the insulation bats makes the installation easier.

The contractor that built the garage come back and do the ceiling installation. It took 3 guys two days to install the 10'-6" long J-channels and the 44, 14' x 3' steel panels. They pre-drilled all the panels before lifting them up ... these panels are not light and are awkward to handle. They must be aligned much more carefully than installing drywall panels.
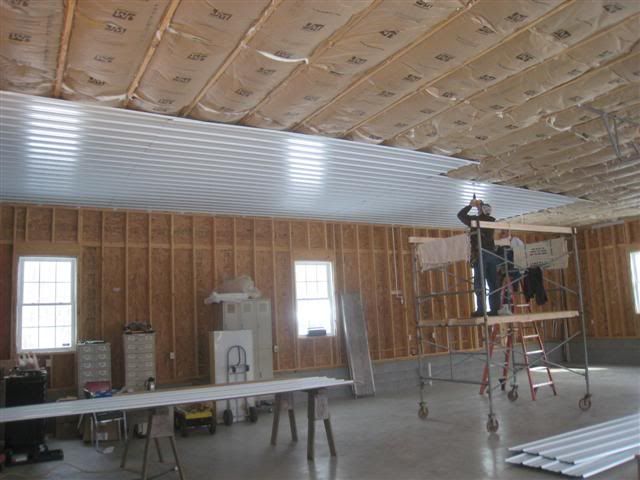

I had the J-channel set out from the wall 1/2 in. to allow future drywall on the walls to slip up behind the vertical leg of the J-channel to ease future finishing of the top edge of the drywall.

Things to be aware of if you are considering a steel ceiling ... check with your local inspector before selecting steel vs. drywall for the ceiling. The steel has a Class A fire spread rating, BUT it does not have a fire retardant rating. There may be concerns if you want to finish a room on second floor of your garage for habitation. Also, the electrical work for all of the ceiling mounted fixtures is a little more difficult (you want to avoid the big ridges on the panels) and you have to be careful of the sharp metal edges cutting the wiring so cutting and trimming holes for boxes takes time.

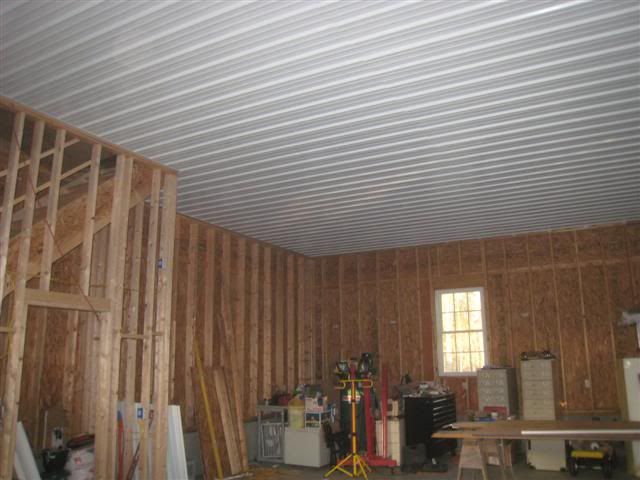


So far, I'm very pleased with the results!
This garage is getting close to being usable! Lights and ceiling fans are next.
I installed regular faced insulation in the ceiling as you can see in some of the photos. Don't know if the vapor barrier is required or not, but using the staple flanges on the insulation bats makes the installation easier.
The contractor that built the garage come back and do the ceiling installation. It took 3 guys two days to install the 10'-6" long J-channels and the 44, 14' x 3' steel panels. They pre-drilled all the panels before lifting them up ... these panels are not light and are awkward to handle. They must be aligned much more carefully than installing drywall panels.
I had the J-channel set out from the wall 1/2 in. to allow future drywall on the walls to slip up behind the vertical leg of the J-channel to ease future finishing of the top edge of the drywall.
Things to be aware of if you are considering a steel ceiling ... check with your local inspector before selecting steel vs. drywall for the ceiling. The steel has a Class A fire spread rating, BUT it does not have a fire retardant rating. There may be concerns if you want to finish a room on second floor of your garage for habitation. Also, the electrical work for all of the ceiling mounted fixtures is a little more difficult (you want to avoid the big ridges on the panels) and you have to be careful of the sharp metal edges cutting the wiring so cutting and trimming holes for boxes takes time.
So far, I'm very pleased with the results!
This garage is getting close to being usable! Lights and ceiling fans are next.
RaysnCayne
Well-known member
Lookin' good John!
Thanks for the LVL info. Though by the time I saw that info, I'd already had mine in place. Went with 18" versions with 6 cripples on each end. Think that's way overkill for my application, but oh well, gotta make the inspector happy.
I'm mostly done now. Got the final back in December. I'm painting walls and hanging cabinets at this point. We'll have to meet up some time this summer and compare notes. Or mostly let me drool over your garage.
-Zach
Thanks for the LVL info. Though by the time I saw that info, I'd already had mine in place. Went with 18" versions with 6 cripples on each end. Think that's way overkill for my application, but oh well, gotta make the inspector happy.
I'm mostly done now. Got the final back in December. I'm painting walls and hanging cabinets at this point. We'll have to meet up some time this summer and compare notes. Or mostly let me drool over your garage.
-Zach
OP
John in OH
Well-known member
Lookin' good John!
Thanks for the LVL info. Though by the time I saw that info, I'd already had mine in place. Went with 18" versions with 6 cripples on each end. Think that's way overkill for my application, but oh well, gotta make the inspector happy.
Yeah, sometimes keeping the inspectors happy ends up costing us a lot of unnecessary money.
I'm mostly done now. Got the final back in December. I'm painting walls and hanging cabinets at this point. We'll have to meet up some time this summer and compare notes. Or mostly let me drool over your garage.
-Zach
Sure, sometime when you're planning to be in the Aylett area let's get together. So, do you have a build thread for your garage?? If not, it's never too late to start! Or, at least, post a few photos of the work to-date.
71GT-37
New member
Not actually in Richmond either. Live about 30 mi NE of Richmond near Aylett in King William County. Pretty much a rural area.
Where in Ohio? I'm from the Portsmouth area...
OP
John in OH
Well-known member
Where in Ohio? I'm from the Portsmouth area...
Near Cadiz in Harrison County. About 25 miles west of Steubenville, OH.
71GT-37
New member
I've been up in that area only a few times; some of my relatives came from Woodsfield in the early 1900s. I lived in Athens for 10 years and Marietta is about as far north I would go occasionally. I like SE Ohio the best, in general it has land features and things to do outside when not raining and snowing.
RaysnCayne
Well-known member
Sure, sometime when you're planning to be in the Aylett area let's get together.
Aylett. The Old Red Store! ; )
So, do you have a build thread for your garage?
Not yet. I've taken a bunch of photos of the build. But since it's nothing real special, I'm waiting til I'm mostly done before I post a thread about it. I hate to keep folks waiting. ; )
OP
John in OH
Well-known member
My older son came down for the weekend and gave me a hand getting the ceiling lights installed. Wires were partially run before the ceiling was installed so it wasn’t too tough a job to get the final wires pulled and the lights hung.
All the ceiling overhead lights are now complete ... 12, eight-foot fixtures, with 4, four-foot T8 bulbs per fixture. Very pleased with the general level of lighting. The fixtures are grouped from four separate switches so I can selectively choose what banks of lights to turn on for any given task.

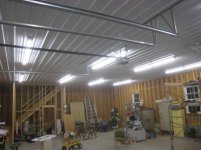


Will probably add several ceiling outlets in selected areas for plugging in task lights ... over workbench, table saw and welding table, etc.
Next … finalize miscellaneous wiring details and get final inspection. Then get the compressor set up!
All the ceiling overhead lights are now complete ... 12, eight-foot fixtures, with 4, four-foot T8 bulbs per fixture. Very pleased with the general level of lighting. The fixtures are grouped from four separate switches so I can selectively choose what banks of lights to turn on for any given task.
Will probably add several ceiling outlets in selected areas for plugging in task lights ... over workbench, table saw and welding table, etc.
Next … finalize miscellaneous wiring details and get final inspection. Then get the compressor set up!
Hey John,
Lookin good! How did you group the lights/switches? I'm putting up the same kind ( a bunch) and am trying to determine what makes the most sense - one bay at a time, left side vs right side of the car or front/rear. I don't want to go overboard on individual control, although that seems to be my tendency! (LOL)
Thanks,
Tom
Lookin good! How did you group the lights/switches? I'm putting up the same kind ( a bunch) and am trying to determine what makes the most sense - one bay at a time, left side vs right side of the car or front/rear. I don't want to go overboard on individual control, although that seems to be my tendency! (LOL)
Thanks,
Tom
OP
John in OH
Well-known member
Hey John,
Lookin good! How did you group the lights/switches? I'm putting up the same kind ( a bunch) and am trying to determine what makes the most sense - one bay at a time, left side vs right side of the car or front/rear. I don't want to go overboard on individual control, although that seems to be my tendency! (LOL)
Thanks,
Tom
The lights are in 3 rows of 4 fixtures each. I sort of grouped them by what I anticipate to be my work areas. Switch #1 switches the first 2 light fixtures in row "A" my ... "machine shop" area, #2 switch is for the second 2 fixtures in row "A" ... my woodworking area, #3 is for 4 fixtures in row "B" over my "assembly" area and #4 is for an additional 4 fixtures in row "C" over my welding/parking area.
Time will tell if this was wise or not!
56rpm
Well-known member
Very nice looking shop! Did you run any conduit or provisions for future electrical from your panel? I sure like that 2nd floor. Any updates?
OP
John in OH
Well-known member
Very nice looking shop! Did you run any conduit or provisions for future electrical from your panel? I sure like that 2nd floor. Any updates?
Thanks! So far, I'm pretty satisfied with how it has turned out.
Regarding provisions for future electrical capacity .... the panel is a 150amp panel and there are several remaining empty breaker slots in the panel. In addition, I ran several circuits for "future" use and terminated the cables in enclosed junction boxes (furnace circuit, water heater) and 2 spare 240v circuits to outlets. I plan to install a removable section of drywall or plywood between the studs above the breaker box so I can get future cables into the box if necessary. Also, I drilled several extra holes through the wall top plate above the box to accommodate any future cables. So far, nothing has been run in conduit except the stub-ups for incoming power and low voltage stuff.
It's been a busy summer and most of my free time is taken up with non-workshop activities so I haven't made much progress, but I did get the 3 ceiling fans installed .... a nice addition considering the hot summer we are having in VA.
Coyote Red
Well-known member
The stem walls are a bit confusing and I’m not totally sure what the builder has in mind, but he was pretty confident that this was the way the block and brick should be laid to accommodate the O/H door frames. This may all become more obvious as the frames are installed. The “notches” in the stem walls are 5-1/2” deep in the dimension parallel to the face of the stem wall and 5-3/4” deep in the dimension perpendicular to the stem wall. The body thickness of each stem wall is 12”.

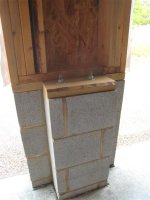
You can also see the top ends of the 5/8” threaded rods that are epoxied into the footer at each stem wall.

First, glad to see this thread come alive again. Beautiful building.
I am interested in the overhead door notches. Would you be willing to provide more detail as to how this was finished out after the overheads were installed?
OP
John in OH
Well-known member
Thanks, Coyote. Sure appreciate your kind words.
First, take a close look at Post #22 & 23 of this build thread that show the general construction of the stem walls.
Then, let me post a couple of additional photos that I don't think are anywhere else in this build thread. These three photos show more construction detail of the stem walls with the brick facing, 12 in. footer blocks, 8 in. stem wall blocks, and the cut blocks used to shim up the stem wall thickness at the location of the future door frame. I gotta admit, I was clueless as to what the mason was doing here, but the mason and the contractor both assured me this was the way to build the stem walls to accommodate the O/H door frames.
North stem wall:
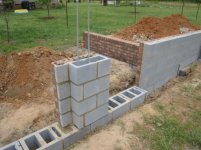
Center stem wall:

South stem wall:

Sorry, but I didn't take any dimensions of these stem wall details, but if you look at the photos in the next post I show some tape measure values and you can probably work backwards to get the masonry dimensions.
I remain a little uneasy about this construction detail as I think it leaves the stem walls rather weak .... especially if your resident teenage driver ever runs into the door frame. I've not actually given any thought as to what would be a better, alternate design, but if I were going to have this built again in another garage I'd give this construction detail a good head scratch to see if there was a better way.
First, take a close look at Post #22 & 23 of this build thread that show the general construction of the stem walls.
Then, let me post a couple of additional photos that I don't think are anywhere else in this build thread. These three photos show more construction detail of the stem walls with the brick facing, 12 in. footer blocks, 8 in. stem wall blocks, and the cut blocks used to shim up the stem wall thickness at the location of the future door frame. I gotta admit, I was clueless as to what the mason was doing here, but the mason and the contractor both assured me this was the way to build the stem walls to accommodate the O/H door frames.
North stem wall:
Center stem wall:
South stem wall:
Sorry, but I didn't take any dimensions of these stem wall details, but if you look at the photos in the next post I show some tape measure values and you can probably work backwards to get the masonry dimensions.
I remain a little uneasy about this construction detail as I think it leaves the stem walls rather weak .... especially if your resident teenage driver ever runs into the door frame. I've not actually given any thought as to what would be a better, alternate design, but if I were going to have this built again in another garage I'd give this construction detail a good head scratch to see if there was a better way.
OP
John in OH
Well-known member
I am interested in the overhead door notches. Would you be willing to provide more detail as to how this was finished out after the overheads were installed?
Stem wall details continued .... see previous post for background.
Following are several photos of the finished out stem walls by the overhead doors. First photos are of the north stem wall showing overall configuration of the stem wall and the 2x6 door frame.

Closer views of the north stem wall and view of how the overhead door frame 2x6 attaches to the LVL above the doors:
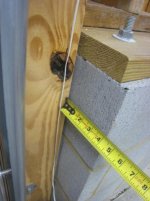
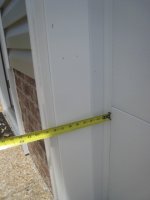

Center stem wall and closer views of center stem wall dimensions:


If these photos and those in the previous post don't answer your questions, let me know and I'll try to get you more info.
Coyote Red
Well-known member
John,
Wow thanks so much for all the detail. I'm a fan of block stem wall construction. If I'm ever in a position to build, it's one thing I'd like to incorporate.
I don't know how it would be done differently either, but it looks plenty strong to me. You have the cut blocks backing up the brick veneer, and that backed by 2-by. Nevertheless I don't think your supposed to hit those with a car, so hopefully no one will.
Wow thanks so much for all the detail. I'm a fan of block stem wall construction. If I'm ever in a position to build, it's one thing I'd like to incorporate.
I don't know how it would be done differently either, but it looks plenty strong to me. You have the cut blocks backing up the brick veneer, and that backed by 2-by. Nevertheless I don't think your supposed to hit those with a car, so hopefully no one will.
OP
John in OH
Well-known member
Time to add a few updates to the new shop project!
After installing the ceiling lights, three ceiling fans were added and several additional ceiling-mounted outlets were installed for ease of use of task lights. The fans are a great addition and saw quite a bit of use during August!


Now that the busy summer activities are starting to thin out, I’ve had a chance to talk my wife into giving me a hand with wall insulation. She’s been a good sport about the help, I measure length, she cuts pieces to length and I staple up. So far we’ve completed two walls. Sure would like to get the insulation finished before Thanksgiving.
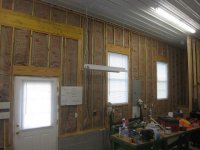
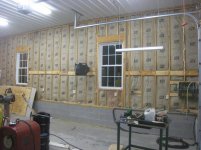
Even though the wall studs are 2x6, I elected to go with R13 wall insulation rather than the typical R19 one would find in 2x6 construction. Winters in VA are rather mild and there is quiet a difference in cost between R13 and R19. I don’t intend to keep this shop fully heated through the winter so I’m hoping the R13 will be adequate.
Still no progress on the enclosure for the 5hp two-stage compressor so its components still sit forlornly on their pallets. Temporarily moved a smaller single-stage compressor in from the house garage to provide some air for tools, air nailers, tires, etc.


After installing the ceiling lights, three ceiling fans were added and several additional ceiling-mounted outlets were installed for ease of use of task lights. The fans are a great addition and saw quite a bit of use during August!
Now that the busy summer activities are starting to thin out, I’ve had a chance to talk my wife into giving me a hand with wall insulation. She’s been a good sport about the help, I measure length, she cuts pieces to length and I staple up. So far we’ve completed two walls. Sure would like to get the insulation finished before Thanksgiving.
Even though the wall studs are 2x6, I elected to go with R13 wall insulation rather than the typical R19 one would find in 2x6 construction. Winters in VA are rather mild and there is quiet a difference in cost between R13 and R19. I don’t intend to keep this shop fully heated through the winter so I’m hoping the R13 will be adequate.
Still no progress on the enclosure for the 5hp two-stage compressor so its components still sit forlornly on their pallets. Temporarily moved a smaller single-stage compressor in from the house garage to provide some air for tools, air nailers, tires, etc.
Tamper84
Well-known member
Very nice!!! And thanks for the details on the ceiling and lights! I read that you are from Cadiz. Used to work out there for cravat coal before they sold out to Oxford. Now I'm down in Monroe county working for Ormet.
Chris
Chris
JDishong
Well-known member
Concerning your stairs ... is the code for garages and homes the same ? I plan to have a 12 ft ceiling and use 10" rise & 7" run on the stairs. I prefer to have the steepest stairs so that it doesn't take up so much wall space.
OP
John in OH
Well-known member
Concerning your stairs ... is the code for garages and homes the same ? I plan to have a 12 ft ceiling and use 10" rise & 7" run on the stairs. I prefer to have the steepest stairs so that it doesn't take up so much wall space.
I don't know the specific answer to your question; however, it is important to note that there isn't really a single national building "code". There are some recognized building guidelines that are usually used as general references for local codes, but these guidelines are not mandatory. You will need to discuss the subject of stair design with your local building department to get specific answers.
Off-hand, I suspect that if the garage you wish to build is under a local building jurisdiction, your proposed ratio of rise vs. run may not be acceptable ... but I'm just guessing.
OP
John in OH
Well-known member
Wow! Time passes quickly and progress moves slowly!!
The goal of getting all insulation complete by Thanksgiving was met thanks to the help of my youngest son who got annoyed at my slow progress and dove right in to get it finished. Unfortunately, after TG things again slowed down due to the Christmas and New Year holiday activities, but I was occasionally able to work a few hours here and there finishing up the 2x6 blocking in all the walls.
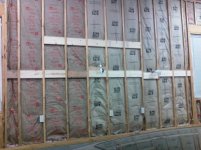
After the holidays, I started to install drywall, but here again, progress was slow as the setup for layout and cutting of the drywall was always in the way. Plus, I was unable to hang the upper levels of sheets without assistance. After a few feeble efforts, and the acceptance that my joint finishing skills are poor at best, I decided to bite the bullet and hire the work done.
Called the contractor that built the shop and he referred me to a local drywall guy. Gave the guy a call and he showed up in a day or two. He worked up a quote that looked reasonable and I gave the go-ahead. So, here’s how it went down ….
Wednesday – truck arrives to deliver drywall and finishing materials. Two guys unload and were gone in about ½ hr.
Thursday – three guys show up about 10am and begin hanging the sheetrock. In SIX hours they had all the interior rock hung and were driving out the driveway!! (Hint here: If you hire someone to hang drywall, make sure material disposal is part of the agreement. I was amazed at how much waste was generated. I would have skimped and scratched to use every possible partial scrap, but not these hangers! They flew through the work, but wasted no time on overly efficient use of material.)
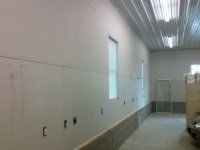
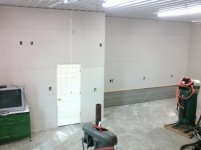

Friday (morning) – truck shows up and one guy unloads some scaffold and some additional material. Then loads up all the scrap material and trash from the hanging work and hauls it away.
Friday (afternoon) - one woman shows up and begins taping mud-taping joints. By 6pm she was finished and drove away.

Saturday – the finisher and one helper show up and apply first coat of joint compound. Done and gone by early afternoon.
Sunday – no work
Monday – the finisher shows up again alone. She sands the first coat, applies second coat, and is gone by mid-afternoon.
Tuesday – the finisher shows up again alone and sands the second coat, cleans up everything broom clean and drives away. Done by early afternoon.
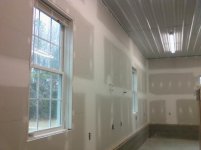

JOB DONE – less than one week from material delivery to complete!! And it looks great!! It would have literally taken me months to do this work myself.
The goal of getting all insulation complete by Thanksgiving was met thanks to the help of my youngest son who got annoyed at my slow progress and dove right in to get it finished. Unfortunately, after TG things again slowed down due to the Christmas and New Year holiday activities, but I was occasionally able to work a few hours here and there finishing up the 2x6 blocking in all the walls.
After the holidays, I started to install drywall, but here again, progress was slow as the setup for layout and cutting of the drywall was always in the way. Plus, I was unable to hang the upper levels of sheets without assistance. After a few feeble efforts, and the acceptance that my joint finishing skills are poor at best, I decided to bite the bullet and hire the work done.
Called the contractor that built the shop and he referred me to a local drywall guy. Gave the guy a call and he showed up in a day or two. He worked up a quote that looked reasonable and I gave the go-ahead. So, here’s how it went down ….
Wednesday – truck arrives to deliver drywall and finishing materials. Two guys unload and were gone in about ½ hr.
Thursday – three guys show up about 10am and begin hanging the sheetrock. In SIX hours they had all the interior rock hung and were driving out the driveway!! (Hint here: If you hire someone to hang drywall, make sure material disposal is part of the agreement. I was amazed at how much waste was generated. I would have skimped and scratched to use every possible partial scrap, but not these hangers! They flew through the work, but wasted no time on overly efficient use of material.)
Friday (morning) – truck shows up and one guy unloads some scaffold and some additional material. Then loads up all the scrap material and trash from the hanging work and hauls it away.
Friday (afternoon) - one woman shows up and begins taping mud-taping joints. By 6pm she was finished and drove away.
Saturday – the finisher and one helper show up and apply first coat of joint compound. Done and gone by early afternoon.
Sunday – no work
Monday – the finisher shows up again alone. She sands the first coat, applies second coat, and is gone by mid-afternoon.
Tuesday – the finisher shows up again alone and sands the second coat, cleans up everything broom clean and drives away. Done by early afternoon.
JOB DONE – less than one week from material delivery to complete!! And it looks great!! It would have literally taken me months to do this work myself.
Dave in Bath
Member
- Joined
- Apr 19, 2011
- Messages
- 6
John -
Looks great! So when is your better half going to get the painting done?
Dave
Looks great! So when is your better half going to get the painting done?
Dave
OP
John in OH
Well-known member
John -
Looks great! So when is your better half going to get the painting done?
Dave
Oooo ... now there's a sore subject!! Better Half has her own painting plans in the house that are in direct conflict with my painting plans!
51rider
Well-known member
I am sorry I missed this build
Been good to see this build & well documented too.
I think you made a good decision on the drywall & taping. I hung the dry wall & tried the taping but in the end, got a pro in to do it.
As for the painting, just make sure you put a nice thin prime/wash coat on first. It's messy but it does help to seal in the jointing compound so that it does not **** in the later top coats.
Looking really good.
Are you far from VIR?
Been good to see this build & well documented too.
I think you made a good decision on the drywall & taping. I hung the dry wall & tried the taping but in the end, got a pro in to do it.
As for the painting, just make sure you put a nice thin prime/wash coat on first. It's messy but it does help to seal in the jointing compound so that it does not **** in the later top coats.
Looking really good.
Are you far from VIR?
OP
John in OH
Well-known member
I am sorry I missed this build
Been good to see this build & well documented too.
I think you made a good decision on the drywall & taping. I hung the dry wall & tried the taping but in the end, got a pro in to do it.
As for the painting, just make sure you put a nice thin prime/wash coat on first. It's messy but it does help to seal in the jointing compound so that it does not **** in the later top coats.
Looking really good.
Are you far from VIR?
Thanks for the kind words! Priming the drywall is, indeed, the next step. With everything pulled away from the walls to allow for the drywall work, I'd sure like to get the painting done before stuff gets moved back against the walls.
VIR ... I assume you are referring to Virginia International Raceway ... it's about 180 miles SW of where I live which is about 25 miles NE of Richmond. But, on the plus side, I'm only about 20 miles from Richmond International Raceway!!
Nice build John, somehow, I have missed it before now.
OP
John in OH
Well-known member
I kind of have a general idea of garage colors … trying for an Oliver tractor motif …. basically, dark green (Oliver Green) and the very faint green white companion color (Clover White). Started out using the narrow stem wall between the O/H doors as my test pallat.
First effort ….. Yuck!! ….. looks way too “institutional” … looks like the inside of an old-time hospital or jail.
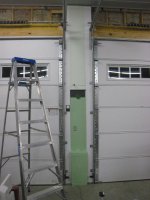
Second effort ….. used a dark green on the block …. Well, a little better, got rid of some of the institutional look, but is way too green … upper “pale” green is too “green” and the intermediate color just isn’t right …. looks like scum on a frog pond.
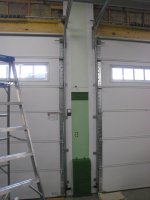
Wife took one look at it and said, “Get rid of the green below the stripe”. So, I say, “And replace it with what?” She walked around the shop looking at it from different angles, looked at the bench color and some of the machine tools, and says, “Use gray with a green tint … and tone down that upper pale green” OK, let’s try it. Got a quart of gray and also cut the light green paint 4 parts white to 1 part pale green.
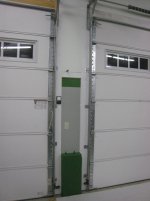
Hey, not bad!! I like this!!
Now with a decent color scheme, I can work up some enthusiasm to start priming the walls, but, geezzz … this priming is seriously slow work with a roller!
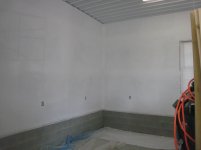
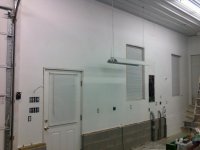
First effort ….. Yuck!! ….. looks way too “institutional” … looks like the inside of an old-time hospital or jail.
Second effort ….. used a dark green on the block …. Well, a little better, got rid of some of the institutional look, but is way too green … upper “pale” green is too “green” and the intermediate color just isn’t right …. looks like scum on a frog pond.
Wife took one look at it and said, “Get rid of the green below the stripe”. So, I say, “And replace it with what?” She walked around the shop looking at it from different angles, looked at the bench color and some of the machine tools, and says, “Use gray with a green tint … and tone down that upper pale green” OK, let’s try it. Got a quart of gray and also cut the light green paint 4 parts white to 1 part pale green.
Hey, not bad!! I like this!!
Now with a decent color scheme, I can work up some enthusiasm to start priming the walls, but, geezzz … this priming is seriously slow work with a roller!
Omphaloskeptic
Well-known member
Looking good! Smart thing to do in that you listened to the Mrs.; did you get her 'stamp of approval' on the final colors of the test wall? lol
OP
John in OH
Well-known member
Looking good! Smart thing to do in that you listened to the Mrs.; did you get her 'stamp of approval' on the final colors of the test wall? lol
Yeah, I learned a long time ago that life runs a lot smoother overall if The Wife is in the loop and has an opportunity to put in her $0.02 worth!! I've also learned that, quite often, her input is extremely beneficial .... she looks at things from a different perspective.
OP
John in OH
Well-known member
Painting is finally done!! It took a lot of time between getting other jobs and projects done around the house, but I’m satisfied with the results.
For painting the stripe, I used a striping technique posted by others here on GJ and it worked great!!
1) paint colors above and below the stripe to some intermediate point within the boundaries of the future stripe;
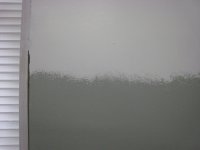
2) apply tape at top and bottom of stripe boundaries;
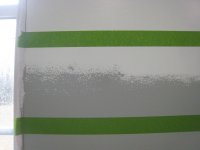
3) paint both edges of tape within the stripe area; bottom of top tape with top color paint, and top of bottom of tape with lower color paint. This “seals” the edges of the tape so the tape won’t “draw” the stripe paint onto the upper or lower colors.
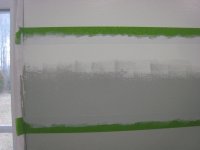
4) paint stripe;
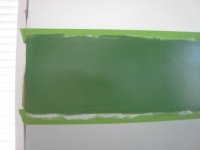
5) gently remove tape.
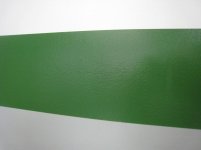
Following these steps results in very sharp and distinct stripe edges.
However, there was one step in the overall painting process that I didn’t do properly and I paid the price!! It is VERY important to completely clean all drywall sanding dust off of the wall in the area of the stripe before priming!! If not, when the tape is removed it can tear off sections of paint and primer completely off the drywall. This happed in two areas where I didn’t clean off the dust properly.
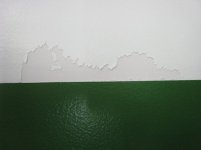

For painting the stripe, I used a striping technique posted by others here on GJ and it worked great!!
1) paint colors above and below the stripe to some intermediate point within the boundaries of the future stripe;
2) apply tape at top and bottom of stripe boundaries;
3) paint both edges of tape within the stripe area; bottom of top tape with top color paint, and top of bottom of tape with lower color paint. This “seals” the edges of the tape so the tape won’t “draw” the stripe paint onto the upper or lower colors.
4) paint stripe;
5) gently remove tape.
Following these steps results in very sharp and distinct stripe edges.
However, there was one step in the overall painting process that I didn’t do properly and I paid the price!! It is VERY important to completely clean all drywall sanding dust off of the wall in the area of the stripe before priming!! If not, when the tape is removed it can tear off sections of paint and primer completely off the drywall. This happed in two areas where I didn’t clean off the dust properly.
Omphaloskeptic
Well-known member
I offered that painters' trick a while back on a different thread; glad it was of use to you.
Sorry that the dust interfered with the clean result. Like they say again and again with any paint job, 90% of the job is proper prep. We all have a tendency to rush through the prep to get to the 'fun' of painting. It's the same kind of haste with most of us guys that don't give much thought to foreplay! heh-heh
Sorry that the dust interfered with the clean result. Like they say again and again with any paint job, 90% of the job is proper prep. We all have a tendency to rush through the prep to get to the 'fun' of painting. It's the same kind of haste with most of us guys that don't give much thought to foreplay! heh-heh
OP
John in OH
Well-known member
A few photos of the final paint job.
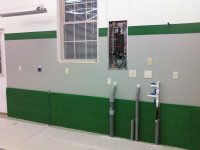

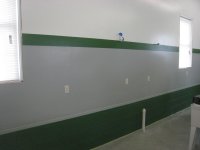
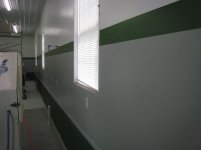
It was a good tip!! Thanks for putting it out on GJ.
I offered that painters' trick a while back on a different thread; glad it was of use to you.
It was a good tip!! Thanks for putting it out on GJ.
OP
John in OH
Well-known member
As a reward to myself for getting the painting finished, I decorated the shop by adding several cord reels. Got two Craftsman Pro reels with 30’ of 14/3 cord, and one Reelcraft with 45’ of 12/3 cord.
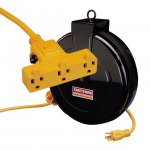

Installed all three on the ceiling and plugged them into nearby ceiling outlets, one Cman reel in the machine shop area and one in the woodworking area. The Reelcraft is mounted on the ceiling between the two overhead doors.
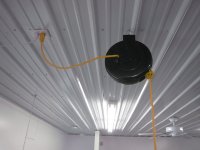
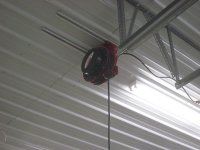
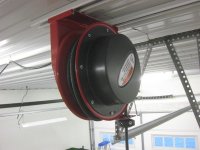

A more extensive discussion of these reels, the search that led up to their final purchase, and their installation is at the Cord Reel Suggestions or Comments thread: http://www.garagejournal.com/forum/showthread.php?t=189733
Hopefully, these reels will help minimize the tangle of extension cords that I'm always tripping over.
Installed all three on the ceiling and plugged them into nearby ceiling outlets, one Cman reel in the machine shop area and one in the woodworking area. The Reelcraft is mounted on the ceiling between the two overhead doors.
A more extensive discussion of these reels, the search that led up to their final purchase, and their installation is at the Cord Reel Suggestions or Comments thread: http://www.garagejournal.com/forum/showthread.php?t=189733
Hopefully, these reels will help minimize the tangle of extension cords that I'm always tripping over.
OP
John in OH
Well-known member
Thanks, Mr. Welsh. The Reelcraft is a very nice item, just a little pricey.
A little more finishing progress this week! Bought several bundles of pre-cut window & door casing at Lowes and began cutting, fitting, installing and painting the trim around the windows and doors.
Originally, intended to simply case the windows, but then (at the wife’s insistence) decided to take the extra time to make stools and aprons for the windows. This should allow me to accumulate a lot more dead bugs as they die on the window panes and drop to the stools!
Fortunately, the wife loves to paint so she volunteered to paint the trim and doors!! She put a first-coat on all the factory-primed casing sections prior to my cutting and installing. Then after filling and sanding the nail holes she painted the final top coat.
West windows and door to second floor

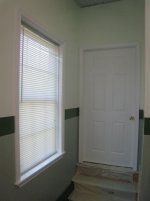
Compressor room door

Entry door

A little more finishing progress this week! Bought several bundles of pre-cut window & door casing at Lowes and began cutting, fitting, installing and painting the trim around the windows and doors.
Originally, intended to simply case the windows, but then (at the wife’s insistence) decided to take the extra time to make stools and aprons for the windows. This should allow me to accumulate a lot more dead bugs as they die on the window panes and drop to the stools!
Fortunately, the wife loves to paint so she volunteered to paint the trim and doors!! She put a first-coat on all the factory-primed casing sections prior to my cutting and installing. Then after filling and sanding the nail holes she painted the final top coat.
West windows and door to second floor
Compressor room door
Entry door
Crackerballer
Well-known member
Why can't I see a single pic?