To avoid these ads, REGISTER NOW!

The "M" House - Razed and Rebuilt Detached Carriage House/Barn - Start to Finish

E46M3

Well-known member
Joined
Jan 5, 2007
Messages
176
Location
Northeast, Upstate New York
The "M" House - Razed and Rebuilt Detached Carriage House/Barn - Start to Finish

Greetings fellow garage enthusiasts,

First, thanks to all who posted before me. I've lurked for more than a year during my build project, and have learned much and been inspired with each thread I've read.

I thought I should take the time to document my build along the way, and give something back in appreciation. This is my first post.

Second, there are a variety of purposes and uses that motivate garage projects that I've seen posted here. Some are purpose built working shops, some are parking places (usually attached to the house) with family storage requirements and all kinds of space limitations, others are full on guy retreats, and others still, are museums for car collections. Some are mixtures. All are cool in their own way, but require special, very different design considerations depending on what you have to work with, and what it is that you want out of the space.

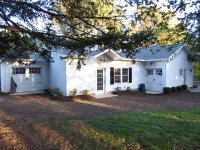
My build is a sorta' a combination of all of these things put together, but in a detached barn-like form, re-built from the ground up after razing an existing structure that no longer met my needs.

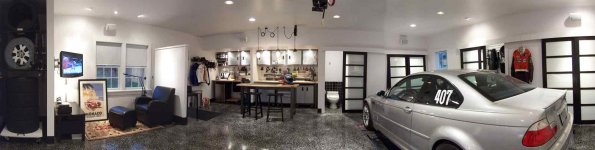
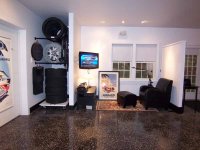
2 shots of the "rear garage":

pan workshop.jpg
pan%20door.jpg


pan door.jpg
pan%20workshop.jpg


(Edited December 7th, 2008: Inserted "non attachment" photographs for the benefit of non members/lurkers -E46M3)
 

Attachments

  • 1 100_1062.jpg
    1 100_1062.jpg
    53.8 KB · Views: 4,525
  • 2 100_1063_b.jpg
    2 100_1063_b.jpg
    31.5 KB · Views: 3,162
Last edited:
To avoid these ads, REGISTER NOW!
OP
E

E46M3

Well-known member
Joined
Jan 5, 2007
Messages
176
Location
Northeast, Upstate New York
Re: The "M" House - Razed and Rebuilt Detached Carriage House/Barn - Start to Finish

The nearly finished "M house" project.
(The entire process is documented below)

I haven't really moved in yet, the neon signs aren't on the walls yet, and the final exterior landscaping, and assorted plants and trees won't be placed or completed 'till later, and...ect, ect, ect. - o.k. - it won't really ever be done... now will it - might as well post now...

(I've waited to serve up pictures till near completion so if this build isn't of interest to you, you needn't read four months of progression updates to find out.)
 

Attachments

  • 9 100_1064.jpg
    9 100_1064.jpg
    61.7 KB · Views: 6,760
  • 8 100_1063.jpg
    8 100_1063.jpg
    52.2 KB · Views: 6,240
  • 7 100_0945.jpg
    7 100_0945.jpg
    40.5 KB · Views: 5,018
  • 6 100_1092.jpg
    6 100_1092.jpg
    68.7 KB · Views: 5,241
  • 5-100_1087.jpg
    5-100_1087.jpg
    42 KB · Views: 5,628
  • 4-100_1080.jpg
    4-100_1080.jpg
    50.3 KB · Views: 5,545
  • 3-100_1071.jpg
    3-100_1071.jpg
    63.5 KB · Views: 6,496
OP
E

E46M3

Well-known member
Joined
Jan 5, 2007
Messages
176
Location
Northeast, Upstate New York
Re: The "M" House - Razed and Rebuilt Detached Carriage House/Barn - Start to Finish

The Quick Specs:
Detached tandem design, 4 car garage (more on why it's a tandem later in this thread.)
• Front 2 car garage - 26' wide x 24' deep, with 2, 9'4" doors openings, interior walls clad in OSB, and will get painted white...when I get around to it eventually
• Rear 2 car garage - 31' wide x 26' deep, with 1, 20' insulated garage door separating front from rear garage space, finished drywall, insulated walls, ceiling, floor, and insulated foam exterior foundation, with in-block vermiculite insulation, and in floor radiant heat.
• Bike and toy storage wing - 11" wide x 18"4" deep, 6' exterior garage door (mandatory design requirement was to keep toy stuff storage away from the cars.) interior walls clad in OSB with a partial peg-board wall, and will also get painted
• Garden tractor and garden tool storage wing - 12' wide x 14'-4" deep, 8' exterior garage door, walls left unclad on two sides
• 5 garage doors total, Wayne Dalton brand, all with Lift-Master electric openers, key pad outside openers, all exterior doors with hinge and carriage style door pull hardware

Total Depth of structure; 51'10"
Total Visible Front Span; 37' wide
Around 1800 sq. feet of covered space in total

Other Details:
• Foundation; 6-7 course block on continuous concrete footers, with foundation drainage, and buried gutter drainage pipe running in ground to daylight, 220 feet away, downhill.
• 4000 psi concrete, 4" to 8" in depth - depending on the location, waterproof top sealed where not epoxy coated
• 806 sq feet of epoxy for rear garage floor, black base color with white and grey flecks, with anti slip additive and UGloss-AF clear coat, U Coat it brand
• In floor radiant heating, rear garage only, natural gas fired boiler, stainless steel - roof vented, 2 zone
• Bend Pack p-6-f in floor (flush mount) mid rise lift with a lifting capacity of 6,000 lbs, hydraulic lines run under floor through PVC pipes, hidden "flow diverter" in floor, covered with steel plate and epoxy-ed to match the floor
• Hot and cold running water, rear garage, natural gas fired 15 gal. hot water heater
• Bathroom, black tile up to 48", white grout (small, but required - see beer fridge requirement)
• Cable TV (with Speed Channel,) Wireless DSL internet, phone lines, 4 speaker wall mounted sound system, Sony amp, NAD preamp
• 6 Gladiator 24" wall cabinets, 2- 6' maple topped work tables, and 1- 8' maple work table with power strip, Gladiator 3/4" x 1' tongue and groove slat-wall Gear Wall systems covering 3 closet and work area walls, Gladiator 4' Gear Track sectional track for specific wall sections, 3 Gladiator rolling under table cabinets with maple tops... a bazillion hooks, bins, shelves, baskets... (all of the above purchased during "Special Today Only Sales!" at either Lowes or Sears)
• Craftsman Professional 3.5-hp Shop Compressor, 25 gallon tank, 175 psi, copper extension pipe over the lift to ceiling mounted hose reel sourced from Griot's Garage, various T valves, shut offs, quick releases, with in-line moisture control etc... (used primarily to loosen/tighten lugs and adjust tire pressures, every so often, maybe a ratchet or something - but decidedly non ******** applications)
• 3, 30 ft. retractable ceiling mounted extension cord reels
• Bissel wall mounted bag-less shop/utility vac with 30' hose, and a ton of attachments
• 3 way exterior lights, switched from main house, and 2 points in garage
• Switched outlets for neon signage - 3, 20 gauge steel neon signs (from Garage Art)
• Wall clock (Texaco) from Retro Planet, set in recessed "clock outlet," a single plug recessed outlet with cord storage in the wall.
• Recessed lighting, 3 zones, 6" and 4", both direct and eyeball fixtures, 2.5+ watts per sq. foot general lighting, all on dimmers, augmented by various task lights, pendants, and "0 degree" fluorescent mounted fixtures in both heated and unheated spaces throughout the structure.
• Exterior lighting from "Barn Light Electric" featuring 4 goose neck mounted radial wave fixtures and 2 sconces, face mounted, all with clear glass heavy dome bulb covers and wire guards, surfaces powder coated black with white reflective undersides.
• 7, Home Depot sourced, 5 light frosted glass doors, painted black, back light illuminated with switched recessed cans in storage spaces, doors mounted on sliding tracks - no doors open into the work space.
• Carpet tiles from Florz (not yet installed)
• HDTV, 1080i LCD flat screen TV mounted on a swing arm
• Beer fridge - this is of course, a mandatory.
 
OP
E

E46M3

Well-known member
Joined
Jan 5, 2007
Messages
176
Location
Northeast, Upstate New York
Re: The "M" House - Razed and Rebuilt Detached Carriage House/Barn - Start to Finish

(56K death from here on)

Select shots of the entire process,
from demolition, to design, to rebuilding, to nearly completed:


100_0436.jpg


The original garage; (Ahwww, isn't it cute...)
The blue tape on the center door post represents one linear foot.

Statement of need: I have 3 cars and a 2 car garage, my wife had to turn sideways to get out of her car door in the above garage, the old garage floor was so pitted and cracked you could not roll a floor jack on it, the structure no longer kept out vermin (my ski boots were filled with black walnuts last season,) the garage floor had been undermined by a family of woodchucks, the potting shed's exterior walls were actively growing moss (a separate outbuilding in the back yard behind the garage,) I was filling the basement with spare tires, race tires, fluids, garden hoses and car parts I didn't want to freeze in the winter, my children have amassed a small sporting goods store worth of "stuff," and so - one day, my wife said - "honey, I think we should think about rebuilding the garage...."

You only have to suggest such a project - once.

The demolition process:

100_0488.jpg
100_0488.jpg


Cute or not, it's going to get crushed. Everything was cleared out, and stuff we don't use daily was stored offsite in "door to store" pod-like containers, or (like the extra car) the local U-Store-it facility. We salvaged and reused an old window my wife liked, but other than that, the whole thing got flattened in a demolition process that took only about a half hour.

100_0500.jpg
100_0500.jpg


Reduced to kindling... the potting shed in the background is next up on the Case CX160's morning agenda...

100_0505.jpg
100_0505.jpg


The wood, metal, and concrete pad debris was hauled off in a big red 10 wheel dump-truck the same day. The grading of the site then got leveled (a little bit) to keep the floor levels within the hight of a single concrete block from the front to the back of the structure - which is about 50 feet. Any more leveling would have required a retaining wall in the back, which I didn't want. At the very back is a separate "garden tractor wing" which has a slightly different, higher, floor level than the main car garages. This wing has its own entrance, so you cant even see the change in floor levels.

(No, he didn't let me drive it, citing various "insurance restrictions," coupled with the fact that I had no f$#&ing idea what I was doing. He took the keys with him at night. I can attest to this fact... because I checked.)

The design process:

100_0705.jpg
100_0705.jpg


This is a sketch my wife did (based on a few of my early form studies to get started) so we both agreed on the shape. It changed a little from here...but this was the starting point. It's rather helpful that both my wife and I can draw. We could sketch our thoughts, and get everything kinda' the way we thought it should be before we even called in our architect.

100_0615.jpg
100_0615.jpg


My original early sketch of the new barn's floor plan based on some of our early exterior renderings...
and this is pretty much what got built.

100_0614.jpg
100_0614.jpg


...here's an example of an early sketch I did of one of the interior elevations... again, stuff moved, but it moved while on paper with an erasure, and not while the job was going up with a crowbar. This also helped my contractor understand what I was planning, and estimate accurately, and that's a good thing.

(Note: Don't try that center Gladiator setup up at home - 'cuz it wont work, and that's the point of the early sketching. I post this because I believe in the "work it out on paper" method. I liked the top cabinet layout that I drew, but wanted the rolling cabinets at the bottom - that I also drew in the same layout - and you can't have both if you do the math. The top needs to be 4 - 24s", not the 2 - 24s" and 2 -30s. Try this - and you'll be 6" too wide on each side on the bottom. I redid the sketch with everything worked out, choosing the bottom setup as the lead, and while I was at it, I moved the bathroom in the final drawing.)
 
Last edited:
OP
E

E46M3

Well-known member
Joined
Jan 5, 2007
Messages
176
Location
Northeast, Upstate New York
Re: The "M" House - Razed and Rebuilt Detached Carriage House/Barn - Start to Finish

Working with my architect: I did an elevation drawing of each side of the outside of the garage to scale, and three of the interior "back garage" wall elevations, spec-ed all the fixtures, doors, sinks, door pulls, the electric switch locations and switch functions, lighting fixture and outlet placements, ect., and turned them over to an architect who worked out the engineering for the roof trusses, and got everything to code for the "stamped drawings" we needed for the permits and approvals. (My conjecture is, few of you will want to do all this - but I can draw, so I did.)

I paid my architect "by the hour" for his specific services, not by a percent per square foot of the structure for design, which is customary. He only asks that, in addition to his limited hourly rate, that I invite him over for a beer when it's done, and that he favors a cold lager.

I can do that.

100_0538.jpg
100_0538.jpg


Special Considerations: My garage project accompanies a circa 1881 historically "designated" farm house - the build required architectural review from the town for a "certificate of architectural appropriateness" for both design and materials. My house is a historic landmark of sorts, which comes with legal and permit issues. (Any building or zoning permit requested within 1000 feet of my house must undergo a similar review by law. A metal "outbuilding" would be deemed architecturally unsympathetic, and thus would not be granted a permit. Please note: I like old houses, so I'm OK with this stipulation, but this mandate also applies to 8 neighboring houses. I have witnessed proposed architectural submissions for neighboring projects get outright denied based on proximity to my house during town zoning meetings.)

The tandem choice: A 3 or 4 door wide garage, even in the rear, would have overpowered the main house from an aesthetics perspective. Additionally, it would have consumed too much of the backyard, which is commonly utilized by my children, and much of the neighborhood for soccer games, et al. So, although problematic in its own way, a tandem design was chosen.

My house originally had a large barn about 15 feet from the current garage build site, the foundation of which is still visible. A barn-like form was thus chosen, and designed to look as if it "rambles" and may have been added on to a few times during its history - just like the main house. The siding choices reflect that decision, a combination of clapboard, and board and baton. My wife grew up on a farm with "cow milking" outbuilding, and "tobacco" barns, and "horse barns" - she drew in the hay loft door on the original sketch, and it stayed as the inspiration for other decisions throughout the design process.
 
Last edited:
OP
E

E46M3

Well-known member
Joined
Jan 5, 2007
Messages
176
Location
Northeast, Upstate New York
Re: The "M" House - Razed and Rebuilt Detached Carriage House/Barn - Start to Finish

Construction begins:

100_0526.jpg
100_0526.jpg


...utilities get run from the main house (gas, electric, phone, cable, and sewer tie-in) and 5' deep trenches are cut for the footers reflecting the barn's foundation footprint... I start having WWI trench warfare flashbacks in my own backyard... (this is shot through a screened window, sorry.)

100_0532.jpg
100_0521.jpg


100_0532.jpg


...footers poured, and starting to lay out the foundation block...

100_0537.jpg
100_0568.jpg


...foundation block laid-up, board insulation now gets placed against the foundation...
(while my wife can draw, she is often not acutely attune to scale. This is the point in the process she notices what we had drawn together, is actually very, very big... Why yes honey, it certainly is.)

100_0575.jpg
100_0575.jpg


...foundation drainage installed, separate gutter pipe runs are in, vermiculite in block insulation in the back garage (the back looks like the middle in this shot), foam foundation block insulation done, gravel backfill, and then soil backfilled...

100_0596.jpg
100_0596.jpg


...the structure starts - and goes up quick - the front elevation begins to take shape on the second day of framing...

100_0609.jpg
100_0609.jpg


...the trusses show up... as does a slow moving cold front with high winds, rain and thunder clouds...

100_0622.jpg
100_0622.jpg


...trusses hoisted over the garage spans... waiting for the high winds to subside so we can get them upright without each successive truss cascading into the next towards the earth like dominoes ... we wait.

100_0623.jpg
100_0623.jpg


blue skies...and the roof finally goes up...

100_0629.jpg
100_0629.jpg


...side elevation takes form... the "mechanics entrance" to the rear garage is the door visible in the center, and the roof shingles get hauled to the peaks for installation... the large opening to the right is for the bikes, the larger door partially in view to the left rear is for the garden tractor.

100_0652.jpg
100_0652.jpg


...prepping for the first pour... with so much concrete, we decided to get the structure up first, so the concrete would cure in a more controlled covered setting without interference from cold rain or hot sun... to facilitate many rolling things, the rear garage has no crack control joints, by design. That design however, required a careful, calculated cure. We'll see how that works in 5 years.

100_0661.jpg
100_0661.jpg


...a section of the front garage floor, still drying - the rear garage floor section was poured about a week later... the front 2 bay garage floor has a slope towards the 2 front garage doors (on the left,) while the "bike and toy" storage wing (seen through the 5' opening) slopes the opposite direction towards its garage door opening to the right. This made for some concrete feathering fun where the 2 slopes crossed... its invisible now, but attention was required.

100_0674.jpg
100_0674.jpg


...the Bend-Pack p-6-f mid rise lift shows up... I got the unit on site before we poured the rear garage floor, as this lift is designed to sit flush with the finished floor level. While I was able to obtain the installation instructions during the design phase, there were more questions posed by the instructions than answered; "STEP 5: install the 3 hydraulic lines to the flow diverter under concrete floor." Gee, very informative...thanks a bunch.

100_0693.jpg
100_0687_large.jpg


meanwhile...all 5 garage doors go on... all with electric openers triggered inside and out (with my wife's door being controllable from 5 separate locations... really...not kidding... 'cuz she has an apparent aversion to closing the *&%$#@!+ garage door - I've designed out potential excuses) and the windows (and all but 1 door) get installed to start to seal the building...
 
Last edited:
OP
E

E46M3

Well-known member
Joined
Jan 5, 2007
Messages
176
Location
Northeast, Upstate New York
Re: The "M" House - Razed and Rebuilt Detached Carriage House/Barn - Start to Finish

Planning for the Bend-Pack p-6-f mid rise lift:

100_0701.jpg
100_0701.jpg


...another quick sketch (1 of 4 for the lift set-up) to locate the lift in the rear garage... this helped determine the plumbing pipe runs to hold the hydraulic lines, determine the shape and size of the 2"x4" concrete forms, and the forms placement within the space, and ensure when the car was in the air, I had space around the car to work. The lift moves the car back 14" in the process of the lift. Additionally, the lifting points on the M3 make contact with the last 2 inches of the lift's fixed base unit.

The good news is, I can simply drive in, hit a predetermined parking point on the floor (marked with a small parking stop,) and without adjusting any lift arms, loosen the lugs, raise the lift in 30 seconds, slip the track tires off the fixed studs, slip the waiting street tires over the studs, re- set the lugs, set the car down, and fine tune the lugs to torque specs. This lift works well for me given the rather limited and specific tasks I require. The bad news is, you better get the placement right when you set it, because it's not all that adjustable later on.

100_0724.jpg
100_0724.jpg


...the rear garage gets its floor insulation, radiant heat tubing - and the lift form gets started...

100_0733.jpg
100_0733.jpg


...the lift form gets plumbed to run the hydraulic lines through the concrete to the flow diverter which splits the pressure between the two lift pads, and an 11' hydraulic line to the control unit mounted just behind a closet door opening. The center small flow diverter hole (center top of the form with the blue foam walls) will later get covered with a flush epoxy coated removable cover. Excess hydraulic lines will be coiled and fit in an opening inside the lift's base - an opening I didn't know was even there until the lift got on site, and so now I know.
 
Last edited:
OP
E

E46M3

Well-known member
Joined
Jan 5, 2007
Messages
176
Location
Northeast, Upstate New York
Re: The "M" House - Razed and Rebuilt Detached Carriage House/Barn - Start to Finish

The start of the finish:

100_0752.jpg
100_0752.jpg


...the outside starts getting its siding... still unprimed... adjusting the grade will get done by the landscaper later, so, some of the ground levels don't make contact with the structure in the right spots yet...

100_0775.jpg
100_0775.jpg


...been busy inside - concrete poured in the rear garage (lift form still in place,) ceiling and wall insulation went in, electrical rough is done, and drywall up... bang.

100_0785.jpg
100_0785.jpg


100_0786.jpg
100_0786.jpg


...clapboard all up now and getting its primer coat... the barns broken up " it's been added-onto a few times" type forms become more apparent now that the siding is up...

100_0691.jpg
100_0691.jpg


...the very back of the main house which has some of the same "added-onto" design qualities...

100_0788.jpg
100_0788.jpg


100_0788.jpg

100_0789.jpg

100_0789.jpg

100_0791.jpg


...drywall gets taped and sanded in the rear garage. The front garage and bike/toy storage area will get sheathed with solid OSB, to be painted later.

100_0801.jpg
100_0801.jpg


...a view with the "4th wall" (garage door) down... this door opens into the front garage bays so the working garage has no overhead obstructions for the lift or the recessed lights, or ceiling hose reels. The small green specks of tape on the door are placement indicators for historic art mural poster from the mid 30's, which will go up later, but these marks are to help guide the electrician's placement of the 4" eyeball lights which will illuminate them.

One very cool aspect of this design is that just about anything sticks to this wall with a magnet - my autocross car numbers, race class designations, and various car stickers are all on magnetic stock - so the car can return quickly to a normal looking vehicle when not on track - and I can store them here. I can stick work-lights anywhere, install a whiteboard, or stick up small photographs with magnetic clips. Everything can be moved or rearranged at will.

100_0813.jpg
100_0813.jpg


...a front view, placing a hinge on the door as a visual test, now all primed, no cupola yet, but the "hay door" is in - but without its hardware, lights have arrived, but are still in the boxes, and won't go up until the finished painting is done...

100_0814.jpg
100_0814.jpg


...the work in progress barn in context behind the main house - shot 3/4 view... from the head on view of the house, you can barely see the barn structure.
 
Last edited:
OP
E

E46M3

Well-known member
Joined
Jan 5, 2007
Messages
176
Location
Northeast, Upstate New York
Re: The "M" House - Razed and Rebuilt Detached Carriage House/Barn - Start to Finish

The final stages:

100_0885.jpg
100_0885.jpg


....primed walls, first coat of epoxy going down, soon to be flecked in grey and white.

100_0891.jpg
100_0891.jpg


....drying epoxy, anti slip additive and the UGloss-AF clear coat. Need to wait a few days for work to continue.

100_0917.jpg
100_0917.jpg


...the Bend Pack p-6-f in floor (flush mount) mid rise lift gets bolted to the floor. The flow diverter is the hole in the center between the lift pads, and gets a steel plate epoxiyed to match the floor. I start moving a few things into the space...

100_0922.jpg
100_0922.jpg


...the doors go on the closets and the bathroom, the Gladiator units get bolted to the strapping behind the drywall that we placed during framing - that made it easy. The M3 finally gets to drive into it's new house.

100_0943.jpg
100_0943.jpg


100_0944.jpg
100_0944.jpg


....exterior walkway gets started that ties the house and rear patio to the new garage. There's grass seed in there somewhere...

100_0941.jpg
100_0941.jpg


....pavers go in. These span the entire front of the barn in front of both doors.

100_0977.jpg
100_0977.jpg


...just back from Watkins Glen after 3 days of BMW Club Racing Certification during "October-Fest," BMW CCA's national gathering, this year hosted by our local BMW chapter in partnership with the Boston Chapter. Garage is not yet done, but pressed into active service, swapping R-compond race tires for the street tires when I got home. The lift in this shot is only about 1/3rd of the way up.

100_1011.jpg
100_1010.jpg


100_1022.jpg
100_1022.jpg


....putting studs on the rotors to replace the lug nuts, and working into the night on other car related projects.

100_1026.jpg
100_1026.jpg


...rear garden storage wing with the garage door up... still a mess... will need to move larger long term storage items (doors and windows) to the rafters to make room to mount all the tools on the walls, but just not done yet as of this picture.

100_1034.jpg
100_1032.jpg


100_1030.jpg
100_1030.jpg


.... two views of the "bike and toy storage wing." We start moving some stuff into the space... still working out some storage issues, and will likely make an enclosed closet area to house all the ski stuff currently stacked in the corner, but here's what it looks like as of now.

100_0995.jpg
100_0995.jpg


...tire storage starting to get sorted. Made a "pallet" with a white Formica base with casters and a handle for easy movement over to the lift... One of the 3, 44" wide art murals can be seen to the left in this shot. It follows the garage door up when it's opened, and is held in place by two aluminum tubes - the top tube is mounted to the garage door, while the bottom tube just acts as a weight to keep the print flat - it's not attached. (Works out real well by the way.)

100_1042.jpg
100_1042.jpg


100_1000.jpg
100_1000.jpg


...and now, just starting to make myself right at home. Anyone want a beer?

Still lots o' stuff to finish, but, close enough to post. That's all for now.
Thank's for looking.

Cheers,
E46M3
 
Last edited:

badtexasz28

Member
Joined
Dec 31, 2007
Messages
22
Re: The "M" House - Razed and Rebuilt Detached Carriage House/Barn - Start to Finish

Man that is am awesome garage/showroom.... I envy you my friend.
 

Stuart in MN

Well-known member
Joined
Sep 8, 2005
Messages
23,036
Location
Minneapolis
Re: The "M" House - Razed and Rebuilt Detached Carriage House/Barn - Start to Finish

Wow, very nice! You did a great job of documenting the project as well - the photography and text are magazine-worthy.
 

justinmc

Well-known member
Joined
May 25, 2006
Messages
2,239
Location
KCMO
Re: The "M" House - Razed and Rebuilt Detached Carriage House/Barn - Start to Finish

WOW...... thats one of the cooler setups I've seen in awhile. I like how you partitioned the space with the roll up in the middle. Makes it nice if you are working, etc and the wife goes somewhere or comes home you don't have to worry about folks cruising past seeing what you've got hidden inside.

Also....... I just have to ask. You've got a plasma, comfy chair, tools, toilet, etc... why would you ever go inside the house!?? hahaha... seriously loving this space.
 
OP
E

E46M3

Well-known member
Joined
Jan 5, 2007
Messages
176
Location
Northeast, Upstate New York
Re: The "M" House - Razed and Rebuilt Detached Carriage House/Barn - Start to Finish

why would you ever go inside the house!?? hahaha... seriously loving this space.

Justinmc,
Ha ha...sometimes I don't go in the house - for rather extended periods of time.
My wife's answer; that little blue box on top of the amp.
It is a wireless intercom.
 

Attachments

  • intercom-modified-100_1042.jpg
    intercom-modified-100_1042.jpg
    23.6 KB · Views: 1,506

67pete300

Well-known member
Joined
Jun 15, 2008
Messages
342
Location
East Lyme, CT
Re: The "M" House - Razed and Rebuilt Detached Carriage House/Barn - Start to Finish

Um...holy cow!

Just Awesome. Kudos to you on such a great project. Well done!
 

justinmc

Well-known member
Joined
May 25, 2006
Messages
2,239
Location
KCMO
Re: The "M" House - Razed and Rebuilt Detached Carriage House/Barn - Start to Finish

Justinmc,
Ha ha...sometimes I don't go in the house - for rather extended periods of time.
My wife's answer; that little blue box on top of the amp.
It is a wireless intercom.


Awesome... haha. I bet the wife has some shiny new kitchen on her side of the property. Honey you can have the house.. I want the garage! :thumbup:
 

Mussel Kar

Active member
Joined
Nov 13, 2008
Messages
38
Re: The "M" House - Razed and Rebuilt Detached Carriage House/Barn - Start to Finish

Awsome build. I'm envious because mine won't be finished for at least a year more.
I did not go to O fest but had some friends that did. A friend on mine set up the autocross course. Alex from the Boston chapter took first. I was hot on his heels at one event this summer.
 
OP
E

E46M3

Well-known member
Joined
Jan 5, 2007
Messages
176
Location
Northeast, Upstate New York
Re: The "M" House - Razed and Rebuilt Detached Carriage House/Barn - Start to Finish

Mussel Kar,
I spend most of my time at road courses, but still AutoCross both the cars. Neither are at the very top of their class, (the E46M3 weighs in at around 3,400lbs) but I do it for the fun, and the car finess practice. We run at a local go cart track that has elevation changes, and at places, is actually no wider than my driveway.

The pictures attached below are of; the M staged for an autox event, as well as my daily driver - a 4 door on the cart track.

(from an earlier post)
The Barns Primary Function: I have 2 BMW 3 series, (E46's) both of which I auto-cross, and both of which have seen regular active track use at road courses such as Watkins Glen or Mosport (a nice road course in Canada.) The M3 is my current dedicated track car, and spends about 3-5 full days a month on track during the season, sometimes more when I can get extra time.

The M3 does some street drives in nice weather... "street legal, pretty much."

I can usually be found in "open track" run groups with a variety of clubs. I teach the novice orientation classroom sessions at the track for new drivers with the local BMW CCA chapter. I love the sport. My M3 doesn't need much at this point, although that doesn't stop me from playing with it. The M3's S54 engine - in stock configuration - is already wound rather tight, and produces as is - more torque per liter than any naturally aspirated production engine in the world. I really don't need to do too much mucking about under the hood to eek out power.

My garage passion started, and is fueled as a driver, and less as a mechanic, but... I do need to do some basic stuff.

Monthly - Change between R-Compound track tires and performance street tires, change brake pads from race compounds to street or between race compounds, bleed brakes before every track event, adjust car geometry and sort (ie: camber) for street and back to track, or dial in whatever I need for a given track setup, perform routine tech inspections... etc. (The garage does get dirty, just in case your wondering.)
Seasonally - Flush and swap brake fluid every 3 months, install after-market parts like chips, control arms, strut braces, CAIs, or fabricate small parts, install gauges, swap rotors, change other fluids, brake lines, clean the car up, play, putz, and generally screw around, drink a beer and wax the hood, (bugs die hard at 149-mph) - drink a beer and watch the Rolex Series. Fix small stuff. Swap snow tires for my daily driver. Store the M3 for the winter.
Maybe this decade: I am unlikely to ever pull the engine, diff, or transmission myself in this space - so this isn't really a full fledged "shop" by design. Some will see the fixed Bend-Pack lift and think; "but you can't drop the tranmission..." I respect those who do, and can. I can't, and don't. Any major project is performed by my trusted friend, an independent BMW certified master mechanic - which he is, and I am not. I can read a Bentley manual, but I pick my battles. I come at all of this from a drivers perspective right now, but maybe later.
 

Attachments

  • Jeff-1Turn-1-original.jpg
    Jeff-1Turn-1-original.jpg
    30.7 KB · Views: 444
  • Jeff-Staged-at-BIMP.jpg
    Jeff-Staged-at-BIMP.jpg
    45.6 KB · Views: 440

Mussel Kar

Active member
Joined
Nov 13, 2008
Messages
38
Re: The "M" House - Razed and Rebuilt Detached Carriage House/Barn - Start to Finish

E
I used to drive Lime Rock and NHMS until April 07. Had to give it up for a while for health reasons. (all set now) Because of that I got addicted to autocross last summer, and because I was new I ended up as the door mat for every club I ran with. No so this year. Two seasons championships with 2 different Porsche clubs that use Devens.
Won my division and also took my first FTD in the vid below. Some student was at this event and made this film that the wife found on youtube. I'm the first car to run, 887.
I'm going for a 2 post lift when my garage ever gets finished. Like you, I have no plans on major engine/tramsmission work. Just want something to make maint work easier.
 
To avoid these ads, REGISTER NOW!
OP
E

E46M3

Well-known member
Joined
Jan 5, 2007
Messages
176
Location
Northeast, Upstate New York
Re: The "M" House - Razed and Rebuilt Detached Carriage House/Barn - Start to Finish

Mussel Kar,

Thanks for the link.
Arggg.
Love the sound of your GT3, most notable at the start - and hate hearing it right about now. (I won't hear that from my car for a very long time - it just started snowing here as I type.)

Won my division

Congrats on that feat!
Is it "easy being green?"
:)

(just out of curiosity, what division does a Cayeen run in? Interesting to see that on the video... none allowed on tracks where I run, not even autox)

Thanks much for the comments Mussel -
Cheers,
E46M3
 

Mussel Kar

Active member
Joined
Nov 13, 2008
Messages
38
Re: The "M" House - Razed and Rebuilt Detached Carriage House/Barn - Start to Finish

The GT3RS has a few mods. It has the Cup car R&P for a really explosive 2nd gear. Major lockup in the diff and I run on Hoosier A6s. I get maybe 7 events from a set. Sadly my P cars are put away for the season too.

I drove an E46 M3 at one of the last BMW autocrosses, two runs in the afternoon. I corded my hooters and asked a friend if he wanted me to drive his car with him as a passenger for my last two runs. Hell yeah. Not my car so I did a soft start. I was 5 seconds faster than him and almost beat everybody in his division.
 

Firetrucks

Well-known member
Joined
Apr 17, 2006
Messages
134
Location
Mooresville, IN
Re: The "M" House - Razed and Rebuilt Detached Carriage House/Barn - Start to Finish

I'm the first car to run, 887.

Mussel
Wow, your car sounds great!!

E
Your garage is amazing. You obviously have thought everything through and come up with innovative ideas that work very well :bowdown:

Oh, and my wife forgets the close garage door about half the time, at least she always remembers to open it.
 

drivinhard

Well-known member
Joined
Sep 9, 2007
Messages
98
Location
Braselton, GA
Re: The "M" House - Razed and Rebuilt Detached Carriage House/Barn - Start to Finish

Fantastic!

As a fellow track junkie (I lived in upstate NY for 5.5 yrs and spent a lot, but not enough, time at the glen) that is a great space for your usage.

You really put a lot of planning into the whole thing, which is why it came out so well. Nothing good every comes from "winging it". Well done. :beer:

If you ever get to the south east to run, ping me.
 
OP
E

E46M3

Well-known member
Joined
Jan 5, 2007
Messages
176
Location
Northeast, Upstate New York
Re: The "M" House - Razed and Rebuilt Detached Carriage House/Barn - Start to Finish

Firetrucks,

at least she always remembers to open it.

yes, but ... this is from hitting the jam of the doors in the old garage... The old garage door was not quite wide enough... i quess. I think it jumped out in front of her. Sure, she swerved to avoid the oncoming garage, but it was elusive.

Pesky garage door jam.
 

Attachments

  • oops.jpg
    oops.jpg
    63 KB · Views: 368

LanCat

Member
Joined
Jan 13, 2008
Messages
22
Re: The "M" House - Razed and Rebuilt Detached Carriage House/Barn - Start to Finish

Does she know you are posting her indiscretions here?

You may be out in that fabulous garage more than you planned!!!
 

Hardware

Well-known member
Joined
May 12, 2008
Messages
337
Location
Bucks County PA
Re: The "M" House - Razed and Rebuilt Detached Carriage House/Barn - Start to Finish

Very nice , well thought out... Good Job
 

caropepe

Member
Joined
Jan 7, 2007
Messages
15
Location
Seattle
Re: The "M" House - Razed and Rebuilt Detached Carriage House/Barn - Start to Finish

E:

What a great space! I love the fact you figured out how to have all the volume you need, without simply making an imposing box (which is all to easy these days).

Nooks, crannies, and alcoves make the space a 100x more interesting. And your garage proves it can be just as efficient.

Joe
 

PAToyota

Well-known member
Joined
Jan 20, 2006
Messages
4,366
Location
South Central Pennsylvania, USA
Re: The "M" House - Razed and Rebuilt Detached Carriage House/Barn - Start to Finish

Very nice build - and well thought out! As the man from the cheesy 80's action show said - "I love it when a plan comes together!"
 
OP
E

E46M3

Well-known member
Joined
Jan 5, 2007
Messages
176
Location
Northeast, Upstate New York
Re: The "M" House - Razed and Rebuilt Detached Carriage House/Barn - Start to Finish

"I love it when a plan comes together!"

PAToyota,
Well, not everything goes according to plan, so, I present to you:

The "Not according to plan" Barn Build Bloopers Section.
It's going to happen - so, here's a list, and a few picture of when things go very, very wrong.

1.) Tile: Order tile for the bathroom and closet slop sink area, wait 10 days. Tile arrives, in the wrong color, tile store re-orders, wait another 10 days. Tile arrives, unpack to find all the tiles are scratched. Re-order from a new supplier, wait 10 days. Scratched again. Switch to standard 4" tiles from the special order 2" tiles. Wait 10 days. Tile size apparently has nothing to do with it, because these too, are scratched. Contractor finally decides to go to the local big box home improvement store and hand pick every single tile, one at a time.
2.) Signs: Neon signs arrives. Drive 20 minutes one way to pick them up at a bus station (shipped Greyhound) Only one is there, and it's a box of glass shards. Neon tubes broken in about 8 places. Call to track second sign, am told it was actually there at the bus station, and if I come back (another 20 minute drive 1 way) they'll give it to me. Arrive, second sign broken too. Re-order with vendor. New neon replacements ordered. Wait. Neon arrives. Second shipment broken in 2 places. Re-order. Wait. Replacement for the replacement arrives broken in 2 places. Have local neon tube builder rebend to fit the sign. That was 2 weeks ago. And I'm still waiting.
(Note: Steve from GarageArt went waaaaay above the call of duty to ensure I got my delicate newly designed signs one way or another, including payment out of his pocket for for remaking the neon for the signs....three times. My conjecture is, that GarageArt will not be selling these signs anymore, unless they can figure out how to get the noen guys to successfully ship them. He is paying out of his own pocket to have the neon repaired locally. Although this is all a massive pain in the ***, customer service I thought was long gone - lives on with Steve at Garage Art ... I can personally recommend Garage Art, I don't think any of this mess was his fault. The signs are very cool I think. Please buy something from him to help offset his loss on my order.)
3.) Wheels: New wheels arrive for the M3 - no center-caps. Duh. Call. Will be sent.
4.) Garage Vac: Order Hoover garage vac with other items from Griots Garage. Order arrives, no vac. Call, and am told they actually no longer carry the item. Re-order same vac from another retailer. 7 days later check shipping status; not yet shipped. Call, am told they no longer carry the item. (sensing a trend, but optimistic.) Re-order from online store that lists Hoover garage vac as "in stock," this is my 3rd attempt. Am told it will be drop shipped from Hoover. Check status of order. Am told it will 7-10 weeks before it's shipped... for an "in stock item?" Cancel order and buy a Bissel brand in a local store, that I can see, and walk out with, and put in my trunk. 2 weeks later, a Hoover garage vac mysteriously appears on my porch from Griot's Garage - you know, the place that said they didn't carry the item in the first place. And then, another one shows up 3 days later. Now I have 2 discontinued vacs? The later company suggested I drive to the closest FedEx location and return it - that would be about 25 minutes one way by car, so... no. Wait. They send paperwork, and a sticker, and a FedEx man to pick it up.
5.) Lighting: Landscape crew backs their truck into the barn, and crushes one of the lights. Landscaper agrees to pay for replacement. Re-orders. Wrong light. Re-orders again. I reinstall.

wishing you all better garage build luck...
E46M3
 

Attachments

  • blooped-light.jpg
    blooped-light.jpg
    31.5 KB · Views: 712
  • blooped-tile.jpg
    blooped-tile.jpg
    58.5 KB · Views: 986
  • blooper-neon.jpg
    blooper-neon.jpg
    51.3 KB · Views: 705
  • blooper-GUV.jpg
    blooper-GUV.jpg
    18.2 KB · Views: 615

PAToyota

Well-known member
Joined
Jan 20, 2006
Messages
4,366
Location
South Central Pennsylvania, USA
Re: The "M" House - Razed and Rebuilt Detached Carriage House/Barn - Start to Finish

Ooof!

As I said "when a plan comes together" not "when all goes according to plan"... :D

The end result is all that you'll remember five years from now - and the end result looks pretty darn good!
 

kbs2244

Well-known member
Joined
Nov 11, 2006
Messages
14,065
Re: The "M" House - Razed and Rebuilt Detached Carriage House/Barn - Start to Finish

On a project this big, you only had 5 bloopers?
I would say you did good.
I love the" It's been here a while and add on to a few times" look.
You have a serious work space that looks real casual.
 

GeoS

New member
Joined
Mar 27, 2008
Messages
4
Re: The "M" House - Razed and Rebuilt Detached Carriage House/Barn - Start to Finish

...taking notes.

Congratulations! Well thought out. I've been lurking here as well planning for a ground-up rebuild in the near future.

I'm often at Mosport (my local track) with the BMW Trillium chapter and other organizers. Maybe I'll see you there some time. I'll be in the Hennarot E30 M3. I have yet to get to The Glen... one day.
 

KevDawg

Well-known member
Joined
Oct 27, 2008
Messages
81
Location
Calgary, Alberta
Re: The "M" House - Razed and Rebuilt Detached Carriage House/Barn - Start to Finish

Wow Awesome garage love the design!

I was wondering how you like the UCoat flooring?
I was thinking of doing the same product, are you happy with the result?
It looks fantastic in the pictures!
 
OP
E

E46M3

Well-known member
Joined
Jan 5, 2007
Messages
176
Location
Northeast, Upstate New York
Re: The "M" House - Razed and Rebuilt Detached Carriage House/Barn - Start to Finish

I was wondering how you like the UCoat flooring?
I was thinking of doing the same product, are you happy with the result?
It looks fantastic in the pictures!

KevDawg,
Relatively new, so it's only got a month or so of frequent active use, and so far - I'm really happy.
Glad I added the anti slip, I would recomend it if you do your project.
It went down easily, I thought. (The gloss top coat smell is rather toxic when initially applied.)
Fluid spills - brake, oil or otherwise, clean up nicely.
Black is an unorthadox color choice, and requires more lighting, as it's less reflective.
(I just really liked the look.)
It shows less dirt than I ever thought, it generally looks clean even when it's not.
Only issue is dropping a 3/16" tiny black finish screw on the floor. It just went away in the flecked floor. Silver screws are fine, but that black screw required a trip to my knees on a search and rescue mission.

Happy as of now.
Good luck on your project... and take pictures for us.
E46M3
 

KevDawg

Well-known member
Joined
Oct 27, 2008
Messages
81
Location
Calgary, Alberta
Re: The "M" House - Razed and Rebuilt Detached Carriage House/Barn - Start to Finish

Thanks E46M3!
That was a quick response.
I was considering Black Base coat as well.
It really looks great, well done!
And thanks for the Stellar write up on your project, I'm sure there are many others out there who are as jealous as I am!

Cheers

KevDawg
 

ersatzs2

Well-known member
Joined
Aug 9, 2006
Messages
630
Location
Mercer County, New Jersey
Re: The "M" House - Razed and Rebuilt Detached Carriage House/Barn - Start to Finish

Only issue is dropping a 3/16" tiny black finish screw on the floor. It just went away in the flecked floor. Silver screws are fine, but that black screw required a trip to my knees on a search and rescue mission.

Your floor looks awesome but the above reason is why I reluctantly went for plain old grey. I hopefully laid down some flecks on the bathroom floor, but after some 'test drops' of various fasteners, I decided my aging eyes couldn't handle anything fancy! Hat's off on the superb project. What I like about it is it seems you designed it for exactly what _you_ want.
 

MSRTom

Well-known member
Joined
Apr 9, 2008
Messages
109
Location
Summerville/Charleston, SC
Re: The "M" House - Razed and Rebuilt Detached Carriage House/Barn - Start to Finish

Thanks for sharing your build! I've gotten some more inspiration for my detached project.

Love the way you incorporated the lift!

Can't wait to see more.
 

boiler7904

Well-known member
Joined
Apr 4, 2006
Messages
3,414
Location
NW IN
Re: The "M" House - Razed and Rebuilt Detached Carriage House/Barn - Start to Finish

Awesome build. I wish I lived on land and that my wife would suggest that we rebuild the garage.

Just curious, what do you and your wife do for a living?

Working for an architectural firm, I see all kinds of client sketches. They are never as good as what you gave your architect to start with.
 

cyclopsblown34

Well-known member
Joined
Jan 26, 2007
Messages
597
Location
Russellville, Missouri
Re: The "M" House - Razed and Rebuilt Detached Carriage House/Barn - Start to Finish

That is an awesome build. Unfortunately, I'd make a big freaking mess in a hurry in there. I'm very impressed.
 
Last edited:
To avoid these ads, REGISTER NOW!
Top Bottom