To avoid these ads, REGISTER NOW!

VISE REPAIR 101 all vise repairs, lubricants, sources for parts and the tricks to fix

OP
D

drivesitfar

Well-known member
Joined
Oct 23, 2013
Messages
35,997
Location
Pacific Northwest
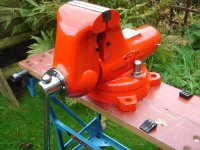
ALL: thanks all for your thoughts. just thinking about the drilling of a few small holes to help the Devcon or JB adhere better. would it also be better to not only clean the surfaces as good as possible and maybe heat the vise up so the Devcon or JB is not trying to bond with a cold surface? or does it matter?

i know for paint it's best to either paint around 60 degrees so maybe putting putty on a warm surface might work better. any heat applied after or just air dry and sand? I've heard JB weld actually leaves a little depression if you put it in wet flush and it sounds like Devcon doesn't which would be a plus if true.

thanks again
 
To avoid these ads, REGISTER NOW!

ironhorsemachinery

Well-known member
Joined
May 20, 2015
Messages
64
I have never used Devcon, but surface prep is critical for any epoxy-based adhesive or filler. Rough is good; holes or grooves also good. Oil or other contaminants are bad, so acetone or a similar cleaner is essential. I don't know whether a warmer surface helps, but in any case the normal JB takes several hours to cure and is relatively liquid, so while it doesn't shrink during curing, you can get low spots due to running or slumping while it is still liquid. There is lots of info at jbweld.com


Sent from my iPad using Tapatalk
 

vintage nut

Well-known member
Joined
Mar 17, 2015
Messages
1,272
Location
west coast of canada
In my knifemaking I have used a ton of epoxy, and figured out a lot of tricks the hard way. Firstly, epoxy has a shelf life and a bond life. The stuff I use (west systems) has a 10 year shelf life, and a 50 year bond life. (basically guaranteed not to degrade in strength for at least 50 years) cheap 5 minute epoxy from home Depot and such generally has a 6 month shelf life and a 5 year bond life. Jb weld is a lot better, although I'm not sure if it is as good as west systems. West systems was designed for boat building, both bonding wood frames, and laminating fiberglass with far more strength than normal fiberglass resin. Unlike some epoxys, it is absolutely waterproof, and has much better heat resistance.
It mixes water clear and maple syrup thickness. You add different fillers to make it how you need it. For filling on metal I add a fair bit of aluminum powder, and then colodial silica until it is at the thickness I need. I have tested the mixing cup after it cures, and it takes a very substantial beating with a hammer to get the stuff to break, and even then it won't shatter or anything.
Surface prep is key. First off degrease it multiple times with acetone and a clean, new cloth or paper towel. Then take a clean new piece of sandpaper or red scotchbright and scuff it all down really well. After this wipe it off with a clean dry cloth or paper towel and apply the epoxy. Don't use compressed air, as it can contain small oil droplets which will impact the bonding.

Another thing to keep in mind is that generally the slower epoxy cures, the stronger it is. I personally recommend west systems, although it is expensive and only comes in large quantities. Other options that would be a step up from jb weld and devcon are loctite E-120hp hysol (although it needs a special applicator gun) or brownells acraglas (rifle bedding compound, possibly even tougher than west systems)
 
OP
D

drivesitfar

Well-known member
Joined
Oct 23, 2013
Messages
35,997
Location
Pacific Northwest
VN: thanks for your great post about more options and methods to use when cleaning up an old cast surface. i edited post #7 of the thread that is for repairs and put in some of your products you use. if you need me to add anything to that just say so. hope you are enjoying your summer

ALL: so i started the 101 thread with a post for members that are willing to repair or spiff up vises for other members and i have yet to put any names in that posting. i know a lot of you have the talent, but i also know it takes a many hours to restore or repair old vises so if any of you are willing to do the job for other members for money or tools just let me know and tell me the area you live in or zip for shipping. Members can PM each other to work out deals and would love to see the before and after pictures here on the 101 thread.

any members want to get on the list as a source for other members that don't have the skills, tools or time to make their old vise shine just say the word.

i'd put my name on first because i do like vises and every member I've met in person so far, but i wont at this time until i perfect my skills and get more of the right tools. maybe some day soon i'll have more than farm fresh vises to sell or be able to spiff one of your vises up for you and until then i'll still watch and learn.

anybody want on the list you can make a post or PM me??
 
Last edited:

caesar2001

Well-known member
Joined
Feb 19, 2012
Messages
74
Location
Livonia, MI
ALL: so i started the 101 thread with a post for members that are willing to repair or spiff up vises for other members and i have yet to put any names in that posting. i know a lot of you have the talent, but i also know it takes a many hours to restore or repair old vises so if any of you are willing to do the job for other members for money or tools just let me know and tell me the area you live in or zip for shipping.

I think this is a great idea. I don't think I will add myself to the list at this time (i've only worked on one thus far).
 
OP
D

drivesitfar

Well-known member
Joined
Oct 23, 2013
Messages
35,997
Location
Pacific Northwest
Caesar: i thought so too, but maybe the guys (and gals) only want to restore vises for themselves or to sell on Ebay.

ALL: anybody want on the list as the member another member can pay you to restore a vise?

I just picked up this American Machine and Tool company woodworker's patter vise that is pretty cool and it was made in Taiwan maybe in the 1960's and not sure of the date because they still make new ones. it also is a company not on the big vise company list so i'm adding that now. i'm going to have to build a thick wood bench before i can mount it because my 2 inch butcher block bench isn't thick enough. also here's a couple videos about how to use this vise if you happen to find one. it is very close to the size and looks of a Emmert patternmaker's vise and i'm wondering if AMT bought the patent.

http://www.highlandwoodworking.com/patternmakerswoodworkingvise.aspx
 

Attachments

  • WP_20150720_003.jpg
    WP_20150720_003.jpg
    140.1 KB · Views: 37
  • WP_20150720_007.jpg
    WP_20150720_007.jpg
    101.6 KB · Views: 35
  • WP_20150720_004.jpg
    WP_20150720_004.jpg
    94.3 KB · Views: 33
  • WP_20150720_002.jpg
    WP_20150720_002.jpg
    99.2 KB · Views: 32
  • WP_20150720_005.jpg
    WP_20150720_005.jpg
    111.4 KB · Views: 31
  • WP_20150720_006.jpg
    WP_20150720_006.jpg
    105.6 KB · Views: 27
  • WP_20150720_009.jpg
    WP_20150720_009.jpg
    108.8 KB · Views: 26

ironhorsemachinery

Well-known member
Joined
May 20, 2015
Messages
64
For me it is primarily a lack of available time, rather than a lack of interest or willingness. I can barely keep up with my own projects! [emoji3]

So, while I think this is a great idea, I don't think I can offer up any services at this point.


Sent from my iPad using Tapatalk
 
OP
D

drivesitfar

Well-known member
Joined
Oct 23, 2013
Messages
35,997
Location
Pacific Northwest
IH: i'm sure that is why others haven't stepped up and wanted to be on the list. is that Alien Reed behaving or does he need a new home. :)

ALL: if anybody does have the time and the skills just say the word and i'll put your name up on the list. if you are not a regular poster showing your restorations maybe show a few and start posting more so the members will get to know you.
 

ironhorsemachinery

Well-known member
Joined
May 20, 2015
Messages
64
Drives: REED has accepted life on earth, and in my shop. We are building a small maple top bench that will serve as its home ...


Sent from my iPad using Tapatalk
 

jeffhay

Well-known member
Joined
Apr 6, 2009
Messages
80
Location
Sammamish, WA
I finished an Athol 614 1/2. I did an electrolysis bath, wire wheel on the unpainted parts, rustoleum self etching primer and Duplicolor GM Light Blue Metallic paint, Johnson paste wax on the handle and unpainted parts and anti-seize on the screw.
 

Attachments

  • Viseleft.jpg
    Viseleft.jpg
    40.8 KB · Views: 112
  • Visefront.jpg
    Visefront.jpg
    41.3 KB · Views: 94
  • Viseright.jpg
    Viseright.jpg
    45.2 KB · Views: 100
  • Vise left after.jpg
    Vise left after.jpg
    45.3 KB · Views: 140
  • Vise front after.jpg
    Vise front after.jpg
    48.3 KB · Views: 121
  • Vise right after.jpg
    Vise right after.jpg
    139 KB · Views: 124
OP
D

drivesitfar

Well-known member
Joined
Oct 23, 2013
Messages
35,997
Location
Pacific Northwest
Jeff: thanks for posting your restoration. nice job and great explanation. just curious does your Athol 614.5 have removable jaws and can you post a couple pictures?

IH::bounce::thumbup:
 

Gert

Well-known member
Joined
Feb 21, 2012
Messages
139
Location
Netherlands
How I removed a non original sleeve from the main spindle of my Reed 106.

It looks like a previous owner made a new sleeve and attached it by a pin all the way through.
I want to remove the sleeve to get rid a little slop and to be able to sandblast.

I drilled the pin both sides and no deeper than the thickness of the sleeve on my mini mill (it looks more mini with such a big piece of vise).
I am going to make a new sleeve and attach it with a screw, like it was done originaly.
In the latest picuture you can see the original notch.

I will remove the remains of the pin from the spindle and weld the hole.

Man vs pin: 1 : 0

Cheers !
 

Attachments

  • DSC04130 (Small).JPG
    DSC04130 (Small).JPG
    96.2 KB · Views: 72
  • DSC04123b (Small).JPG
    DSC04123b (Small).JPG
    84.9 KB · Views: 73
  • DSC04123a (Small).JPG
    DSC04123a (Small).JPG
    114.5 KB · Views: 71
  • DSC04112 (Small).JPG
    DSC04112 (Small).JPG
    90.8 KB · Views: 75
  • DSC04106 (Small).JPG
    DSC04106 (Small).JPG
    110.6 KB · Views: 62
  • DSC04105 (Small).JPG
    DSC04105 (Small).JPG
    109.4 KB · Views: 65
  • DSC04083 (Small).JPG
    DSC04083 (Small).JPG
    86.8 KB · Views: 69
Last edited:

GETRIDAONE

Well-known member
Joined
May 21, 2013
Messages
1,549
Location
Auburn, GA
Gert, I like your holding fixture ! I bet it took an hour to rig that up and 30 seconds to drill it.
That is a common problem with a set screw on large vises. The screw reams the hole out when moving the heavy dynamic slide.
 
OP
D

drivesitfar

Well-known member
Joined
Oct 23, 2013
Messages
35,997
Location
Pacific Northwest
Gert: i bet your arms are a little sore from moving even just the dynamic of that big Reed around. nice that you figured it out and thanks for posting pictures here so others have an idea on how to remove an old owner's modification.

i also agree with Get that your set up to hold the vise in place to drill is awesome.

have a great weekend
 

Mark in Indiana

Well-known member
Joined
Aug 11, 2010
Messages
3,057
Location
Southern Indiana
ALL: so i started the 101 thread with a post for members that are willing to repair or spiff up vises for other members and i have yet to put any names in that posting. i know a lot of you have the talent, but i also know it takes a many hours to restore or repair old vises so if any of you are willing to do the job for other members for money or tools just let me know and tell me the area you live in or zip for shipping. Members can PM each other to work out deals and would love to see the before and after pictures here on the 101 thread.

any members want to get on the list as a source for other members that don't have the skills, tools or time to make their old vise shine just say the word.

i'd put my name on first because i do like vises and every member I've met in person so far, but i wont at this time until i perfect my skills and get more of the right tools. maybe some day soon i'll have more than farm fresh vises to sell or be able to spiff one of your vises up for you and until then i'll still watch and learn.

anybody want on the list you can make a post or PM me??

All:
To give you the information that I gave Drives last night: I've recently retired about 6 months ago. Now, I just farm and resell tools & equipment. It's a great occupation because of the tool enthusiasts that I get to meet. So I have plenty of opportunities to schedule commissioned vise restorations.

About my commissioned restorations: Commissioned restorations are a privilege to do because I'm able to create a family heirloom from the rusty old vise in their garage. The vise will be disassembled, inspected, cleaned down to the bare metal as needed, primed/painted, bare metal details polished, clear coated, lubricated, and reassembled. Nicks & dings (or the vise's character) are cleaned up, but not erased. BTW; I usually detail the embellishments for free. Prices start around $100.00. Everything I do is local, but I'm sure that shipping & payment can be worked out.

Attached are some before & after pictures;
 

Attachments

  • DUNLAP2.jpg
    DUNLAP2.jpg
    142.6 KB · Views: 58
  • DUNLAP15.jpg
    DUNLAP15.jpg
    136.7 KB · Views: 62
  • CRAFTSMAN1.JPG
    CRAFTSMAN1.JPG
    84.7 KB · Views: 73
  • CRAFTSMAN 3.5 VISE.jpg
    CRAFTSMAN 3.5 VISE.jpg
    141.4 KB · Views: 63
  • CRAFTSMAN3.JPG
    CRAFTSMAN3.JPG
    86 KB · Views: 68
OP
D

drivesitfar

Well-known member
Joined
Oct 23, 2013
Messages
35,997
Location
Pacific Northwest
Mark: thanks for volunteering to restore vises for other members if they either don't have the time or the skills currently. you've been added to the list on post #11 and I've mentioned that members can PM you to make negotiations and arrangements for drop off and pick up.

have a great day
 

ironhorsemachinery

Well-known member
Joined
May 20, 2015
Messages
64
Gert: nice job! When you put it back together, it might be worth drilling and tapping for two opposing set screws to hold the collar more securely.


Sent from my iPad using Tapatalk
 
To avoid these ads, REGISTER NOW!

jakemac

Well-known member
Joined
May 21, 2013
Messages
9,035
Location
New England
How I removed a non original sleeve from the main spindle of my Reed 106.

It looks like a previous owner made a new sleeve and attached it by a pin all the way through.
I want to remove the sleeve to get rid a little slop and to be able to sandblast.

I drilled the pin both sides and no deeper than the thickness of the sleeve on my mini mill (it looks more mini with such a big piece of vise).
I am going to make a new sleeve and attach it with a screw, like it was done originaly.
In the latest picuture you can see the original notch.

I will remove the remains of the pin from the spindle and weld the hole.

Man vs pin: 1 : 0

Cheers !

You may be able to find a sleeve at your local hardware store in the parts bins. Home Depot or Lowes may have one that will fit as well.
 

Gert

Well-known member
Joined
Feb 21, 2012
Messages
139
Location
Netherlands
Getridaone It took me indeed about an hour to set this up. I must admit that KMScott showed my this setup earlier in another thread. The dynamic slide rests on two places - the jaw and a piece of aluminium. The clamp on the knob is to prevent any movement from the spindle. Works like a charm.
If it is a common problem with a set screw, than the pin all the way through is not a bad solution after all.

Drivesitfar Not only my arms. I feel muscles that I did not know I have.

Ironhorsemachinery I like the idea of two opposing set screws. I think I am going for that solution.

Jakemac Thanks for the hardware store tip. I live in the Netherlands, Europe. We don't have Home Depot or Lowes here. No problem. I have a lathe and will make one myself. That gives me the opportunity to choose the material. I think of Bronze or a soft kind of steel. I hate rust so I guess bronze it will be.
 

jakemac

Well-known member
Joined
May 21, 2013
Messages
9,035
Location
New England
Jakemac Thanks for the hardware store tip. I live in the Netherlands, Europe. We don't have Home Depot or Lowes here. No problem. I have a lathe and will make one myself. That gives me the opportunity to choose the material. I think of Bronze or a soft kind of steel. I hate rust so I guess bronze it will be.

Oops. I forgot to look at your location. Sorry. My bad. :p
 
OP
D

drivesitfar

Well-known member
Joined
Oct 23, 2013
Messages
35,997
Location
Pacific Northwest
Jake: while i might not help Gert other members and lurkers benefitted from your wisdom.

Gert: gotta love a big vise because you are very aware when it comes to your shop. how's the Wilton C1 or was it a C2 that you painted bright red doing? or did it find another good home so you'll have room for Mr. Reed?
 

Gert

Well-known member
Joined
Feb 21, 2012
Messages
139
Location
Netherlands
Gert: gotta love a big vise because you are very aware when it comes to your shop. how's the Wilton C1 or was it a C2 that you painted bright red doing? or did it find another good home so you'll have room for Mr. Reed?

It's a C2. Amazing that you remember that :thumbup:. Nooooo, I cannot seperate from Mr. Wilton. It's inside my house on a small portable bench.

Like this:
 

Attachments

  • DSC03698.jpg
    DSC03698.jpg
    143 KB · Views: 89
Last edited:

jrobb316

Well-known member
Joined
May 18, 2014
Messages
1,377
Location
WI
Anyone who has restored a reed vise with a split nut set up, I am using the original shim. How did you adjust the split nut depth versus the set screw that adjusts the main nut? Adjust both so there is just a hair of endplay in the main nut and the spindle handle? Thanks for your advise :)
 

bagged89s10

Well-known member
Joined
Mar 13, 2005
Messages
4,607
Location
CT
Anyone who has restored a reed vise with a split nut set up, I am using the original shim. How did you adjust the split nut depth versus the set screw that adjusts the main nut? Adjust both so there is just a hair of endplay in the main nut and the spindle handle? Thanks for your advise :)


Do you mean a shim behind the split nut?Mine didn't have a shim but I need to put one it so the handle is perfectly perpendicular when closed. For the main nut, I just tightened the screw all the way so there isn't any play.
 

jrobb316

Well-known member
Joined
May 18, 2014
Messages
1,377
Location
WI
Yes there was a shim (washer) between the jaw and the spindle. It was in very good shape so no issue with that. Or else the spindle would be riding directly on the casting. I adjusted the split nut so there was just a hair of end play in the spindle. Do the same with the adjustment screw for the main nut?
 

partsproduction

Well-known member
Joined
Apr 22, 2015
Messages
74
Location
Tillamook, Oregon, soggy coast.
Hi,
I need to know what the thread size is for a tiny vise. My second Boley, this one came missing one jaw and the half circle retainer under the main screw handle. All three screws were broken off flush, and I need to know what thread they are.
This Boley is the one with jaws 1 3/16" wide, the screws are tiny, maybe 1-72? If anyone knows of a source for screws and that retainer and especially the missing jaw I'd sure like to hear about it.
Thanks,
parts
 
OP
D

drivesitfar

Well-known member
Joined
Oct 23, 2013
Messages
35,997
Location
Pacific Northwest
PP: can you post a few pictures of your vise so if a member pops in on this thread he can see them and maybe help you? sorry i don't think I own a Boley and wish i did.
 

bagged89s10

Well-known member
Joined
Mar 13, 2005
Messages
4,607
Location
CT
VISE REPAIR 101 all vise repairs, lubricants, sources for parts and the trick...

Started taking my Parker 383-1/2 apart. This is the cleanest vise I've own yet. Look how clean the swivel base is. No rust!

ImageUploadedByTapatalk1438444100.811927.jpg
ImageUploadedByTapatalk1438444339.778725.jpg

The pin for the swivel jaw came out almost too easy. All I could find was a piece of 3/8" stainless tubing. I stuck it in through the swivel bolt hole and 1 knock and the pin flew across the garage. I did soak the pin in acetone/atf for a day and a half.

ImageUploadedByTapatalk1438444319.051689.jpg
ImageUploadedByTapatalk1438444326.905748.jpg

Now a slowly tapped the swivel jaw with a block of wood and hammer and applied more penetrant until I got it to turn 90 degrees in either way. It's still tight but I have yet to remove the swivel jaw completely.

ImageUploadedByTapatalk1438444387.570845.jpg

Now my question. Does the swivel jaw just sit in there? You can see the round part of the jaw from inside. Can I just tap it out? I don't want to accidentally break it.
ImageUploadedByTapatalk1438444432.459512.jpg
 
Last edited:

McBrownie

Well-known member
Joined
Mar 27, 2014
Messages
1,827
Location
Cleveland, OH
Re: VISE REPAIR 101 all vise repairs, lubricants, sources for parts and the trick...

Started taking my Parker 383-1/2 apart. This is the cleanest vise I've own yet. Look how clean the swivel base is. No rust!

Now my question. Does the swivel jaw just sit in there? You can see the round part of the jaw from inside. Can I just tap it out? I don't want to accidentally break it.

Bagged,
I'm not sure about yours, but on other Parker swivel jaws, there is a pin on the "Meriden" side of the static jaw that holds the swivel jaw in place. It might just look like part of the casting at this point. I don't have a picture, but I think there might be one on Dayid's site. Nice vise, btw.
 

bagged89s10

Well-known member
Joined
Mar 13, 2005
Messages
4,607
Location
CT
Re: VISE REPAIR 101 all vise repairs, lubricants, sources for parts and the trick...

Bagged,

I'm not sure about yours, but on other Parker swivel jaws, there is a pin on the "Meriden" side of the static jaw that holds the swivel jaw in place. It might just look like part of the casting at this point. I don't have a picture, but I think there might be one on Dayid's site. Nice vise, btw.


I'm assuming you're talking about the river looking pin? Right above the USA in this pic.
How do I get that thing out?

ImageUploadedByTapatalk1438452151.676073.jpg
 

brooker

Member
Joined
Oct 20, 2013
Messages
9
You drive it out (carefully) from the other side. It's a 3" long pin with a "head" on the side you see in the photo above the USA mark. Clean up the other side a little if you can't locate the end of the the pin, and it will appear. Once it's out you can lift out the swivel jaw to clean, lubricate etc the mechanism. You'll immediately understand the whole thing once you see it taken apart. Great vise.
 

bagged89s10

Well-known member
Joined
Mar 13, 2005
Messages
4,607
Location
CT
You drive it out (carefully) from the other side. It's a 3" long pin with a "head" on the side you see in the photo above the USA mark. Clean up the other side a little if you can't locate the end of the the pin, and it will appear. Once it's out you can lift out the swivel jaw to clean, lubricate etc the mechanism. You'll immediately understand the whole thing once you see it taken apart. Great vise.


Ok so I'm picturing the swivel jaw kind of riding on the pin. Makes sense. Thanks for the help and I will post here when I take it out.
 

McBrownie

Well-known member
Joined
Mar 27, 2014
Messages
1,827
Location
Cleveland, OH
It's a C2. Amazing that you remember that :thumbup:. Nooooo, I cannot seperate from Mr. Wilton. It's inside my house on a small portable bench.

Like this:

Gert,

That is a great looking Wilton and it looks like it is sitting on a blue frame Workmate. Those are a bit rare and it would be great if you could post some pics of it on the Workmate thread.

http://www.garagejournal.com/forum/showthread.php?t=92136
 

Fretters

Well-known member
Joined
Jan 25, 2014
Messages
4,217
Location
South Yorkshire, England
...and it looks like it is sitting on a blue frame Workmate. Those are a bit rare and it would be great if you could post some pics of it on the Workmate thread.

I honestly can't believe there's a Workmate thread. :D Next time I dig it out, I'll pop a photo of mine on there. It's usually well out the way, buried under something, seeing as those poxy leg retainer clips are knacked. That thing tries it's damnedest to shin one when it's folded for storage, if it's not well out of the way. :D

Btw, ****** nerds. Workmate thread indeed. There'll be one about vices next. :evil:
 

glenn27

Member
Joined
Jul 31, 2009
Messages
22
Location
Virginia
The only problem--"Drives" here with that brand of paint--NO ONE carries it locally, single can or at all---and it order on line--have to buy a case. I only need one can.....

glenn
 

Outlawmws

Well-known member
Joined
Aug 9, 2011
Messages
39,101
Location
The Badlands
I honestly can't believe there's a Workmate thread. :D Next time I dig it out, I'll pop a photo of mine on there. It's usually well out the way, buried under something, seeing as those poxy leg retainer clips are knacked. That thing tries it's damnedest to shin one when it's folded for storage, if it's not well out of the way. :D

Btw, ****** nerds. Workmate thread indeed. There'll be one about vices next. :evil:

Or clamps :lol_hitti
 
To avoid these ads, REGISTER NOW!
Top Bottom