Hello all,
First time poster, but I’ve been lurking for a while. I used this site earlier this year to get great deals on the Dewalt DW745 portable table saw and the Dewalt DWS782 miter saw from Home Depot. Maybe I can now offer some payback.
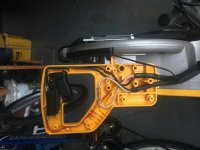
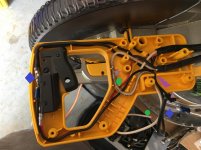
I like many others here wanted to add the XPS cross cut light to the DWS782, but the cost was just too high. With shipping & tax I was looking at nearly $200 to purchase all the parts from ServiceNet (Dewalt’s parts division). Most of the parts were reasonably priced, but the light assembly by itself was over $120.
From time to time over the last 9 months, I’d check the current prices at ServiceNet to see if the cost of this conversion had gone down any. It FINALLY happened last week. The light assembly dropped $100. I placed an order on 10/27/15 and received it yesterday. Here’s what I ordered and the cost:
1 - Handle set - 624730-00 - $13.21
1 - Power supply - N078832 - $23.65
1 - Work Light - N030317 - $21.75
1 - Motor Cord - N114499 - $17.19
With tax & shipping it all came to $94.19. I could have saved a few dollars more by picking up the handle set & power supply on eBay. I also probably could have done without the motor cord as I only used some of the wiring it came with, but it did make it easier to tie into the existing wiring. The installation of the parts was straight forward. I have the XPS on another Dewalt miter saw and love it and now have it on the DWS782.
It was the price drop on the light that made all of this cost effective. I can’t tell you if the lower price is temporary, permanent, or maybe even a mistake. I personally believe the new price to be correct because after receiving it and looking at its construction, there is NO way the light should have ever been priced so high. All other suppliers on the interweb still show the high price, but if you Google the part number for the light, the first link that shows up is the lower price at ServiceNet.
I hope this helps anybody wanting to add the XPS light.
First time poster, but I’ve been lurking for a while. I used this site earlier this year to get great deals on the Dewalt DW745 portable table saw and the Dewalt DWS782 miter saw from Home Depot. Maybe I can now offer some payback.
I like many others here wanted to add the XPS cross cut light to the DWS782, but the cost was just too high. With shipping & tax I was looking at nearly $200 to purchase all the parts from ServiceNet (Dewalt’s parts division). Most of the parts were reasonably priced, but the light assembly by itself was over $120.
From time to time over the last 9 months, I’d check the current prices at ServiceNet to see if the cost of this conversion had gone down any. It FINALLY happened last week. The light assembly dropped $100. I placed an order on 10/27/15 and received it yesterday. Here’s what I ordered and the cost:
1 - Handle set - 624730-00 - $13.21
1 - Power supply - N078832 - $23.65
1 - Work Light - N030317 - $21.75
1 - Motor Cord - N114499 - $17.19
With tax & shipping it all came to $94.19. I could have saved a few dollars more by picking up the handle set & power supply on eBay. I also probably could have done without the motor cord as I only used some of the wiring it came with, but it did make it easier to tie into the existing wiring. The installation of the parts was straight forward. I have the XPS on another Dewalt miter saw and love it and now have it on the DWS782.
It was the price drop on the light that made all of this cost effective. I can’t tell you if the lower price is temporary, permanent, or maybe even a mistake. I personally believe the new price to be correct because after receiving it and looking at its construction, there is NO way the light should have ever been priced so high. All other suppliers on the interweb still show the high price, but if you Google the part number for the light, the first link that shows up is the lower price at ServiceNet.
I hope this helps anybody wanting to add the XPS light.