1/2 Cup
Member Emeritus
JB, that's not nice.
Great to see your helpers in your shop, what an opportunity to share..
Regards
Great to see your helpers in your shop, what an opportunity to share..
Regards

I'm glad to see you finally got on the important work!
Great design you have their, and great memories of a dad who cares for the girls. They won't remember the excellent troubleshooting you're doing on the truck.
Can you take the fuel line loose and pump the tank dry with the booster pump?


You need to dump a ton of clear on that footprint
You should of made a extended cab Jeep, that way they both get to ride their way to sleep.

Looks like the engine needs repair.
You have great helpers!
JB, that's not nice.
Great to see your helpers in your shop, what an opportunity to share..
Regards
I was a nervous wreck and just wanted to step in and get it done without a big mess. But in the end I held back and just cleaned up a bit after they went inside. One thing I won't clean up is this little reminder Cat left me:

We should be ready for the purple paint today once I get home.
JB


GB,That's how I do it too JB. Sometimes if your photos are largish, just upload 5 or 6 at a time. Occasionally I'll get an error trying to do a full 7 that have come from phone etc.
Also I use a txt (PC and Mac) editor to copy all the links too first while I compose a post, then copy the whole lot into the post box to preview and edit before submitting.
Cheers GB
I know and share the frustration. Wife having an bachelor of arts major and kids brought up with the same artsy freethinking I sometimes have to just walk away and hope there's not too much mess at the end of it.
The little reminder is priceless though. Also be tempted to try and preserve it with clearcoat or epoxy.
I also think that because I've work on so many projects for so long alone that I'm just stuck in my ways and if I work with someone and they try to do something different it hurts. I will have to agree with you and Dreaming Muscle, I'll try to get some clear coat on it soon. Sure I'm going grey earlier than my dad.
Hummm, teaching your girls patience. Girls stick together, you know.
Think your wife will teach you a little patience?
")
I love it when my kids work with me. Although, 3 of mine are old enough where it isn't cool any more. My 5 year old still loves it.
Hehe... yeah mine are 6 and 8 and I'm also still learning that kids learn best through experience and my wife always remind me that fun is not meant to be efficient or 'doing things the correct way' all the time
It does mean that even the simplest things will take ages. You can also bet your last dollar that if you tell them to do something a certain way they will find a way to 'experience' doing it their own way. Unless they've experienced why your way is better. That is until it becomes fun and 'better' goes out the door or unless it turns out to be the better way of having fun! I've accepted my role as providing a safe place for experience and help them avoid the bad ones.
I do get to impress on them at times. Covered my 6yo son in acetal shavings with him turning the handwheel on the lathe the other day. Nervous, with my hand on the E-stop, yes! But he followed instructions while using the big scary machine and I doubt he'll ever forget the experience. He is very interested and peaks in at times and knows to ask for safety glasses and not reach in to touch anything running. Same with my daughter using the skillsaw while cutting wood for her bunkbed. Not something she'll want to do by herself yet. She actually enjoyed the intense concentration of using the router.
Can only hope to get the basics right so far... but pretty much forget their patience and focus on my own
She might try but I think at this point there is no teaching in that respect.
From my experience and from talking to others it appears there will be a 10ish year gab between being cool the first time and the second, but that 10 year span can be tough.
Great your able to share that with your son, he will be better off for it. I will say that I'm not going gray just yet, and my hair line is more solid than my fathers at this age. Now check back with me in 5 years and I'll probably have another story to tell and more hats.
All,
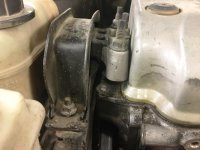
I thought I'd share this even though it was a small project. Last week my DD the Green Dragon started acting weird, bucking a bit and vibrating more than normal. I'd just replace the engine mounts not long ago and was a little worried. I opened the hood to have a quick look around and found this:

No idea how it happened but it did, the studs screw into an aluminum head but the three bolts are what broke. I removed the mount and started drilling out the bolts to try an easy out, as I was drilling the third one it started to turn a bit. I grabbed a broken drill bit and wend in reverse and it screwed out. I repeated this on the other two and had similar results, success! I used some studs from a duramax exhaust manifold to replace them and it is all back together now. Woo hoo free repair and the Green Dragon lives on.
JB
Great repair job! Get a set of left hand drill bits and use them to drill out studs. Heat and vibration of drilling often lets the stud come right on out. That's for studs broken in service, for studs broken because you twisted them off because they were corroded into place, welding is still the best route. But not in aluminum
JB,
It's been a long time since I posted here, but I've been looking in.
Enjoy your children at the age they are now, because it seems all too soon
they are all grown up.
Just checking in. That bed is so cool and something your daughter will love for many years. Also, thanks for the picture tutorial and PM. I think I've got it figured out now.

A good repair broken studs. Sometimes that twisting the studs impossible and then this can be done using nitric acid, it corrodes steel and not touch the aluminum.
A good repair broken studs. Sometimes that twisting the studs impossible and then this can be done using nitric acid, it corrodes steel and not touch the aluminum.
.There's a tip I need to remember!
 I have it listed for sale and even have someone coming Wednesday to take a look at it for a possible trade.
  I'll let you know how that turns out.
you gotta tell more of the story on the deraileur issue man.. what happened?
The girls will forever remember their jeep Bed I am sure.


The bed is great!! Those faces tell it all!
So the old fuel in the truck was not an issue. I am impressed you fixed it, you should get a handsome return on that investment.
Congratulations all around!!
Ouch, shure glad you weren't be side a road somewhere.
You need to get the old 57 Chevy drivable.
JB,
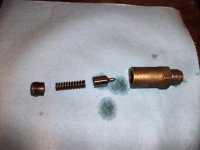
The fuel pressure regulator relief valve has caused me more headaches than I care to talk about. I am on my second Dmax truck and I can tell you that shimming the spring with the washers is almost mandatory. I'm not sure if that's what's causing your no start issue but you should shim the relief valve just because.
Sounds like sage advice from experience to me
Hope you can get the trucks started. What do you do for service manuals?
Now that is something I haven't tried, do I just toss the herb around the engine while performing some ritualistic dance, I don't need any chicken blood do I?JB, in thyme you'll get it figured out.
JB,
The fuel pressure regulator relief valve has caused me more headaches than I care to talk about. I am on my second Dmax truck and I can tell you that shimming the spring with the washers is almost mandatory. I'm not sure if that's what's causing your no start issue but you should shim the relief valve just because.
Sounds like sage advice from experience to me

Hey I don't want to be tossed around the engine?
I don't keep track of hours but probably have less than 100 hours in the truck as well as $3,899.61, and sold it for $7,200. Not a bad deal but I was sweating about it a few times throughout the repair. Good work JB, care to enlighten the lost and aimless on this big piece of equipment and or the ffffeeeeewwwww hundred dollars worth of tools?

![IMG_6192[1].jpg](/forum/data/attachments/533/533408-0294e4c34b734c99dcb6fdee5f7b6abb.jpg)


![IMG_6265[1].jpg](/forum/data/attachments/582/582140-1732a04183f8d9262995b6e1ff9106a4.jpg)