To avoid these ads, REGISTER NOW!

What did you do "IN" your garage today?

Outlawmws

Well-known member
Joined
Aug 9, 2011
Messages
39,197
Location
The Badlands
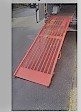
Finished making the tent, I still need to install it on the platform.

Two nights ago I mentioned stitching the coated rip stop on the long sides. with the cord in the edge. last night I closed the ends, and added a second line of stitching on the edges of the door flap (which is also part of the top when closed).

Today I had to go looking for webbing to sew on the bottom edges as the "staple Strip" to attach it to the platform, and that wound up taking a drive for an hour round trip to get decent stuff. (the big chain stores have **** selections...)

So mid afternoon I started sewing again, and got it done. The sewing machine started acting up but I got that squared away..

Tomorrow it gets installed!

Just for grins I weighed it and its between 12 and 13 lbs. The tent cot is over 40, so a decent weight savings, and space too! Less setup and tear down as well!

attachment.php
 

Attachments

  • Tent Done.jpg
    Tent Done.jpg
    72.1 KB · Views: 678
To avoid these ads, REGISTER NOW!

NUTTSGT

Super Moderator
Staff member
Joined
Sep 14, 2009
Messages
50,925
Location
Northern Central Ohio
First post. I don't think I'll ever post pics of my shop. It is somewhat organized chaos and not pretty like so many on here. I'm in awe of the garages on here. Anyway, last night and this morning I finished assembling my blast cabinet, sealed all the seams and tried it out. Fantastic to have the ability to clean cruddy parts. Glass beaded a couple of parts for my KZ750 restore and was very pleased. Now to tackle the burned out lights in my shop. The previous owner installed a great array of flouroscents but I haven't kept up over the last year or so and the result is it's getting dark in there. Not the rest of today though; I have the trailer hooked up and will be moving my son and his girlfriend into their new apartment. Cheers all,

Bill

Welcome to GJ Bill..

No need to be ashamed of your garage, we all start somewhere. Don't be afraid of posting pictures either, it provides a record of what you've done, and the direction you're going. When you post pictures, your fellow members comment and helps keep the motivation going.
 

bulwnkle

Well-known member
Joined
Apr 22, 2017
Messages
87
Wasn't exactly in my garage but in front of it. My own laziness caused a little adrenalin rush, I absolutely know better than to not use wheel chocks especially in the driveway that's on a slight angle. Anyway, I had noticed a snapped leaf a couple weeks ago while doing brakes. Looked on eBay and Craigslist for springs and didn't find any for cheap so off to the salvage yard I went. Found a set that had been replaced at some point, 35 bucks and less than an hour later they were mine. Four hours to swap they newish ones in and the pig is sitting pretty again. BTW the Snap-on dead blow in one of the pictures was a $2 garage sale score.
4ac4b75ecd4ffff2ba8d6c4b1604e411.jpg
a9c6f6a1ceb4090ec50023300316a628.jpg
2a4280f8fd1908e5611cc2293f54c212.jpg
402fb33273b76a14a3b387a5cd3ca06d.jpg


Sent from my SAMSUNG-SM-G930A using Tapatalk
 

Outlander

Well-known member
Joined
Jul 30, 2010
Messages
5,154
Location
Quebec, Canada
Not much. Was at ATV club demo ride. I did deliver the wheel chocks I made out of scrap 2x4s and painted yellow for the club's trailer at events. Nice day today, I'll make a point of enjoying the outside and the garage!
 

Jazz1

Well-known member
Joined
Jan 3, 2016
Messages
4,184
Location
Thunder Bay On.
Incorporated torches onto welding cart. Makes the garage just a little bigger. Torch cart has never left garage so been thinking about this a while
 

Attachments

  • IMG_1213.jpg
    IMG_1213.jpg
    148.8 KB · Views: 92
Last edited:

M_George

Well-known member
Joined
Sep 25, 2016
Messages
966
Location
Eastern Pa.
Changed the master break cylinder in my Mustang. Got to try out my new Gearwrench ratchet wrenches. Made the job a lot easier.
 

Outlawmws

Well-known member
Joined
Aug 9, 2011
Messages
39,197
Location
The Badlands
OK! I'm PUMPED!

I thumb tack installed the completed tent onto the platform, and IT FITS! [sSig_woohoo2]

I woke at O'dark thirty this AM realizing I might not have had enough stretch on the wool to the webing that gets stapled to the platform... What I SHOULD have done is cut the web to measure against the platform and made sure I stretched the wool to THAT...

All is well though!

Pics speak for themselves. its just thumb tacked to verify everything, I've opened and closed it twice to make sure every thing lands where it should, and I'm setting up to staple it now. (Needed a break and food)

attachment.php


attachment.php


attachment.php


attachment.php


And I even included a flue thimble for my candle stove!

attachment.php
attachment.php
 

Attachments

  • T6.jpg
    T6.jpg
    81.7 KB · Views: 981
  • T5.jpg
    T5.jpg
    72.2 KB · Views: 986
  • T4.jpg
    T4.jpg
    100.3 KB · Views: 579
  • T3.jpg
    T3.jpg
    115.1 KB · Views: 579
  • T2.jpg
    T2.jpg
    132.3 KB · Views: 579
  • T1.jpg
    T1.jpg
    119.5 KB · Views: 581

Steveodle

Well-known member
Joined
Jul 23, 2016
Messages
176
Location
Southern part of a very corrupt state
Finished hanging and adjusting the 10x10 all glass garage door, did some more 110+220v wiring, insulated and installed plywood and osb.
Hung a 2x6x8 on the centerline of the scissors trusses to support the new 1500#hoist post top end.
 

bmxdad

Well-known member
Joined
Feb 18, 2014
Messages
2,539
Location
Puyallup, WA
OK! I'm PUMPED!

I thumb tack installed the completed tent onto the platform, and IT FITS! [sSig_woohoo2]

I woke at O'dark thirty this AM realizing I might not have had enough stretch on the wool to the webing that gets stapled to the platform... What I SHOULD have done is cut the web to measure against the platform and made sure I stretched the wool to THAT...

All is well though!

Pics speak for themselves. its just thumb tacked to verify everything, I've opened and closed it twice to make sure every thing lands where it should, and I'm setting up to staple it now. (Needed a break and f

And I even included a flue thimble for my candle stove!

attachment.php
attachment.php


That came out nice ... like the candle stove. Those actually work pretty well.
 

Mtlwright

Well-known member
Joined
Sep 27, 2017
Messages
58
Location
Arnprior, Ontario
Outlaw, good suggestion on the fluoroscents. I went to HD and looked them over. Expensive to do all at once but I had two dead fixtures, so replaced one strip over the main working area (workbench, lathe, mill) with LED track lights. Terrific light in areas where I need it. Used the stuff I tore out to fix other lights but as the bulbs or fixtures go in the rest of the garage I think I'll replace with LED strips. Nice to have a well lit shop again.

OK, so here's the shop (bigger than I ever thought I would have and thanks to my great wife):

View attachment 687458

View attachment 687460

And to stay on topic, I built this. Book shelf and desk to hold an open manual and my laptop (I take a lot of hi res photos when I disassemble a bike; helps a lot):

View attachment 687459

Thanks for the welcome. Cheers,

Bill
 

R. Deschain

Well-known member
Joined
Jan 7, 2016
Messages
393
Location
Seattle, Wa
Wired in 4' lights above the lathe, tool wall, and welding table. Also put in lights that come on automatically when the garage door is opened and hooked them to the alarm - When armed, the alarm goes off if the lights come on. More light and more peace of mind. win/win
 

Attachments

  • matt talley_Lathe light.jpg
    matt talley_Lathe light.jpg
    99.1 KB · Views: 90
To avoid these ads, REGISTER NOW!

isb cornbinder

Well-known member
Joined
Nov 3, 2010
Messages
7,073
Location
Pacific South West, BC, Canada
I hung my folding ramp on a crane scale. I need to know what material I should be cutting for the fold-away bracket for the ramp/bridge. It weighs 258 pounds.
I did some ECU diagnostics.
 

Attachments

  • RAMP 2.jpg
    RAMP 2.jpg
    38.2 KB · Views: 86
  • RAMP 3.jpg
    RAMP 3.jpg
    39.7 KB · Views: 85
  • ramp in the shop 2.jpg
    ramp in the shop 2.jpg
    89.5 KB · Views: 86
  • RAMP 6.jpg
    RAMP 6.jpg
    23.6 KB · Views: 692
Last edited:

Outlawmws

Well-known member
Joined
Aug 9, 2011
Messages
39,197
Location
The Badlands
That came out nice ... like the candle stove. Those actually work pretty well.

Thanks BMX. For taking the edge off the cold in a small area, the candle stove does alright. But tents are notorious for loosing heat fast, so I'm hoping the wool will do better and the stove have more effect...

Looking to setup a small alcohol burner in that thing...
 
Last edited:

hemifalcon

Well-known member
Joined
Jan 4, 2013
Messages
708
Location
Union Grove, Wisconsin
What did you do "IN" your garage today?

eadf4c9c707a2aad36e5294b02f0fab2.jpg


321654f73ee9e1b2ba0ae60ecfebcc3f.jpg


28a1a0c78532169c560a9e62189f6368.jpg


f00f5de8865e00092e7acd6f03ab5ada.jpg


a30c8acfacf00055cd557fc6b1bb83e7.jpg


Two Radio Flyer beaten wagons... Some barn wood I had, and the rest was just "wingin it" to make one hot rod hillbilly wagon for my son!

Built in storage for kid supplies or momma's purse.. The whole structure lifts right out to be used as a regular wagon if needed.. Drink holder for the little guy too..

And yes--it's got exhaust with cotton batting (smoke) and a working Cateye taillight fixed to the rear exile for late night walks in the neighborhood (and cool points)..

Sent from my iPhone using Tapatalk
 
Last edited:

NUTTSGT

Super Moderator
Staff member
Joined
Sep 14, 2009
Messages
50,925
Location
Northern Central Ohio
Since the wife Explorer was acting up yesterday, I decided to do a little work to it. I changed the plugs and wires. The plugs were showing what appeared to be a lean condition. I was worried it might be a weak fuel pump but luckily, 68k miles yielded a nasty fuel filter.


I also drained and added some new antifreeze.
 

Attachments

  • explorer fuel filter.jpg
    explorer fuel filter.jpg
    111.4 KB · Views: 41

exranger06

Well-known member
Joined
Aug 9, 2015
Messages
1,686
Location
CT
Ok so it wasn't actually in the garage, it was out in the driveway (I did keep going into the garage to get more tools though), but tonight I pulled the rear axle out of my junk/parts Explorer. I've got someone who might want to buy it.
 

Outlawmws

Well-known member
Joined
Aug 9, 2011
Messages
39,197
Location
The Badlands
Made an Alcohol burner for the candle stove.

I've always used either Tea lights or those small mini pillars, 2" high in a small metal can and they don't last the night. I figured an alcohol lamp would do it and tested one with 1-1/2 oz capacity for burn time. 3 hours. So to get 8 hours I needed a 4 oz capacity reservoir. It also had to fit inside the stove... I'd have bought one but they were all too big or too small...

Last night I found an old can of High Tack (two actually) that wasn't sealed shut and scooped the remaining contents out and gave it an overnight soak in Acetone (The solvent for the High tack) It came out pretty clean! I de-soldered the brush out of the cap, drilled a hole and soldered in a brass tube the size of the wick. (had that brass tube already...)

I had to open up the door opening to the stove a bit, but it fits in now with some finessing, and the can is about 5 oz. capacity! The can says 4 oz capacity, but the calculations say a hair under 5. I don't suppose they were filling the can to the top. I'll need to leave a little space for thermal expansion as well...

This is the stove. I made that many years ago from scraps and stuff I had around... almost everything was aluminum except fasteners. The square flue tube on the back was part of an old towel bar for instance. it was pop riveted on and some JB weld to close gaps. That was formed round to *** the new flue, which is 1" round aluminum.

attachment.php


The Alcohol burner in place.

attachment.php


And a shot trying to get the flame. its just touching the top of the stove.

attachment.php


It's working well! the top 2/3 or more is to hot to keep touching it, The bottom edges I'm just barely able to touch those.

The flue pipe is cool to the touch at the half way up point, so should not scorch the wool as it exits the tent.

I tried my laser thermometer on the stove parts but I don't believe the numbers entirely, as the lower portions for instance shows 85 and its over 98.6 as its hot to the touch. I think the aluminum shine is throwing it off. I'm debating giving the stove a good clean and painting it high heat flat black... In theory it should radiate heat better...


In any case I'll do a little cleanup on the stove, dress some rough edges down, possibly remake the door, (and open the opening a smidgen more) paint the alcohol burner can, just some detailing.

I'm fairly certain this runs hotter than with the candles, I'll try one inside and compare results... I'll also give it a "how long on a full tank" test. I'm expecting 8 hours or more. I generally get up about 5 or so up hunting so I could start the stove at 9 and it should run all night.
 

Attachments

  • Candle stove testing.jpg
    Candle stove testing.jpg
    84.9 KB · Views: 1,218
  • Candle stove Alcohol Burner 1.jpg
    Candle stove Alcohol Burner 1.jpg
    68.7 KB · Views: 1,211
  • Candle stove Alcohol Burner 2.jpg
    Candle stove Alcohol Burner 2.jpg
    118.2 KB · Views: 2,140

MFGENG

Well-known member
Joined
Jul 21, 2011
Messages
79
A second coat of Danish oil on the flag. Planning to throw some poly on it in a few days to finish it off.


Then laminated up my first of three glue ups for the new workbench top.


NewShockerGuy

Well-known member
Joined
Oct 12, 2010
Messages
2,481
Location
Northern Virginia / DC
Started removing the calipers off my STi so I can do pads, rotors and the passenger side axle.

Had two bolts f'ing snap in the caliper, one on my rear driver side brembo, and one on my front driver side brembo. Thanks Subaru for using steel bolts in aluminum calipers which causes galvanic corrosion...

Now I have to figure out where to take these to drill out the f'ing bolts and hopefully be able to put in helicoils or preferably Time-Sert inserts.

***(Anyone in Northern VA know of a GOOD machine shop that can do this?)***

So much fun... yay!

-Nigel
 

Attachments

  • 20171003_192722_resized.jpg
    20171003_192722_resized.jpg
    131.3 KB · Views: 67
  • 20171003_192716_resized.jpg
    20171003_192716_resized.jpg
    133.8 KB · Views: 73
  • 20171003_192653_resized.jpg
    20171003_192653_resized.jpg
    131.2 KB · Views: 73
Last edited:

NewShockerGuy

Well-known member
Joined
Oct 12, 2010
Messages
2,481
Location
Northern Virginia / DC
Also try Costco for LED shop lights. They sometimes have a sale.

Use the advanced posting option and do this:

attachment.php

Your post needs to be a freaking sticky or posted so everyone can see it. Drives me nuts when people don't post pictures on things or when the sell stuff indicating they are unable to post pictures... It's like use the forum here, no need to use a different source and it's super easy.

-Nigel
 

polexican23

Banned
Joined
Jun 11, 2013
Messages
2,168
Location
burbs-Illinois
a friend gifted me his old couch (his old couch still nicer than my personal home couches) but it is in the garage. So hard not to just go out there and lay down when the nerves are shot.
 

Outlawmws

Well-known member
Joined
Aug 9, 2011
Messages
39,197
Location
The Badlands
Your post needs to be a freaking sticky or posted so everyone can see it. Drives me nuts when people don't post pictures on things or when the sell stuff indicating they are unable to post pictures... It's like use the forum here, no need to use a different source and it's super easy.

-Nigel

I've been using the same Image for that loaded on GJ several years ago. I've no clue anymore how many times I've posted the same image linked to the original post!

Feel free to copy the thing, Img tags and all, and reuse it! (go into quote, and copy paste it somewhere handy...)
 

NewShockerGuy

Well-known member
Joined
Oct 12, 2010
Messages
2,481
Location
Northern Virginia / DC
Dropped off my calipers to Mach V motorsports who specializes in Subies in my area... Hoping they can drill out the fused bolts on my Brembo's and helicoil them...

As it sits my car is at this point...lol

-Nigel
 

Attachments

  • 20171004_101919_resized.jpg
    20171004_101919_resized.jpg
    148.6 KB · Views: 125

lakeroadster

Well-known member
Joined
Jan 19, 2015
Messages
5,166
Location
Central Colorado
Took the Model A out for a spin. :3gears:

Came back, drained the gas out of the fuel tank and put in 5 gallons of fresh gas with some additive for storage.

I built the fuel tank myself back in the early 1990's.. and installed a drain plug.

Why every tank doesn't have a drain plug is truly a mystery to me :headscrat
 

Attachments

  • 1004171145-01.jpg
    1004171145-01.jpg
    91.6 KB · Views: 92
  • Model A In The Barn 001.jpg
    Model A In The Barn 001.jpg
    98.8 KB · Views: 111
  • Gas Tank Autocad Drawing.jpg
    Gas Tank Autocad Drawing.jpg
    139.5 KB · Views: 108

idriveahonda

Well-known member
Joined
Jan 3, 2017
Messages
160
This forum really needs to implement the "like" feature.

I did some cleaning from the complete overhaul of my Integra over one very long week. Need new tires, then need to pull the RaceDeck and clean it real well!
 

Boilerhouse

Well-known member
Joined
Mar 20, 2012
Messages
1,320
Location
Muskoka
Did an oil and filter change on the car and truck.
I sometimes keep household containers because I find they are handy for mixing epoxies etc. Today I saved the plastic dishes that Chinese food came in. I was a little amused at the irony as to where the containers for Chinese take out originated.
 

Attachments

  • DSCN5303.jpg
    DSCN5303.jpg
    140.8 KB · Views: 137

d.mcfarland

Well-known member
Joined
Jun 18, 2012
Messages
6,570
Location
Western PA
Drained some burnt orange looking ATF out of the power steering reservoir and replaced with Redline D4. Much better looking and smelling!
 
To avoid these ads, REGISTER NOW!
Top Bottom