To avoid these ads, REGISTER NOW!

Above 1200 Sq/FT Speed Metal Garage - rattle_snake’s 34x40 shop build in AZ

Wokspaces above 1200 squarefeet.
OP
R

rattle_snake

Well-known member
Joined
Jun 25, 2015
Messages
5,179
Location
Chandler, AZ
None of my beezwax but ..

Think you might should re-think the compressor shed

My close buddy owns
http://www.greenvalleycompressor.com/

he says, never bolt them down .. they vibrate and will crack the legs

and , its going to get hot as all get out in there, they need air to cool , especially that one you have .

I appreciated the feedback. We discussed this a few pages back and I took your advice. The nuts on the leg studs are now finger tight and rubber isolated so aren't going to apply much force to the legs, if any.

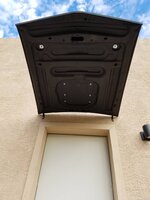
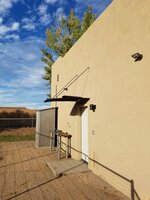
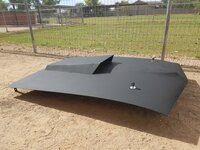
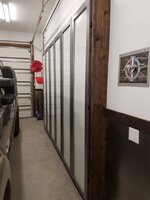
As for thermal, I made this enclosure bigger and taller to give the compressor head some more room to dissipate heat into the air. Convection though the open back will cool the enclosure (I'm assuming you see it has only 3 side of metal).
I have a few temp sensors I can instrument the enclosure with to compare with ambient, and can insulate if it makes sense (although even with hard data the threshold of 'too hot' is subjective anyhow).

Believe me, I thought too much about it. But that's what I do. It is same as theta J (thermal resistance) for a semiconductor package. Silicon die temp vs ambient, heat flow. Luckily my compressor duty cycle is very low most all of the time.

There are only a few options anyhow
1) Put inside the shop. loud as hell, and hot.
2) Outside with no enclosure. Full sun, hot, and wet when raining.
3) Outside in enclosure. hot.
 
To avoid these ads, REGISTER NOW!

Big Dad

Well-known member
Joined
Sep 8, 2006
Messages
2,287
Location
S.E. South Dakota
I think the biggest issue (And in Arizona may not be since air is so dry) is condensation in the airlines ..

The more heat in the compressor, the more it turns the h20 in the air intol steam but, you might be alright
 
OP
R

rattle_snake

Well-known member
Joined
Jun 25, 2015
Messages
5,179
Location
Chandler, AZ
Got the Mustang hood up over the door this weekend. It was a fun project, as the quality level could be much less than a real car. Instead of spending most of the effort on fixing little imperfections, I just threw some stuff together and painted it.
Dents? Fine.
Block sand? no need.
Plasma dross? leave it.
Let the paint fully dry? F-it, install it now.

I added a strip of metal to the front edge where the trim would have gone as it was rust and looked like ****.

I used the remains of the old compressor hut and a 10' pipe to suspend the hood. Used oil based flat black thought the HPLV gun.
814a80a296a1cbb6e4317826ec336574.jpg2dedfba393302702a1ef7c328f339c93.jpg

Mounting hardware is fully adjustable and pivots on 2 axis on both ends. I used 1/2 rebar with nuts welded on the ends to make a link.


dedcb59a36ca0380e105ba1fdd9210db.jpg5768c9c0a173607c4202bd9f4c4a4a10.jpg

I think the support struts are up to high. They are at 45*. Would look better to have them raked back more.
7315a2428a9f62aadbf557ac6de8b63d.jpg
Probably fill in the gap to the wall as well. Lower brackets are just a L that used the hinge mounting holes.
ab169bf7c99c74e6d90d40318f0c103f.jpg

Wife was concerned about random automotive parts adorning her buildings....
but I got her approval.
778e21e567dbccb6810f2d7ee7193762.jpg
 

Attachments

  • 814a80a296a1cbb6e4317826ec336574.jpg
    814a80a296a1cbb6e4317826ec336574.jpg
    74.9 KB · Views: 1
  • 778e21e567dbccb6810f2d7ee7193762.jpg
    778e21e567dbccb6810f2d7ee7193762.jpg
    109.9 KB · Views: 1
  • ab169bf7c99c74e6d90d40318f0c103f.jpg
    ab169bf7c99c74e6d90d40318f0c103f.jpg
    91 KB · Views: 1
  • 7315a2428a9f62aadbf557ac6de8b63d.jpg
    7315a2428a9f62aadbf557ac6de8b63d.jpg
    121.2 KB · Views: 1
  • 5768c9c0a173607c4202bd9f4c4a4a10.jpg
    5768c9c0a173607c4202bd9f4c4a4a10.jpg
    39.7 KB · Views: 1
  • dedcb59a36ca0380e105ba1fdd9210db.jpg
    dedcb59a36ca0380e105ba1fdd9210db.jpg
    70.4 KB · Views: 1
  • 2dedfba393302702a1ef7c328f339c93.jpg
    2dedfba393302702a1ef7c328f339c93.jpg
    143.7 KB · Views: 1
Last edited:

zmotorsports

ALLIANCE MEMBER
Joined
Oct 20, 2009
Messages
21,350
Location
Northern Utah
Hood turned out great Justin.

You may want to lower the angle a bit so the snow slides off.:bounce:

Oh, that's right, you don't have to deal with that ugly white ****.
 
OP
R

rattle_snake

Well-known member
Joined
Jun 25, 2015
Messages
5,179
Location
Chandler, AZ
I love the creativity displayed in your postings, great stuff.
Thanks, it's even better when it doesn't cost me anything.
Hood turned out great Justin.
You may want to lower the angle a bit so the snow slides off.:bounce:
Oh, that's right, you don't have to deal with that ugly white ****.
I did build in 3 height adjustment provisions just in case! Supposedly photons (sun shine) have zero rest mass so they can pile up forever.
Great repurpose of the hood as awking (spelling).
I love that!!! :thumbup:
:beer:
Fastest awning in the west!
Thanks guys. I think it would look faster if the supports were angled back a bit more.
:3gears:
I though about removing the porch light and putting in a dome light on the bottom of the hood instead... maybe I should finish these cabinets first.
 
OP
R

rattle_snake

Well-known member
Joined
Jun 25, 2015
Messages
5,179
Location
Chandler, AZ
I think i have convinced myself to do the bare finish on the cabiner door frames. I prepped a pair and it wasnt that bad. They are pretty dang tall! Hope to cut some panels tonight and test fit68ebd7bd8f0dd44ad0778460ccd5cc2a.jpg

The blank wall needs some art (aka junk) on it badly..
 

Attachments

  • 68ebd7bd8f0dd44ad0778460ccd5cc2a.jpg
    68ebd7bd8f0dd44ad0778460ccd5cc2a.jpg
    56.3 KB · Views: 1

zmotorsports

ALLIANCE MEMBER
Joined
Oct 20, 2009
Messages
21,350
Location
Northern Utah
I think i have convinced myself to do the bare finish on the cabiner door frames. I prepped a pair and it wasnt that bad. They are pretty dang tall! Hope to cut some panels tonight and test fit68ebd7bd8f0dd44ad0778460ccd5cc2a.jpg

The blank wall needs some art (aka junk) on it badly..

Nice. I like the bare metal look.
 

Attachments

  • 68ebd7bd8f0dd44ad0778460ccd5cc2a.jpg
    68ebd7bd8f0dd44ad0778460ccd5cc2a.jpg
    55.9 KB · Views: 1
OP
R

rattle_snake

Well-known member
Joined
Jun 25, 2015
Messages
5,179
Location
Chandler, AZ
Painted the main speaker enclosures this weekend. I chose to just put a few coats of red spray paint on them and not go crazy with a 37 step process piano finsh for 2 reasons:
1) They are shop speakers and will get dusty/dirty and stay that way.
2) The audio system is the only mission critical system in the shop and downtime must be minimized at all cost.

They already had a thin lacquer finish so I just sanded one last time, disassembled and sprayed.
ad82c04e1d793c3df693d5bbf6b0d495.jpg

6ae21773ebfe93b2192125bf40da2e00.jpg

I also moved the right main speaker farther to the right, and rewired all 4 speakers with new wire. The speakers have been moved at least 10 times over the last year and half and I had used leftovers spliced together. I drilled a hole in the corner of the shelf for the wires to pass through to the amplifiers. I ran the wires from the mains up though the holes for the air piping, and had to modify the trim bezels because the guy that made them did too good of a job.
bf3c4f8e35c8c9f45e22a64b888da477.jpg

I spent some time re-tuning the system to it's new speaker locations. The EQ curve is quite different that it was before for and sounds a hell of a lot better. I use an inexpensive mic and a RTA app on my phone. I am also using a bluetooth link instead of headphone jack and the frequency response is noticeably different, interestingly but not surprising. My phone did have additional signal processing on by default, so I turned it all off.
 

Attachments

  • ad82c04e1d793c3df693d5bbf6b0d495.jpg
    ad82c04e1d793c3df693d5bbf6b0d495.jpg
    55 KB · Views: 1
  • 6ae21773ebfe93b2192125bf40da2e00.jpg
    6ae21773ebfe93b2192125bf40da2e00.jpg
    64.9 KB · Views: 1
  • bf3c4f8e35c8c9f45e22a64b888da477.jpg
    bf3c4f8e35c8c9f45e22a64b888da477.jpg
    70.4 KB · Views: 1
Last edited:
OP
R

rattle_snake

Well-known member
Joined
Jun 25, 2015
Messages
5,179
Location
Chandler, AZ
Completed one of the three pairs of cabinet doors. I tried not to get to **** on the finish, they will get dusty/dirty and stay that way. That's the point of the door, to keep the stuff inside less dirty. I didn't remove all the mill scale or go for a mirror finish. I put a few light coats of satin clear on the frames to prevent rusty finger prints.
The panel is 1/8 white hardboard that is secured with a thin bead of silicone. I used spacers to set the depth from the front.
a27018457d4763af877ac0e7fe7d87fb.jpg

The panel white isn't a great match to the walls but good enough. I like the way they came out but not looking forward to sanding the other 4. The cabinets I made for the garage about 2 years ago were just OK, so I guess these are a little over the top after some process improvements.
721851a18f5d3034a4f2f812956f60df.jpg648545520accbe5d7d01ce0e451f20f5.jpg
 

Attachments

  • 648545520accbe5d7d01ce0e451f20f5.jpg
    648545520accbe5d7d01ce0e451f20f5.jpg
    87.3 KB · Views: 2
  • 721851a18f5d3034a4f2f812956f60df.jpg
    721851a18f5d3034a4f2f812956f60df.jpg
    54.9 KB · Views: 2
  • a27018457d4763af877ac0e7fe7d87fb.jpg
    a27018457d4763af877ac0e7fe7d87fb.jpg
    64 KB · Views: 2

OutlawDrifter

Well-known member
Joined
Jan 20, 2015
Messages
3,872
Location
KS
Nice work Justin. My 1980s sound setup with 1 good functioning speaker would make you cringe! I plan to update, but it's good enough for now.
 

C_F

ALLIANCE MEMBER
Joined
Jan 21, 2005
Messages
9,675
Location
Utah...SNOW BLOWS!
Nice work Justin. My 1980s sound setup with 1 good functioning speaker would make you cringe! I plan to update, but it's good enough for now.

Haha! Mine is an old radio alarm clock.:D Sometimes I just turn on the radio of whichever vehicle I'm working on at the moment.
 
OP
R

rattle_snake

Well-known member
Joined
Jun 25, 2015
Messages
5,179
Location
Chandler, AZ
Haha! Mine is an old radio alarm clock.:D Sometimes I just turn on the radio of whichever vehicle I'm working on at the moment.
I have done the same when the shop system was down. Both trucks and the boat have big bad audio systems. and the Cobra. and the living room. Even the back patio and barn have custom systems with subwoofers.
Everyone has their own priories. I like good whiskey too...
:rocker:
 
Last edited:
OP
R

rattle_snake

Well-known member
Joined
Jun 25, 2015
Messages
5,179
Location
Chandler, AZ
Finished up the rest of the cabinet doors. The cabinet project as a whole was a lot of work, but I am proud of the results. They are definitely one of a kind. Not something you can just order on the internet. Still came out cheaper than buying equivalent decent quality cabinets, but no one makes anything this shallow anyhow.
After hanging the last door it occurred to me that my time here is temporary, and one day I will eventually move someplace else and leave all my hard work behind (to be ripped out and thrown away). No different than a vehicle project with lots of time/money invested I guess.
Maybe I’ve gone a little overboard… there are plenty of other members here in GJ land that went even farther and built some incredible stuff. So I blame all of you. :)
I’m contemplating powering though and finishing the last of the big projects vs taking a break and working IN the shop.
But I’m already tired of looking at the **** up on the shelf so I think doors for it are next, but the A/C should go in first… If only I could commit to a plan on either of those.

357389f815f15f6eae4aadcc095ed40d.jpg5ecadaa1b8d359be67181a5d05114996.jpg085143326d93706ecc228f978563b67c.jpg
 

Attachments

  • 085143326d93706ecc228f978563b67c.jpg
    085143326d93706ecc228f978563b67c.jpg
    87.9 KB · Views: 3
  • 5ecadaa1b8d359be67181a5d05114996.jpg
    5ecadaa1b8d359be67181a5d05114996.jpg
    63 KB · Views: 2
  • 357389f815f15f6eae4aadcc095ed40d.jpg
    357389f815f15f6eae4aadcc095ed40d.jpg
    42.6 KB · Views: 2
Last edited:
To avoid these ads, REGISTER NOW!
OP
R

rattle_snake

Well-known member
Joined
Jun 25, 2015
Messages
5,179
Location
Chandler, AZ
I looked at some data from the temp sensor I hung inside the air compressor hut. In the hottest part of the day when it is in full sun, the interior temp is only 5-10 degrees above ambient. Less than I thought, and not going to make any noticeable difference. Had it been more, one could build the equivalent of a cold air intake. Essentially a tube from the filter to the outside.

The only issue I have, is that it is rusting too slowly.
 

zmotorsports

ALLIANCE MEMBER
Joined
Oct 20, 2009
Messages
21,350
Location
Northern Utah
Gate knob stop from a rusty automobile part. As opposed to a hole in the stucco.
Cobra IRS hub that spun bearingc7723fd75ed101940457758ce7bba33a.jpg

Great minds Justin.

I did something similar on my man gate where it opens up against the third bay on the house. I drilled and mounted it to the brick cap just below the stucco and put a rubber bumper on it so it wouldn't mark up the powder coating on the gate if it came in contact.
 

nsula_country

Well-known member
Joined
May 23, 2013
Messages
1,534
Location
Northwestern Louisiana
Finished up the rest of the cabinet doors. The cabinet project as a whole was a lot of work, but I am proud of the results. They are definitely one of a kind. Not something you can just order on the internet. Still came out cheaper than buying equivalent decent quality cabinets, but no one makes anything this shallow anyhow.
After hanging the last door it occurred to me that my time here is temporary, and one day I will eventually move someplace else and leave all my hard work behind (to be ripped out and thrown away). No different than a vehicle project with lots of time/money invested I guess.
Maybe I’ve gone a little overboard… there are plenty of other members here in GJ land that went even farther and built some incredible stuff. So I blame all of you. :)
I’m contemplating powering though and finishing the last of the big projects vs taking a break and working IN the shop.
But I’m already tired of looking at the **** up on the shelf so I think doors for it are next, but the A/C should go in first… If only I could commit to a plan on either of those.

357389f815f15f6eae4aadcc095ed40d.jpg5ecadaa1b8d359be67181a5d05114996.jpg085143326d93706ecc228f978563b67c.jpg

Wow... :bowdown:

Those cabinets turned out much different than I imagined. Very functional, minimally intrusive to the work space. I am inspired to do something similar.

Good work man!

CT
 

Attachments

  • 357389f815f15f6eae4aadcc095ed40d.jpg
    357389f815f15f6eae4aadcc095ed40d.jpg
    41.6 KB · Views: 2
  • 5ecadaa1b8d359be67181a5d05114996.jpg
    5ecadaa1b8d359be67181a5d05114996.jpg
    62.5 KB · Views: 2
  • 085143326d93706ecc228f978563b67c.jpg
    085143326d93706ecc228f978563b67c.jpg
    86.6 KB · Views: 3
OP
R

rattle_snake

Well-known member
Joined
Jun 25, 2015
Messages
5,179
Location
Chandler, AZ
Thanks for the complements guys. I finally feel like I am getting close to the finish line on the building. The cabinet doors made the junk on the shelf more noticeable, so I had to prioritize the doors for it. The hard part was committing to a design. There will be 4x, 8.5’ x 2’ doors (similar to the cabinet doors) that will ride on 3’ V-rollers on a pair of 3/16 steel tracks setup in bypass style. One of the goals was to minimize all the gaps in the system so after lots of drawings and math I hacked up 200’ of steel.
The trusses run parallel to the shelf, and not close the edge where the doors need to be. I ended up going with 4 steel supports that span the truss gap and yield 5x, ~80” sections of tracks.
Each support is adjustable in the x, y, and z dimensions. No matter how careful the measurements are taken, things like this never line up and I knew the install would be a pain without adjustability.
9c266708dd1d8e910b09975468f2d14b.jpg
The lower plate is slotted to allow for track to mount mis-alignment.
5ca84500423e77131b12abcac4ce8986.jpg

The assembled tracks are 33’ each. I put in provisions for a cross bolt in the center of each section, but the tracks are not as straight as I would like. I can fiddle with the length on a few to get them ‘good enough’ but would need to add horizontal cross braces to get them ‘OCD compliant’.
d9b2f73e24c026c4a4cf6d8bf87a0237.jpg
 

Attachments

  • d9b2f73e24c026c4a4cf6d8bf87a0237.jpg
    d9b2f73e24c026c4a4cf6d8bf87a0237.jpg
    58.2 KB · Views: 4
  • 5ca84500423e77131b12abcac4ce8986.jpg
    5ca84500423e77131b12abcac4ce8986.jpg
    32.7 KB · Views: 4
  • 9c266708dd1d8e910b09975468f2d14b.jpg
    9c266708dd1d8e910b09975468f2d14b.jpg
    57.8 KB · Views: 3
Last edited:
OP
R

rattle_snake

Well-known member
Joined
Jun 25, 2015
Messages
5,179
Location
Chandler, AZ
Got a pair of doors hung this weekend. Other set are almost done. Overall the system has worked out well.
46309d4eeed91bc41cec3521a67f6ca1.jpg3371d28c08acb54200994dbad3c3814d.jpg
 

Attachments

  • 46309d4eeed91bc41cec3521a67f6ca1.jpg
    46309d4eeed91bc41cec3521a67f6ca1.jpg
    75.3 KB · Views: 3
  • 3371d28c08acb54200994dbad3c3814d.jpg
    3371d28c08acb54200994dbad3c3814d.jpg
    29.8 KB · Views: 4

nsula_country

Well-known member
Joined
May 23, 2013
Messages
1,534
Location
Northwestern Louisiana
Now all you need is to power them with some drive rollers and install travel limit switches for proper indexing of the sliders and to prevent overtravel!

Freaking insanely cool!

CT
 
OP
R

rattle_snake

Well-known member
Joined
Jun 25, 2015
Messages
5,179
Location
Chandler, AZ
You guys are a bad influence. I've done similar things at work in the past so those thoughts passed through what's left of my mind.

Here is the finished product. I left the subwoofers up on the shelf for now behind the doors. I think my next shop project is to finish and find a new home for them
551a1551dfafe4b4d18ba31e92bee8f1.jpg29795f3f7c1fa977cc0f9a977dc36c69.jpg
Glad I'm done cutting tube. I built 10 doors total each with 8 miter cuts. I bought a new Tenryu 66t blade while my evo was out getting sharpened. I think the evo product is a little better.
d6184eab5497a6d38f76d38426e6a92a.jpg
 

Attachments

  • d6184eab5497a6d38f76d38426e6a92a.jpg
    d6184eab5497a6d38f76d38426e6a92a.jpg
    101.2 KB · Views: 2
  • 29795f3f7c1fa977cc0f9a977dc36c69.jpg
    29795f3f7c1fa977cc0f9a977dc36c69.jpg
    64.1 KB · Views: 1
  • 551a1551dfafe4b4d18ba31e92bee8f1.jpg
    551a1551dfafe4b4d18ba31e92bee8f1.jpg
    70.7 KB · Views: 1
Last edited:
OP
R

rattle_snake

Well-known member
Joined
Jun 25, 2015
Messages
5,179
Location
Chandler, AZ
I guess this puts me just 2 projects away from completion of the final phase, 'Phase 3' (let's not confuse this with 'done'). I'm in this a little over 2 years now and didn't think I would be as far along as I am.

Still evaluating and contemplating (analysis paralysis) A/C system configurations and details.
I have a thread over in HVAC land
https://www.garagejournal.com/forum/showthread.php?t=373241
if anyone has inputs or would like to add confusion and extra expenses..
 

Djui5

Active member
Joined
Dec 7, 2017
Messages
34
Location
Mesa, AZ
Nice shop! I’m a local too, and know Ashman as well. If you have a “come see my shop” party I’ll be there.

I really like the tall cabinets.
 
OP
R

rattle_snake

Well-known member
Joined
Jun 25, 2015
Messages
5,179
Location
Chandler, AZ
Nice shop! I’m a local too, and know Ashman as well. If you have a “come see my shop” party I’ll be there.

I really like the tall cabinets.

Thanks for stopping in. Cabinets working out good but the door inserts are coming loose so need a plan b for them...
 
To avoid these ads, REGISTER NOW!
Top Bottom