To avoid these ads, REGISTER NOW!

ZMotorsports Shop Projects 2.0

OP
Z

zmotorsports

ALLIANCE MEMBER
Joined
Oct 20, 2009
Messages
21,312
Location
Northern Utah
The good thing for us is it doesn't take long to get over the Channel and into some proper mountains in Europe, and they seem more "special" because we have to plan the trip.

Nice. I guess then you can call it a proper "holiday" rather than merely an afternoon drive.:D
 
To avoid these ads, REGISTER NOW!
OP
Z

zmotorsports

ALLIANCE MEMBER
Joined
Oct 20, 2009
Messages
21,312
Location
Northern Utah
I purchased our Toro MX4250 Timecutter last March after our move and having a larger yard in which to mow/maintain. It has been a great mower but the last couple of mows last fall I detected a slight noise that I suspected as an idler bearing. It wasn't a squeal or grind, it merely sounded like a bearing starting to run dry and rough. Again I immediately suspected an idler bearing on the mower deck as it was only audible when the mower deck clutch was engaged.

I removed the deck from the mower last night and spun the idlers which felt perfectly fine. I then thought I hope it isn't a clutch assembly so I started the mower and engaged/disengaged the clutch a few times and it was quiet as could be. I had my son assist me lifting the mower deck up on the motorcycle lift so I could turn it on its side and not only diagnose but also clean out the underside of the deck.

As soon as I turned it on its side and removed the belt I spun the two blades still attached to the spindles and BINGO, found the noise. I had one spindle that was rough sounding and if I placed my hand on the deck and spun the spindle shaft I could actually feel the bearing roughness.

Luckily upon disassembling I discovered that they are merely standard 6203-2RS sealed bearings, two per spindle. I removed the bearings and cleaned everything up so I can pick up some bearings and replace them.

Toro MX4250 Timecutter with the mower deck removed.
5d6bf9c36b5bdf45c6755cabd8aa368b.jpg

Mower deck turned on its side to clean and disassemble.
7546dbc11c63ddbcf4e6a5db3358020a.jpg

Deck cleaned and spindle removed.
b4c8f83a807a6c9195336a59a0bd4475.jpg

Spindle assembly removed and ready for disassembly.
eebec8c528714ebf6b30ce97b661cd50.jpg

Bearing removed from the spindle housing.
766664f52e193de96d9ed9f0a66ad772.jpg

Tonight I’ll stop at my local bearing supply house and pick up a couple of bearings as well as an oil filter so I can finish up the ZTR and it’s ready for spring.
 

Attachments

  • 766664f52e193de96d9ed9f0a66ad772.jpg
    766664f52e193de96d9ed9f0a66ad772.jpg
    772.2 KB · Views: 0
  • eebec8c528714ebf6b30ce97b661cd50.jpg
    eebec8c528714ebf6b30ce97b661cd50.jpg
    728.5 KB · Views: 0
  • b4c8f83a807a6c9195336a59a0bd4475.jpg
    b4c8f83a807a6c9195336a59a0bd4475.jpg
    776.1 KB · Views: 0
  • 7546dbc11c63ddbcf4e6a5db3358020a.jpg
    7546dbc11c63ddbcf4e6a5db3358020a.jpg
    836.8 KB · Views: 0
  • 5d6bf9c36b5bdf45c6755cabd8aa368b.jpg
    5d6bf9c36b5bdf45c6755cabd8aa368b.jpg
    758.4 KB · Views: 1
Last edited:
OP
Z

zmotorsports

ALLIANCE MEMBER
Joined
Oct 20, 2009
Messages
21,312
Location
Northern Utah
After closing up the shop for the evening and bringing the garbage cans as I was walking back to the house I snapped a picture of the shop exterior lit up and after our snowstorm less than 48-hours ago.
61f72d52ce8015830425e6fe0291297d.jpg

Thanks for looking.
 

Attachments

  • 61f72d52ce8015830425e6fe0291297d.jpg
    61f72d52ce8015830425e6fe0291297d.jpg
    771.1 KB · Views: 2

nutjob

Well-known member
Joined
May 8, 2008
Messages
804
Location
NE, PA
Tonight I’ll stop at my local bearing supply house and pick up a couple of bearings as well as an oil filter so I can finish up the ZTR and it’s ready for spring.

Are you going to pick up a "couple" or 4? Can't be that many hours on it already, I think I would replace all 4 since you have it this far apart and I'll bet the replacements will be a much better quality.

Kevin
 
OP
Z

zmotorsports

ALLIANCE MEMBER
Joined
Oct 20, 2009
Messages
21,312
Location
Northern Utah
Are you going to pick up a "couple" or 4? Can't be that many hours on it already, I think I would replace all 4 since you have it this far apart and I'll bet the replacements will be a much better quality.

Kevin

Yes, I will replace the ones in the other spindle while the deck is on the bench. Much easier to replace with good quality bearings now vs. having to replace the other spindle's bearings mid-way through the summer mowing season.:sad:

Like you said, I doubt they are the highest quality bearings, the mower only has 18.7 hours on it and probably more like 15 hours on the mowing deck. Poor bearing life in my opinion so I will be replacing with better quality for sure.

Thanks for stopping by and checking out my projects thread.
 

larry4406

Well-known member
Joined
Jan 27, 2006
Messages
18,999
Location
Northern Virginia
Those mower deck spindles make me mad. The ones on my MTD have zerk fittings yet the freaking bearings are sealed both side! WTF. How is grease supposed to get in? I’ve toyed with prying off the bearing seal on the interior side next time so the grease can get in.
 

bullfrog123

Well-known member
Joined
Feb 10, 2011
Messages
477
Location
SE Idaho
Those mower deck spindles make me mad. The ones on my MTD have zerk fittings yet the freaking bearings are sealed both side! WTF. How is grease supposed to get in? I’ve toyed with prying off the bearing seal on the interior side next time so the grease can get in.

Same thing on my Cub Cadet RZT-S. I drilled a hole and installed zerks in the spindles and removed the inside seal to allow grease to get to them. As fast as those little bearings spin I am surprised the factory ones lasted that long being sealed.
 
OP
Z

zmotorsports

ALLIANCE MEMBER
Joined
Oct 20, 2009
Messages
21,312
Location
Northern Utah
Those mower deck spindles make me mad. The ones on my MTD have zerk fittings yet the freaking bearings are sealed both side! WTF. How is grease supposed to get in? I’ve toyed with prying off the bearing seal on the interior side next time so the grease can get in.

Yeah, I've worked on a lot like that and it isn't proprietary to just MTD. Don't understand that at all. I thought about removing a seal on either side of these and drilling/tapping to install a zerk but that isn't always the answer either as sometimes it makes it easier to introduce contaminants and foreign material into the assembly.

I think this was just an inferior bearing from the get go. I went and purchased some good quality bearings a little bit ago and I will replace all four bearings (both spindles) and will probably be fine.

Thanks for stopping by my projects thread.
 
OP
Z

zmotorsports

ALLIANCE MEMBER
Joined
Oct 20, 2009
Messages
21,312
Location
Northern Utah
I have the identical mower with 80+ hours on it. You must have gotten a bad bearing from the factory.:headscrat

That's kind of what I think too as the other one is smooth as glass and no signs of wear. I'll replace all of them and move on. Other than this little hiccup, I love the mower and have no complaints about it.

Thanks for commenting and stopping by.
 
OP
Z

zmotorsports

ALLIANCE MEMBER
Joined
Oct 20, 2009
Messages
21,312
Location
Northern Utah
Same thing on my Cub Cadet RZT-S. I drilled a hole and installed zerks in the spindles and removed the inside seal to allow grease to get to them. As fast as those little bearings spin I am surprised the factory ones lasted that long being sealed.

It's hard to say, we have sealed bearings in much worse environmental conditions at work and in other items than those and they hold up fine. I think a better quality bearing will fix my issue.

Thanks for following along on my thread.
 

GRN96WS6

Well-known member
Joined
Dec 23, 2012
Messages
2,195
Location
SOMD
The bearings aren't under any warranty... If not yikes! But knowing how meticulous you are... Haha
 
OP
Z

zmotorsports

ALLIANCE MEMBER
Joined
Oct 20, 2009
Messages
21,312
Location
Northern Utah
The bearings aren't under any warranty... If not yikes! But knowing how meticulous you are... Haha

No, the warranty on the mower expired around October~ish. The mower had just started making a noise by then but I had an idea of what it was and to be honest didn't want to take it to the shop as I just wanted to address it myself, warranty or not.

I just talked to the guy I purchased the mower from because I want to run by and pick up an oil filter today and asked him if he has seen premature failures on those bearings. He said they generally go 250+ hours easily but has seen an occasional one fail prematurely, probably no different than anything else. I explained that I had a bearing fail @ 18.7 hours and he said he would give me a bearing as he has them on hand. I told him not to worry about it as I picked up four *** 6203-2RS bearings a little bit ago from my local bearing house but I appreciated the offer. He said he would make it right when I stopped by to pick up the filter but I didn't mention it to him to get something out of him, I just wanted to ask if he saw any fail with such low hours on them.

One of the reasons I bought my mower from a small mom & pop shop and NOT the big box is for that very reason, if something was to go wrong I wanted a truthful answer. I work on a lot of mowers but just not this particular model and know that each brand and model seem to have their own little idiosyncrasies so it helps to have a network of folks to bounce things off of and Chris is a great guy to work with. I also purchase quite a few parts from him as he stocks several different brands of OPE lines.

I hope to get out of work on time tonight so I can wrap up the repair tonight. Looking forward to working in the shop tonight and hanging out with my son while he works on his Jeep.

Thanks for stopping by and checking on the projects I have going on.
 

Finallygotit

ALLIANCE MEMBER
Joined
Jul 6, 2013
Messages
4,077
Location
Tucson, AZ
.....One of the reasons I bought my mower from a small mom & pop shop and NOT the big box is for that very reason, if something was to go wrong I wanted a truthful answer.

BINGO! :rocker:

Plus, like most mom and pop shops and as he said, he want's to make it right.

Kudos to him! :thumbup:

:beer:
 
OP
Z

zmotorsports

ALLIANCE MEMBER
Joined
Oct 20, 2009
Messages
21,312
Location
Northern Utah
BINGO! :rocker:

Plus, like most mom and pop shops and as he said, he want's to make it right.

Kudos to him! :thumbup:

:beer:

Thanks Dan. I'm glad I'm not alone in my thinking. To me it boils down to more than just dollars and cents, it is about loyalty to a business rather than just cherry picking trying to save a buck. I am sure at times I pay a few bucks more than I could get something elsewhere but I also know there are many times I am rewarded for being loyal to a place of business. I find myself being an extremely loyal customer, everything from restaurants, tire shops, parts stores and pretty much everything else. They take care of me, I support them. The exact opposite is true also, if they ever cross me, I will go out of my way to make sure they know it as well as letting everyone else know.:D
 
OP
Z

zmotorsports

ALLIANCE MEMBER
Joined
Oct 20, 2009
Messages
21,312
Location
Northern Utah
Finished up the spindle bearing replacement on the Toro ZTR tonight.

I picked up four *** 6203-2RS bearings today and replaced the bearings on both spindles.
c895033876c2f4ccfaa94f64b8f55e4d.jpg

f5e72997bcdace54b88db59542cef66b.jpg

Prior to reinstalling the deck back under the mower I sharpened and balanced both blades.
20691dcfd7717a10c4e888a465889a86.jpg

Finally I changed the oil and filter in preparation for the upcoming season.

There will also be a newly uploaded video of this repair to my YouTube channel following shortly.

Thanks for looking.
 

Attachments

  • 20691dcfd7717a10c4e888a465889a86.jpg
    20691dcfd7717a10c4e888a465889a86.jpg
    772 KB · Views: 0
  • f5e72997bcdace54b88db59542cef66b.jpg
    f5e72997bcdace54b88db59542cef66b.jpg
    755.8 KB · Views: 0
  • c895033876c2f4ccfaa94f64b8f55e4d.jpg
    c895033876c2f4ccfaa94f64b8f55e4d.jpg
    822.8 KB · Views: 0
Last edited:

yhprum

Well-known member
Joined
Jul 27, 2006
Messages
1,380
Location
Brisbane Australia
I would not be surprised if that bearing failed due to improper installation i.e. hammered or pressed on though the wrong race or excessive preload. Either way you're all set for awhile now.
 
OP
Z

zmotorsports

ALLIANCE MEMBER
Joined
Oct 20, 2009
Messages
21,312
Location
Northern Utah
I would not be surprised if that bearing failed due to improper installation i.e. hammered or pressed on though the wrong race or excessive preload. Either way you're all set for awhile now.

Yeah, it's hard to say. You would think at the factory they would have the proper tools and not be hammering on bearings but someone could have dropped one or any number of things. Either way I think I'm good for a while and I am fairly confident mine was just a fluke. I would still recommend the mower even despite this minor issue.

Thanks for following along and commenting.
 
OP
Z

zmotorsports

ALLIANCE MEMBER
Joined
Oct 20, 2009
Messages
21,312
Location
Northern Utah
I had planned on polishing the headlights on my 2006 Duramax tonight but instead I ended up blowing the 5~ish inches of snow off the driveway and back yard.
1ca1a066f2e9712545dfcf1cd641027e.jpg

That was 2-1/4 hours I hadn’t planned on.

Hopefully tomorrow the weather will be nicer and I can get some shop time in.
 

Attachments

  • 1ca1a066f2e9712545dfcf1cd641027e.jpg
    1ca1a066f2e9712545dfcf1cd641027e.jpg
    695.7 KB · Views: 0
To avoid these ads, REGISTER NOW!

littleponderosa

Well-known member
Joined
Sep 27, 2014
Messages
864
Location
MONTANA
Mike, tell me you shoot elk. Or at least try like I do. Bigass wapiti down your way.
I keep coming back to this thread, it's calming.

You ever rework a 2 into1 oldass supertrapp pipe? If you remember way back - like '89 - the softail version had a upward kick to it - i've wanted this level for 25+ years and i finally met the right guy with skills!
You ever take on long distance work? From the looks of your shop, I'd have to ship cause you ain't gonna want a 31 year old, 145k road hog in there. It dont leak, yet. Mirrors work at 0mph & bout 89mph. It has a nice vibe.
Bill
 

dittle fart around

Well-known member
Joined
Jan 9, 2011
Messages
2,455
Location
Vancouver, Washington, USA
I had planned on polishing the headlights on my 2006 Duramax tonight but instead I ended up blowing the 5~ish inches of snow off the driveway and back yard.
1ca1a066f2e9712545dfcf1cd641027e.jpg

That was 2-1/4 hours I hadn’t planned on.

Hopefully tomorrow the weather will be nicer and I can get some shop time in.

I follow your posts. My son and his family lives near you. My grandson is 6 weeks old.

Kinda makes me feel closer by reading your posts. :beer:
 

Attachments

  • 1ca1a066f2e9712545dfcf1cd641027e.jpg
    1ca1a066f2e9712545dfcf1cd641027e.jpg
    76.2 KB · Views: 0
OP
Z

zmotorsports

ALLIANCE MEMBER
Joined
Oct 20, 2009
Messages
21,312
Location
Northern Utah
Mike, tell me you shoot elk. Or at least try like I do. Bigass wapiti down your way.
I keep coming back to this thread, it's calming.

You ever rework a 2 into1 oldass supertrapp pipe? If you remember way back - like '89 - the softail version had a upward kick to it - i've wanted this level for 25+ years and i finally met the right guy with skills!
You ever take on long distance work? From the looks of your shop, I'd have to ship cause you ain't gonna want a 31 year old, 145k road hog in there. It dont leak, yet. Mirrors work at 0mph & bout 89mph. It has a nice vibe.
Bill

Sorry Bill, not much of a hunter any more. I used to do quite a bit of hunting about 30 or so years ago but once I got married for some reason I gave it up. Still enjoy to go shooting with my son when I have time but no hunting. To be honest, if it doesn't have an engine on it or relate to the shop of something mechanical, I don't have much interest.:lol_hitti

Not too familiar with Supertrapp exhausts on the Harley's, used them on some of the late 80's into the mid-90's on ATV's but that is about it.

Thanks for stopping by and keeping an eye on my projects.
 
OP
Z

zmotorsports

ALLIANCE MEMBER
Joined
Oct 20, 2009
Messages
21,312
Location
Northern Utah
I follow your posts. My son and his family lives near you. My grandson is 6 weeks old.

Kinda makes me feel closer by reading your posts. :beer:

Awesome, glad to hear that.

Congratulations on the new grandson.

I appreciate you following along on my projects thread. I sure appreciate you helping me out on my New Age cabinets. I sure like them.
 
OP
Z

zmotorsports

ALLIANCE MEMBER
Joined
Oct 20, 2009
Messages
21,312
Location
Northern Utah
Finished up the oil change on the Toro Timecutter ZTR this morning.

Drained the oil from the engine.
b197588bb63f17117ed9a51c38080660.jpg

I did some research and found the WIX/Napa Gold equivalent to the Toro oil filter. It appears to be the same one many of the other OPE manufacturers use. It crosses over to a WIX # 51394 or a NAPA Gold 1394.
9c8fe977d33575efeb8e62bd1b193cad.jpg

9ee57930522d3a82e50ad3f46cc95a5e.jpg

9677700d9115b4522c944003828e90da.jpg

Following the mower service I moved on to polishing the headlights out on my 2006 Chevrolet Duramax. I’m ashamed to say that they have been neglected for a few years. I usually run the cleaner and polish over them a couple times a year but have gotten a bit behind. Now that my truck will be parked indoors all of the time except the once or twice a week I drive it, I am sure they will stay looking good much longer with probably only require a quick touch up with the cleaner or polish once a year.

I did a video and will be posting it to my channel shortly, but I completely forgot to take a before picture of how bad they were. A few years ago I did a similar write up on my original projects thread where I restored the headlights on our 2003 Monaco Dynasty coach.

Here are the materials that I use on headlights.
431b684b824da741e33258dbb6279f51.jpg

Final results. Look as good as new.
37927b594c00eb75a461625a3b9c09d7.jpg

ef50b1fa384c9326bf95274dc3b3736e.jpg


Headlight polishing/restoration video.

Thanks for looking.
 

Attachments

  • ef50b1fa384c9326bf95274dc3b3736e.jpg
    ef50b1fa384c9326bf95274dc3b3736e.jpg
    628.4 KB · Views: 1
  • 37927b594c00eb75a461625a3b9c09d7.jpg
    37927b594c00eb75a461625a3b9c09d7.jpg
    660.5 KB · Views: 0
  • 431b684b824da741e33258dbb6279f51.jpg
    431b684b824da741e33258dbb6279f51.jpg
    863.4 KB · Views: 0
  • 9677700d9115b4522c944003828e90da.jpg
    9677700d9115b4522c944003828e90da.jpg
    932.7 KB · Views: 0
  • 9ee57930522d3a82e50ad3f46cc95a5e.jpg
    9ee57930522d3a82e50ad3f46cc95a5e.jpg
    900.4 KB · Views: 0
  • 9c8fe977d33575efeb8e62bd1b193cad.jpg
    9c8fe977d33575efeb8e62bd1b193cad.jpg
    807.5 KB · Views: 0
  • b197588bb63f17117ed9a51c38080660.jpg
    b197588bb63f17117ed9a51c38080660.jpg
    726.8 KB · Views: 0
Last edited:

C_F

ALLIANCE MEMBER
Joined
Jan 21, 2005
Messages
9,675
Location
Utah...SNOW BLOWS!
Nice video tutorial on restoring your headlights, they did turn out nice! I need to do the headlights on a couple of my cars this spring, and I will re-watch your video to refresh my memory. :)
 
OP
Z

zmotorsports

ALLIANCE MEMBER
Joined
Oct 20, 2009
Messages
21,312
Location
Northern Utah
I had about an hour after work tonight so I thought I would make the most of it. I looked over my white board and a task jumped out at me that I thought fit the time frame I had available.

At my last shop I had my my JMR tube notcher welded to a tube/pedestal that was then bolted to my floor. I really didn’t want to mount it permanently nor in the same fashion in my new shop so I opted to make another adapter in which to fasten to my fabrication table when needed.

This is what I started with ready to cut the welds and separate the vertical tube from the mounting base of the notcher.
47a70efce4e6cb14c35bda78336c08d7.jpg

Separated and ready to knock the remaining weld down.
72dbd592971fdda134251b9e7a93f0d2.jpg

I inserted the 2”x 1/4” wall tubing into the receiver tubing and tack welded the notcher after leveling.
3f97499d79e2383f5ece271f07f747b2.jpg

Completed and ready for paint.
2cedf395fa3fa60378b21934007b8ade.jpg

2a69d687286e22016eb372f1be73455b.jpg

Wiped down with pre-cleaner and painted.
a39a77789cac8677ce7ceb14ad8c1d80.jpg

e8463317f9efc267cea888bb0df3d416.jpg

Ready for years of notching tube.

Thanks for looking.
 

Attachments

  • 3f97499d79e2383f5ece271f07f747b2.jpg
    3f97499d79e2383f5ece271f07f747b2.jpg
    708.1 KB · Views: 0
  • 72dbd592971fdda134251b9e7a93f0d2.jpg
    72dbd592971fdda134251b9e7a93f0d2.jpg
    776 KB · Views: 0
  • 47a70efce4e6cb14c35bda78336c08d7.jpg
    47a70efce4e6cb14c35bda78336c08d7.jpg
    742 KB · Views: 0
  • 2cedf395fa3fa60378b21934007b8ade.jpg
    2cedf395fa3fa60378b21934007b8ade.jpg
    753.4 KB · Views: 0
  • 2a69d687286e22016eb372f1be73455b.jpg
    2a69d687286e22016eb372f1be73455b.jpg
    839.6 KB · Views: 0
  • a39a77789cac8677ce7ceb14ad8c1d80.jpg
    a39a77789cac8677ce7ceb14ad8c1d80.jpg
    677.7 KB · Views: 0
  • e8463317f9efc267cea888bb0df3d416.jpg
    e8463317f9efc267cea888bb0df3d416.jpg
    710.6 KB · Views: 0
Last edited:

Bob Heine

ALLIANCE MEMBER
Joined
Oct 24, 2009
Messages
10,703
Location
Boca Raton, Florida
Mike, changing the tubing notcher from permanent obstacle to handy location is a really great idea but even better you can put it away when it isn't needed. Are you thinking of fabricating a receiver tree on wheels to store multiple tools like this? I have a couple of receiver-mount tools but I don't have a good place to store them when not in use.
 
OP
Z

zmotorsports

ALLIANCE MEMBER
Joined
Oct 20, 2009
Messages
21,312
Location
Northern Utah
Mike, changing the tubing notcher from permanent obstacle to handy location is a really great idea but even better you can put it away when it isn't needed. Are you thinking of fabricating a receiver tree on wheels to store multiple tools like this? I have a couple of receiver-mount tools but I don't have a good place to store them when not in use.

Thanks Bob. That was my thinking as well being able to not have it in the way when not being used. Currently I will store it under one of my workbenches along with the small brake as it is close and quite handy. I haven't really thought about a receiver tree because again, it may take up more room but as time goes on and if needs be that may be something to look into.

Thanks for following along Bob.
 
OP
Z

zmotorsports

ALLIANCE MEMBER
Joined
Oct 20, 2009
Messages
21,312
Location
Northern Utah
Nice job Mike! :thumbup:

I enjoy knocking out projects like those.

:beer:

Thanks Dan. I seem to have been on a run of being able to knock these little items off the white board lately. One of these days I may get to a point where I can actually just walk into the shop and think "huh, EVERYTHING is exactly the way I want it".:bounce:
 
OP
Z

zmotorsports

ALLIANCE MEMBER
Joined
Oct 20, 2009
Messages
21,312
Location
Northern Utah
PPpppfffffff!!!Ha! Ha! Almost choked on my coffee right there. Good one.:lol_hitti

Thank you for getting that Claude. I had a hard enough time typing it, let alone reading it.:lol:


Hahahahahahaha.......... :spit:

Oh, were you serious?!?! :wtf:

:beer:

Hardly serious there Dan. It seems the tool shuffle is something that always has been and more than likely always will be alive and well. :willy_nil

Let me try this, at least when I walk in for the "near" future I am happy where everything is at and like what I see. At least in this shop I can see between pieces of equipment and have room to work and not have to go outside to change my mind.:lol_hitti
 
OP
Z

zmotorsports

ALLIANCE MEMBER
Joined
Oct 20, 2009
Messages
21,312
Location
Northern Utah
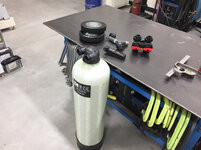
Started on a cart or dolly for my deionized filtration system today. I’ve been researching and waffling on a system for a few years now as it generally takes me around 2-1/2 hours to wash and chamois my coach. I hope to be able to more than cut that in half. I finally pulled the trigger on the Pro 100 tank/system from DI Rinse.
e0f3e29433be9f2be9acfd63c8f866df.jpg

The tank measures 9” in diameter. I had some 1-1/4” x .095” DOM tubing left over from a previous project and my 1-1/4” die is a 4-1/2” centerline radius so that should be perfect.
44321379e01fad9ef7d1e0d13a3eb221.jpg

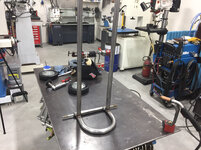
Next I decided to bend up another 180-degree hoop in which will go up and back down to the bottom hoop. Thus will allow the tank to actually nestle back into it and merely need a strap to secure it.
74e3c8d4fdb37eac46e6d53cecaabf50.jpg

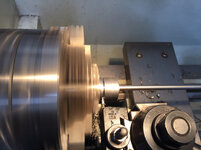
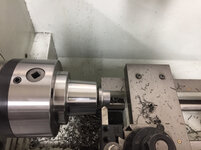
Next to the lathe in which to start on the axle assembly.
048d2e8730a98c4e2664a2b121cd898f.jpg

Im making a couple of tube adapters in which will be welded into another piece of 1-1/4” tube that will be botched and welded to the back of the bottom hoop where the tank will rest.
031ee508d00824ec24011b6584a0536d.jpg

Parting the tube adapter off.
f634d427e786e673df311624b72baacd.jpg

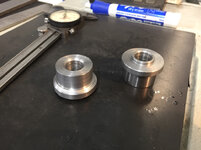
Chamfering to allow void or channel for weld after pressing into tube.
58b6eff26fca5b84fe1db4f276f85808.jpg

Tube adapters complete.
310a0b287097cacc6fd8175ef46d029c.jpg

Test fit into tube.
02decdbe8c9e102f2fd3c2380d43460f.jpg

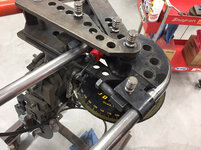
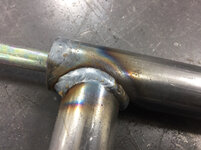
I then used a couple of 1/2”-13 x 3” bolts through the tube adapters and the heads welded on the inside on the adapters and welded the adapters into the tube using my MK Products weld positioner and TIG arm rest.
113e737eef149b4e3bf91ef553aab77b.jpg

Axle then clamped and welded to the lower hoop.
9e365bafcfef22f758fdc5a010f44795.jpg

760f4291f5fdce573f73624632ca176f.jpg

36e085971a4e19b20d91980ba8ed3028.jpg

So far this is where it is at.
012e15fe0a1aa6db8c34baf8469702da.jpg

Here is the video of my Deionized Filtration Cart Part 1.

More to come, stay tuned.....
 

Attachments

  • 048d2e8730a98c4e2664a2b121cd898f.jpg
    048d2e8730a98c4e2664a2b121cd898f.jpg
    756.3 KB · Views: 0
  • 74e3c8d4fdb37eac46e6d53cecaabf50.jpg
    74e3c8d4fdb37eac46e6d53cecaabf50.jpg
    808.1 KB · Views: 0
  • 012e15fe0a1aa6db8c34baf8469702da.jpg
    012e15fe0a1aa6db8c34baf8469702da.jpg
    822.1 KB · Views: 0
  • 760f4291f5fdce573f73624632ca176f.jpg
    760f4291f5fdce573f73624632ca176f.jpg
    760.8 KB · Views: 0
  • 9e365bafcfef22f758fdc5a010f44795.jpg
    9e365bafcfef22f758fdc5a010f44795.jpg
    802.2 KB · Views: 0
  • 44321379e01fad9ef7d1e0d13a3eb221.jpg
    44321379e01fad9ef7d1e0d13a3eb221.jpg
    676.2 KB · Views: 0
  • e0f3e29433be9f2be9acfd63c8f866df.jpg
    e0f3e29433be9f2be9acfd63c8f866df.jpg
    723.4 KB · Views: 0
  • 113e737eef149b4e3bf91ef553aab77b.jpg
    113e737eef149b4e3bf91ef553aab77b.jpg
    794 KB · Views: 0
  • 36e085971a4e19b20d91980ba8ed3028.jpg
    36e085971a4e19b20d91980ba8ed3028.jpg
    736.4 KB · Views: 0
  • 031ee508d00824ec24011b6584a0536d.jpg
    031ee508d00824ec24011b6584a0536d.jpg
    666.3 KB · Views: 0
  • f634d427e786e673df311624b72baacd.jpg
    f634d427e786e673df311624b72baacd.jpg
    717.2 KB · Views: 0
  • 02decdbe8c9e102f2fd3c2380d43460f.jpg
    02decdbe8c9e102f2fd3c2380d43460f.jpg
    843.5 KB · Views: 0
  • 310a0b287097cacc6fd8175ef46d029c.jpg
    310a0b287097cacc6fd8175ef46d029c.jpg
    682.7 KB · Views: 0
  • 58b6eff26fca5b84fe1db4f276f85808.jpg
    58b6eff26fca5b84fe1db4f276f85808.jpg
    706.9 KB · Views: 0
Last edited:

Boosted1

Well-known member
Joined
Nov 25, 2007
Messages
1,676
Location
Georgetown, KY
Nice cart!
I have the Griots garage tank that looks just like that, fittings and all.
The few times I have used it on my truck, it did work well. No spots on the truck and easy to wipe dry.
Just don't run water through the tank all the time as it media has limited life.
 
OP
Z

zmotorsports

ALLIANCE MEMBER
Joined
Oct 20, 2009
Messages
21,312
Location
Northern Utah
Nice cart!
I have the Griots garage tank that looks just like that, fittings and all.
The few times I have used it on my truck, it did work well. No spots on the truck and easy to wipe dry.
Just don't run water through the tank all the time as it media has limited life.


Thank you. That’s one of the things that made this DI system so attractive, the bypass feature. You only want to use the deionized water for the final rinse.

I will post a video to my channel once complete, these are just a few shots from this afternoons work on the cart.

Thanks for stopping by and checking out my projects thread.
 
To avoid these ads, REGISTER NOW!
Top Bottom