WaterBoyz
Well-known member
In this installment, I will go over some of the install things I learned.
Get a comfy chair.............
The assembly manual was written by someone who has already assembled 50 of these so a lot of steps were left out that would be useful for the self-install.
These are not in any certain order. I'm old, so my thoughts are not always in sequence. There are pics as well. Some will be referenced, some not.
Some of these issues are close enough for "Government Work". I don't work for the Government.
Air Lines:
Installed the valve bracket (pic) at the top of the motor mounting plate. Decided to route the supply side coming in from the bottom. Ran the 2 lines under the ramp. Raised the ramp to a comfortable working position. Then installed the lines.
It is stupid to do this on your back for this part. Routed the line (pic) at the lock solenoid into the corner to get it to lay better and avoid the rod for the ramp and stop plate. I had a fair amount of line left over so they included a bit more than actually needed. But don't tell them.
Safety Locks:
The stud that the cable roller rolls on has a ton of welding at the attachment point (pic). That rubs on the frame. I "adjusted" it away from the frame. But, the stud may touch the other side before the adjustment will work. I slipped a thin screwdriver into the gap, at the very bottom of the lever, between it and the frame. This allowed a better adjustment.
I also greased the roller and oiled the pivot point. Also oiled the main lock pivot points by raising up the lift enough for them to be released.
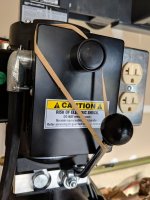
Power Unit:
The manual ***** when it comes to what ports to use so I have pics of mine. My unit is a 220v unit so I ran a 100 amp subpanel to the garage for this and other things. Since my lift will not be bolted down I installed a 10/4 cable (pic). This allowed me to run the motor and have a 110v outlet (pic) at the post.
I used transmission fluid since it had the red dye in it so in case there was an issue I could see it better. I held up the handle (pic) and just poured straight from the gallon jugs. Used 3 gallons total.
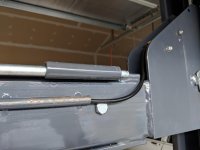
Cylinder:
I had initially hand installed the big nut (pic) knowing I was going back later and tighten it. Well, I should have tightened it before when I did. Had to use a ratcheting strap to pull out the rod enough then reset the strap to pull back the sliding block so I could access the 2 flat spots on the rod while I tightened the nut. Do not grab the rod with any other tool because the rod does completely retract into the cylinder and you don't want to mess up the seal.
The manual does not match what I actually had since I had a nylon locking nut. I'm guessing the manual had a regular nut and a clip to keep it from unscrewing. I just tightened mine all the way.
I made sure the power (pic) and non-power (pic) fittings were angled upward to help keep the plumbing away from the cables.
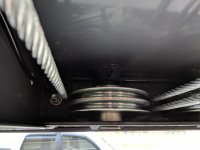
Double Pulleys:
The shaft is held in at the top by a set screw. It has a groove that the screw sets in so you have to really loosen the screw to clear the top ring of the shaft. When you do, be sure there are no body parts below the shaft because it is really heavy and will just exit rapidly....experience.
The cables from the far end are in the top groove of the pulley (pic).
After I got the lift fully operational, I could work on the pulleys while standing upright. I used the ratching strap to pull slack on the cables so I could remove the pulleys. The reason is that the "factory" cleaning and lubing was bad bad bad. The shaft was very rough considering that a pulley was rotating on it. It had ribs on it like corduroy from the "lathe" operation along with spurs. I had to use my belt sander to smooth the shaft. Didn't get all of the ribs out but at least it was smooth enough for the rotating pulley to go around.
I installed the grease fitting and pumped in the grease until it came out the side hole. Then I greased the shaft itself.
Oh my, the pulley. It was dirty dirty dirty inside the bearing. Wiped it out and grease it. Also greased the outer face that rides on the bottom.
Single Pulley:
Did the same thing as the double pulley.
Crossbar Pulley:
You have to remove the "cable keeper" roller and screw to remove the pulley. Do not stick your finger in the pulley to push out the shaft. That pulley is heavy as well and will put a serious hurt on that finger....experience. Once you remove that shaft the pulley will exit rapidly and will damage any body part between it and the floor....experience.
This shaft and bearing were way cleaner than the horizontal pulleys. The shaft was smooth and the bearing not nearly as dirty. Just did the same clean and grease as the horizontal pulleys.
When installing the "cable keeper" be sure that the roller does rotate freely when the bolt is tightened. I had one that did not so I had to back off the bolt a pinch.
=====
That is it for now. I have more thoughts on how Bendpak can improve the manual for the self-installer. One very important thing that needs to be done is a picture of the various fittings for the air and fluid. Lots of items and squat in the manual.
I'm open to your discussion and questions as to why I did what I did.
=====
Get a comfy chair.............
The assembly manual was written by someone who has already assembled 50 of these so a lot of steps were left out that would be useful for the self-install.
These are not in any certain order. I'm old, so my thoughts are not always in sequence. There are pics as well. Some will be referenced, some not.
Some of these issues are close enough for "Government Work". I don't work for the Government.
Air Lines:
Installed the valve bracket (pic) at the top of the motor mounting plate. Decided to route the supply side coming in from the bottom. Ran the 2 lines under the ramp. Raised the ramp to a comfortable working position. Then installed the lines.
It is stupid to do this on your back for this part. Routed the line (pic) at the lock solenoid into the corner to get it to lay better and avoid the rod for the ramp and stop plate. I had a fair amount of line left over so they included a bit more than actually needed. But don't tell them.
Safety Locks:
The stud that the cable roller rolls on has a ton of welding at the attachment point (pic). That rubs on the frame. I "adjusted" it away from the frame. But, the stud may touch the other side before the adjustment will work. I slipped a thin screwdriver into the gap, at the very bottom of the lever, between it and the frame. This allowed a better adjustment.
I also greased the roller and oiled the pivot point. Also oiled the main lock pivot points by raising up the lift enough for them to be released.
Power Unit:
The manual ***** when it comes to what ports to use so I have pics of mine. My unit is a 220v unit so I ran a 100 amp subpanel to the garage for this and other things. Since my lift will not be bolted down I installed a 10/4 cable (pic). This allowed me to run the motor and have a 110v outlet (pic) at the post.
I used transmission fluid since it had the red dye in it so in case there was an issue I could see it better. I held up the handle (pic) and just poured straight from the gallon jugs. Used 3 gallons total.
Cylinder:
I had initially hand installed the big nut (pic) knowing I was going back later and tighten it. Well, I should have tightened it before when I did. Had to use a ratcheting strap to pull out the rod enough then reset the strap to pull back the sliding block so I could access the 2 flat spots on the rod while I tightened the nut. Do not grab the rod with any other tool because the rod does completely retract into the cylinder and you don't want to mess up the seal.
The manual does not match what I actually had since I had a nylon locking nut. I'm guessing the manual had a regular nut and a clip to keep it from unscrewing. I just tightened mine all the way.
I made sure the power (pic) and non-power (pic) fittings were angled upward to help keep the plumbing away from the cables.
Double Pulleys:
The shaft is held in at the top by a set screw. It has a groove that the screw sets in so you have to really loosen the screw to clear the top ring of the shaft. When you do, be sure there are no body parts below the shaft because it is really heavy and will just exit rapidly....experience.
The cables from the far end are in the top groove of the pulley (pic).
After I got the lift fully operational, I could work on the pulleys while standing upright. I used the ratching strap to pull slack on the cables so I could remove the pulleys. The reason is that the "factory" cleaning and lubing was bad bad bad. The shaft was very rough considering that a pulley was rotating on it. It had ribs on it like corduroy from the "lathe" operation along with spurs. I had to use my belt sander to smooth the shaft. Didn't get all of the ribs out but at least it was smooth enough for the rotating pulley to go around.
I installed the grease fitting and pumped in the grease until it came out the side hole. Then I greased the shaft itself.
Oh my, the pulley. It was dirty dirty dirty inside the bearing. Wiped it out and grease it. Also greased the outer face that rides on the bottom.
Single Pulley:
Did the same thing as the double pulley.
Crossbar Pulley:
You have to remove the "cable keeper" roller and screw to remove the pulley. Do not stick your finger in the pulley to push out the shaft. That pulley is heavy as well and will put a serious hurt on that finger....experience. Once you remove that shaft the pulley will exit rapidly and will damage any body part between it and the floor....experience.
This shaft and bearing were way cleaner than the horizontal pulleys. The shaft was smooth and the bearing not nearly as dirty. Just did the same clean and grease as the horizontal pulleys.
When installing the "cable keeper" be sure that the roller does rotate freely when the bolt is tightened. I had one that did not so I had to back off the bolt a pinch.
=====
That is it for now. I have more thoughts on how Bendpak can improve the manual for the self-installer. One very important thing that needs to be done is a picture of the various fittings for the air and fluid. Lots of items and squat in the manual.
I'm open to your discussion and questions as to why I did what I did.
=====