Thank you, I'm really glad people find some inspiration here.
Okay, I've not posted because I've been in the weeds - the usual place I find myself with almost every project. And I went to NYC for a week.
The back room. The "den" the "tv room" or the room that we just tend to put things we don't want in the house. It's been the red headed step child of the house but a room that I really want to make useful. Obviously all the house I want to be useful but this room needs to be. It's become my defacto office and where we watch movies on Friday night but there's zero storage. We have no book cases in the house - well, one in that room which is filled with kids coloring stuff.
Lara cleaned it out in preparation of this project. What do we have to work with...
I of course measured with a tape as well but I'll be damned if they weren't a few mm apart. After literally months of thinking about how to layout the room we decide to go with a wall of cabinets on the long wall. We'll put the tv in the middle and probably get a long sectional. This will sit us closer to the TV and sort of make the experience a bit more... dramatic? Like hifi I'm into the idea of a "correct" viewing or listening distance. The short side of the room will put us in the "zone" so to speak.
While I think that it would be helpful to draw this stuff out on Sketchup or something I just like drawing. The sketchbook is like a journal - it's a physical mark in time and something about a pencil on paper helps me to work through problems.
So the plan is cabinets that go the full length of the room and a set of book shelves on top with the TV on the wall in the middle. Or something like that - the cabinets are certain, the bookshelves are less so but the experience of building the parts container with prefin plywood left me bitter - I loathe poor materials and I won't be using prefin.
Some notes on measuring. I was always taught to make a "V" when I make a cut mark. The point of the "V"
is the measurement as a line can vary or not be straight but marks are the least accurate way to make cuts because they vary.
"Stops" are the most accurate or at least more accurate as the wood is hitting the same spot and you're hopefully able to repeat the process.
Hopefully.
This is the bane of my existence. I use the stops, I check my work, I take my time and yet I get variation that, while perhaps only 2mm, is something that can add up. I can work in tenths or at least thousandths in metal but wood eludes me. I went back here and triple checked the set up and ended up cutting the boards all the same orientation. I think the table was a bit less than 1mm out of square over about 400mm but if you flip a board you now have 2mm...
It's a hassle to finish but I have yet to regret using Baltic Birch for anything. It cuts perfectly, it sands perfectly, it finishes well. It's not "fancy" but it's honest. It's plywood but the best sort. I think it's the right choice for the room because it's a dark room and it's a casual room.
The plan is to divide the length of base cabinets into something that is divisible by a sheet of plywood. Most of my dimension choices are based on how to get the most out of a sheet. Making three base cabinets of about 2040mm that are divided in half should give me a generous 7-8mm of room...
I have a couple of sheets of 3/4" prefin left over so I rip a bunch of 100mm tall strips to serve as the bases. I use pocket screws here because, well, I still have a bunch of pocket screws. It will also let me hide the screws and just have plain fronts.
We start by just ripping the sheets, making the bases and then cutting the parts to length. In order to try to keep these as accurate as humanly possible I don't move or reset the stops. All the long parts are cut at the same time, all the next longest parts are cut after. I make sure I don't go backwards to try to repeat a cut that was missed.
I bring out the Festool 32mm spacer rail and again, I try to be as meticulous as I can.
I find the paint marks from the garage cabinets and ironically I'm using the same measurements. I decide to drill the vertical panels all the same so they can be flipped if need be but then realize that some of the panels are not perfect multiples of 32mm - again, it's only 1mm out but when I built the kitchen cabinets this bit me in the ***. Flipping the rail and measuring from the other side now doubles the error and your shelves will not sit perfectly. Sure, once there's some plates on them but I really want to do this better.
Nonetheless, mistakes are made. I overdrilled a set of holes where the hinges were - not a big deal. I decide to reference all the holes off the bottom edge. This way all doors can be similarly referenced and mistakes not multiplied. Slowly I'm coming to realize that you can't
not make mistakes but you can take precautions to not let them multiply and grow with tolerance stacking.
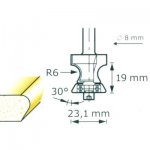
There's no reason for me to use markers on my sketches other than I love to use markers on my sketches. As the idea solidifies I'll add ink. My notes multiply and details get flushed out. In the above sketch I realized how I wanted to detail the opening with an Ogee bit on a bevel. That came to me in NYC. I'm not keen on hardware so the tops of the doors will be cut at an angle and there will be just enough room for your fingers to reach in and pull.
I just love the look of that rounded angle - I've had that router bit for maybe 12 years and I don't get tired of what it does.
While I'm ripping boards, Lara is finishing them. We're having a run of perfect weather so we take advantage of it and lay down the poly before we build.
The plan is to assemble them and put on the last coat of poly in situ.
I'm cutting away but haven't yet decided on how I'm actually putting the cases together. Like staining or prefinished plywood I've also decided I really don't like glue unless I absolutely have to use it. I did predrill this test piece but not with a drill that was long enough. I was curious if the screw would split the baltic birch or not and so now I know.
I decide that I'm going to use the Domino to hold the boards together in alignment but I end up spending about two hours adjusting the Domino so that it's perfect. It was close - less than 1mm off - but again, I'm trying to chase down every opportunity for tolerance stacking. I'd rather put the time in to adjust the tool perfectly.
The time put in adjusting the Domino pays off. Each domino is perfect, each board is perfect, each face is in alignment. I am way less than 1mm now on the joints and I feel like I made some sort of leap in skills but really I was just more careful.
I used 1/4" or 6mm baltic birch for the backs and measure from corner to corner to check for squareness and am thrilled to find that I'm only 1mm out over 2100mm. When I tell that to Lara she deadpans, "Wow, how are you going to fix that?"
So I'll post this shot of her...
The first box goes in on the leveled base. It's off the floor because I shimmed the base to be level with blocks screwed to the back side. A new floor will cover the gap.
I have brought out and used nearly all the Festool gear I have and am now getting back to familiarity with the process and tools again.
The second box goes against the other wall...
And my extra 7mm turns out to be about 2-3mm too short. Today I'll trim the base a bit to get it to fit and then just shorten that cabinet overall by 3mm. I may need to actually build it in place because it's so tight but overall I'm still pleased. As Ben said when he stopped by - nothing in the house is actually square, it's an old house.
The goal is to get the bases complete and locked in today and start work on the doors before spring break.
And, apropos of nothing besides the first day of spring, we grilled outside this week for the first time. Skirt steak is a favorite with some grilled vegetables.
Gregor

")