To avoid these ads, REGISTER NOW!

VISE REPAIR 101 all vise repairs, lubricants, sources for parts and the tricks to fix

LesserSon

Well-known member
Joined
Feb 7, 2016
Messages
5,047
Location
PA USA
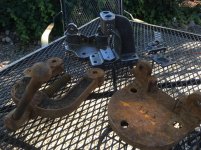
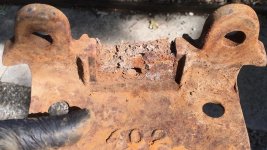
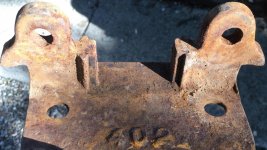
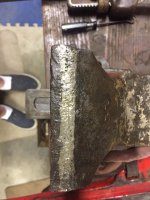
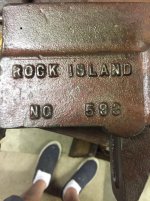
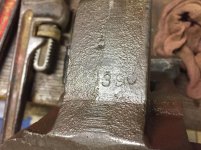
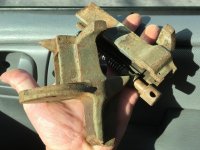
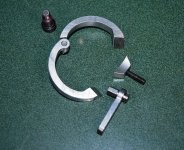
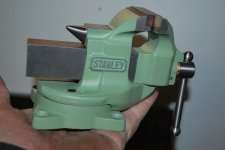
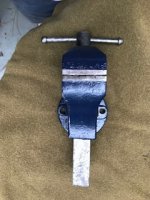
On Saturday, I bought a Stanley sweetheart no.742 clamp-on 1-3/4” vise, missing the clamp (broken). I probably wouldn’t have bought it, but my greedy eyes mistook [S...] for LS...T, so I deluded myself that it was a relic of Athol. It didn’t take long for me to recognize my mistake, but by then, I already had a plan to clean it up.
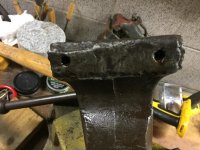
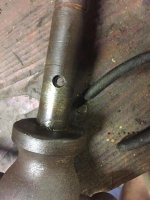
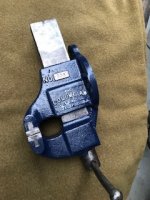
Now I’m thinking three holes would be better than the two existing ones, which are placed pretty far back to keep it stable by themselves. At first I was going to drill a hole on either side of the spline reinforcing the chin, but there isn’t much real estate to accommodate a bolt or screw head. Seems like holes would become notches.
Then I thought of creating a centered flat spot by removing more of the spline, and drilling a single hole there. It would mean it could only be attached to a benchtop with a minimal thickness of 1-3/4”, but I don’t see a problem with that.
Anybody ever do this? Does it seem like it will work, or will stresses like wood expansion/contraction snap off the bottom tab I will create?
 

Attachments

  • F14E502A-12A2-44D0-827B-7D97237A62D6.jpg
    F14E502A-12A2-44D0-827B-7D97237A62D6.jpg
    150.1 KB · Views: 131
  • 6364192D-A4EC-4208-BE53-75C3CCB86A01.jpg
    6364192D-A4EC-4208-BE53-75C3CCB86A01.jpg
    113.7 KB · Views: 41
  • BDA82100-6A08-412E-95CA-EE725D500BCE.jpg
    BDA82100-6A08-412E-95CA-EE725D500BCE.jpg
    127.4 KB · Views: 44
  • E2FF9A6E-3808-42E3-9F3A-814A2AA114AB.jpg
    E2FF9A6E-3808-42E3-9F3A-814A2AA114AB.jpg
    139.3 KB · Views: 37
  • D7DBA2FA-688F-498F-86C9-DF2B068866EC.jpg
    D7DBA2FA-688F-498F-86C9-DF2B068866EC.jpg
    140.9 KB · Views: 48
To avoid these ads, REGISTER NOW!

Outlawmws

Well-known member
Joined
Aug 9, 2011
Messages
39,105
Location
The Badlands
LS, if you give the holes a bit of clearance it should work fine even with a little expansion/contraction.

Me, I'd be doing a Dr Scott with that one! Cut/grind flat, ad a centering hole, and make a simple swivel base.!
 
Last edited:

KMScott

Well-known member
Joined
Feb 14, 2012
Messages
4,632
Location
Daufuskie Island, South Carolina
LS, if you have access to a milling machine then like Outlaw mentioned a swivel base set up is the way to go. I found my Stanley 744 swivel base I built a while ago. I did 4 at once and all were different size. Made it more challenging. Once you have a complete design then building is the simple step. I hope the sketch make sense and happy to share what I have as geometry.

The way you mentioned is a good method too, maybe bolting it to a heavy block of steel so you can move it around but still have a use-able vise setup. My neighbor had me fit his baby Wilton to a 4 x 4 x 2-1/2" thick block of steel and he uses this for work in his weld shop but mostly he has his business cards clamped in the jaws.
 

Attachments

  • Stanley_1-750_jaw_Vise.jpg
    Stanley_1-750_jaw_Vise.jpg
    59.2 KB · Views: 47
  • Stanley 744 1-2018 (6).jpg
    Stanley 744 1-2018 (6).jpg
    152.5 KB · Views: 45
  • Stanley 744 1-2018 (5).jpg
    Stanley 744 1-2018 (5).jpg
    147.7 KB · Views: 42
  • Stanley 744 1-2018 (4).jpg
    Stanley 744 1-2018 (4).jpg
    161 KB · Views: 43
  • Stanley builds 2017 (10).jpg
    Stanley builds 2017 (10).jpg
    87.5 KB · Views: 54

gpw_42

Well-known member
Joined
Apr 24, 2017
Messages
717
Location
NC Sandhills, USA
Columbian 503, basically a clean and paint I finished up yesterday. She had kind of a tough life, but should be good for another 50 years.
 

Attachments

  • IMG_2067.jpg
    IMG_2067.jpg
    38.3 KB · Views: 49
  • IMG_2068.jpg
    IMG_2068.jpg
    39.7 KB · Views: 44
  • IMG_2070.jpg
    IMG_2070.jpg
    36.7 KB · Views: 41

BigAlTX

Member
Joined
Jun 6, 2019
Messages
5
Location
Tx
If there's anyone out there with some experience with a Union Parker 974B, I'm looking for some suggestions on how to remove the metal tab used to hold the female threaded block that the handle screws into (I don't know the correct name for it); mine doesn't use a dowel pin like most others. I could also use some recommendations for getting a custom set of replacement jaws made. Rather than completely duplicate my previous post, here is the title of my original post:

"Help with a Parker-Union 974B(?)", post #7917700 (they won't let me include a link yet).

TIA.
 
Last edited:

kenc184

Well-known member
Joined
Feb 25, 2012
Messages
718
Location
Nor Cal
LS, if you have access to a milling machine then like Outlaw mentioned a swivel base set up is the way to go. I found my Stanley 744 swivel base I built a while ago. I did 4 at once and all were different size. Made it more challenging. Once you have a complete design then building is the simple step. I hope the sketch make sense and happy to share what I have as geometry.

The way you mentioned is a good method too, maybe bolting it to a heavy block of steel so you can move it around but still have a use-able vise setup. My neighbor had me fit his baby Wilton to a 4 x 4 x 2-1/2" thick block of steel and he uses this for work in his weld shop but mostly he has his business cards clamped in the jaws.

What great workmanship.
 

kenc184

Well-known member
Joined
Feb 25, 2012
Messages
718
Location
Nor Cal
Jaw repair on a Tradesman 1750. Both holes were stripped, one hole had a partial screw remaining and a new hole had been drilled off to the side. P.O. had used wall anchors and wood screws to hold the home made jaw on.....sigh.

Fitted a helicoil to the "good" hole, then removed the partial screw, brazed up the egged out hole and used a real jaw and a transfer punch to locate the second hole properly.
Drilled and tapped the brass for 1/4-20.

The cutoff wheel marks were from the P.O. not me!

IMG-2250.jpg
 

Productbob

Well-known member
Joined
Dec 10, 2018
Messages
414
Location
ny
ken nice work! Still getting a chuckle out of the wall anchors and wood screws approach to vise repair.
 

kenc184

Well-known member
Joined
Feb 25, 2012
Messages
718
Location
Nor Cal
Thanks Guys! Always fun bringing a buggered up vise back to life. I use the Oxy for brazing. I do have AC/DC Tig also but haven't used it in years - prefer Oxy for both sheetmetal welding and general brazing/braze welding.

Picked up another Prentiss 6" today, the jaw towers are in very sad shape, someone attempted to silicon Bronze Tig the jaws on and really damaged the towers somehow. Looks like I will be back to brazing again some time in the future!
 

anythingyoucanimagine

Well-known member
Joined
Feb 6, 2019
Messages
423
Location
New England
Is this a fake Wilton?

Vintage-Red-Wilton-Vise-3-1-2-Jaw.jpg


I bought that vise for $5. Not that exact vise but one very similar. Wondering if it's fake because every other Wilton I see has the threads up over the metal slide and this vise has the threads going through a piece of U-channel. It's stamped wilton, made in usa, etc. Also, the ends of the handle are squared off and every other Wilton I've seen (even many knock-off/fake ones) has balls at the ends of the handle with rubber bumpers like the one in the picture below. I have a real 6" Wilton bullet and that little red thing is nothing compared to the bullet vise.

mpv-Vise-Features.png


Regardless of whether or not the $5 vise I bought is real/fake, it was only $5 and I broke it yesterday. I put the picture above to make it easier to describe what I did and how it's broken. Where the letter "A" is... That end of the screw & handle was wearing into the front jaw of the vise creating a bunch of end play.... So I put two washers and a thrust roller needle bearing between the handle end of the screw and the jaw. That was great. MUCH more clamping force/power.

I have this thing mounted on a 2" receiver coming off the side of my welding table.

I didn't have a pipe on the handle or anything. I'm building an electrolysis tank in a 25-gallon 28"Lx19"Wx16"H Rubbermaid container. I'm using 3/8" rebar to bend/build/weld an electrode cage around the perimeter of the tank. I was hand tightening a 10' length of 3/8" rebar in the vise so I could use a zip wheel to cut a section... And the thing snapped. The front jaw didn't snap clean off, it's just bent out a little so the jaws are now open like a V. Where the letter B is on the picture above, the front jaw is no longer solidly attached to the metal slide.

I put the metal slide rail in my 6" vise with 3-1/2" jaw facing up and was able to persuade the front jaw back into place.

Can I just grind it out a little and weld it? When I did the needle thrust bearing I lubed the whole thing up pretty good with moly grease. I'm thinking engine degreaser then dunk it in the electrolysis tank for a few hours, spray it quick with a weld-through primer (just so it doesn't rust) then grind at the joint, heat and weld. Does that sound like a decent plan?

What process? This will be the most structural and dynamic weld I've done. I believe the front jaw is cast but I have no clue what the U-channel is. The finish looks cast but they are two separate parts and I've never seen anyone use a press fit for two cast parts.

Here's another picture:

2431492doublejaw65155vise5nhalfinalt4.jpg


I'm trying to re-attach that metal slide bar to the front jaw and not sure what type of metal that U-channel is. How deep should I grind?

I have three machines, an older (not retail, pre-nascar sticker) Lincoln 140 fcaw, Miller 350p gmaw and Lincoln 225 gtaw. I've never used stick on the 225 and I've never done something big/thick enough to require multi-pass gmaw.

Any recommendations on process and how to approach this?

Thanks
 

Outlawmws

Well-known member
Joined
Aug 9, 2011
Messages
39,105
Location
The Badlands
It's not fake that was a homeowners line that Wilton imported from Asia...

The Slide is likely a mild steel, (but from Asia, who knows...) the jaw will be grey cast iron...

Welding process (may not hold even if done perfectly...)
PreHeat the parts to be welded
PreHeat a bucket of sand to bury it in after you weld
I've welded cast with regular flux core MIG wire, there are better alloys...
Weld three passes.
Bury it in the hot sand so it cools Slowly. Leave it over night...


I just posted a link to a vise I did several years ago in the Vises thread for more reference. (Sub-Topic was "Zombie" Vise...)
 

Leviton

Well-known member
Joined
Feb 25, 2019
Messages
895
Location
Oregon
Rock Island 503A

I have been looking for a 4.5" to 6" vise to restore (I blame Garage Journal). Not having a lot of luck, but I will be patient until the right thing comes along.
Today I found a smaller vise that I am considering purchasing to keep me occupied until I find one in my desired size range.

The one I found today is a Rock Island 503A.
It has no cracks or welds, but it is well worn. I can buy it for $20 but it has vertical play in the dynamic jaw and when the vice is tightened the bottom of the jaws contact first and leave a slight gap at the top.
Is there any way to address this problem without conducting major surgery?
 

Attachments

  • Rock-Island-503A.jpg
    Rock-Island-503A.jpg
    137.1 KB · Views: 28

Provincial

Well-known member
Joined
Sep 21, 2011
Messages
6,855
Location
Near Salem, OR
Put a straight edge on the top or bottom of the slide. It probably is bent. Careful use of a press should get it straight again.

In straightening, imagine the force that bent it. In this case, it is probably force applied to the face of the movable jaw. You are trying to apply a force just the reverse of this, or one that produces the same effect.
 

Outlawmws

Well-known member
Joined
Aug 9, 2011
Messages
39,105
Location
The Badlands
That slide may have also gained some slop in the D jaw as well. They are cast in place and don't always fit tight, or the bottom of the D jaw could be beginning to fracture...
 

Leviton

Well-known member
Joined
Feb 25, 2019
Messages
895
Location
Oregon
I have been looking for a 4.5" to 6" vise to restore (I blame Garage Journal). Not having a lot of luck, but I will be patient until the right thing comes along.
Today I found a smaller vise that I am considering purchasing to keep me occupied until I find one in my desired size range.

The one I found today is a Rock Island 503A.
It has no cracks or welds, but it is well worn. I can buy it for $20 but it has vertical play in the dynamic jaw and when the vice is tightened the bottom of the jaws contact first and leave a slight gap at the top.
Is there any way to address this problem without conducting major surgery?

Put a straight edge on the top or bottom of the slide. It probably is bent. Careful use of a press should get it straight again.

In straightening, imagine the force that bent it. In this case, it is probably force applied to the face of the movable jaw. You are trying to apply a force just the reverse of this, or one that produces the same effect.

That slide may have also gained some slop in the D jaw as well. They are cast in place and don't always fit tight, or the bottom of the D jaw could be beginning to fracture...

Thank you for replying.

I can lift the dynamic jaw slide up and down quite a bit in the body/base.
 
To avoid these ads, REGISTER NOW!

Productbob

Well-known member
Joined
Dec 10, 2018
Messages
414
Location
ny
picked this up last night; 'Large heavy vise, doesn't work, buyer must remove'.
It was heavy, the screw didn't turn and I did remove it. paid $35 and it's a Prentiss 56 that's missing the slide support on the static jaw. Tackled it a bit today. Inside the dynamic two large spacer/washers were jammed up next to the screw but not on the screw. When I dug those out the screw turned out easily but didn't bring the dynamic along for the ride. Once the screw was out a tab collar with only one chewed up tab on it dropped to the ground. Wood and a hammer drove the slide out so now it's apart. Cleaned up the slide and rails and the dynamic, without the screw, goes in and out smoothly now. Screw and nut look to be good.

Should i try and find another tab collar or change over to a set screw collar?

Not having any idea about a fix for the long gone slide support I'm thinking I can use this as is for small to medium weight applications. Make sense??
thanks
 

Attachments

  • IMG_2276.jpg
    IMG_2276.jpg
    151.1 KB · Views: 64

kenc184

Well-known member
Joined
Feb 25, 2012
Messages
718
Location
Nor Cal
Bob,
I'm with you on this - I'm going to make a solid collar with set screw to replace the tab collar on my 518. The tab collar idea doesn't seem to have any merit vs a set screw type.

I can see your missing slide support on the fixed jaw (I just can't bring myself to use the "dynamic", "static" terminology!) . I'd be tempted to braze on a weldment replacement, making the replacement would be easy, but it would take a lot of heat on that big old heatsink to get up to braze welding temps.
Perhaps pre- heat and Ni rod would be the answer here - or one of the many "miracle" no pre heat rods - muggyweld etc would be a better solution.

Time to do "sum lernin" on welding cast iron!
 

454ragtop

Well-known member
Joined
Mar 24, 2008
Messages
5,011
Location
Carver, MA
Productbob, since that is a fixed base vise, if you are going to mount and use it, locate the fixed jaw so it's even with the edge of the bench, and then bolt a steel block in front of it to act as the missing slide support.
 

Leviton

Well-known member
Joined
Feb 25, 2019
Messages
895
Location
Oregon
Rock Island 574.
I've been looking for a 4.5" - 6" vise to restore. I've not had much luck so far, but I came across this R.I. 574 for $100 that looks like it does not need restoring. It seems like a good deal?

What would you check if you went to inspect it?

I'm thinking:
- Check the condition of the jaw faces
- Check alignment of jaws when closed
- Look for a crack in the static jaw bottom support

Looking for a bottom support crack might be difficult without removing the dynamic. Is the dynamic jaw easily removed by just continuing to unscrew it, or is there more to it than that with this vise?

If there is a general thread on "what to check when buying a vise" thread please point me in the right direction.

Thank you.
 

Attachments

  • RI 574b.JPG
    RI 574b.JPG
    43.7 KB · Views: 37
  • RI 574c.JPG
    RI 574c.JPG
    74.1 KB · Views: 42
  • RI 574a.JPG
    RI 574a.JPG
    75.7 KB · Views: 54

Productbob

Well-known member
Joined
Dec 10, 2018
Messages
414
Location
ny
Hi Leviton, there is a thread "Everything you need to know about bench vises" started on 4-27-10. Start at post #1, it will have some good info for you.
 

Productbob

Well-known member
Joined
Dec 10, 2018
Messages
414
Location
ny
Ken & 454 thanks for the input- both ideas would work with a little ingenuity on my part. I could do 'sum lernin' on welding (buy equipment, ruin stuff practicing, don't burn down house) which would be fun; or because the vise has a bottom lip overhang I need to lift the vise to take that out of play. Then the vise needs to be set back far enough on the bench so the the steel replacement block can sit on top of the bench (there's more than an inch of fixed jaw between the outside of the lip and the break point that's at a higher level then the bottom of the vise.)
Would drilling and tapping a new front block into the fixed jaw and then grinding it to shape be a possibility?
 

BigAlTX

Member
Joined
Jun 6, 2019
Messages
5
Location
Tx
Productbob -- Rather than potentially compromising the strength of the base that you'd be drilling into, I would be more inclined to sandwich a steel plate between the vise base and the workbench it will be mounted to, then attach the support block to that. And you would be able to weld the block to the plate no problem.
 

Productbob

Well-known member
Joined
Dec 10, 2018
Messages
414
Location
ny
BigAl was just mocking up something similar to this with a piece of 5/8" thick plywood when your message came. the challenge is recessing the lip which is just short of 1/2" deep, Not a metal guy so figuring I need a least 5/8" base plate, maybe even 3/4" to handle the 1/2" trench and maintain the plate integrity. :dunno:
 

kenc184

Well-known member
Joined
Feb 25, 2012
Messages
718
Location
Nor Cal
Bob,
It's good fun figuring out this stuff isn't it? There are always alternatives, and you'll ahve a nice user whichever way you go. I am beginning to really like my Frankenprentiss 56, it clamps stuff so solidly - feels much more so than my previous 4-1/2" user.
 

kenc184

Well-known member
Joined
Feb 25, 2012
Messages
718
Location
Nor Cal
Making progress on my Prentiss 518, 6" vise. Levelled the jaws, I think I took off between .1 and .125". Need to take a skim cut off the sides too. And need to remove some Tig brazing from the back edge of each jaw.
Thanks be to carbide tooling!

Still unsure of how to deal with the ugle trench behind the jaws. How the heck did this damage ever occur?

BTW, anyone know on replaceable jaw vises like this one if the jaw tower is slightly lower than the hardened jaw or are they level like with cast in?

unnamed (2).jpg
 
Last edited:

anythingyoucanimagine

Well-known member
Joined
Feb 6, 2019
Messages
423
Location
New England
It's not fake... homeowners line... Slide is likely a mild steel... Welding process

That slide may have also gained some slop in the D jaw as well. They are cast in place and don't always fit tight, or the bottom of the D jaw could be beginning to fracture...

Thanks Outlawmws. Yeah it's pretty worn basically everywhere. The slide could be mild steel. The bottom of the slide has started to wear. Nothing crazy but it is wearing on the bottom of the D in the fixed jaw. I don't think the fixed/D jaw is fracturing, I think the movable jaw is just trashed/wasted.


Put a straight edge on the top or bottom of the slide. It probably is bent. Careful use of a press should get it straight again.

In straightening, imagine the force that bent it. In this case, it is probably force applied to the face of the movable jaw. You are trying to apply a force just the reverse of this, or one that produces the same effect.


Slide is straight, just worn on the bottom where it rides against the fixed jaw. I was thinking about trying to weld or repair that too, thinking the weld would be harder than the mild steel slide. But this was a $5 yard sale vise with much bigger issues at the moment.

I still have a bunch to grind out before I go for getting it perfectly straight. To get it close I put the slide into a 6" Wilton and persuaded it with a 3# hammer. I'll be a little more careful once it is ground out and ready to weld. The jaws on the vise are destroyed too. It must have been worn or broken for a while because the last guy who owned it used it enough to wear the jaws into a V. I guess once it is welded I'll have to either make new jaws or use a file to do a saw fit on the existing jaws.
 

Productbob

Well-known member
Joined
Dec 10, 2018
Messages
414
Location
ny
ken it is fun except for the occasional #%&# when a brilliant idea turns out to be a bust :evil: 
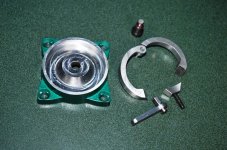
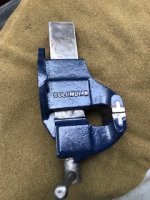
Glad you're enjoying that 56! What does yours have in the area where the handle slides into the front of the movable jaw; bushing, spacer, bearing?? Mine has nothing so the handle sits way to deep into the movable for my taste. thanks
 

kenc184

Well-known member
Joined
Feb 25, 2012
Messages
718
Location
Nor Cal
Bob,

I think there was a single thin washer, that was all. I had to put my meatball in the lathe (LOL, sounds funny) and turn the "bearing" surface flat, it was so worn that it was cone shaped. did the same with the mating movable jaw surface, so if anything mine sits deeper than it did originally I guess.

p.s. I end up doing just about everything twice due to screw ups.
 

LesserSon

Well-known member
Joined
Feb 7, 2016
Messages
5,047
Location
PA USA
Pleasant warm, breezy day here in eastern PA, with fairly constant sun, so I took my bench grinder with wire wheels outside and worked on three pipe vises and a saw-sharpening vise. I ran out of enterprise before getting the fussy hand work done on the two yokes (harps, wishbones?), but got BLO on most of the parts. Forgot to wipe down excess on a couple things, so they are gummy. I tried wiping them down a bit late, so I will give them a couple days to see if it was enough, or if they will need a cleaning.
One base was really gunked up, like it had been buried. So much better clean and oiled.
 

Attachments

  • FD3480F7-D7BA-4111-905C-31EDBED7F4AA.jpg
    FD3480F7-D7BA-4111-905C-31EDBED7F4AA.jpg
    163.4 KB · Views: 40
  • 3ED27454-4EF6-47EA-B5FF-FBCD78F588AC.jpg
    3ED27454-4EF6-47EA-B5FF-FBCD78F588AC.jpg
    162.3 KB · Views: 29
  • EC9FB7DF-EBA1-4B48-9153-67AAF055DC46.jpg
    EC9FB7DF-EBA1-4B48-9153-67AAF055DC46.jpg
    155.3 KB · Views: 29
  • 944A01D5-CFE9-43B2-B4B8-5B9EC76B664D.jpg
    944A01D5-CFE9-43B2-B4B8-5B9EC76B664D.jpg
    154 KB · Views: 29
  • 836B259C-6909-470B-BC3F-14121ABA44E7.jpg
    836B259C-6909-470B-BC3F-14121ABA44E7.jpg
    159.3 KB · Views: 31

MayerMR

Well-known member
Joined
Feb 13, 2018
Messages
831
Location
Dallas, Texas
Making progress on my Prentiss 518, 6" vise. Levelled the jaws, I think I took off between .1 and .125". Need to take a skim cut off the sides too. And need to remove some Tig brazing from the back edge of each jaw.
Thanks be to carbide tooling!

Still unsure of how to deal with the ugle trench behind the jaws. How the heck did this damage ever occur?

BTW, anyone know on replaceable jaw vises like this one if the jaw tower is slightly lower than the hardened jaw or are they level like with cast in?

unnamed (2).jpg

Looks to me like someone did a crappy job trying to weld the jaws in place but they didn't pre-heat or used the wrong rod or something that penetrated but didn't stick...so after it was removed you were left with the trenches?
 

kenc184

Well-known member
Joined
Feb 25, 2012
Messages
718
Location
Nor Cal
Looks to me like someone did a crappy job trying to weld the jaws in place but they didn't pre-heat or used the wrong rod or something that penetrated but didn't stick...so after it was removed you were left with the trenches?

I guess so, someone had obviously dumped silicon Bronze around the jaws in several places.
I milled the jaw towers down about 50 thou below the top line of the jaws, which themselves got taken down about 1/8", that reduced the trench quite a bit, at that point I could've left it but decided to fill it with JB weld for appearance sake.
Just made a new "regular" collar for the screw to replace that tabbed thing too - it's getting there.
 

Farmstock

Member
Joined
Jun 22, 2019
Messages
5
Location
Kentucky
Thought I’d show some pics of an old vise from the farm dad said it’s always been there. I cleaned it up. It’s been very used and abused. Rock Island No. 593. The stationary jaw has been welded on. Looks good though. The moving jaw is missing and beat all to ****. The screw didn’t have a keeper collar, just a gob of welding rod. Dad used his tools to the limit and I guess if a repair was needed it was needed right now. Here’s som pics after clean up.
 

Attachments

  • 2AEE8CD2-9683-49FF-85B8-C6AA0DBD78C2.jpg
    2AEE8CD2-9683-49FF-85B8-C6AA0DBD78C2.jpg
    140.4 KB · Views: 40
  • A5F355D6-10BB-4E04-8CC0-707D782C4F03.jpg
    A5F355D6-10BB-4E04-8CC0-707D782C4F03.jpg
    92.9 KB · Views: 38
  • E005F8AD-AD51-4260-ABBF-61526F1D198F.jpg
    E005F8AD-AD51-4260-ABBF-61526F1D198F.jpg
    147.4 KB · Views: 37
  • B7DB41F6-3668-42D5-B6A2-3046DBB1CD5E.jpg
    B7DB41F6-3668-42D5-B6A2-3046DBB1CD5E.jpg
    153.2 KB · Views: 37
  • CF2D7E98-BFE4-4C86-9A2D-B0D7EE1696B1.jpg
    CF2D7E98-BFE4-4C86-9A2D-B0D7EE1696B1.jpg
    152.2 KB · Views: 35
  • BEC47C83-6DCD-4CBA-AFB9-74D1314E5E07.jpg
    BEC47C83-6DCD-4CBA-AFB9-74D1314E5E07.jpg
    149.9 KB · Views: 36
  • 9258944F-405A-4E3D-9D3F-8F2EFAC1AB39.jpg
    9258944F-405A-4E3D-9D3F-8F2EFAC1AB39.jpg
    92.1 KB · Views: 38

kenc184

Well-known member
Joined
Feb 25, 2012
Messages
718
Location
Nor Cal
The Prentiss 518 is coming along. I milled the jaws down a bit, along with the jaw towers which I lowered below the top edge of the jaws by 10 or 15thou. Cleaned up the sides of the jaws/towers and then a skim coat of JB weld to fill the trenches (now much shallower) and a few dings.
Also made a new collar to replace that crappy tabbed thing.

prentiss_518.jpg
 

MayerMR

Well-known member
Joined
Feb 13, 2018
Messages
831
Location
Dallas, Texas
The Prentiss 518 is coming along. I milled the jaws down a bit, along with the jaw towers which I lowered below the top edge of the jaws by 10 or 15thou. Cleaned up the sides of the jaws/towers and then a skim coat of JB weld to fill the trenches (now much shallower) and a few dings.
Also made a new collar to replace that crappy tabbed thing.

prentiss_518.jpg

I've used JB Weld many times to fix divots, bumps, and trenches and it works very well. One thing that I do as well is to take some very low grit sandpaper and use a hammer and knock it against the JB weld to give it the same look as the casting around it. Takes a little practice, but you can pretty much make it blend perfectly. Nice job on the repairs!
 

KMScott

Well-known member
Joined
Feb 14, 2012
Messages
4,632
Location
Daufuskie Island, South Carolina
The Prentiss 518 is coming along. I milled the jaws down a bit, along with the jaw towers which I lowered below the top edge of the jaws by 10 or 15thou. Cleaned up the sides of the jaws/towers and then a skim coat of JB weld to fill the trenches (now much shallower) and a few dings.
Also made a new collar to replace that crappy tabbed thing.

prentiss_518.jpg

You know Ken since you have a VMC you should make a new set of jaws instead of messing with the old ones. I am happy to add any jaws that are made from A2 to my monthly heat treat run at no charge. This saves a bunch of bucks. Just cover shipping. I have not seen to many vises with good jaws, even if they look good they are not parallel to each other.
 
To avoid these ads, REGISTER NOW!
Top Bottom