To avoid these ads, REGISTER NOW!

VISE REPAIR 101 all vise repairs, lubricants, sources for parts and the tricks to fix

jmhinkle

Well-known member
Joined
Feb 6, 2019
Messages
452
Location
Portland, OR
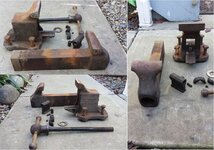
Here's what mine has. No adjustment. Just a metal dowel I guess. Once I get the swivel off can I drive it out from below?

GNwq8ZQ.jpg
 
To avoid these ads, REGISTER NOW!

nutjob

Well-known member
Joined
May 8, 2008
Messages
807
Location
NE, PA
I’d also like to know what purpose the slot has./QUOTE]

My understanding is the piece has a slot to allow a slight difference in the thread length to act as a thread lock. The piece is threaded, slot cut, the thread is in perfect alignment between the 2. Spread it apart and the misalignment is now a thread lock.

Kevin
 

davethorik

Well-known member
Joined
Sep 14, 2013
Messages
4,992
Location
Norka, Ohio
Have you seen another type that doesn't have an adjuster. I recently pulled my old 204 apart to clean up and paint it and it doesn't have that style. It looks more like a plug with a tip to pull it out with. I'll get a picture of it and post because I was going to ask about it anyway. I need to find a piece of metal hard enough to make a giant screwdriver for the swivel bolt as well.

Ww and shift's Reeds that have the adjuster are newer models. Even tho the combo vises did not get the added R after the number like standard bench vises (204R), his is the equivalent to an R model.

To add, I don't think all the R model Reeds have that adjuster feature, either. Most likely early models do not. I have a hunch that if the vise came with a steel nut (visible in pic, octagon shape) then it had the adjuster. I could be wrong, and probably am.
 

trijeff

Well-known member
Joined
Jan 21, 2015
Messages
1,359
Location
Northern Cali
I had a transition Reed 104.5R, transition meaning the 4 hole base and split nut retainer, but still the old meatball handle. It did have the split nut-retaining pin.

Sent from my Moto G (5) Plus using Tapatalk
 

trijeff

Well-known member
Joined
Jan 21, 2015
Messages
1,359
Location
Northern Cali
here it is61c1fdd80262e4c203d6b7b37c8f4c37.jpg0ba11411a78d2f65887bba25aecaea25.jpg
 

Attachments

  • 0ba11411a78d2f65887bba25aecaea25.jpg
    0ba11411a78d2f65887bba25aecaea25.jpg
    87.2 KB · Views: 1
  • 61c1fdd80262e4c203d6b7b37c8f4c37.jpg
    61c1fdd80262e4c203d6b7b37c8f4c37.jpg
    201.5 KB · Views: 1
Last edited:

GETRIDAONE

Well-known member
Joined
May 21, 2013
Messages
1,549
Location
Auburn, GA
That pin can be driven out from the bottom. I assume you want to completely clean the vise. I hate all the **** and dry grease that gathers in that area. You might have to find some new pin material depending on how bent the old one is. On some vises you can put the pin back in from the top, others are bottom only.
Good Luck !
 

jmhinkle

Well-known member
Joined
Feb 6, 2019
Messages
452
Location
Portland, OR
Yes, I'm cleaning it up and painting it. It's seen a long hard life, but it's still a great vise and I pull it off the shelf and use it when I need it. Pretty sure it's older than my Dad even, but it was at the place he worked until he retired and closed the plant down. I grew up wandering around in that place on the weekends when he had to go in off shift. He took anything useful when it closed and mailed me the vise to use. Has a lot of sentimental value for the both of us so I wanted to preserve it a bit and keep it healthy, but still a used item. I already scrubbed the dynamic jaw clean, ground down some weld splatter and rough spots as best I could and painted that portion. Waiting on my drag link socket to arrive to get the rest apart to clean.

Thanks, for the answer on that pin. Wasn't sure since it wasn't the screw type that others seem to have.
 

454ragtop

Well-known member
Joined
Mar 24, 2008
Messages
5,011
Location
Carver, MA
Yes, I'm cleaning it up and painting it. It's seen a long hard life, but it's still a great vise and I pull it off the shelf and use it when I need it. Pretty sure it's older than my Dad even, but it was at the place he worked until he retired and closed the plant down. I grew up wandering around in that place on the weekends when he had to go in off shift. He took anything useful when it closed and mailed me the vise to use. Has a lot of sentimental value for the both of us so I wanted to preserve it a bit and keep it healthy, but still a used item. I already scrubbed the dynamic jaw clean, ground down some weld splatter and rough spots as best I could and painted that portion. Waiting on my drag link socket to arrive to get the rest apart to clean.

Thanks, for the answer on that pin. Wasn't sure since it wasn't the screw type that others seem to have.
Unless there is a problem of some sort, I'd leave the nut alone. Why make a problem where none exists? Your vise, do what you like, I'd clean, lube and paint the vise and let it live another 100 years.
 

jmhinkle

Well-known member
Joined
Feb 6, 2019
Messages
452
Location
Portland, OR
Unless there is a problem of some sort, I'd leave the nut alone. Why make a problem where none exists? Your vise, do what you like, I'd clean, lube and paint the vise and let it live another 100 years.

It pretty filthy and dry from 60+ years inside a folding carton printing plant. It needs broken down, cleaned out and lubed really well. That's why I'm finally doing it. It has some wear on spots where it wasn't lubed in a long time and I never thought about it since I kept it on a shelf and only used it once in a blue moon.
 

Shiftless

Well-known member
Joined
Mar 9, 2014
Messages
14,553
Location
East Bay SFO
In similar situations, I have soaked the static in undiluted Simple Green for a few hours. This loosens up the greasy dirt so it can be easily brushed out. A gun barrel cleaning brush is handy. I have also used a low pressure, 1500 psi pressure washer to help clean up vise parts.

If the nut is in the proper position and there is no damage, why risk alignment problems later on?

I would follow the advice from 454.

Jeff:
That Reed looks GREAT :beer:
What specific paint did you use?
.
.
 
Last edited:

jmhinkle

Well-known member
Joined
Feb 6, 2019
Messages
452
Location
Portland, OR
When you guys are saying leave the nut alone, I assume you mean the the part the dynamic jaw threads in and out of. Is that correct? It doesn't have play so yeah, if there is no need to remove it, then I won't.

As far as cleaning, I can say that simple green had zero results except causing the grime to become smeary and making cleaning harder on the dynamic jaw. I ended up using brake cleaner to remove the grease and grime, then dish detergent to wash after that. Painted it with the Rustoleum Pro machine gray and like the result. I didn't tape off a jaw line as there really wasn't one on mine and the deep marks and wear wouldn't have polished nicely to give the desired effect. I taped the jaw face and painted up to it. I'll get pictures up of it this weekend and hopefully get the static parts ready to paint.
 

Outlawmws

Well-known member
Joined
Aug 9, 2011
Messages
39,277
Location
The Badlands
Were you using the SG full strength, and did you give it some time on the thick stuff? I've had good to great results with SG for almost everything great.

My daughter is using SG to clean an engine and its parts for her Samurai project.

Shift likes to use it warm.
 

jmhinkle

Well-known member
Joined
Feb 6, 2019
Messages
452
Location
Portland, OR
I bought the spray bottle of it. I'm assuming it's full strength because the directions have parts about mixing into different solution strengths. I sprayed it on full strength and it ran right off the parts like water would to grease. Kept soaking and watching it run off as fast as it could. Left it overnight and tried again the next day with spraying and scrubbing with a stiff nylon brush. Ruined the brush and just spread the grease around on the parts. Gave up and bought 4 cans of brake cleaner. Used 1 can to clean the dynamic jaw and main screw.

Haven't started cleaning the rest, but my drag link socket arrived yesterday and I just unbolted the swivel after work this morning so it's all apart now. I'll start after I wake up this afternoon. I won't be using the simple green again.
 

Shiftless

Well-known member
Joined
Mar 9, 2014
Messages
14,553
Location
East Bay SFO
jmhinkle:
Sorry you had so much trouble. When I said soak, I meant use enough SG in a plastic tub to fully immerse the dirty greasy parts in it for a long time.
I buy SG in 2 1/2 gallon jugs.

As outlaw said, I like to heat it up so it works even better. Hot SG not only removes grease, it also removes paint so be careful. Undiluted SG will remove paint even at room temperature. Not immediately but it will. When I am cleaning old vises where I want to preserve the original paint, I only immerse for a few minutes and then check the progress. Obviously, different levels of dirtyness and greasiness will dictate time.
I use an old crock pot to heat the SG bath. Here I am removing several layers of paint from a 4 inch Wilton bullet vise dynamic jaw.
The SG is reusable.
 

Attachments

  • 08F2CF23-313F-4F9D-823B-C72E08A68A67.jpg
    08F2CF23-313F-4F9D-823B-C72E08A68A67.jpg
    123.4 KB · Views: 18
Last edited:

PghJKB

Well-known member
Joined
Oct 13, 2012
Messages
490
Location
Industrial Heartland
Hi All,

I'm in the process of attempting to adjust the backlash on a Reed 4C, but I think either the adjuster is broken (not sure how it happened) or it does not work the way i thought it should. There is right now ~1/8" gap between the adjuster and the main nut

Do i just keep bending that tab over? Should it thread through?
And related, how much of a turn should I turn the handel before the jaws start to move, Should I be targeting close to 0 degrees, or is 90 a safer number so nothing binds?

See pics


I’d also like to know what purpose the slot has.

jm:
Lots of Reeds have a pin stuck into a hole to retain the main nut. You can bend the pin a bit to tighten up the slack if necessary.

Like PacificaVette, I use a drag link socket for stuck swivel screws. They come in different sizes. Here is a pic if you aren’t familiar with that tool.

It is half inch drive so you can use serious tools to break those screws free. A few bumps with a pneumatic impact gun??

I’d also like to know what purpose the slot has./QUOTE]

My understanding is the piece has a slot to allow a slight difference in the thread length to act as a thread lock. The piece is threaded, slot cut, the thread is in perfect alignment between the 2. Spread it apart and the misalignment is now a thread lock.

Kevin

Guys
If you want further explanation/elucidation of the split post, see Thorvald Petersen patent #2127008 assigned to Reed Manufacturing.
Patent URL:
https://pdfpiw.uspto.gov/.piw?PageN...1=2127008.PN.%26OS=pn/2127008%26RS=PN/2127008

There have been several references to this patent that misidentify it as being the patent for the split ring on the main screw. A careful read of the patent will show that this is not the case.

Here is an image of the patent drawing. Note there is no numeric references to the screw nose area other than citing the presence of the screw.

Nutjob - you are on point.

JKB
 

Attachments

  • ReedMainNutRetainer.pdf
    37.9 KB · Views: 11

va.grouseman

Well-known member
Joined
Mar 26, 2011
Messages
4,965
Location
Southern-Central VA.
So the slight misalignment of the threads acts just like a secondary lock tap.---That is to say, like affixing one tap on a bolt and then placing another one on top of that one to lock the first in place because there is a slight binding of the threads from one tap to the other.---That's probably wrong but that's what it sounds like to me.:dunno:
 

PghJKB

Well-known member
Joined
Oct 13, 2012
Messages
490
Location
Industrial Heartland
VA
Possibly.

My first thought was how to produce the thread offset (Torvalds word). How about starting the tap from "the front", cutting the thread to the slot, then starting the tap from "the back" cutting the thread to the slot. The thread miss alignment (offset) would hold the screw tightly, drawing the far side to the near side (or vise versa). This would keep the screw in place, if that is how this works.

But that seems like too much work. But running the tap all the way through should produce an aligned thread. Therefore no binding, no bite to keep the screw in place.

Anyone?

JKB
 
To avoid these ads, REGISTER NOW!

454ragtop

Well-known member
Joined
Mar 24, 2008
Messages
5,011
Location
Carver, MA
My guess is you tap all the way thru from the front, cut the slot, then spread it open just a few thousandths. So if you had say a 3/8"-16 thread, you end up with one thread that would measure say 3/8"-15, just different enough to "lock" the screw in place.
 

va.grouseman

Well-known member
Joined
Mar 26, 2011
Messages
4,965
Location
Southern-Central VA.
Yep 454, that what I was thinking using the taps on a bolt as an example.---Using 2 taps, one on top of the other, and then that last little torqueing, off-setting the threads of each one about 1, 2, maybe 3 thousands, so the threads bind and lock.---The same principal as threading all the way through the retaining pin, splitting and then spreading ever so slightly.---Not enough to cross-thread, but act as a spring loaded binder.
 

Outlawmws

Well-known member
Joined
Aug 9, 2011
Messages
39,277
Location
The Badlands
With two flexible pieces, the one closest to the nut would see the pressure first even with no offset. That alone would create locking pressure.

Many studies out there show the first thread d=take most of the pressure, by the time you get to #4 there is almost none.
 

jmhinkle

Well-known member
Joined
Feb 6, 2019
Messages
452
Location
Portland, OR
Here's the parts I got done before I ran out of cleaner and paint. Only a few small parts left to finish and reassemble. Need to pick up a shim for the screw as well. Lot of play in it.

WMaE1h4.jpg

GdFEc4m.jpg

FFvRR68.jpg
 

jmhinkle

Well-known member
Joined
Feb 6, 2019
Messages
452
Location
Portland, OR
That's the Rustoleum Pro Dark Machine Gray color. Came out exactly as I hoped. The cap looks a little darker than I wanted for the vise, but I tried it anyway. I like any shade of gray just about so I wasn't too worried about liking the color, just wanted it to be a light to medium shade and it is.
 

mgmlvks

Well-known member
Joined
Jul 28, 2017
Messages
200
Location
Leavenworth, KS
2.5" Drill Press vise missing the "angle adaptor brackets". Vise may be Craftsman, likely by Palmgren. Craftsman vise below for comparison (not mine)

Bolts are offset

L/R - 1/2"
U/D - 7/8"

Am looking to beg, borrow, steal, copy etc. a set.

48409164127_fa58ac21a4_z.jpg


Similar Vise on Eeekpay
s-l1600.jpg
 
Last edited:

jmhinkle

Well-known member
Joined
Feb 6, 2019
Messages
452
Location
Portland, OR
Got the rest of the parts painted this evening while doing my daughters' brakes. Finished off the evening by painting the lettering on the vise.

HaBiW7a.jpg

2aHYSor.jpg
 

mgmlvks

Well-known member
Joined
Jul 28, 2017
Messages
200
Location
Leavenworth, KS
Cleaned up, no real issues other than set-screw dogs. Removal of set screw revealed a (I think) a squashed lead ball, which promptly rolled off the bench to "somewhere". Drove myself crazy figuring how to get a lead or copper or brass ball stuffed down there, and saw a video that said "Full Dog Set Screw". Never knew they existed! Guessing PO lost the original and made it work. Fastenal lets you order a few pieces at a time and shipping is 5% of total. Killer deal for HTF fasteners!

Still need a set of brackets - or will (try to) make my own.

48418975722_829445460a_z.jpg


48390918617_db6fd9e35a_z.jpg


6725068-11.jpg
 

GETRIDAONE

Well-known member
Joined
May 21, 2013
Messages
1,549
Location
Auburn, GA
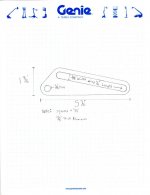
Hopefully you can print this full size 8 1/2 × 11 page. I just traced around the bracket , hope you can use it.
 

Attachments

  • 20190731_051655.jpg
    20190731_051655.jpg
    126.4 KB · Views: 29
  • img016.jpg
    img016.jpg
    45.2 KB · Views: 34

Jer218

New member
Joined
Jul 29, 2019
Messages
3
Location
Duluth, MN
Anyone know what the original paint color of an Athol vise was? Picked up a rusted out one that I am refurbishing.
 

mgmlvks

Well-known member
Joined
Jul 28, 2017
Messages
200
Location
Leavenworth, KS
No changes appear to have been made over the decades. Will be talking with local machine shop for a good guy discount, or drill drill dill, file file file!

48428009241_3bc56c1c90_z.jpg
 

JZiggy

Well-known member
Joined
Dec 1, 2014
Messages
990
Location
Atlanta
No changes appear to have been made over the decades. Will be talking with local machine shop for a good guy discount, or drill drill dill, file file file!

48428009241_3bc56c1c90_z.jpg

Hey there, I use one of these vises on a regular basis as well. I noticed that these brackets are aluminum and have always thought that some steel ones would improve the strength & stiffness of the vise nicely. If you want to go that route let me know, I'd like to chip in and help get a set made!
 

mgmlvks

Well-known member
Joined
Jul 28, 2017
Messages
200
Location
Leavenworth, KS
Hey there, I use one of these vises on a regular basis as well. I noticed that these brackets are aluminum and have always thought that some steel ones would improve the strength & stiffness of the vise nicely. If you want to go that route let me know, I'd like to chip in and help get a set made!
GREAT! I am picking up to 5.5" x 2"x 1/8" aluminum sheets today - I'll ask what some steel ones would cost to do. Think their shop rate is $75/hr.
 

Mr. Wonderful

Well-known member
Joined
Jan 15, 2018
Messages
1,775
Location
Pacific Northwest
Anyone know what the original paint color of an Athol vise was? Picked up a rusted out one that I am refurbishing.


It would probably depend on the age of your vise. Some of the N.O.S. examples I have seen on here are a medium blue with white specks. It's a very nice color.
 

davethorik

Well-known member
Joined
Sep 14, 2013
Messages
4,992
Location
Norka, Ohio
It would probably depend on the age of your vise. Some of the N.O.S. examples I have seen on here are a medium blue with white specks. It's a very nice color.

Mr W- I think the blue with white speckles was a newer Starrett thing only. I have no idea what the original color would be.
 

Ststephen7

Well-known member
Joined
Sep 24, 2016
Messages
165
Location
Elkins Park, PA
Hey guys,

I'm doing some work for a local guy. He was a farrier for all of his life, and he has collected a ton of old vises and anvils over the years.

This time he gave me this Reed 206R. He wants me to weld the worst of the gouges and grinder marks. It's really just a bit of practice for welding the giant Fisher chain vise he wants restored. He is not selling these, nor is he (so far) willing to part with any of his larger vises or anvils. I'm doing welding work for him in trade for some tools he is wiling to part with, and I'm hoping that in time he will give me a deal on an anvil.

I got some 55 nickel rod, and I've done some practicing an old broken vise. I've read lots on nickel rod and cast iron, and watched tons of videos. My welding with the 55 rod is going well, and I think the welding will be fine.

My questions concern welding the jaws where the worst damage is on this vise. Would the jaws be steel cast in place? And if so what rod do I use for that? Sometimes on old vises I can see where the jaw line is, however I can't see anything like that on this old Reed.

Also the hole in the screw (for the handle) is really deformed and egg shaped. I think if I had a mill I'd bore it out round and insert a steel tube to fit (with the correct ID for the handle), then weld or braze that in place. However... I don't, so he wants me to add weld metal to bring that back close to round.

I can do that, and... again... what rod should I use. This should not be cast iron right?... forged steel? Cast steel?

One last thing... he does not want it brazed, he wants it welded, so that is what I'll be doing.

Thank you!
Steve

IMG_8004.jpg

IMG_8005.jpg

IMG_8006.jpg

IMG_8008.jpg

IMG_8009.jpg
 
Last edited:
To avoid these ads, REGISTER NOW!
Top Bottom