To avoid these ads, REGISTER NOW!

The Powermatic 66 Table Saw

rlitman

Well-known member
Joined
Oct 18, 2010
Messages
24,582
Location
Long Island
By popular demand, I've decided to start a thread documenting my PM66 (the "centerpiece" of my shop), rather than hijack any existing threads.

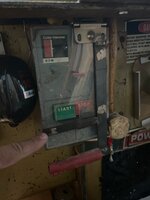
It all began several years back, when I was picking up a Stihl power sweep on CL, when I said "nice saw", and $300 and a day later he was dropping off this beast in my driveway (a similar trip for a vacuum got me a Delta 14" metal cutting bandsaw, but that's a different story).

It required a new arbor pulley and bearings, new belts, and a lot of rust removal just to get me a working saw. The PM66 is a very nice and classic saw, but nothing unusual by itself, so I don't really see the point on expounding much on it's factory state. Rather, what follows here is what I've done to it to make it my own.

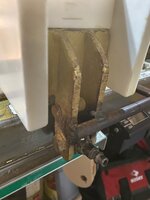
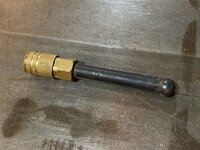
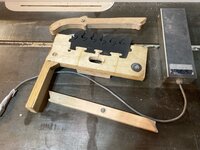
The biggest modification has been the faux "riving knife". This knife comes up with the blade, and is mounted to the arbor. The knife itself was plasma cut from 1/8" stainless sheet, and was then hand sanded down to a dull knife taper so that the thickest part at the back is a few thousandths thinner than the 1/8" full kerf blade's kerf (to prevent sticking), but is still thicker than the blade's plate (this is CRITICAL to its function). The arm beneath the knife is 1" square steel stock (it was from an "iron" staircase newel), welded to 1/4" plate near the top where I needed clearance, and a piece of 1" all-thread that passes through the arbor casting where it's bolted down with a single nut (which isn't going anywhere). The 1/4" plate at the top was drilled and tapped, and a pair of 1/4" grade 8 bolts pass through it to act as studs that the knife is held on with. Due to clearance issues (with the foot cast in the table top that supports the insert), I had to use a die grinder to remove much of the heads of these bolts, but the heads really only serve to lock in the threads, so that wasn't a big deal. A pair of 1/4" flange nuts (I didn't want to lose washers) serve to hold it all together.

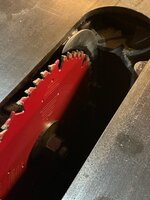
Because of the tight spacing between the blade and the back of this saw, the knife had to take on a sort of boomerang shape that gets about as thin as 7/8" in one spot to clear the castings. However, a riving knife doesn't actually have to be that strong, and the zero-clearance slot keeps it from wandering from side to side (it's most springy direction).

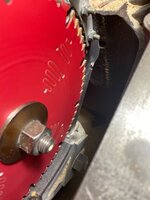
My knife rotates up with the arbor, so it follows a path concentric to the blade. That's what differentiates it from a true riving knife. The problem with this design is that it doesn't rise and fall at the same rate as the blade. Working with this, I decided to cut the knife so that it would be at the same height as the blade at a few thousandths above 3/4". In other words, any cuts under 3/4", the knife will appear, but will be lower than the blade, so that I can leave the knife on for dado cuts, and any cuts with the blade higher than 3/4" must be through cuts, as the knife will stick up.

55f9298a2e3339d56c5fc0e7d2caca59.jpg
dd898d7736d2a1bfa71308af63ac692d.jpg
d03b48360d2fa787a86e03e3b7441956.jpg
922ebc055a7c75b5005dfacce2fbde08.jpg
c13f88c33d7859b00b01df195bb07e6a.jpg1d52fe8aa8e90d907f80a45cd7b01f45.jpg
d28b060a9b9ce471bd6fb561d08170b9.jpg
bfac7d8eea23e080ab685669656fb366.jpg

That attachment nut doesn't appear much bigger than the 5/8" arbor nut in the foreground, but remember that it's twice as far from the camera as the arbor. Yes, it's on a 1" thread, and that's why I only bothered with a single nut.
 

Attachments

  • d28b060a9b9ce471bd6fb561d08170b9.jpg
    d28b060a9b9ce471bd6fb561d08170b9.jpg
    63 KB · Views: 13
  • 1d52fe8aa8e90d907f80a45cd7b01f45.jpg
    1d52fe8aa8e90d907f80a45cd7b01f45.jpg
    87.6 KB · Views: 9
  • c13f88c33d7859b00b01df195bb07e6a.jpg
    c13f88c33d7859b00b01df195bb07e6a.jpg
    59.5 KB · Views: 10
  • bfac7d8eea23e080ab685669656fb366.jpg
    bfac7d8eea23e080ab685669656fb366.jpg
    93.3 KB · Views: 15
  • 922ebc055a7c75b5005dfacce2fbde08.jpg
    922ebc055a7c75b5005dfacce2fbde08.jpg
    77 KB · Views: 9
  • d03b48360d2fa787a86e03e3b7441956.jpg
    d03b48360d2fa787a86e03e3b7441956.jpg
    74.5 KB · Views: 7
  • dd898d7736d2a1bfa71308af63ac692d.jpg
    dd898d7736d2a1bfa71308af63ac692d.jpg
    72.1 KB · Views: 8
  • 55f9298a2e3339d56c5fc0e7d2caca59.jpg
    55f9298a2e3339d56c5fc0e7d2caca59.jpg
    60.4 KB · Views: 11
Last edited:
To avoid these ads, REGISTER NOW!
OP
R

rlitman

Well-known member
Joined
Oct 18, 2010
Messages
24,582
Location
Long Island
The Biesemeyer tee square fence that came with it was in sorry shape, and the original formica was replaced and the replacement was trashed. So, since I had some corian, new sides were in order. They're currently attached to the steel core with Clear Gorilla Glue. My original attempts using epoxy failed over the first winter due to lack of grip and thermal cycles pulling the dissimilar materials apart. The Corian is glued to itself (in the cross pieces at the ends) with CA.

I kept the original length about the same, but added some height.

cc6c0ce737e49bcaf6ae370abaa076e8.jpg

The original handle was long gone, and someone had welded on that L as a handle. I cut the L off and welded it in place to protect the Wixey (more on that in a sec). It now also makes a great handle to lift off the fence when I want to use my sliding table.

Instead, I welded on a scrap steel air male QD, and made a new handle out of a leaking female QD plus some pipe with a ball bearing welded onto the end. Now I can take off the nut knocker handle when I don’t need it.

38e04acbdee79ff46c0baef9190cc2e4.jpg

4439f9b76d0923c92779164dd78edd53.jpg
8a871f008505930c1b9d112fdab745c8.jpg

The Wixey is a linear encoder (DRO) that reads to the hundredth of an inch, and shows fractions. It has been a HUGE timesaver, and has really helped with my repeatability.
1811ec4f44842c78182101a3ca7b38f3.jpg

Inside the till, at the very rear of the fence (behind the table) there is a wooden block that has an architects swing arm lamp base clamped to it. This lets me mount a lamp right on the fence.

dc0351b119ab71d41a01efebadff21a2.jpg

A pair of 2x6’s hang from the fence rails leaving a surface for my plywood side table to sit on (this will eventually get a cutout for a router plate), and the rear one has an outlet strip attached that the lamp plugs into.
 

Attachments

  • dc0351b119ab71d41a01efebadff21a2.jpg
    dc0351b119ab71d41a01efebadff21a2.jpg
    75.9 KB · Views: 10
  • 1811ec4f44842c78182101a3ca7b38f3.jpg
    1811ec4f44842c78182101a3ca7b38f3.jpg
    73.8 KB · Views: 11
  • 8a871f008505930c1b9d112fdab745c8.jpg
    8a871f008505930c1b9d112fdab745c8.jpg
    55.4 KB · Views: 13
  • 4439f9b76d0923c92779164dd78edd53.jpg
    4439f9b76d0923c92779164dd78edd53.jpg
    46.7 KB · Views: 9
  • 38e04acbdee79ff46c0baef9190cc2e4.jpg
    38e04acbdee79ff46c0baef9190cc2e4.jpg
    57.4 KB · Views: 9
  • cc6c0ce737e49bcaf6ae370abaa076e8.jpg
    cc6c0ce737e49bcaf6ae370abaa076e8.jpg
    95.8 KB · Views: 9
Last edited:
OP
R

rlitman

Well-known member
Joined
Oct 18, 2010
Messages
24,582
Location
Long Island
My tenoning jig slides on the top of the fence. It has maple glides, but is otherwise ply. The reverse side is set to 45 degrees for spline cutting.

It bridges the gap nicely, so I don’t need to pull my pencils or knives from the fence till to use it.

The DRO allows me to jog it accurately enough without the need for a screw advance (unlike how the T-slot style jigs move).

3c00399e85b013ffc269ca822da0127b.jpg
5c70f4476995850ea14817fb5e8f6502.jpg

The tenon cuts that left those tracks in that jig were at max blade height, so you can see that the fence stands just a little higher than that. It is taller than than the original Biesemeyer design, to keep my hands further from the blade, give better support for cutting things held vertically, and better support to jigs that ride it.

3c779d127fa76f3cf303b5cfa61c5153.jpg

By design, a fence mounted jig needs two sides, and I figured that I might as well have different functions on each, but as you can see by the lack of cuts, I haven’t used the 45 degree side yet.
 

Attachments

  • 3c779d127fa76f3cf303b5cfa61c5153.jpg
    3c779d127fa76f3cf303b5cfa61c5153.jpg
    81 KB · Views: 9
  • 5c70f4476995850ea14817fb5e8f6502.jpg
    5c70f4476995850ea14817fb5e8f6502.jpg
    78.3 KB · Views: 7
  • 3c00399e85b013ffc269ca822da0127b.jpg
    3c00399e85b013ffc269ca822da0127b.jpg
    84.9 KB · Views: 8
Last edited:
OP
R

rlitman

Well-known member
Joined
Oct 18, 2010
Messages
24,582
Location
Long Island
Pressing the Stop button causes the Start to pop out. If you press both, it will always stop. So, I made that hinged plexi cover with a hole cut out. You stick your finger through the hole to press Start. Bump it anywhere or with anything bigger than a finger and and it stops. That air hose covered bottom extension makes it impossible to miss with my knee. I never have to divert my eyes to find the Stop switch.

It’s not a magnetic switch, but I find it to be safe enough for me with the new paddle. Anyway, this is a 3HP saw on a dedicated circuit, so tripping a breaker is not likely.

707f2e1df136f1a10113ce53395c4005.jpg
71267d6978212a1c7696097b9368d157.jpg

The rawhide mallet has a magnet at the end of the handle for storage, and is for fence fine tuning. The earmuffs have a magnet at the top of the strap. Even the marker and some pencils have magnets. The double sided magnetic plate holds that ruler, plus the hex driver for my Incra miter jig. A magnetic strip on the front fence rail to the right of the table holds the arbor wrench, plus some squares.

4cfc046558ccad7e1ca7ae464a03b65e.jpg

That’s the foam insert from a Featherpro featherboard. I was too cheap to buy their kit, so I cut the ply on the scrollsaw. And it’s a 1200lb magnetic door lock, connected to a Bosch 12V battery to energize it. It’s the BEST featherboard I’ve used so far, and will absolutely not allow reversal. I HIGHLY recommend the foam Featherpro. It works way better than wood or plastic featherboards. I’m quite happy with my magnetic clamp as well. Being electronic, it has zero holding force until I plug it in. And with 1200lbs of pull, a gorilla couldn’t remove it from the table once it’s on. That being said, it is possible to get this to slide, but it takes great effort, and is significantly firmer than any T-slot bolt-down jig I've seen, let alone anything done with permanent magnets (while I like the concept of the Mag-Switch, it only has a few hundred pounds of holding force at best).

edit (7/2022): Not much about this setup has changed over the years, but after I damaged the wire in the magnetic lock, I soldered in a piece of 18 gauge zip-cord with a strain relief as a replacement. The zip-cord allowed me to add an inline rotary switch. The thing about a featherboard is you want to clamp it down starting out with some pressure on the fingers, so with one hand pressing the board into place, the other hand clamps it down. That's simple with the typical knob, but unplugging and plugging the barrel connector with one hand was annoying, and the switch makes it much easier. I also hung a power strip under my Biesemeyer rear rail with a 12V supply plugged in, so I don't use the battery any more.

7a89d5ca242167f9c08626b024e47e8a.jpg

There is a magnet on the underside for storage. The push sticks have magnets too, and all live stuck to the motor cover. Push sticks are ALWAYS within reach.

08386b81532e9b2582fd6006f48696a3.jpg

The zero-clearance inserts are made from 3/4" plywood with a hard lacquer finish (scrapped from a large piece of furniture, so I have enough to be supplied for a LONG time). Each one has to go through a router jig (not pictured yet) to make it fit the table and clear all obstructions (such as the riving knife arm and the arbor nut and blade stiffeners), and then some tiny #2x3/8" wood screws allow for fine level adjustment.

763fb2adac9f65d6c3089042c090faa9.jpg

The blade is raised through the wood without the riving knife for final slot cutting, but then I need to finish the slot on the scroll saw to make room for the knife.

Exact blade height is set using a height gauge that has a scrap of corian to touch the blade teeth without damaging them.

690acc690c4daed6cffb4946c3aa6136.jpg
 

Attachments

  • 707f2e1df136f1a10113ce53395c4005.jpg
    707f2e1df136f1a10113ce53395c4005.jpg
    57.7 KB · Views: 8
  • 71267d6978212a1c7696097b9368d157.jpg
    71267d6978212a1c7696097b9368d157.jpg
    61.2 KB · Views: 7
  • 4cfc046558ccad7e1ca7ae464a03b65e.jpg
    4cfc046558ccad7e1ca7ae464a03b65e.jpg
    79.8 KB · Views: 6
  • 7a89d5ca242167f9c08626b024e47e8a.jpg
    7a89d5ca242167f9c08626b024e47e8a.jpg
    87.5 KB · Views: 14
  • 08386b81532e9b2582fd6006f48696a3.jpg
    08386b81532e9b2582fd6006f48696a3.jpg
    86.5 KB · Views: 8
  • 763fb2adac9f65d6c3089042c090faa9.jpg
    763fb2adac9f65d6c3089042c090faa9.jpg
    68.7 KB · Views: 8
  • 690acc690c4daed6cffb4946c3aa6136.jpg
    690acc690c4daed6cffb4946c3aa6136.jpg
    74.5 KB · Views: 7
Last edited:
OP
R

rlitman

Well-known member
Joined
Oct 18, 2010
Messages
24,582
Location
Long Island
Rather than make a sliding table, I ended up buying an Incra 5000 table on CL. Since my saw is left tilt, I reversed it from the as purchased condition, and re-cut the new left side using my blade. That left me short on parts, so I made my own left table using 1/4” melamine board and shims cut to bring it to the same height as the Incra table. I’d post pictures, but aside from the fact that my off-cut table is wider and white, it’s pretty much the same as pictures you can get from Incra, so I don’t see the point.

However, I just completed a box joint jig. Again, there are hundreds of good plans out there, so I’ll focus on the things I haven’t seen before.

The “finger” is cut from hickory flooring scraps. It was cut as a single long stick, and then cross cut into the finger and spacer.
IMG_0951.jpg

The fence piece that has the finger has a wood screw in the side that butts up against a fixed section which allows me to precisely reposition the finger location. The idea is that I can make multiple finger fences for multiple dado widths, and easily switch between them without having to recalibrate each time.
IMG_0947.jpg
The fence over the blade is replaceable, so I can always have a new piece there to minimize tear out. It’s sized to always leave just under 1/8” to the left of the blade, no matter the dado width. That way, I can actually use this with my 1/8” full kerf blades too.

Lastly, there’s a piece of fir going across the front. You adjust the bolt to fit the workpiece snugly, and when holding tightly with your right hand, the leverage keeps it firmly in place. A screw rides on the table so it stays level. And a piece of plastic recycled from a berry container keeps the initial chips thrown by the dado blade away from my face.
IMG_0946.jpg

So, the left wing nut adjusts the "hand clamp" bar, the center wing nut locks the finger section in place, and the right wing nut locks the sacrificial section in place.
 
Last edited:

turbowoodworker

Well-known member
Joined
Mar 18, 2012
Messages
3,520
Location
Apex NC
That is innovative. I follow your projects on the woodworking thread and have been impressed. Thanks for posting
 
OP
R

rlitman

Well-known member
Joined
Oct 18, 2010
Messages
24,582
Location
Long Island
Looks like a site issue ate my last post, so from memory...

These saws shipped with a plastic knob inside the handwheel that inevitably split and failed. The knob controls a locking feature.


5c938c212e1cf32be79b4cc4ceeb0d73.jpg

For many saws, most people never even touch these. But the dry lube I used on my worm gears and trunnions has made my elevation handwheel turn so smoothly that I’ve seen it slowly reverse downwards during a cut. Not so quickly that it will affect most cuts, but for repeated dado cuts where the height is critical, it was causing me issues. So, I had to put together a quick fix.

014f19c032da9c56374488c6fdc42c41.jpg

The threaded shaft is original. The piece I added came from a pitcher pump piston shaft that was in the scrap bin (the iron spider had broken, so I recently replaced the piston).

Adam Savage recently posted a video about replacing his handwheel, because his spinner was broken, and his replacement piece of iron is beautiful, but he has no locking mechanism now.

If you look at my spinner, I replaced the broken piece of plastic with a piece of tubing as a spacer. It’s been working fine since I first got the saw.
 

Attachments

  • 014f19c032da9c56374488c6fdc42c41.jpg
    014f19c032da9c56374488c6fdc42c41.jpg
    131.2 KB · Views: 17
  • 5c938c212e1cf32be79b4cc4ceeb0d73.jpg
    5c938c212e1cf32be79b4cc4ceeb0d73.jpg
    159.4 KB · Views: 16
Last edited:
To avoid these ads, REGISTER NOW!

tarbellb

Well-known member
Joined
Apr 17, 2011
Messages
5,738
Location
Oregon
Very well thought out upgrades. Clearly made for getting things done efficiently and accurately, I appreciate this approach to shop upgrades.
 
OP
R

rlitman

Well-known member
Joined
Oct 18, 2010
Messages
24,582
Location
Long Island
Thanks, I love my pm66 but wish I had a riving knife for safety.
I'm happy with how mine turned out, but I do wish it would be easier to put on and take off. Had it been a real riving knife that rises at the same rate as the blade I could get away with leaving it on all the time, but mine does have to come off for some cuts. I never could come up with a tool-less quick disconnect for it that's as secure as the two nuts, so for now a wrench still lives on my saw.

Have you looked at the MicroJig splitters? The ones with steel inside look like you could have most of the benefits of this knife, with few drawbacks.
 

DenisG

Well-known member
Joined
Jul 14, 2013
Messages
1,278
Location
Milwaukee
Pressing the Stop button causes the Start to pop out. If you press both, it will always stop. So, I made that hinged plexi cover with a hole cut out. You stick your finger through the hole to press Start. Bump it anywhere or with anything bigger than a finger and and it stops. That air hose covered bottom extension makes it impossible to miss with my knee. I never have to divert my eyes to find the Stop switch.

It’s not a magnetic switch, but I find it to be safe enough for me with the new paddle. Anyway, this is a 3HP saw on a dedicated circuit, so tripping a breaker is not likely.

707f2e1df136f1a10113ce53395c4005.jpg
71267d6978212a1c7696097b9368d157.jpg

The rawhide mallet has a magnet at the end of the handle for storage, and is for fence fine tuning. The earmuffs have a magnet at the top of the strap. Even the marker and some pencils have magnets. The double sided magnetic plate holds that ruler, plus the hex driver for my Incra miter jig. A magnetic strip on the front fence rail to the right of the table holds the arbor wrench, plus some squares.

4cfc046558ccad7e1ca7ae464a03b65e.jpg

That’s the foam insert from a Featherpro featherboard. I was too cheap to buy their kit, so I cut the ply on the scrollsaw. And it’s a 1200lb magnetic door lock, connected to a Bosch 12V battery to energize it. It’s the BEST featherboard I’ve used so far, and will absolutely not allow reversal. I HIGHLY recommend the foam Featherpro. It works way better than wood or plastic featherboards. I’m quite happy with my magnetic clamp as well. Being electronic, it has zero holding force until I plug it in. And with 1200lbs of pull, a gorilla couldn’t remove it from the table once it’s on. That being said, it is possible to get this to slide, but it takes great effort, and is significantly firmer than any T-slot bolt-down jig I've seen, let alone anything done with permanent magnets (while I like the concept of the Mag-Switch, it only has a few hundred pounds of holding force at best).

edit (7/2022): Not much about this setup has changed over the years, but after I damaged the wire in the magnetic lock, I soldered in a piece of 18 gauge zip-cord with a strain relief as a replacement. The zip-cord allowed me to add an inline rotary switch. The thing about a featherboard is you want to clamp it down starting out with some pressure on the fingers, so with one hand pressing the board into place, the other hand clamps it down. That's simple with the typical knob, but unplugging and plugging the barrel connector with one hand was annoying, and the switch makes it much easier. I also hung a power strip under my Biesemeyer rear rail with a 12V supply plugged in, so I don't use the battery any more.

7a89d5ca242167f9c08626b024e47e8a.jpg

There is a magnet on the underside for storage. The push sticks have magnets too, and all live stuck to the motor cover. Push sticks are ALWAYS within reach.

08386b81532e9b2582fd6006f48696a3.jpg

The zero-clearance inserts are made from 3/4" plywood with a hard lacquer finish (scrapped from a large piece of furniture, so I have enough to be supplied for a LONG time). Each one has to go through a router jig (not pictured yet) to make it fit the table and clear all obstructions (such as the riving knife arm and the arbor nut and blade stiffeners), and then some tiny #2x3/8" wood screws allow for fine level adjustment.

763fb2adac9f65d6c3089042c090faa9.jpg

The blade is raised through the wood without the riving knife for final slot cutting, but then I need to finish the slot on the scroll saw to make room for the knife.

Exact blade height is set using a height gauge that has a scrap of corian to touch the blade teeth without damaging them.

690acc690c4daed6cffb4946c3aa6136.jpg
 
OP
R

rlitman

Well-known member
Joined
Oct 18, 2010
Messages
24,582
Location
Long Island
...I like your electro-magnetic clamp. Any details? Brand (Bosch)? Where you got it?
It's the fixed half of a 1200lb rated magnetic door/gate lock, designed to take 12V or 24V DC. My last company scrapped a bunch when we moved, of various brands. It is meant to be bolted to a doorframe, with a matching steel armature attached to the door that sticks to it. But any thick iron or steel table top will hold to it just fine. These locks differ from magnetic chucks in that they usually only have a couple of magnetic zones, so they need a ferromagnetic object that's large enough to cover the entire face of the lock to work effectively (I never had any issues bridging miter slots though).

Here's a 1200lb rated similar example (don't take this as a specific shopping recommendation, I'm not making any endorsements in this post):

These locks come in smaller 600lb, 300lb and even 150lb versions (I bought a 150lb magnet the other day on ebay for under $20). All would probably work, but this big guy offers a lot of flat space to clamp to. Smaller electromagnets are often round, and I suppose round ones could be built into such a jig, but too small a magnet may not hold well over a miter slot.

One nice thing about magnetic locks is that by code, they must have near zero residual magnetism. This means that they completely let go the moment power is removed. An unpowered alternative would be a switchable magnet like this:
 
Last edited:
To avoid these ads, REGISTER NOW!
Top Bottom